Applications for Clientless Access
Giving remote users access to the internal network exposes the network to external threats. A balance needs to be struck between connectivity and security. In all cases, strict authentication and authorization is needed to ensure that only the right people gain access to the corporate network. Defining an application requires deciding which internal LAN applications to expose to what kind of remote user.
Mobile Access provides the remote user with access to the various corporate applications, including, Web applications, file shares, Citrix services, Web mail, and native applications.
Protection Levels
Protection Levels are predefined sets of security settings that offer a balance between connectivity and security. Protection Levels allow Mobile Access administrators to define application protections for groups of applications with similar requirements.
Mobile Access comes with three default Protection Levels — Normal, Restrictive, and Permissive. You can create additional Protection Levels and change the protections for existing Protection Levels.
Using Protection Levels
Protection Levels can be used in the definition of Mobile Access Web applications, file shares, Citrix applications, or Web mail service. On Mobile Access gateways of version R71 and higher, protection level s can also be set for each native application. Every application of one of these types can have a Protection Level associated with it. A single Protection Level can be assigned for all native applications.
When defining an application, in the Protection Level page of the application object, you can choose:
- Security Requirements for Accessing this Application:
- This application relies on the security requirements of the gateway
Rely on the gateway security requirement. Users who have been authorized to the portal, are authorized to this application. This is the default option. - This application has additional security requirements specific to the following protection level
Associate the Protection Level with the application. Users are required to be compliant with the security requirement for this application in addition to the requirements of the portal.
Defining Protection Levels
To access the Protection Level page from the Mobile Access tab:
- From the Mobile Access tab in SmartDashboard, select the Additional Settings > Protection Levels page from the navigation tree.
- Click New to create a new Protection Level or double-click an existing Protection Level to modify it.
The Protection Levels window opens, displaying the General Properties page.
To access the Protection Level page from a Mobile Access application:
- From the Properties window of a Mobile Access application, select Additional Setting > Protection Level.
- To create a new Protection Level, select Manage > New.
- To edit the settings of a Protection Level, select the Protection Level from the drop down list and then select Manage > Details.
The Protection Levels window opens, displaying the General Properties page.
To define a Protection Level:
- In the General Properties page, enter a unique name for the Protection Level (for a new Protection Level only), select a display color and optionally add a comment in the appropriate fields.
- Click on Authentication in the navigation tree and select one or more authentication methods from the available choices. Users accessing an application with this Protection Level must use one of the selected authentication schemes.
- If required, select User must successfully authenticate via SMS.
- Click Endpoint Security in the navigation tree and select one or both of the following options:
- Applications using this Protection Level can only be accessed if the endpoint machine complies with the following Endpoint compliance policy. Also, select a policy. This option allows access to the associated application only if the scanned client computer complies with the selected policy.
- Applications using this Protection Level can only be accesses from within Secure Workspace. This option requires Secure Workspace to be running on the client computer.
- Click OK to close the Protection Level window
- Install the Security Policy.
Web Applications
A Web application can be defined as a set of URLs that are used in the same context and are accessed via a Web browser, for example, inventory management or human resource management.
Mobile Access supports browsing to websites that use HTML and JavaScript.
Browsing to websites with VBScript, Java, or Flash elements that contain embedded links is supported using SSL Network Extender, by defining the application as a native application.
Additionally, some sites will only work via a default browser, and so cannot be defined as a Web application. If that is the case, use a native application.
Web Applications of a Specific Type
It is possible to configure a Web Application with a specific type as a Domino Web Access (iNotes) application or as an Outlook Web Access application.
Domino Web Access
IBM Lotus Domino Web Access (previously called iNotes Web Access) is a Web application that provides access to a number of services including mail, contacts, calendar, scheduling, and collaboration services.
Domino Web Access requires its files to be temporarily cached by the client-side browser. As a result, the endpoint machine browser caching settings of the Mobile Access Protection Level do not apply to these files. To allow connectivity, the cross site scripting, command injection and SQL injection Web Intelligence protections are disabled for Domino Web Access.

|
Note - To make Domino Web Access work through the Mobile Access portal, you must work with Hostname Translation.
|
These Domino Web Access features are not supported:
- Working offline
- Notebooks with attachments.
- Color button in the Mail Composition window.
- Text-alignment buttons in the Mail Composition window.
- Decline, Propose new time and Delegate options in meeting notices.
- Online help- partial support is available.
Outlook Web Access
Outlook Web Access (OWA) is a Web-based mail service, with the look, feel and functionality of Microsoft Outlook. Mobile Access supports Outlook Web Access versions 2000, 2003 SP1, 2007, and 2010.
Configuring Web Applications
To configure a Web Application:
- In the Mobile Access tab navigation tree, select Applications > Web Applications.
- Click New. The Web Application window opens.
The following sections explain the fields in each page.
Web Application General Properties Page
- Go to the General Properties page.
- Fill in the fields on the page:
- Name is the name of the application. Note that the name of the application that appears in the user portal is defined in the Link in Portal page.
- This application has a specific type: Select this option if the Web application is of one of the following types:
- Domino Web Access is a Web application that provides access to a number of services including mail, contacts, calendar, scheduling, and collaboration services.
Note -
Domino Web Access requires its files to be temporarily cached by the client-side browser. As a result, the endpoint machine browser caching settings of the Mobile Access Endpoint Compliance Profile do not apply to these files.
To allow connectivity, the cross site scripting, command injection and SQL injection Web Intelligence protections are disabled for Domino Web Access.
- Outlook Web Access (OWA) is a Web-based mail service, with the look, feel and functionality of Microsoft Outlook. OWA functionality encompasses basic messaging components such as email, calendaring, and contacts.
Web Application Authorized Locations Page
- Go to the Authorized Locations page.
- Fill in the fields on the page:
- Host or DNS name on which the application is hosted.
- Allow access to any directory gives the user access to all locations on the application server defined in Servers.
- Allow access to specific directories restricts user access to specific directories. For example
/finance/data/. The paths can include $$user, which is the name of the currently logged-in user. Note -
For an application that is defined as an Outlook Web Access application, the following are set as the allowed directories:
- Private Mailboxes: /exchange/
- Graphics and Controls: /exchweb/
- Client access: /owa/
- Public Folders: /public/
When two or more overlapping applications are configured (for example, one for any directory and one for a specific directory on the same host), it is undefined which application settings take effect. If one of the overlapping applications is OWA or iNotes, it will take precedence.
- Application paths are case sensitive improves security. Use this setting for UNIX-based Web servers that are case sensitive.
- Services that are allowed are typically
http for cleartext access to the Web application, and https for SSL access.
Web Application Link in Portal Page
- Go to the Link in Portal page.
- Fill in the fields on the page:
- Add a link to this Web application/file share in the Mobile Access portal (Web Application without a specific type). If you do not enter a link, users will be able to access the application by typing its URL in the user portal, but will not have a pre-configured link to access it.
- This application requires a link in the Mobile Access portal (Web Application with a specific type), otherwise it cannot be accessed.
- Link text (multi-language) is shown in the Mobile Access Portal. Can include
$$user, which represents the user name of the currently logged-in user. If more than one link is configured with the same (case insensitive) name, only one of them will be shown in the portal. - URL is the link to the location of the application. Can include
$$user, which represents the user name of the currently logged-in user. For example, a URL that is defined as http://host/$$user appears for user aa as http://host/aa and for user bb as http://host/bb. - Tooltip (multi-language) for additional information about the application. Can include
$$user, which represents the user name of the currently logged-in user. The text appears automatically when the user hovers the mouse pointer over the link and disappears when the user clicks a mouse button or moves the pointer away from the link.
Web Application Protection Level Page
- Go to the Protection Level page.
- Select an option for Security Requirements for Accessing this Application:
- Allow access to this application to any endpoint machine that complies with the security requirements of the gateway,
- OR make access to the application conditional on the endpoint being compliant with the selected Endpoint Compliance Profile.
- Select an option for Browser Caching on the Endpoint Machine, to control caching of web application content in the remote user's browser.
- Allow caching of all content is the recommended setting when using the host name Translation method of Link Translation. This setting allows Web sites that use ActiveX and streaming media to work with Hostname Translation.
- Prevent caching of all content improves security for remote users accessing a Web Application from a workstation that is not under their full control, by making sure that no personal information is stored on the endpoint machine. But this setting prevents users from opening files that require an external viewer application (for example, a Word or a PDF file), and may cause some applications that rely on file caching to malfunction.
Configuring Web Content Caching
Protection Levels let administrators prevent browsers from caching Web content. The caching feature in most browsers presents a security risk because cache contents are easily accessible to hackers.
When the Prevent caching of all content option is enabled, users may not be able to open files that require an external viewer application (for example, a Word or PDF file). This requires the user to first save the file locally.
To let users open external files:
- Set the Protection Level to Allow caching of all content.
- To allow caching Microsoft Office documents, add them to the HTML caching category.
- Run:
cvpnstop - Backup the Apache configuration file:
$CVPNDIR/conf/http.conf - In this file, uncomment the
CvpnCacheGroups directives related to Microsoft Office documents. - In cluster setups, repeat these steps for all cluster members.
- Run:
cvpnstart
- Install Policy.
Web Application Link Translation Page
- Go to the Link Translation page.
- Choose the Link Translation method used by Mobile Access to access this application.
- - Uses the method configured in the: Additional Settings > Link Translation page, in the Link Translation Settings on Mobile Access Gateways section.
- - Select the Link translation method that will be used for this application.
Using the Login Name of the Currently Logged in User
Mobile Access applications can be configured to differ depending on the user name of the currently logged-in user. For example, portal links can include the name of the user, and a file-share can include the user's home directory. For this purpose, the $$user directive is used. During a Mobile Access session, $$user resolves to the login name of the currently logged-in user.
For such personalized configurations, insert the $$user string into the relevant location in the definitions of Web applications, file shares, and native applications.
For example, a Web application URL that is defined as http://host/$$user appears for user aa as http://host/aa and for user bb as http://host/bb.
If the user authenticates with a certificate, $$user resolves during the user's login process to the user name that is extracted from the certificate and authorized by the directory server.
For its use in configuring File Shares, see Using the $$user Variable in File Shares.
Completing the Configuration of the Web Application
- Go to the Policy page of the Mobile Access tab.
- In the Policy page, associate:
- User groups.
- Applications that the users in those user groups are allowed to access.
- Install On indicates the Mobile Access gateways and gateway clusters that users in those user groups are allowed to connect to.
- From the SmartDashboard main menu, choose Policy > Install and install the policy on the Mobile Access gateways.
Configuring a Proxy per Web Application
It is possible to define an HTTP or HTTPS proxy server per Web application. This configuration allows additional control of access to Web resources allowed to users. For configuration details see sk34810.
Configuring Mobile Access to Forward Customized HTTP Headers
For proprietary Web applications that do not support a standard HTTP authentication method, the CvpnAddHeader directive can be used to forward end-user credentials (user name and IP address) that are carried in the HTTP header.
To configure Mobile Access to automatically forward a customized HTTP header, with a specified value, such as the user name or the client IP address:
- Edit
$CVPNDIR/conf/http.conf. For a Mobile Access cluster, edit all members. - Add or edit the line containing
CvpnAddHeader according to the following syntax:CvpnAddHeader "customized_header_name" "customized_header_value"
You can use the following two macros for the customized_header_value string:
$CLIENTIP, which is resolved to the actual IP address of the end-user's client machine.$USER NAME which is resolved to the user name entered as a credential in the login page
Examples:
CvpnAddHeader "CustomHTTPHeaderName" "MyCustomHTTPHeaderValue"CvpnAddHeader "CustomIPHeader" "$CLIENTIP"CvpnAddHeader "CustomUsernameHeader" "$USER NAME"
Link Translation
Mobile Access ensures secure VPN connectivity by converting HTTP requests into secure HTTPS requests and by changing the port to 443. To accomplish this, Mobile Access translates the source URL into an HTTPS URL that routes traffic to its destination via the Mobile Access gateway. The translated URL is returned to the browser and is visible to the user.
What is Link Translation?
Link Translation is the process by which Mobile Access converts internal URLs to public URLs that are valid on the Internet, so that internal resources become accessible via any Internet-connected browser.
Mobile Access supports different methods of Link Translation:
- URL Translation (UT) the original link translation method, maintained for backward compatibility.
- Hostname Translation (HT) provides dramatically improved performance for Mobile Access gateways and end users, resulting in faster Web access and fewer connectivity issues. It gives access a wider range of websites, with enhanced support for HTML pages, JavaScript, VBscript, and Web applications (such as the SAP Portal).
- Path Translation (PT) is the newest Link Translation method. It offers the same connectivity level as Hostname Translation, without the more difficult and costly configurations. (Hostname Translation requires a more expensive server certificate.)
How Translated URLs Appear in a Browser
A translated URL appears to users in their browser differently, for the different Link Translation methods.
|
Translated http://www.example.com/path
|
UT
|
https://ssl.example.com/Web/path,CVPNHost=www.example.com,CVPNProtocol=http
|
HT
|
https://c-ds1q-itfgppae7oq.ssl.example.com/path
Note that the seemingly random character string, c-ds1q-itfgppae7oq, represents the destination URL.
|
PT
|
https://ssl.example.com/PT/http://www.example.com/path
|
Link Translation Per Gateway or Per Application
Some sites work better (or only) with a specific Link Translation method. If you can choose, each method has its advantages and disadvantages.
Check Point gateway versions support these methods:
|
Supporting Gateways
|
UT
|
all gateways, all versions
|
HT
|
R66.x and higher
Requires configuration to be supported.
|
PT
|
R71.40, R75.20 and higher
(It is the default method for R75.20 new installations.)
|
You can choose a different method for different applications. You can set the default Link Translation method used by Mobile Access applications in the gateway. And Mobile Access applications can be configured override the default translation method.
SmartDashboard Configuration of Link Translation
Link Translation can be configured to accommodate the distinctive requirements of the application (a Web application or a Citrix service) or the gateway through which the applications are accessed. For example, you can configure a particular Mobile Access application to work with URL Translation, while all other applications supplied by the gateway use Path Translation.
- You can set the default Link Translation method for all applications of a gateway - only applications that have a different specified method will not use the default method.
- You can set the default Link Translation method of a specific application - this Web application will be accessed using the selected method, even if another method is default on the gateways.
Configuring UT
URL Translation is supported by all versions of gateways.
To configure UT as default method for gateways:
- In the Mobile Access tab, click > .
- Select a gateway and click .
- Under , leave selected.
- Under , select .
- Click .
To configure UT as default method for an application:
- In the Mobile Access tab, click > .
- Select an application and click .
The Link Translation page of the Mobile Access application opens.
- Select .
- Click .
Configuring HT
Hostname Translation enhances security by replacing the destination host name with a seemingly random character string in the URL, as it appears in the client browser.
You must configure the DNS server to resolve wildcard hostnames, to enable HT.

|
Warning - If the DNS server is not configured to resolve wildcard Mobile Access host names, users will be unable to connect to Mobile Access, because the portal changes to a sub-domain: portal.ssl.example.com.
If you use Hostname Translation as your method for link translation, users must enter an FQDN as the portal URL and not an IP address.
|
To configure the DNS server for HT:
- Add a record to the DNS server, to resolve Mobile Access sub-domains to the Mobile Access IP address:
*.domainFor example, assume ssl.example.com is the gateway. Configure the DNS to resolve *.ssl.example.com to the gateway IP address. This wildcard includes all sub-domains of the parent domain, such as a.ssl.example.com and b.ssl.example.com.
- Define the parent domain (
ssl.example.com) as a separate DNS record, to resolve Mobile Access IP address.This lets users access the Mobile Access portal directly, with its FQDN.
- Use a wildcard server certificate to make sure clients can access Web applications in sub-domains behind the gateway without warnings.
To configure HT as default method for gateways:
- In the Mobile Access tab, click > .
- Select a gateway and click .
The Link Translation page of the gateway opens.
- Click .
If this message appears, clear , for now:
Hostname Translation requires Portal URL to be defined in the following format: 'https://hostname/'
- In the Portal Settings page > , enter the portal URL of the Mobile Access gateway.
- In the page > under , select .
Leave selected.
If the gateway is of a version earlier than R75.20:
- Enter the FQDN of the Mobile Access gateway in the page.
- Create or select a DNS Name object for the parent DNS names of the Mobile Access gateway. Do not include the wildcard prefix ("*.") in the DNS name. For example, enter "ssl.example.com" as the .
- Under , select .
- Click .
To configure HT as default method for an application:
- In the Mobile Access tab, click > .
- Select an application and click .
The Link Translation page of the Mobile Access application opens.
- Select .
- Click .
- Click .
- Select a Cookies Handling Mode:
- On the gateway - Default. All HTTP cookies that are sent to clients by internal Web servers are stored on Mobile Access, and are not passed on to the client's browser.
- On the endpoint machine - If the default setting causes the JavaScript (from the internal servers that run on the client browser) that handles HTTP cookies to fail, select this option. Mobile Access passes HTTP cookies to the browser.
- Click .
Statically Obscuring DNS Host Names
In versions prior to R66.1, when using Hostname Translation, each time a website is visited, the DNS host is dynamically obscured in a different way. With R66.1 and later, the default is that the obscured host is always the same for each user. This utilizes the browser cache and optimizes Web browsing.
By default an obscured host is always the same for each user. This utilizes the browser cache and optimizes Web browsing.
To turn off Static Obscure Key, run the following command from the Mobile Access CLI in expert mode:
cvpnd_settings set useStaticObscureKey false
|
To turn on Static Obscure Key (the default setting), run the following command from the Mobile Access CLI in expert mode:
cvpnd_settings set useStaticObscureKey true
|
You will be asked whether to first back up the current $CVPNDIR/conf/cvpnd.C file. It is recommended to do so. Follow the instructions on screen.
After making and saving the changes, run cvpnrestart to activate the settings.
If the Mobile Access gateway is part of a cluster, be sure to make the same changes on each cluster member.
Configuring PT
Path Translation is a new method, selected by default for newly installed gateways.
To support PT on R71.40 and higher R71-series gateways:
- Enter expert mode.
- Run:
cvpnPT on This changes the link translation method for all applications that use the gateway default setting.
- To revert the method, run:
cvpnPT off - In a cluster environment, run the cvpnPT command on all members.
To configure PT as default method for gateways:
- In the Mobile Access tab, click > .
- Select a gateway and click .
- Under , leave selected.
- Under , select .
- Click .
To configure PT as default method for an application:
- In the Mobile Access tab, click > .
- Select an application and click .
The Link Translation page of the Mobile Access application opens.
- Select .
- Click .
Link Translation Issues
These Link Translation configuration tips apply to Web applications.
- For Web sites that use ActiveX and streaming media, configure Mobile Access Web applications to Allow caching of all content. This is configured in the Protection Level page of the Web application.
- Domain cookies created in JavaScript are not supported. For example, if you create a cookie with the following JavaScript code:
document.cookie=Name=Value; domain=.example.com,
The client browser cannot send the cookie to Mobile Access and the Web server if Mobile Access is not located under the domain .example.com.
Note that domain cookies created in HTTP headers are supported, as long as they are not manipulated by JavaScript code.
- With Hostname Translation, the URL shown in the client browser is:
https://<obscured destination host name>.<Mobile Access FQDN>/path
(For an explanation, see How Hostname Translation Works). The maximum number of characters in each part of the host name (between https:// and the /path) is limited to 63 (see RFC 1034 - Domain names - concepts and facilities). Therefore, the entire internal host name, including the protocol and the port, must not exceed 63 characters.
- Hostnames displayed in client browsers appear as a seemingly random character string, instead of the complete destination path.
- Signing out from Outlook Web Access, from Domino Web Access (iNotes), or from Microsoft SharePoint may disconnect the Mobile Access session as well.
Link Translation Domain
Defining a Link Translation Domain for Web applications:
- Improves connectivity to external sites. For example, links to external sites displayed in emails are not broken, because they are not translated by Mobile Access.
- Reduces the load on the Mobile Access machine, thereby increasing performance.
- Saves the administrator the trouble of defining all external content as Web applications.
To use the feature, you must define Mobile Access’s internal Link Translation domain. Only URLs in the Link Translation Domain are translated by Mobile Access. URLs from outside the Link Translation Domain are directed to their original destination.
You should include all Web resources defined as Web applications in the Link Translation Domain. You can also add additional domains or hosts to the Link Translation Domain.
Configuring the Link Translation Domain
The Link Translation Domain is configured in GuiDBedit, the Check Point Database Tool. Select Connectra_Global_Properties and search for translation_domain.
Link Translation Domain can be enabled or disabled. Domains and hosts can be added to or excluded from the Link Translation Domain.
After making changes, save the changes in GuiDBedit and install policy on the Security Management Server.
To enable or disable Link Translation Domain in the Connectra_Global_Properties table:
- To enable: Set enable_translation_domain to true.
- To disable: Set enable_translation_domain to false.
To add each domain or host to the Link Translation Domain:
In the Connectra_Global_Properties table, in the domains_to_translate parameter, enter host names or domain names.
- Host names should be in the format,, www.example.com
- Domain names should begin with “.”, for example, .example.com
|
Note - Add all DNS aliases of host names. For example, if intranet is an alias for www.example.com, you must add intranet to the Link Translation Domain.
|
You can exclude hosts or sub-domains that are included in the Link Translation Domain but have public access.
To exclude a host or sub-domain:
In the connectra_global_properties table, in the domains_to_exclude parameter, enter host names or domain names.
- Host names should be in the format,, www.example.com
- Domain names should begin with “.”, for example, .example.com
You can add or exclude as many domains or hosts as you want .
Web Application Features
Mobile Access contains various features to make working with Web Applications efficient and secure. Some of these are described in the following sections.
Reuse TCP Connections
The Reuse TCP Connections feature enhances performance by letting the network reuse TCP connections that would otherwise be closed. To enable Reuse TCP Connections, make a change to the gateway configuration files.
|
Note - We strongly recommend that you back up configuration files before you make changes.
|
In the General Properties page of a Web application, there is a section called Application Type. In this section, you can define the application as having a specific type, either Domino Web Access or Outlook Web Access.
In previous versions, if you chose one of these Application Type options, the TCP connections for the application are closed after each request. However, if you enable Reuse TCP Connections, the connections are reused. This leads to a boost in performance as the three-way handshake does not have to be renewed and the optimized authorization cache feature can be fully utilized.
By default, Reuse TCP Connections is enabled. To turn off Reuse TCP Connections, change the following line in the $CVPNDIR/conf/http.conf configuration file from:
to:
After making and saving the changes, run cvpnrestart to activate the settings.
If your Mobile Access gateway is part of a cluster, be sure to make the same changes on each cluster member.
Website Certificate Verification
In this version, Mobile Access includes the option to validate website security certificates, and either warn the user about problems, ignore any problems, or block websites with certificate problems.
By default, Website Certificate Verification is set to “monitor” this means that a record is entered in SmartView Tracker and there is no effect on end-users. The setting can also be set to "warn" so that users are alerted to any potential security issues and can then decide what steps to take. The setting can also be set to “block,” which blocks any website that has a problem with its SSL server certificate, or “ignore", to ignore any issues with a website’s security. All settings create a record in SmartView Tracker except for "ignore".
You must restart Mobile Access services after changing the website certificate verification setting.
You can configure Website Certificate Verification per gateway and per application.
Website Certificate Verification is configured in GuiDBedit, the Check Point Database Tool.
To change the Website Certificate Verification default behavior for Web applications on the gateway:
- In GuiDBedit, go to the table of the gateway > Connectra_settings.
- Search for certificate_verification_policy. Enter block, warn, monitor or ignore as the value. The default is monitor.
If your internal web servers do not use a commonly known certificate (such as an internal CA), then either change the default setting, or add a trusted Certificate Authority for Website certification to Mobile Access.
If the Mobile Access gateway is part of a cluster, be sure to make the same changes on the cluster object table.
To change the Website Certificate Verification default behavior per Web application:
- In GuiDBedit, go to the table of the Web application in Network Objects > network_objects.
- Search for certificate_verification_policy. Type block, warn, or ignore as the value.
- For the use_gateway_settings parameter:
- Enter true to use the gateway settings.
- Enter false to use the setting configured for the application.
- Save the changes in GuiDBedit.
- Install policy on the Security Management Server using SmartDashboard.
Adding a Trusted Certificate Authority for Website Certification
You can add specific Certificate Authorities that Mobile Access does not recognize by default, such as your organization’s internal CA, to your trusted certificates. The list of default Certificate Authorities recognized by Mobile Access is the same as the list recognized by common browsers. To add CAs to this list, copy the certificate to a .pem file and then move the file to your Mobile Access gateway. If your Mobile Access gateway is part of a cluster, be sure to make the same changes on each cluster member.
Saving a Trusted Certificate in .pem Format
The procedure for saving a trusted certificate as a .pem file is similar for all browsers and versions with slight differences. Below is an example procedure, using Internet Explorer 7.0.
To save a trusted certificate in .pem format using Internet Explorer 7.0:
- Using your browser, View the certificate of a website that uses the Certificate Authority you want to add. Be sure to choose the Certificate Authority certificate: In the Certification Path tab, choose the CA and click View Certificate.
- Select the Details tab and click Copy to File.
The Certificate Export Wizard opens.
- In the Export File Format page, select Base-64 encoded.
- In the File to Export page, type the File name under which you want to save the certificate information with a .pem file extension.
- Click Finish.
Moving the CA Certificate to the Mobile Access Gateway
To move the CA Certificate to the Mobile Access Gateway:
- Move the .pem file to your Mobile Access gateway, into a directory called:
$CVPNDIR/var/ssl/ca-bundle/
- Run the following command:
rehash_ca_bundleThe Certificate Authority should now be accepted by the Mobile Access gateway without any warnings. You do not need to restart Mobile Access services for the change to take effect.
Deleting a Certificate Authority from a Trusted List
To delete a Certificate Authority from your trusted Certificate Authorities:
- Delete the .pem file from the
$CVPNDIR/var/ssl/ca-bundle/ file of the Mobile Access gateway. - Run the following command:
rehash_ca_bundleYou do not need to restart Mobile Access services for the change to take effect.
File Shares
A file share defines a collection of files, made available across the network by means of a protocol, such as SMB for Windows, that enables actions on files, including opening, reading, writing and deleting files across the network.
File Share Viewers
Two file share viewers are available. For end-users using Microsoft Internet Explorer, the administrator can allow the end-user to choose the file share viewer:
- Web-based file viewer is browser-based, browser-independent, and therefore multi-platform. Note that when using this viewer, extremely large files (bigger than 2GB) cannot be viewed or accessed.
- Windows Explorer user interface is for Windows file shares, and requires Internet Explorer 6 or higher. It is based on Microsoft Web Folders and the WebDAV extension of HTML, and uses the familiar Windows file and folder handling model. However, the capabilities of this viewer depend on the version of Web Folders installed on the endpoint machine, and the viewer must be restarted if the user's credentials become out of date.
Configuring File Shares
To configure a File Share Application:
- In the Mobile Access tab navigation tree, select Applications > File Shares.
- Click New. The File Share Application window opens. The following subsections explain the fields in each page.
File Share Application General Properties Page
File Share Application - Authorized Locations Page
- Go to the Authorized Locations page of the File Share Application object.
This page allows you to configure the file shares that users are authorized to access. These settings take effect whenever a user attempts access, no matter what interface is used, whether by manually typing a path in the portal, browsing using the file viewer, clicking a user-defined file favorite, or clicking the predefined file favorite path defined by the administrator in the Link in Portal page.
- Fill in the fields on the page:
- Servers are the machine(s) or DNS Name(s) on which the file server is hosted. Choose either a single Host or DNS name, or Multiple hosts.
- Allow access to any file share gives the users access to all locations on the file server defined in Servers.
- Allow access to specific file shares restricts user access to specific shares. For example
My_Share. Use only the name of a share, such as My_share, $$user, or My_share$, without any slashes. Do not specify a subdirectory inside a share. The $$user variable represents the name of the currently logged-in user. This variable provides personalized authorization for users. If $$user is defined as a file share, then if the user currently logged-in is alice, alice will be allowed access to the share named alice defined on the server, such as \\myserver\alice.
If you configure two or more overlapping file share applications (for example, one for Any Share and one for a specific share on the same host), the application settings that are in effect are undefined.
File Share Application Link in Portal Page
This page allows you to configure one predefined favorite link. This link is displayed in the Mobile Access portal. By clicking the link the user is able to directly access the specified path. Note that you must authorize access to this location in the Authorized Locations page.
- Go to the Link in Portal page of the File Share Application object.
- Fill in the fields on the page:
File Share Application Single Sign-On Page
To configure Single Sign On:
- Go to the Single Sign On page of the File Share Application object.
- Select Turn on single Sign On for this application.
- Configure the sign on method for the application. The default option is:
Prompt the users for their credentials and store them for future use
File Share Application Protection Level Page
- Go to the Protection Level page of the File Share Application object.
- Fill in the fields on the page:
- Security Requirements for Accessing this Application allows you to:
- Allow access to this application to any endpoint machine that complies with the security requirements of the gateway
- Make access to the application conditional on the endpoint being compliant with the selected Endpoint Compliance Profile
Completing the Configuration of the File Share Application
- Go to the Access to Application page of the Mobile Access tab.
- In the Access to Application page, associate:
- User groups.
- Applications that the users in those user groups are allowed to access.
- Install On are the Mobile Access gateways and gateway clusters that users in those user groups are allowed to connect to.
- From the SmartDashboard main menu, choose Policy > Install... and install the policy on the Mobile Access gateways.
Using the $$user Variable in File Shares
You can configure personalized user locations that use the login name of the currently logged in user. To do this, use the $$user variable wherever you need to specify the name of the user. The $$user variable is resolved during the Mobile Access session to the login name of the currently logged-in user.
For example, a UNC file path that is defined as \\host\Pub\$$user is resolved for user Alice as \\host\Pub\Alice and for user Bob as \\host\Pub\Bob.
Citrix Services
Mobile Access supports Citrix client connectivity to internal Presentation servers. In this type of deployment, Mobile Access functions as a Secure Gateway.
You do not need to use Secure Ticketing authority (STA) servers because Mobile Access implements its own STA engine. But, you can install Mobile Access in a topology with STA and Citrix Secure Gateway (CSG) servers.
Citrix Deployments Modes - Unticketed and Ticketed
Unticketed Mode
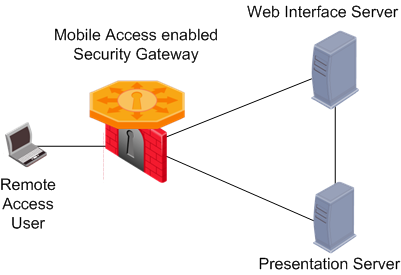
In the recommended Unticketed Mode scenario:
- The remote access user logs into the Mobile Access user portal
- Using the Mobile Access Web interface, the user is directed to the Citrix Web Interface server and then has access to the Presentation server.
Ticketed Mode
In the Ticketed Mode scenario:
- The remote access user logs into the Mobile Access user portal.
- Using the Mobile Access Web interface, the user is directed to the Citrix Web Interface server.
- The user logs into the Citrix Web Interface server and is assigned a secure ticket by the Secure Ticket Authority. This ticket allows the user to access the Presentation server once it is verified by the Mobile Access Web Security Gateway.
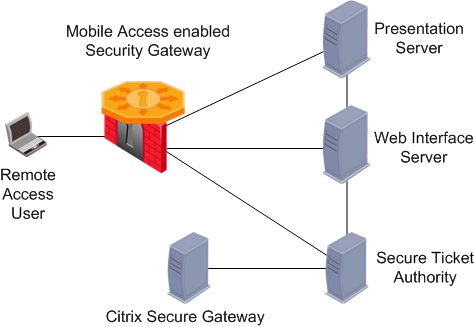
You do not need to use Secure Ticketing authority (STA) servers because Mobile Access implements its own STA engine.
Configuring Citrix Services
To configure a Citrix Service:
- In the Mobile Access tab navigation tree, select Applications > Citrix Services.
- Click New. The Citrix Services window opens.
Before Configuring Citrix Services
Mobile Access's server certificate must be Fully Qualified Domain Name (FQDN)-based i.e. issued to Mobile Access's FQDN, for example www.example.com.
Before configuring Citrix Services, change the Mobile Access server certificate to one that was issued to the Fully Qualified Domain Name (FQDN). This is required in order to comply with the accepted Citrix standards for server certificates. Additionally, end-users must browse to Mobile Access using its FQDN, and the FQDN must be routable from their network.
For instructions about how to install server certificates, see Mobile Access Server Certificates.
If your Web Interface server is configured to deploy ICA Web clients and Mobile Access's server certificate is issued by a private CA, the certificate's public key must be installed on the client side browser in order for ICA Web Client to function properly. Mobile Access's certificate public key is located under: $CVPNDIR/var/ssl/server.crt.
Citrix Service Web Interface page
- Go to the Web Interface page of the Citrix Service object.
- Fill in the fields on the page:
- Servers are the machine(s) or DNS Name(s) on which the Web Interface server is hosted. Choose either a single Host or DNS name, or Multiple hosts. In order to keep the environment simple, it is recommended to configure a single Web Interface server per Citrix Application.
- Services must match the settings on the Web Interface server. Select
http or https, as required. Other services are NOT supported.
Citrix Service Link in Portal Page
- Go to the Link In Portal page of the Citrix Service object.
- Fill in the fields on the page:
- Link text (multi-language) is shown in the Mobile Access Portal. If more than one link is configured with the same (case insensitive) name, only one of them will be shown in the portal.
- URL is the link to the location of the application, or to a subdirectory of the application.
- Tooltip (multi-language) for some additional information. The text appears automatically when the user pauses the mouse pointer over the link and disappears when the user clicks a mouse button or moves the pointer away from the link.
Citrix Service STA Servers Page
- Go to the STA servers page of the Citrix Service object.
- Get the Host from the current settings on the Web Interface (WI) server.
- Get the STA ID from the Secure Ticketing Authority (STA) servers.
|
Note - Mobile Access implements its own Secure Ticketing authority (STA) engine. STA servers are not necessary.
|
To get the host name or IP address:
- Login to the Web Interface Citrix administration page.
- Click Server-Side Firewall.
- Scroll to the Secure Ticket Authority list.
- If the field is blank, you are in unticketed mode and you do not need to define any STA Servers on Mobile Access.
- If the field contains entries, you are in ticketed mode. Each entry in this list is a URL containing the IP or FQDN of a Citrix server. Every entry in the Secure Ticket Authority list must be separately entered into Mobile Access.
To get the STA ID:
- Login to the STA server.
- From the Windows Start menu, select Programs > Citrix > Citrix Secure Gateway > Secure Ticket Authority Configuration.
- Click Next.
The STA ID is shown in the Enter the STA ID field.
Citrix Service MetaFrame Servers Page
Go to the MetaFrame servers page of the Citrix Service object. In this page you can allow access to all Presentation Servers, or restrict access to defined MetaFrame servers.
If you select Restrict access to these servers only:
- Define the servers using an IP address or Fully Qualified Domain Name (FQDN).
- Make sure that the definition matches the configuration made on the XenApp server farm. If you do not, Mobile Access may not authorize the connection. The Presentation server configuration affects one of the parameters in the ICA file that is received by the client.
Citrix Service Single Sign On Page
Single Sign On is increases application security.
To configure Single Sign On:
- Go to the Single Sign On page of the File Share Application object.
- Select Turn on single Sign On for this application.
Configure the sign on method for the application.
Citrix Service Protection Level Page
- Go to the Protection Level page of the Citrix Service object.
- Fill in the fields on the page.
Security Requirements for Accessing this Application lets you:
- Allow access to this application to any endpoint that complies with the security requirements of the gateway,
- OR make access to the application conditional on the endpoint being compliant with the selected Endpoint Compliance Profile.
|
Note - The Citrix architecture requires ICA files and ActiveX executables to be temporarily cached by the client-side browser. As a result, Mobile Access's Protection Level settings do not apply to these files.
|
- Obtain the Host and the STA ID of the Secure Ticketing Authority (STA) servers from the current settings on the Web Interface (WI) server.
|
Note - Mobile Access implements its own Secure Ticketing authority (STA) engine. STA servers are not necessary.
|
To get the hostname or IP address:
- Login to the Web Interface Citrix administration page.
- Click Server-Side Firewall.
- Scroll to the Secure Ticket Authority list.
- If the field is blank, you are in unticketed mode and you do not need to define any STA Servers on Mobile Access.
- If the field contains entries, you are in ticketed mode. Each entry in this list is a URL containing the IP or FQDN of a Citrix server. Every entry in the Secure Ticket Authority list must be separately entered into Mobile Access.
To get the STA ID:
- Login to the STA server.
- From the Windows Start menu, select Programs > Citrix > Citrix Secure Gateway > Secure Ticket Authority Configuration.
- Click Next.
The STA ID is shown in the Enter the STA ID field.
Completing the Configuration of the Citrix Service
- Go to the Access to Application page of the Mobile Access tab.
- In the Access to Application page, associate:
- User groups.
- Applications that the users in those user groups are allowed to access.
- Install On are the Mobile Access gateways and gateway clusters that users in those user groups are allowed to connect to.
- From the SmartDashboard main menu, click Policy > Install and install the policy on the Mobile Access gateways.
Web Mail Services
Mobile Access supports built-in Web mail. Web mail provides a simple way for remote users, through a web browser interface, to access their email. Employees can access their email from any computer that has access to the Internet, such as a computer in a library, or Internet cafe. There is no need to install special email or remote access software. This is helpful for employees who work outside the office on a regular basis.
|
Note - The traffic log does not show actions done by the user through the Web mail interface.
|
Mobile Access also supports the IBM Lotus Domino Web Access (DWA, formerly known as iNotes) and Outlook Web Access (OWA). DWA and OWA are configured in Mobile Access as Web Applications.
Web Mail Services User Experience
Remote users login to Mobile Access and authenticate themselves in order to gain access to the portal. They can then click a link to access the Web mail application. Mobile Access can be configured to reuse the login credentials when authenticating to the IMAP account on the mail server. If the reused credentials are incorrect, Mobile Access again presents the user with a login page. Valid credentials are saved for future logins.
Once authenticated to the mail application, users can:
- Compose, send and receive email.
- Create, delete, rename, and manipulate mail folders.
- Index messages in various ways.
- Stores addresses.
- Search emails according to various criteria, such as body text, subject and sender's address.
- Highlight messages with different background colors, enabling quick differentiation.
- Display preferences.
Incoming (IMAP) and Outgoing (SMTP) Mail Servers
Mobile Access provides a Web front-end for any email application that uses the IMAP protocol for incoming mail, and SMTP for outgoing mail.
Email stored on the IMAP server is manipulated through the browser interface without having to transfer the messages back and forth. Users can connect to several mail servers depending on their authorization.
Configuring Mail Services
To configure a Web Mail application:
- In the Mobile Access tab navigation tree, select Applications > Web Mail.
- Click New. The Web mail service window opens. The following sections explain the fields on each page.
Web Mail Service General Properties Page
- Go to the General Properties page of the Web mail service object.
- Fill in the fields on the page:
- Name for the mail service, for example, my_mail_server
- Outgoing Mail Server (SMTP)
- Host or DNS Name, for example, smtp.example.com
- Service is normally the standard predefined SMTP service.
- Incoming Mail Server
- IMAP server type
- Host or DNS Name, for example, smtp.example.com
- Service is normally the standard predefined IMAP service.
Web Mail Service Link in Portal Page
- Go to the Link In Portal page of the Web mail service object.
- Fill in the fields on the page:
- Link text (multi-language) is shown in the Mobile Access Portal. If more than one link is configured with the same (case insensitive) text, only one of them will be shown in the portal.
- Tooltip (multi-language) for additional information. The text appears automatically when the user pauses the mouse pointer over the link and disappears when the user clicks a mouse button or moves the pointer away from the link.
Web Mail Service Single Sign-On Page
- Go to the Single Sign On page of the Web mail service object.
- Select the sign on method for the application.
For more information, see Single Sign On.
Web Mail Service Protection Level Page
- Go to the Protection Level page of the Web mail service object.
- Fill in the fields on the page:
- Security Requirements for Accessing this Application allows you to
- EITHER allow access to this application to any endpoint machine that complies with the security requirements of the gateway,
- OR make access to the application conditional on the endpoint being compliant with the selected Endpoint Compliance Profile.
Completing the Configuration of the Web Mail Service
- Go to the Access to Application page of the Mobile Access tab.
- In the Access to Application page, associate:
- User groups.
- Applications that the users in those user groups are allowed to access.
- Install On are the Mobile Access gateways and gateway clusters that users in those user groups are allowed to connect to.
- From the SmartDashboard main menu, choose Policy > Install and install the policy on the Mobile Access gateways.
Enabling LDAP Contacts Search in Web Mail Applications
By default, the contact search in Web Mail applications works only for internal users that are defined on the Mobile Access gateway. To enable search on contacts that are defined on an LDAP server, see sk34997.
Native Applications
Native applications are not clientless. They require the SSL Network Extender client on the endpoint machine. See Native Applications for Client-Based Access.
DNS Names
If an internal application is hosted on a server inside the organization, using a DNS Name object in the definition of the Mobile Access application makes it possible to change the IP address of the server without having to change the definition of the host object in the Mobile Access application.
For example, if "myhost.example.com" is used in the definition of a Mobile Access application, Mobile Access resolves the IP address of "myhost" when authorizing access to the application.
If an internal application is hosted on multiple replicated servers, a single DNS Name object can be used in the definition of the Mobile Access application, instead of having to individually define each host.
The DNS server that is specified on Mobile Access resolves the DNS names. To set or change the DNS server, use the sysconfig command.
DNS Names and Aliases
A DNS name can have a number of aliases. For example, www.example.com, www.example.co.uk and www.example.co.fr could be aliases of the same DNS name.
In the definition of the DNS Name object, use the format "a.b
x.y.z", where each section of the DNS name is demarcated by a period. For example, mail.example.com or www.example.co.uk.
Wildcards can be used at the beginning of a domain name, but not at the end. For example, *.example.com includes www.example.com and mail.example.com. On the other hand, www.example.* is NOT valid.
Where DNS Name Objects are Used
DNS objects are used when defining hosts for Mobile Access Web applications, file share applications, Citrix services, and Web mail services. They are also used when configuring support for Hostname Translation.
DNS Name objects cannot be used in the Security Rule Base.
Defining the DNS Server used by Mobile Access
The DNS server that resolves the IP addresses of the DNS Name objects must be defined in one of these locations:
- In SmartDashboard, in the Mobile Access tab, in the Additional Settings > Network Accessories > Name Resolution page.
- From the Mobile Access Security Gateway itself, using either the console, or the Web User Interface.
|
Using the Console
|
Using the Web User Interface
|
On SecurePlatform
|
- Run
sysconfig, - Select
3) Domain Name Servers.
|
- Connect your browser to the SecurePlatform Administration Portal.
- Go to the page.
|
On Gaia
|
- Run
set dns primary <ip_address> - Optional: Run
set dns suffix VALUE.
An example of VALUE is example.com - Run
save config
|
- Connect your browser to the Gaia WebUI.
- Go to the .
|
Configuring DNS Name Objects
To create a DNS Name object:
- In SmartDashboard, select Network and Resources > DNS Names.
- Click New.
The DNS Name window opens.
- Give the DNS Name object a Name.
- Click DNS Names.
The DNS Names window opens.
- Click Add.
The Edit DNS Name window opens.
- Type the DNS name.
- Click OK three times.
The DNS Name window closes.
Using the Login Name of the Currently Logged in User
Mobile Access applications can be configured to differ depending on the user name of the currently logged-in user. For example, portal links can include the name of the user, and a file-share can include the user's home directory. For this purpose, the $$user directive is used. During a Mobile Access session, $$user resolves to the login name of the currently logged-in user.
For such personalized configurations, insert the $$user string into the relevant location in the definitions of Web applications, file shares, and native applications.
For example, a Web application URL that is defined as http://host/$$user appears for user aa as http://host/aa and for user bb as http://host/bb.
If the user authenticates with a certificate, $$user resolves during the user's login process to the user name that is extracted from the certificate and authorized by the directory server.
For its use in configuring File Shares, see Using the $$user Variable in File Shares.
|
|
