Installing Multi-Domain Security Management
Multi-Domain Security Management is a centralized management solution for large-scale, distributed environments with many different network Domains. This best-of-breed solution is ideal for enterprises with many subsidiaries, branches, partners and networks. Multi-Domain Security Management is also an ideal solution for managed service providers, cloud computing providers, and data centers.
Centralized management gives administrators the flexibility to manage polices for many diverse entities. Security policies should be applicable to the requirements of different departments, business units, branches and partners, balanced with enterprise-wide requirements.
Basic Architecture
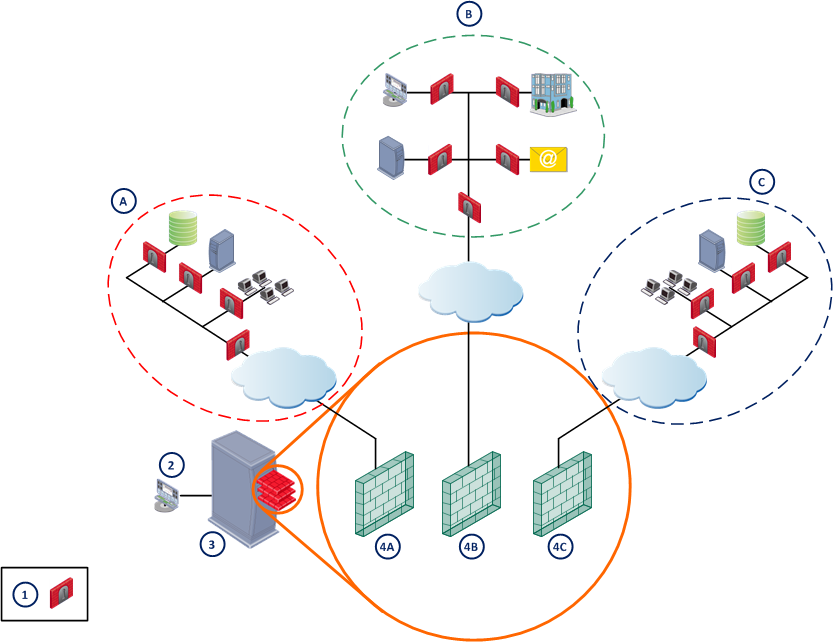
Multi-Domain Security Management uses tiered architecture to manage Domain network deployments.
- The Security Gateway enforces the security policy to protect network resources.
- A Domain is a network or group of networks belonging to a specified entity, such as a company, business unit, department, branch, or organization. For a cloud computing provider, one Domain can be defined for each customer.
- A Domain Management Server is a virtual Security Management Server that manages security policies and Security Gateways for a specified Domain.
- The Multi-Domain Server is a physical server that hosts the Domain Management Server databases and Multi-Domain Security Management system databases.
- The SmartDomain Manager is a management client that administrators use to manage domain security and the Multi-Domain Security Management system.
The Multi-Domain Servers and SmartDomain Manager are typically located at central Network Operation Centers (NOCs). Security Gateways are typically located together with protected network resources, often in another city or country.
Item
|
Description
|
|
|
USA Development Domain
|
|
|
Headquarters Domain
|
|
|
UK Development Domain
|
|
|
Security Gateway
|
|
|
Network Operation Center
|
|
|
Multi-Domain Server
|
|
|
USA Development Domain Management Server
|
|
|
Headquarters Domain Management Server
|
|
|
UK Development Domain Management Server
|
Setting Up Multi-Domain Security Management Networking
The Multi-Domain Server and Domain Security Gateway computers should be ready to connect to the network. The Multi-Domain Server must have at least one interface with a routable IP address. It also must be able to query a DNS server and resolve other network components.
Make sure that you configure routing to allow IP communication between:
- Domain Management Server, Domain Log Server and their Domain Security Gateways.
- All Multi-Domain Servers in the deployment.
- The Domain Management Server and Log Servers for the same Domain.
- The Domain Management Server and its High Availability Domain Management Server peer.
- The SmartDomain Manager clients and Multi-Domain Servers.
- The SmartDomain Manager clients and Log Servers.
Installing Multi-Domain Server
You can install a Multi-Domain Server on certain Smart-1 appliances, or Open Servers on SecurePlatform or Gaia. For more about supported appliances and platforms, see the R76 Release Notes.
Smart-1 Appliances
Install a Multi-Domain Server on supported Smart-1 models. Make sure that you use the Smart-1 ISO file when you install the operating system.
To install Multi-Domain Server on an appliance:
- Install the SecurePlatform operating system on the appliance, as described for the UTM-1 and 2012 Models.
- While the appliance restarts, open the terminal emulation program.
- When prompted, press any key to enter the boot menu.
- Select and press .
- Type and press .
Multi-Domain Server is installed on the appliance and then the appliance resets.
To start the First Time Configuration Wizard:
- Connect a standard network cable to the appliance management interface and to your management network.
The management interface is marked .
- Open Internet Explorer to the default management IP address,
https://192.168.1.1:4434 - Log in to the system using the default login name/password: .

|
Note - You can use the WebUI menu to configure the appliance settings. Navigate to https://<appliance_ip_address>:4434.
|
- Set the username and password for the administrator account.
- Click .
The First Time Configuration Wizard opens.
To configure Multi-Domain Server R76 on appliances:
- In the First Time Configuration Wizard, set the date and time and then click .
- Configure the settings for the management and other interfaces and then click .
- Configure the settings for the routing table and then click .
- Set the , , and and then click .
- Set the clients that can manage the appliance using a web or SSH connection and then click .
- Select and then click .
- Select and then click .
- Define the Multi-Domain Server administrator that is a Multi-Domain Server Superuser and then click .
Click .
- Download SmartConsole and SmartDomain Manager and then click .
The window shows the settings for the appliance.
- Click .
Multi-Domain Server R76 is installed on the appliance.
To configure a secondary Multi-Domain Server R76 on appliances:
Do steps 1 - 10 with these changes:
To configure a Multi-Domain Server R76 log server on appliances:
Do steps 1 - 10 with these changes:
Converting a Security Management Server to Multi-Domain Server
The Single2Multi Domain utility lets you easily convert a Security Management server on Smart-1 50 and 150 appliances to a Multi-Domain Server.
- Security Management server is converted to a Domain Management Server with the same name and IP address.
- Security Management administrators and GUI clients that are defined using
cpconfig are converted to Multi-Domain Superuser administrators and Superuser GUI clients. - Security Management administrators defined in the SmartDashboard are converted to Domain Management administrators.
- Security Management High Availability server is converted to a Security Management backup server to the Domain Management Server.
Preparing to Convert
Before you run the Single2Multi Domain utility, do these steps to prepare for the conversion.
- Install SmartDomain Manager on a computer to configure the Multi-Domain Server.
- Connect to the appliance using the console port or LOM.
- Make sure that you have these details:
- New routable IP address and netmask for the Multi-Domain Server. The new Domain Management Server uses the Security Management server IP address.
- Name for the Multi-Domain Server that can be resolved with DNS.
- File with the Multi-Domain Server license.
Converting the Security Management Server
Use the s2mwrapper command to convert the Smart-1 50 or 150 appliance to a Multi-Domain Server.
The utility lets you create a snapshot of the Security Management server during the conversion process. You can use this snapshot to revert back to the Security Management server.
|
Note - Before you revert back to the Security Management server, backup the Multi-Domain Server log file in the /opt/CPInstlog directory.
|
To convert the Security Management server:
- Log in to the Smart-1 50 or 150 appliance and enter Expert mode.
- Run
s2mwrapper. - Follow the on-screen instructions.
- Log out of the appliance.
- Log in to SmartDomain Manager with the
cpconfig administrator username and password.
Open Servers
Install Multi-Domain Server on a dedicated Gaia or SecurePlatform open server.
Configure the Multi-Domain Server when you install the operating system on the open server. This procedure starts after you configure the date and time in the Gaia or SecurePlatform installation.
Use this procedure to install these Multi-Domain Server types:
- Primary Multi-Domain Server - The first Multi-Domain Server that you install and log on to.
- Secondary Multi-Domain Server
- Standalone log servers - Domain Log Server or Multi-Domain Log Servers.
To install a Primary Multi-Domain Server on SecurePlatform:
- Use the Multi-Domain Security Management removable media or ISO file to install and configure SecurePlatform.
- In the Multi-Domain Security Management welcome screen, enter yes.
- Select .
- Enter when prompted to install a Primary Multi-Domain Server.
You must install the first.
You can install a secondary Multi-Domain Server or a Multi-Domain Log Server later.
- When prompted, enter to confirm installation of a .
You cannot change this installation setting later.
- At the prompt, enter to continue.
- When prompted, press the space bar to scroll through the license agreement and then press .
- If there is more than one interface on the Multi-Domain Server, enter the interface that connects Domain Management Servers to their managed networks and gateways. This is typically the management interface.
You can only have one interface for this purpose.
- In Configuring Licenses, enter n to continue using the 15 day trial license.
We recommend that you get and attach your licenses when configuring Multi-Domain Security Management with the SmartDomain Manager.
- In Configuring Groups, press Enter and then press y to assign the root user group by default. You can define groups later.
- Press Enter to start the Certificate Authority.
- Press y to save the certificate fingerprint to a file.
- Define least one Multi-Domain Security Management administrator.
You must define the first administrator as a Multi-Domain Security Management Superuser. You can add this administrator to a group.
You can define more administrators, but we recommend that you use the SmartDomain Manager to do this later.
- Enter when prompted to add this administrator to an administrators group. You can do this later.
- Define at least one GUI client (SmartDomain Manager) to manage this Multi-Domain Server.
- When prompted, press Enter.
- Restart the Multi-Domain Server.
To install a secondary Multi-Domain Server:
Do the steps in the above procedure with these exceptions:
- In step 5, enter when prompted to install a Primary Multi-Domain Server.
- In step 6, do the action to confirm this choice.
To install a Multi-Domain Server log server:
Do the steps in the above procedure with these exceptions:
- In step 4, select .
- In step 5, enter when prompted to install a Primary Multi-Domain Server.
- In step 6, do the action to confirm this choice.
Installing Gateways
Install the Network Operation Center (NOC) and Security Gateways of the domain using the R76 removable media.
Installing Multi-Domain Security Management GUI Clients
The SmartDomain Manager is automatically installed together with Check Point SmartConsole. If you have not yet installed SmartConsole, do so now.
To install the SmartConsole clients on Windows platforms:
- Insert the R76 distribution media or download the SmartConsole application from the Support Center.
- If you are using the installation media, go to the
Linux\linux\windows folder. - Run the executable.
- Continue with the instructions on the screen.
Post-Installation Configuration
Use the SmartDomain Manager to configure and manage the Multi-Domain Security Management deployment. Make sure to install SmartDomain Manager on a trusted GUI Client. You must be an administrator with appropriate privileges (Superuser, Global Manager, or Domain Manager) to run the SmartDomain Manager.
To start the SmartDomain Manager:
- Click > > > .
- Enter your credentials:
- To use a password, enter the Multi-Domain Server host name or IP address. Then enter your administrator user name and password.
- To use a certificate, enter the Multi-Domain Server host name or IP address. Then click and select the certificate.
- To start without credentials, select .
- Optional: Enter a description of this session.
- Click .
SmartDomain Manager connects to the Multi-Domain Server. When SmartDomain Manager opens, it shows the network objects and options that you have permission to work with.
- If necessary, confirm the connection using the fingerprint generated during installation.
You see this only the first time that you log in from a client computer.
Enabling IPv6 on Gaia
IPv6 is automatically enabled if you configure IPv6 addresses in the First Time Configuration Wizard.
If you did not do this, enable IPv6 in one of the following ways:
To enable IPv6 using clish:
- Run:
set ipv6-state on Run:
save config- Run:
reboot
To enable IPv6 using the WebUI:
- In the WebUI navigation tree, select .
- For , select .
Enabling IPv6 on the Multi-Domain Server and Domain Management Servers
If your environment uses IPv6 addresses, you first must enable IPv6 support for the Multi-Domain Server and for any existing Domain Management Servers. It is not necessary to enable IPv6 support for Domain Management Servers that are created after IPv6 is enabled on the Multi-Domain Server, because this is done automatically.
Before enabling IPv6 support for the Multi-Domain Server:
- Enable IPv6 on Gaia and assign an IPv6 address to the management interface.
- Write down the Multi-Domain Server IPv6 address and the names and IPv6 address for all Domain Management Servers. This is necessary because the procedures disconnect the SmartDomain Manager.
To enable IPv6 support for the Multi-Domain Server:
- From the Multi-Domain Server command line, run
mdsconfig. - Select .
- Press when asked to change the IPv6 preferences for the Multi-Domain Server.
Press again to confirm.
- Enter the management interface name (typically eth0).
- Enter the Multi-Domain Server IPv6 address.
- Press to start Check Point services.
After a few moments, the mdsconfig menu shows.
To enable IPv6 support for all existing Domain Management Servers:
- From the
mdsconfig menu, select . - Press when asked to change the IPv6 preferences for Domain Management Servers.
- Press to add support to an existing Domain Management Server.
- Press to add Support to all Domain Management Servers at once.
- Press to manually add IPv6 addresses
Or
Press to automatically assign IPv6 address from a specified range.
- Do the instructions on the screen to enter the IPv6 address or a range of IPv6 addresses when prompted.
To manually enable IPv6 support for specified Domain Management Servers.
- From the
mdsconfig menu, select . - At the prompt, press to change the IPv6 preferences for Domain Management Servers.
- Press to add support to an existing Domain Management Server.
- Press when asked to enable IPv6 support for all Domain Management Servers at once.
Press to confirm.
- At the prompt, enter the Domain Management Server name.
The available Domain Management Servers show above prompt. You can copy and paste the name.
- Enter the IPv6 address.
Demo Mode
You can open the SmartDomain Manager in Demo mode. This mode does not require authentication or a connection to the Multi-Domain Server. Use the Demo mode to experiment with different objects, views, modes and features before you create a production system. The Demo mode includes several pre-configured sample Domains, Domain Management Servers, Security Gateways and policies.
Operations performed in Demo mode are stored in a local database. You can continue a Demo session from the point at which you left off in a previous session.
Adding Licenses using the SmartDomain Manager
You can add a license to a Multi-Domain Server or Multi-Domain Log Server using the SmartDomain Manager.
- In the SmartDomain Manager, open the General View > Multi-Domain Server Contents page.
- Double-click a Multi-Domain Server or Multi-Domain Log Server. The Multi-Domain Server Configuration window opens.
- Open the License tab.
- Install licenses using or :
Fetch License File
- Click .
- In the Open window, browse to and double-click the desired license file.
Add License Information Manually
- Click .
- In the email message that you received from Check Point, select the entire license string (starting with
cplic putlic... and ending with the last SKU/Feature) and copy it to the clipboard. - In the Add License window, click to paste the license details you have saved on the clipboard into the Add License window.
- Click to display your Validation Code. Compare this value with the validation code that you received in your email. If validation fails, contact the Check Point licensing center, providing them with both the validation code contained in the email and the one displayed in this window.
Uninstalling Multi-Domain Security Management
To uninstall a Multi-Domain Server:
- Back up the databases if you want to reinstall the Multi-Domain Server on this or another computer.
- Reformat the hard disk or re-install a Multi-Domain Server from the removable media.
To uninstall the SmartDomain Manager and SmartConsole applications:
- Use Add/Remove Programs to uninstall the clients.
Where To From Here?
Check Point documentation provides additional information and is available on the R76 home page on the Check Point Support Center. It is also available on the Check Point DVD.
|
