UserCheck Interaction Objects
Creating UserCheck Interaction Objects
Create a UserCheck Interaction object from the Rule Base or from the page of the DLP tab. The procedure below shows how to create the object from the Rule Base.
To create a UserCheck object that includes a message:
- In the > rule base > column, select one of these interaction modes:
- - Show an informative message users. Users can continue to the application or cancel the request.
- - Show a message to users that asks them if they want to continue with the request or not. To continue with the request, the user is expected to supply a reason.
- - Show a message to users and block the application request.
- Select or one of the existing UserCheck Interaction objects.
If you selected , the window opens on the page.
- Enter a name for the UserCheck object and, optionally, a comment.
- Select a language (English is the default) from the Languages tabs.
- Click to add a graphic, such as company logo.

|
Note - The graphic must have a height and width of 176 x 52 pixels.
|
- Click the text box adjacent to the picture and enter title text for the message.
|
Note - Right-clicking inside any of the text boxes gives you the option to and enter HTML code directly. Switching to HTML mode closes the formatting toolbar.
|
- In the page title, message subject, and message body text boxes, enter the message content. You can:
- Use the formatting toolbar to change text color, alignment, add or remove bullets.
- variables for:
- Username
- Original URL
- Source IP
- Incident ID
- Violation protocol
- Email subject / File name
- Matched Rules Notifications
Variables are replaced with applicable values when the (Prevent, Ask, Inform) action occurs and the message shows. The Username can only be displayed if the Identity Awareness blade is enabled.
- Use the variable to add a:
- - Users select a checkbox to continue
- - Users can enter an explanation for their activity or other text according to the instructions. Edit the default text in the Textual Input box based on your business needs.
- - Users can click a link to report that an incorrect category was included in the message. Use this field with the variable.
- Optional: Click to see the results in your default browser.
Plain Text Email Notifications
Not all emails clients can handle emails in rich text or HTML format. To accommodate such clients, you can configure the gateway to send emails without images.
To configure emails without images:
- On the DLP gateway, open this file for editing:
$FWDIR/conf/usrchkd.conf
- Locate the
send_emails_with_no_images entry. - Change the value to
true. - Save and close the file.
- Kill the
userchkd process. The process is automatically restarted by the gateway. The new configuration will survive a gateway reboot.
Email notifications are now sent in both plain text and HTML formats. The user's email clients decides which format to show.
More UserCheck Interaction Options
For each UserCheck Interaction object you can configure these options from the UserCheck Interaction window:
- - Modify the message text.
- - Select a default language for the message.
- - For DLP, the fallback action is derived from the original action. If the original action is:
- - The fallback is
- - The fallback is
- - Select actions that must occur before users can access the application. Select one or more of these options:
- - This applies if the UserCheck message contains a checkbox ( > ). Users must accept the text shown and select the checkbox before they can access the application.
- - This applies if the UserCheck message contains a text field ( > ). Users must enter text in the text field before they can access the application. For example, you might require that users enter an explanation for use of the application.
UserCheck Page
On the page, you can create, edit, and preview UserCheck interaction objects and their messages. It has these options:
Option
|
Meaning
|
New
|
Creates a new UserCheck object
|
Edit
|
Modifies an existing UserCheck object
|
Delete
|
Deletes an UserCheck object
|
Clone
|
Clones the selected UserCheck object.
|
These are the default UserCheck messages:
Name
|
Action Type
|
Description
|
Inform User
|
Inform
|
Shows when the action for the rule is It informs users what the company policy is for that site.
|
Blocked Message
|
Block
|
Shows when a request is blocked.
|
Ask User
|
Ask
|
Shows when the action for the rule is . It informs users what the company policy is for that site and they must click to continue to the site.
|
Cancel Page
|
Cancel
|
Shows after a user gets an Inform or Ask message and clicks Cancel.
|
Success Page
|
Approve
|
Shows information was sent according to the user's request.
|
Successfully Discarded
|
Discard
|
Shows when the information was successfully discarded according to the user's request.
|
and pages include a button that users can click to cancel the request.
You can preview each message page in these views:
- - How the message shows in a web browser on a PC or laptop
- - How the message shows in a web browser on a mobile device
- - How the message shows in email
- - How the message shows in the agent
Configuring UserCheck
Configuring the Security Gateway for UserCheck
Enable or disable UserCheck directly on the Security Gateway. The DLP tab > Gateways window shows a list of Security Gateways with the DLP blade enabled.
|
Note -
- When you enable UserCheck on a Security Gateway that is on an IP Series appliance, make sure to set the Voyager management application port to a port other than 443 or 80.
- When you enable the UserCheck portal, make sure the DLP portal is enabled as well.
|
To configure a Security Gateway for UserCheck:
- Select a gateway and click Edit.
The Gateway Properties window opens.
- On the UserCheck page, select .
- Enter the information for the UserCheck Web portal:
- In the field, enter the primary URL for the web portal that shows the UserCheck notifications.
If the points to an external interface, set to or .
If users connect to the gateway remotely, set the internal interface of the gateway (on the page) to be the same as the for the UserCheck portal.
- In the field, enter the IP address that the URL resolves to.
- Click to add URL aliases that redirect different hostnames to the , for example: Usercheck.mycompany.com. The aliases must be resolved to the portal's IP address on the corporate DNS server
- In the area, click to import a certificate that the portal uses to authenticate to the server.
By default the portal uses a certificate from the Check Point Internal Certificate Authority (ICA). This might generate warnings if the user's browser does not recognize Check Point as a trusted Certificate Authority. To prevent these warnings, import your own certificate from a recognized external authority.
Even though DLP interactions are displayed in a secure (https) portal, the main URL for the UserCheck portal starts with http:// and is not secured by a certificate. You might consider using a valid certificate to secure the main portal URL when using UserCheck for DLP violations.
- In the area, click to configure interfaces on the gateway through which the portal can be accessed. These options are based on the topology configured for the gateway. Users are sent to the UserCheck portal if they connect:
Source
|
Destination
|
VPN
|
Service
|
Action
|
Any
|
Gateway on which UserCheck client is enabled
|
Any Traffic
|
UserCheck
|
Accept
|
- In the area, select .
- Click .
- Install policy.
The Security Gateway has an internal persistence mechanism that preserves UserCheck notification data if the gateway or gateway cluster reboots. Records of a user answering or receiving notifications are never lost.
UserCheck CLI
Usrchk
You can use the usrchk command in the gateway command line to show or clear the history of UserCheck objects.
Description
|
usrchk
|
Syntax
|
usrchk [debug] [hits] [incidents]
|
Parameters
|
Parameter
|
Description
|
debug
|
Controls debug messages
|
hits
|
Shows user incident options:
list - Options to list user incidents
all - List all existing incidents.user <username> - List incidents of a specified user. uci <name of interaction object> - List incidents of a specified UserCheck interaction object
clear - Options to clear user incidents
all - Clear all existing incidentsuser <username> - Clear incidents for a specified useruci <name of interaction object> - Clear incidents of a specified UserCheck interaction object
db - user hits database options
|
incidents
|
Operations that can be done for incidents. For example:
|
|
|
Examples:
- To show all UserCheck interaction objects, run:
usrchk hits list all - To clear the incidents for a specified user, run
: usrchk hits clear user <username>
Notes:
- You can only run a command that contains
user <username> if:- Identity Awareness is enabled on the gateway.
- Identity Awareness is used in the same policy rules as UserCheck objects.
- To run a command that contains a specified UserCheck interaction object, first run
usrchk hits list all to see the names of the interaction objects. Use the name of the interaction object as it is shown in the list.
Kerberos Single Sign On
The UserCheck agent supports single sign on using the Kerberos network authentication protocol. Kerberos is the default authentication protocol used in Windows 2000 domains and above.
The Kerberos protocol is based on the idea of tickets, encrypted data packets issued by a trusted authority, in this case the Active Directory (AD). When a user logs in, the user authenticates to a domain controller that provides an initial ticket granting ticket (TGT). This ticket vouches for the user’s identity.
When the user needs to authenticate against the DLP gateway through the UserCheck agent, the agent presents this ticket to the domain controller and requests a service ticket (SR) for a specific resource (the DLP gateway). The UserCheck agent presents this service ticket to the gateway.
For more detailed information on Kerberos SSO, see:
Single Sign-On Configuration
SSO configuration has two steps:
AD Configuration
The AD configuration involves:
- Creating a New User Account
- Mapping the User Account to a Kerberos Principle Name
Creating a new User Account
- In Active Directory, open Active Directory Users and Computers (Start > Run > dsa.msc)
- Add a new user account. You can choose any username and password. For example: a user account named ckpsso with the password 'qwe123!@#' to the domain corp.acme.com.
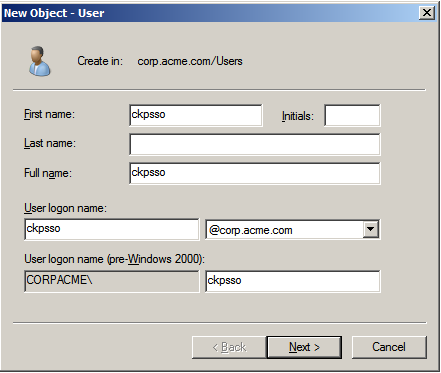
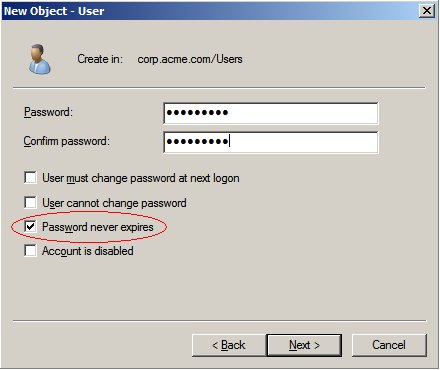
- Clear User must change password at next logon and select Password Never Expires.
Mapping the User Account to a Kerberos Principle Name
This step uses the ktpass utility to create a Kerberos principal name that is used by both the gateway and the AD. A Kerberos principal name consists of a service name (for the DLP gateway that the UserCheck agent connect to) and the domain name to which the service belongs.
Ktpass is a command-line tool available in Windows 2000 and higher.
Retrieve the correct executable
You must install the correct ktpass.exe version on the AD. Ktpass.exe is not installed by default in Windows 2003.
Use Ktpass
- Open a command line to run the ktpass tool (Start > Run > cmd).
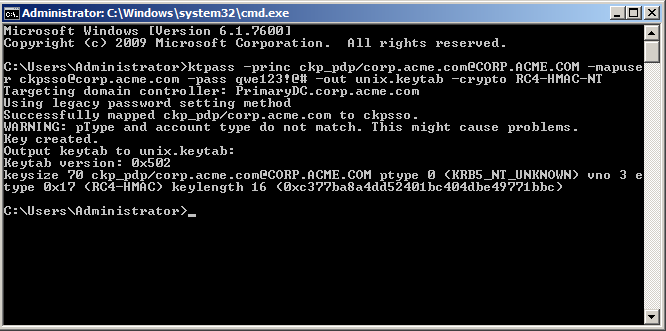
- At the command prompt, run ktpass with this syntax:
C:> ktpass -princ ckp_pdp/domain_name@DOMAIN_NAME -mapuser username@domain_name -pass password -out unix.keytab –crypto RC4-HMAC-NT

|
Important - Enter the command exactly as shown. It is case-sensitive.
|
This is an example of running ktpass with these parameters:
Parameter
|
Value
|
domain_name@DOMAIN_NAME
|
corp.acme.com@CORP.ACME.COM
|
username@domain_name
|
ckpsso@corp.acme.com
|
password
|
qwe123@#
|
The AD is ready to support Kerberos authentication for the Security Gateway.
The example above shows the ktpass syntax on Windows 2003. When using Windows 2008/2008 R2 Server, the ktpass syntax is slightly different. Parameters are introduced using a forward slash "/" instead of a hyphen "-".
Example (Windows 2008):
ktpass /princ ckp_pdp/corp.acme.com@CORP.ACME.COM /mapuser ckpsso@corp.acme.com /pass qweQWE!@# /out unix.keytab /crypto RC4-HMAC-NT
Authentication Failure
Authentication will fail if you have used the ktpass utility before for the same principal name (ckp_pdp/domain_name@DOMAIN_NAME) but with a different account.
If you have used the ktpass utility before:
- On the AD server, run:
ldifde -f check_SPN.txt -t 3268 -d "dc=corp,dc=acme,dc=com" -l servicePrincipalName -r "(servicePrincipalName=ckp_pdp*)" -p subtree
- Open the
check_SPN.txt file and verify that only one record is present.If multiple records exist, you must delete the different account or remove its association to the principal name.
Remove the association with the principle name by running:
settspn –D ckp_pkp/domain_name old_account name.
For example:
setspn –D ckp_pdp/corp.acme.com ckpsso
SmartDashboard Configuration
In SmartDashboard you need to configure an LDAP Account Unit to support SSO
To configure the account unit:
- Add a new host to represent the AD domain controller. Go to Network Objects tab > Nodes > Node > Host.
- Enter a name and IP address for the AD object and click OK.
For example, ADServer. - Add a new LDAP Account Unit.
Select Servers and OPSEC Applications in the Objects Tree. Right-click Servers > New > LDAP Account Unit.
- In the General tab of the LDAP Account Unit:
- Enter a name.
- In the Profile field, select Microsoft_AD.
- In the Domain field, enter the domain name. It is highly recommended to fill this field for existing account units that you want to use for Identity Awareness. Entering a value into this field will not affect existing LDAP Account Units.
- Select CRL retrieval and User management.
- Click Active Directory SSO configuration and configure the values (see example):
- Select Use kerberos Single Sign On.
- Enter the domain name.
For example, CORP.ACME.COM - Enter the account username you created in Creating a New User Account.
For example, ckpsso. - Enter the account password for that user (the same password you configured for the account username in AD) and confirm it.
- Leave the default settings for Ticket encryption method.
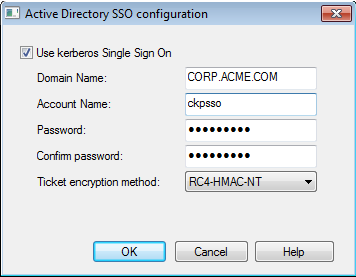
- Click OK.
- In the Servers tab:
- Click Add and enter the LDAP Server properties.
- In the Host field, select the AD object you configured in step 4 above.
- In the Login DN field, enter the login DN of a predefined user (added in the AD) used for LDAP operations.
- Enter the LDAP user password and confirm it.
- In the Check Point Gateways are allowed to section, select Read data from this server.
- In the Encryption tab, select Use Encryption (SSL), fetch the fingerprint and click OK.
|
Note - LDAP over SSL is not supported by default. If you have not configured your domain controller to support LDAP over SSL, either skip step f or configure your domain controller to support LDAP over SSL.
|
- In the Objects Management tab:
- In the Manage objects on field, select the AD object you configured in step 4 above.
- Click Fetch Branches to configure the branches in use.
- Set the number of entries supported.
- In the Authentication tab, select Check Point Password in the Default authentication scheme and click OK.
Localizing and Customizing the UserCheck Portal
After you set the UserCheck interaction object language, you can translate the Portal OK and Cancel buttons to the applicable language. For more information, see: sk83700.
|
|
