Getting Started
It is easy to get started with Application Control and URL Filtering after you install and configure your R76 environment. Application Control can be enabled on R75 or higher gateways and URL Filtering can be enabled on R75.20 or higher gateways.
Application Control and URL Filtering Licensing and Contracts
Make sure that each Security Gateway has a Security Gateway license and an Application Control contract and/or URL Filtering contract. For clusters, make sure you have a contract and license for each cluster member.
New installations and upgraded installations automatically receive a 30 day trial license and updates. Contact your Check Point representative to get full licenses and contracts.
If you do not have a valid contract for a Security Gateway, the Application Control blade and/or URL Filtering blade is disabled. When contracts are about to expire or have already expired, you will see warnings. Warnings show in:
- The section of the pane of the Application and URL Filtering tab.
- The Check Point User Center when you log in to your account.
SmartDashboard Toolbar
You can use the SmartDashboard toolbar to do these actions:
Icon
|
Description
|

|
Open the SmartDashboard menu. When instructed to select menu options, click this button to show the menu.
For example, if you are instructed to select > , click this button to open the Manage menu and then select the option.
|

|
Save current policy and all system objects.
|

|
Open a policy package, which is a collection of Policies saved together with the same name.
|

|
Refresh policy from the Security Management Server.
|

|
Open the Database Revision Control window.
|

|
Change global properties.
|

|
Verify Rule Base consistency.
|
|
Install the policy on Security Gateways or VSX Gateways.
|
|
Open SmartConsoles.
|
Enabling Application Control on a Security Gateway
Enable the Application Control Software Blade on each Security Gateway.
To enable the Application Control Software Blade on a Security Gateway:
- In SmartDashboard, right-click the Security Gateway object and select Edit.
The Gateway Properties window opens.
- In General Properties > Network Security tab, select .
- Click OK.
- Install the Policy.
After you enable Application Control, you can see logs that relate to application traffic in SmartView Tracker and SmartEvent. These logs show how applications are used in your environment and help you create an effective Rule Base.
Enabling URL Filtering on a Security Gateway
Before you enable the URL Filtering Software Blade, make sure a DNS has been configured in the environment. If you have a proxy server in your network, make sure it is defined on the Security Gateway or in the management environment.
To enable the URL Filtering Software Blade on a gateway:
- In SmartDashboard, right-click the Security Gateway object and select .
The Gateway Properties window opens.
- In General Properties > Network Security tab, select .
- Click OK.
- Install the Policy.
Creating an Application Control and URL Filtering Policy
Create and manage the Policy for Application Control and URL Filtering in the Application and URL Filtering tab of SmartDashboard. The Policy defines which users can use specified applications and sites from within your organization and what application and site usage is recorded in the logs.
- The Overview pane gives an overview of your Policy and traffic.
- The pane contains your Rule Base, which is the primary component of your Application Control and URL Filtering Policy. Click the Add Rule buttons to get started.
- Look through the AppWiki to learn which applications and categories have high risk levels. Find ideas of applications and categories to include in your Policy.
Creating Rules
Here are examples of how to create different types of rules.
Monitoring Applications
Scenario: I want to monitor all Facebook traffic in my organization. How can I do this?
To monitor all Facebook application traffic:
- In the Application and URL Filtering tab of SmartDashboard, open the Policy page.
- Click one of the Add Rule toolbar buttons to add the rule in the position that you choose in the Rule Base. The first rule matched is applied.
- Make a rule that includes these components:
- - Give the rule a name such as Monitor Facebook.
- - Keep it as Any so that it applies to all traffic from the organization.
- - Keep it as Internet so that it applies to all traffic going to the internet or DMZ.
- - Click the plus sign to open the Application viewer. Add the application to the rule:
- Start to type "face" in the Search field. In the Available list, see the Facebook application.
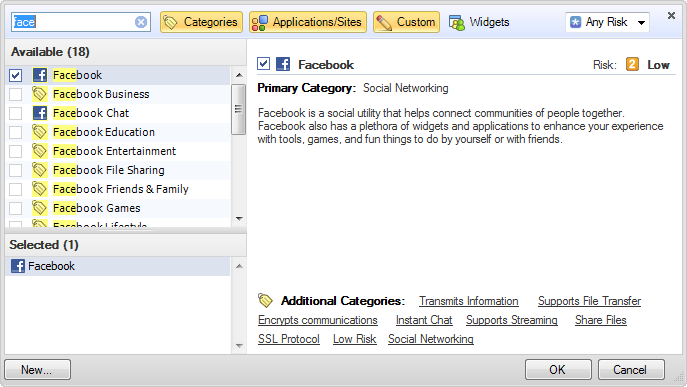
- Click each item to see more details in the description pane.
- Click the checkboxes of the items to add to the rule.
- Action - Keep it as Allow.
- Track - Keep it as Log
- Install On - Keep it as All or choose specified Security Gateways to install the rule on.
The rule allows all Facebook traffic but logs it. You can see the log data in SmartView Tracker and SmartEvent to monitor how people use Facebook in your organization.
Blocking Applications
Scenario: I want to block pornographic sites in my organization. How can I do this?
To block an application or category of applications, such as pornography, in your organization:
- In the Application and URL Filtering tab of SmartDashboard, open the Policy pane.
- Click one of the Add Rule toolbar buttons to add the rule in the position that you choose in the Rule Base. The first rule matched is applied.
- Make a rule that includes these components:
- - category
- - , and optionally, a UserCheck The message informs users that their actions are against company policy and can include a link to report if the website is included in an incorrect category.
- -
Name
|
Source
|
Destination
|
Applications/
Sites
|
Action
|
Track
|
Install On
|
Block Pornography
|
Any
|
Internet
|
Pornography
|
Block
Blocked Message
|
Log
|
All
|
The rule blocks traffic to pornographic sites and logs attempts access sites that are in the pornography category. Users who violate the rule receive a customizable UserCheck message that informs them that the application is blocked according to company security policy. The message can include a link to report if the website is included in an incorrect category.

|
Important - A rule that blockstraffic, with the and parameters defined as , also blocks traffic to and from the Captive Portal.
|
Limiting Application Traffic
Scenario: I want to limit my employees' access to streaming media so that it does not impede business tasks.
If you do not want to block an application or category, there are two ways to set limits for employee access:
- Add a object to a rule to limit the bandwidth that is permitted for the rule.
- Add one or more objects to a rule to make it active only during specified times.
The example rule below:
- Allows access to streaming media during non-peak business hours only.
- Limits the upload and download throughput for streaming media in the company to 1 Gbps.
To create a rule that allows streaming media with time and bandwidth limits:
- In the Application and URL Filtering tab of SmartDashboard, open the Policy pane.
- Click one of the Add Rule toolbar buttons to add the rule in the position that you choose in the Rule Base. The first rule matched is applied.
- Make a rule that includes these components:
- - category.
- - , and a object that specifies the maximum upload and download throughput.
- - Add a object that specifies the hours or time period in which the rule is active.
|
|
|
|
|
|
|
|
|
|
Name
|
Source
|
Destination
|
Applications/Sites
|
Action
|
Track
|
Install On
|
Time
|
Limit Streaming Media
|
Any
|
Internet
|
Media Streams
|
Allow
Upload_1Gbps
Up: 1 Gbps
|
Log
|
All
|
Non-peak
|

|
Note - In a cluster environment, the specified bandwidth limit is divided between all defined cluster members, whether active or not. For example, if a rule sets 1Gbps limit in a three member cluster, each member has a fixed limit of 333Mbps.
|
Using Identity Awareness Features in Rules
Scenario: I want to allow a Remote Access application for a specified group of users and block the same application for other users. I also want to block other Remote Access applications for everyone. How can I do this?
If you enable Identity Awareness on a Security Gateway, you can use it together with Application Control to make rules that apply to an access role. Use access role objects to define users, machines, and network locations as one object.
In this example:
- You have already created an Access Role that represents all identified users in the organization. You can use this to allow access to applications only for users who are identified on the Security Gateway.
- You want to allow access to the Radmin Remote Access tool for all identified users.
- You want to block all other Remote Access tools for everyone within your organization. You also want to block any other application that can establish remote connections or remote control.
To do this, add two new rules to the Rule Base:
- Create a rule and include these components:
- Create a rule below the rule from step 1. Include these components:
Name
|
Source
|
Destination
|
Applications/Sites
|
Action
|
Track
|
Install On
|
Allow Radmin to Identified Users
|
Identified_users
|
Internet
|
Radmin
|
Allow
|
None
|
All
|
Block other Remote Admin
|
Any
|
Internet
|
Remote Administration Tool
|
Block
|
Log
|
All
|
Notes on these rules:
- Because the rule that allows Radmin is above the rule that blocks other Remote Administration tools, it is matched first.
- The Source of the first rule is the Identified Users access role. If you use an access role that represents the Technical Support department, then only users from the technical support department are allowed to use Radmin.
For more about Access Roles and Identity Awareness, see the R76 Identity Awareness Administration Guide.
Blocking Sites
Scenario: I want to block sites that are associated with categories that can cause liability issues. Most of these categories exist in the Application and URL Filtering Database but there is also a custom defined site that must be included. How can I do this?
You can do this by creating a custom group and adding all applicable categories and the site to it. If you enable Identity Awareness on a Security Gateway, you can use it together with URL Filtering to make rules that apply to an access role. Use access role objects to define users, machines, and network locations as one object.
In this example:
- You have already created an Access Role that represents all identified users in the organization.
- You want to block sites that can cause liability issues for everyone within your organization.
- You will create a custom group that includes Application and URL Filtering Database categories as well as a previously defined custom site named Smirnoff.
To create a custom group:
- In the Application and URL Filtering tab of SmartDashboard, open the pane.
- Click > .
- Give the group a name. For example, Liability_Sites.
- the group members:
- Filter by (make sure only the Categories button is selected) and select the checkboxes of all the related categories in the Application and URL Filtering Database.
- Filter by (click the Categories button to clear it and select Custom) and select the custom application.
- Click .
The categories and custom site are shown in the group members list.
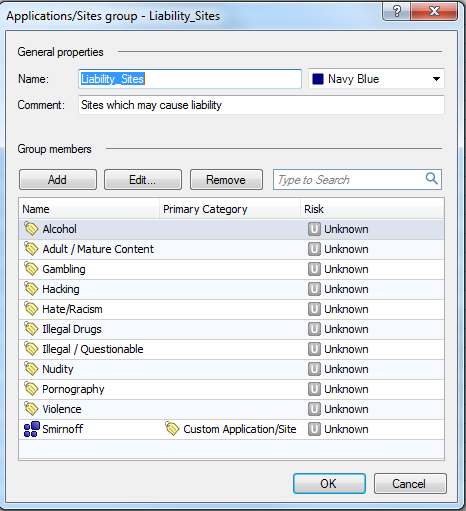
- Click .
The group is added to the Applications/Sites list. You can now use it in the Rule Base
In the Rule Base, add a rule similar to this:
- Create a rule and include these components:
Name
|
Source
|
Destination
|
Applications/Sites
|
Action
|
Track
|
Block sites that may cause a liability
|
Identified_Users
|
Internet
|
Liability_Sites
|
Block
|
Log
|
Blocking URL Categories
Scenario: I want to block pornographic sites. How can I do this?
You can do this by creating a rule that blocks all sites with pornographic material with the Pornography category. If you enable Identity Awareness on a Security Gateway, you can use it together with URL Filtering to make rules that apply to an access role. Use access role objects to define users, machines, and network locations as one object.
In this example:
- You have already created an Access Role that represents all identified users in the organization.
- You want to block sites related to pornography.
In the Rule Base, add a rule similar to this:
- Create a rule and include these components:
- - The access role
- -
- - category
- - Block
|
