Configuring the Check Point Mobile Security Dashboard Integration Settings
Assign the app to the selected groups of users or devices.
|
|
Note - For easy reference during configuration, you can record your settings in the special table (See Integration Information). |
Prerequisites
You need these details from your Citrix Endpoint Management Deployment:
-
Server: The URL of your Citrix Endpoint Management System. Usually the same as the Citrix Endpoint Management Console.
Example: URL = https://cpmobile.xm.cloud.com:4443
-
Citrix Endpoint Management Administrative Username and Password:
These are the Admin credentials that the Mobile Security dashboard will use to connect to the UEM
 Unified Endpoint Management. An architecture and approach that controls different types of devices such as computers, smartphones and IoT devices from a centralized command point..
You may have created a special API Only Admin account for this purpose as described in Creating Limited Administrator Account (optional).
Example: API Admin Username/Password = Admin_User/<hidden>
The credentials that the Mobile Security dashboard uses to connect to Citrix Endpoint Management.
-
Organization Local Group(s):
This is the Citrix Endpoint Management locally defined groups where the users/ devices are members, and whose devices will be integrated with the Mobile Security dashboard. Multiple groups can be integrated with the one Mobile Security dashboard instance by entering each group name separated with a semicolon (;).
Example: Delivery Group = SBM_local_group
-
Organization AD Group(s):
This is the Citrix Endpoint Management AD groups where the users/ devices are members, and whose devices will be integrated with the Mobile Security dashboard. Multiple groups can be integrated with the one Mobile Security dashboard instance by entering each group name separated with a semicolon (;).
Example: Delivery Group = Users_Group_SBM
-
Mitigation Attribute:
This field will not be used as we will be using the CHKP Risk and Status tags.
-
Tag Device Status:
Toggle ON to send preset mitigation tag CHKP_Status variable that can be set to “Provisioned”, “Active”, or “Inactive” by Mobile Security to reflect the status of the device within Mobile Security. This variable is interpreted as a "device property" of "CHKP_Status" by Citrix Endpoint Management.
-
Tag Device Risk:
Toggle ON to send preset mitigation tag CHKP_Risk variable that can be set to
High, Medium, Low, or None by Mobile Security to reflect the status of the device within Mobile Security. This variable is interpreted as a "device property" of "CHKP_Risk" by Citrix Endpoint Management.
-
For On-Premise UEM Environment, the TCP Web Services port (usually TCP port 4443 (HTTPS)) must be remotely accessible through your firewall from the Mobile Security dashboard to the UEM system before trying to connect.
|
|
Note - Before you start, delete any existing devices in the Mobile Security dashboard. Only the devices are synchronized from the UEM to the Mobile Security dashboard, not users. |
Configuring Integration Settings
After you complete the necessary steps, the Device Management pane shows the detailed status of the settings.
-
From the Infinity Portal, go to Settings > Integrations.
-
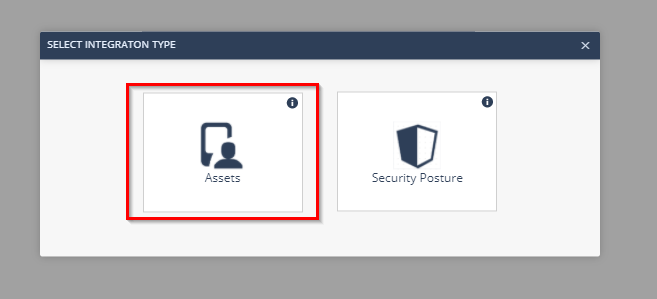
Click the “+” icon.

-
Select Assets.
-
In UEM service, select Citrix XenMobile.

-
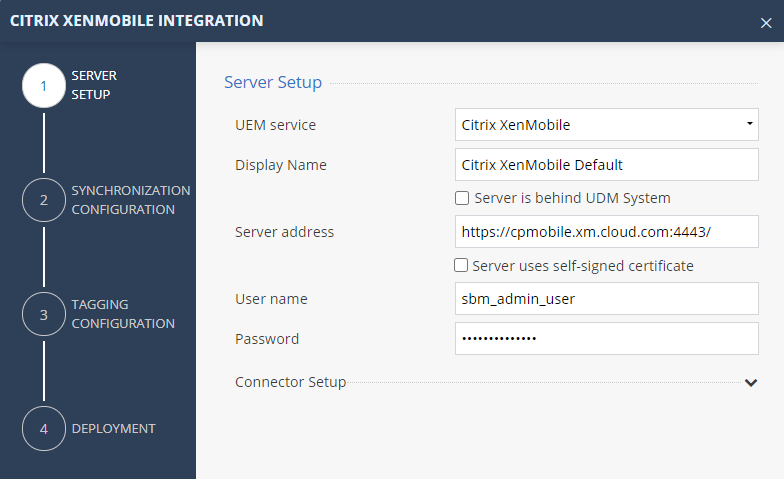
Server Setup
Configure your UEM to integrate with the created Citrix Endpoint Management devices:
-
In Server Setup section, enter this information:
-
UEM service – Citrix Endpoint Management
-
Server Address - The full URL needed for the UEM service
-
User name
-
Password
-
Connector Setup (advanced)
Using Connector (Optional)
You can configure Mobile Security Connector when the UEM is on-premises and has no direct access from the Mobile Security cloud. For more information, see Mobile Security Connector Installation Guide.
-
-
Click Next.
-
-
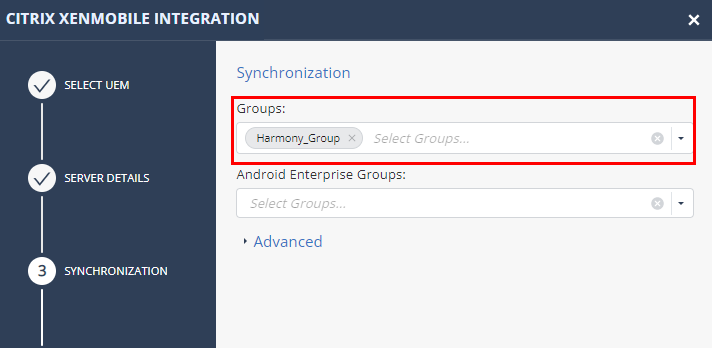
Synchronization Configuration
Configure the devices and groups that you synchronize with Mobile Security dashboard.
-
In the Group(s) field:
-
Click Group(s).
A drop-down with list of the available groups opens.
-
Select the group(s) you need for integration with Citrix Endpoint Management.
-
-
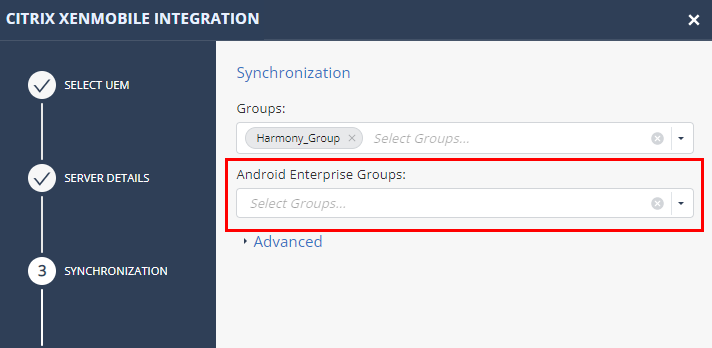
In the Android Enterprise Groups field:
In case your Android Enterprise devices are deployed with two profiles (Work and Personal) it is recommended to protect both of them. Select the appropriate groups for deployed applications as part of the Citrix Endpoint Management Android Enterprise deployment. See Using Android Enterprise with Harmony Mobile.
-
In the Advanced section:
Import Personally Identifiable Information (PII) and set the synchronization intervals.
You can limit the import of the PII devices (users) to Mobile Security.

-
Click Next.

Note - If all entries are OFF, the placeholder information set for the email address is placed in the Mobile Security dashboard’s Device Owner’s Email, in form of "UEMDevice UDID@vendor.UEM".
Setting
Description
Value
Device sync interval
Interval to connect with UEM to sync devices.
10-1440 minutes, in 10 minute intervals.
Device deletion threshold
Percentage of devices allowed for deletion after UEM device sync (in %)
0-100%
Note - Use 100% for no threshold.
100% value is recommended for:
-
Evaluation/test usage - When you are adding a small amount of devices.
-
Planned bulk deletion of devices from the UEM (see sk184319). After the devices are deleted from the Mobile Security Admin Portal, set it back to a safer value (such as 5–10%) to prevent accidental mass deletions in the future.
Device deletion after
Delay device deletion after several sync attempts – device is deleted after this amount of sync tries that confirmed deletion
1-100 sync tries
App sync interval
Interval to connect with UEM to sync applications.
10-1440 minutes, in 10 minute intervals.
-
-
Tagging Configuration
Specify the information sent to Citrix Endpoint Management and the risk level of the device.
The tagging configuration will be synced to Citrix Endpoint Management and will be used in setting device risk status.
-
In Tagging Section:
Set Tag device status to ON.
For integration with Citrix Endpoint Management, the Device Status tag is interpreted as a "device property" of "CHKP_ Status" with the values of Provisioned, Active, or Inactive.
We will use the CHKP_Status device property to determine when to prompt the user to install the Harmony Mobile Protect app on their device. If the CHKP_Status device property hasn’t been set yet, then the device has not been synced with Mobile Security dashboard.
-
Set Tag device risk to ON.
For integration with Citrix Endpoint Management, the Device Risk tag is interpreted as a "device property" of "CHKP_Risk" with the values of None, Low, Medium, or High.
We will use the CHKP_Risk device property to determine when to enact certain policies or actions on the device. If the CHKP_Risk is High or Medium, then the device will be sent an in-app notification and blocked from running corporate apps.
-
Set Tag device threat factor to ON.
The Threat Factor tag (CHKP_TF) is a list of threat factors associated with the Security Risk level, such as TF_ BACKUP_TOOL, etc. These threat factors can be used to provide additional detail and granularity of the current Risk level, however, they are not necessarily appropriate for policy triggers. The CHKP_TF value is a sort of free-form comma separated string of threat factors from the BRE Behavioral Risk Engine database.Example:

-
In Advanced section:
Mitigation attribute: This field will not be used as we will be using the CHKP_Risk and Status tags.
-
Click Next.
-
-
Deployment
Specify the deployment status of a device.
Note - This section is optional, because Citrix Endpoint Management manages the deployment automatically.
If you use Mobile Security to manage the deployment:
In the Advanced section:
Enable options to send email and/or SMS notification to the new users with instructions to download and install the Harmony Mobile Protect app.
Example:

Click Finish.
View the Integration Status (In the Infinity Portal, Settings > Device Management).
The Device Management pane shows this information:
-
Server – The latest server configuration status.
-
Synchronization – The synchronized groups and the sync status.
-
Device Sync – The synced labels from Citrix Endpoint Management
-
App Sync – The last type applications were fetched from the UEM (For iOS deployments only).
-
Tagging – Tagging Configuration and Tagging Status.
-
Deployment – Deployment Configuration and Deployment Status.

Click Edit in each section to edit the settings.
-