Advanced Configuration
Setting up an On-Premises SMTP Service (without UEM)
-
In Installing and Configuring Mobile Security Connector , follow all the procedures except the pii protector settings.
-
Configure your on-premises SMTP service:
-
In the Mobile Security Administrator Portal, go to Settings > Integrations.
-
Click + and select SMTP.
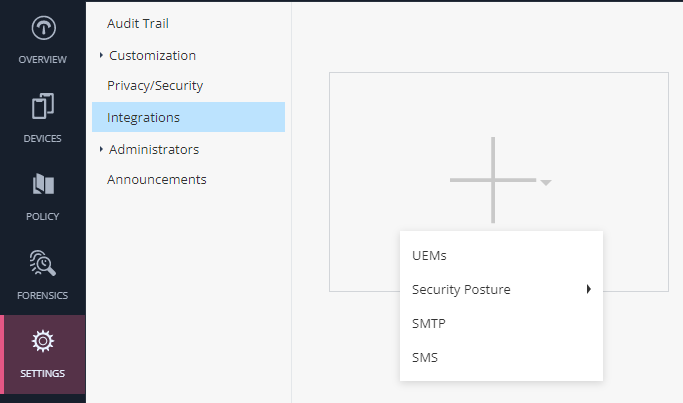
The SMTP window appears.

-
Configure Server Details:
-
SMTP transport for ports 25 and 587.
-
SMTPS transport for port 465.
-
-
To use the connector with an on-premises UEM without a direct internet connection, select the checkbox under Using Connector section.
-
Click Test Connectivity.
If there are no errors, click Apply.
-
Working with a Proxy
To connect a proxy from the Mobile Security Connector to the internet or to the UEM:
-
Log in to the VM through
ssh. -
Update the settings to access Mobile Security dashboard through the proxy.
-
Open this settings file:
vi /opt/CPsbmc/components/pii_protector/application.yml
-
Update the relevant settings in the file (server > Proxy), for example:
proxy:
         enabled: true
         host: "myproxy.mydomain.com"
         port: 8080
         authentication-required: true
         user: "proxy_user"
         password: "proxy_password"
-
-
Update the settings to access the Mobile Security Connector cloud component through the proxy.
-
Open this settings file:
vi /opt/CPsbmc/components/api_dispatcher/application.yml -
Update the relevant settings in the file:
-
relay Proxy:
Example:
proxy:
        enable: true
        host: "myproxy.mydomain.com"
        port: 8080
        username: "proxy_user"
password: "proxy_password" -
MDM Proxy:
If there is a proxy to connect to the UEM.Example:
proxy:
         enable: true
         host: "myproxy.mydomain.com"
         port: 8080
         username: "proxy_user"
         password: "proxy_password"
-
-
Using a UEM with a Self-Signed Certificate
To use a UEM server with a self-signed certificate (not signed with a valid Certificate Authority):
-
Download the UEM certificate in a Privacy Enhanced Mail (PEM) format and copy it to the Mobile Security Connector server.
-
Connect to the VM through
sshwith your user credentials. -
Update the settings file to use the self-signed certificate:
-
Open the settings file:
vi /opt/CPsbmc/components/api_dispatcher/application.yml -
When you connect to the UEM, use the self-signed certificate.
mdm > ssl >use_self_sign_certificatePath to the UEM certificate:
mdm > ssl >certificate_pathExample:
use_self_sign_certificate: true
certificate_path: "/web/conf/my_uem_certificate.pem"
Note - The option to disable the SSL verification to the MSD should be used only in Proof of Concept (POC) and not in production.
-
Setting up High Availability for the Connector
|
|
Note - Mobile Security Connector was formerly called Harmony Mobile Connector. |
To set up a high availability for the Mobile Security Connector:
-
Create a copy of the existing VM that runs the Mobile Security Connector.
-
Change the new VM IP address (in Gaia).
In clish:
show interface eth0
set interface eth0 ipv4-address <ip> mask length <16/23>
save config -
Add the new IP address to the UEM settings in Mobile Security dashboard.
Viewing Connector
To set up a new viewing connector (an instance without API dispatcher. Read-only):
-
Follow the steps in Setting up High Availability for the Connector to set up the additional Mobile Security Connector VM.
-
In the Expert mode, on the Mobile Security Connector, run these commands:
-
To restart SBMC:
sbmc_stop; sbmc_start
-
To deactivate api_dispatcher:
-
-
source /opt/CPsbmc/scripts/sbmc_functions.sh
-
stop_component api_dispatcher
Upgrading Mobile Security Connector from R80.40 to R81.20
|
|
Note - Mobile Security Connector was formerly called Harmony Mobile Connector. |
-
Create a snapshot of the current R80.40 virtual machine.
-
Pause MDM sync in Mobile Security Administrator Portal:
-
Sign in to Check Point Portal.
-
In the Mobile Security Administrator Portal, go to Settings > Integrations.
-
Hover over the MDM card and click
 and then click Pause.
-
-
In the Mobile Security Administrator Portal, go to Settings > Audit Trail and check if there is any active MDM device sync:
-
Click the
 icon above the table.
 -
In the Filters panel on the right, expand Category and filter for MDM device sync.
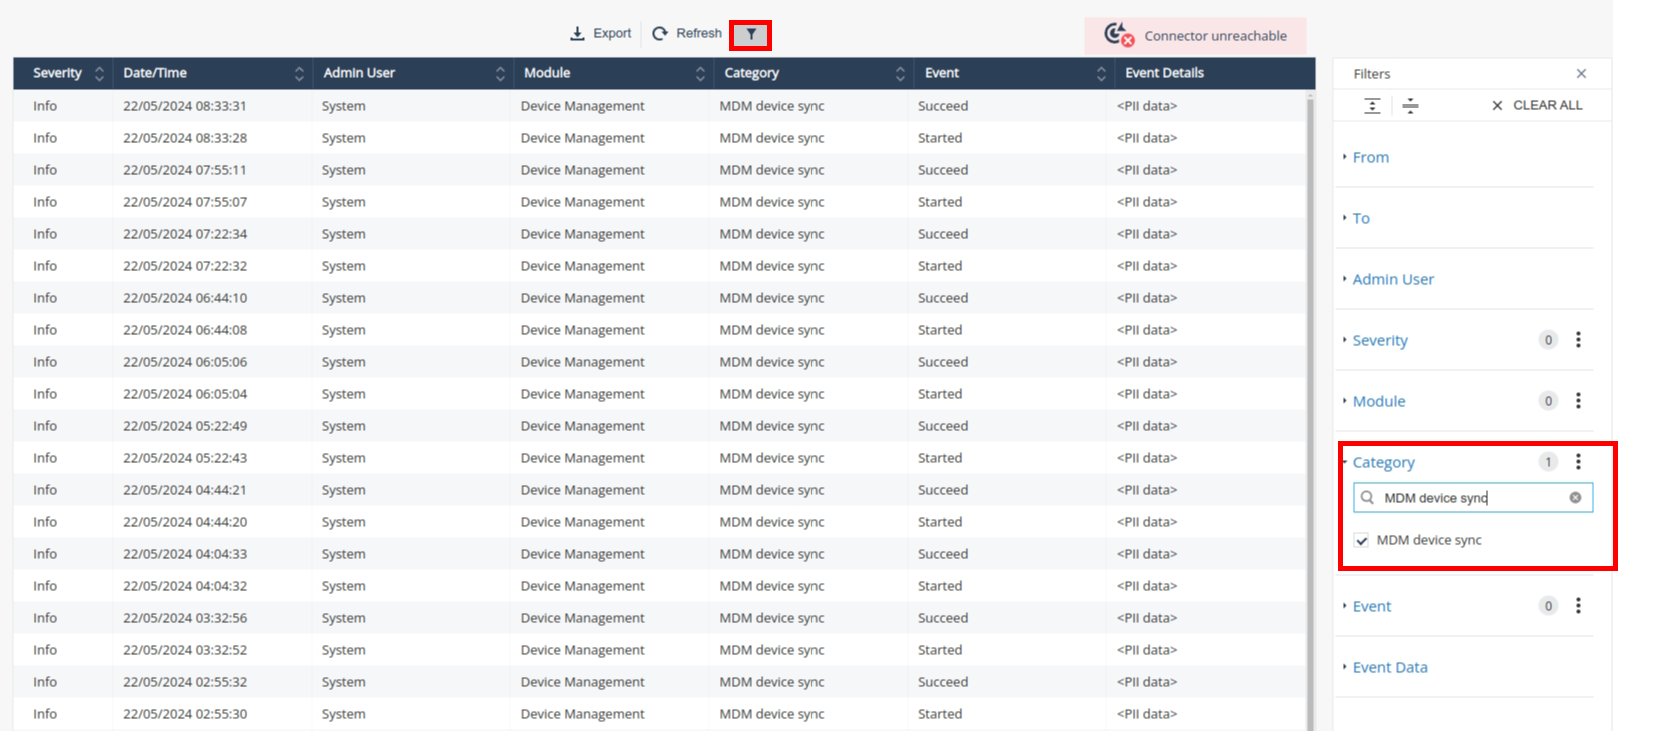
If there is an active MDM device sync (Event column shows as Started), wait until the sync ends (Event column shows as Succeed).
Refresh the page to view the current sync status.
Note - The MDM device sync process may take up to 24 hours depending on the number of devices. If the sync status is not shown as Succeed after 24 hours, you may continue the upgrade process.
Note - If you are setting up Gaia R81.20 on a new VM, skip the steps below and go toUpgrading Mobile Security Connector from R80.40 to R81.20 - Setting up a new VM.
-
-
Connect to the Gaia virtual machine through ssh and log in to Expert mode with your username and password.
-
Before you upgrade, make sure the partition /var/log/ has a minimum of 20 GB of free space:
-
To view partition size, run:
df-h -
Verify whether the partition /var/log/ has a minimum of 20 GB of free space.
-
If partition resize is required:
-
Log in to the Gaia VM through ssh and run:
lvm_manager -
Select option 2
resize lv_current/lv_log ligical volume -
Select option 2
lv_log -
Follow the instructions displayed on the terminal.
After the process is successfully completed, Gaia notifies it and performs a restart.
-
To validate whether the partition is resized, run:
df-h
-
-
-
Verify if you have installed any CA certificates in the Gaia VM Java truststore. For each CA, run:
keytool-list-keystore $JAVA_HOME/lib/security/cacerts-storepass changeit | grep <CA SHA1 finger print>If you have installed any CA certificates, make a note of them.
Note - All CA certificates installed in the Gaia VM Java truststore will be deleted during the upgrade process to Gaia R81.20. You must re-install them after you complete the upgrade.
-
Log in to the Gaia VM through ssh.
-
Run this script to back up the configuration files:
SBMCBACKUPDIR=/var/log/SBMCBACKUPmkdir $SBMCBACKUPDIRcp $SBMCDIR/components/api_dispatcher/application.yml $SBMCBACKUPDIR/api_dispatcher_application.ymlcp $SBMCDIR/components/pii_protector/application.yml $SBMCBACKUPDIR/pii_protector_application.ymlcp-r $SBMCDIR/components/pii_filter/conf $SBMCBACKUPDIR/confcp /web/conf/sbmc_private_key.pem $SBMCBACKUPDIR/sbmc_private_key.pemcp /web/conf/sbmc_public_key.pub $SBMCBACKUPDIR/sbmc_public_key.pubcp $SBMCDIR/components/directory_service/application.yml $SBMCBACKUPDIR/directory_service_application.ymlcp-r $SBMCDIR/log $SBMCBACKUPDIR/log -
Upgrade to R81.20:
-
Log in to Gaia:
https://<gaia_vm_ip>Username - The admin username set when you installed Gaia
Password - The password set when you installed Gaia.
-
On the left panel, under Upgrades (CPUSE), click Status and Actions.
-
Right-click R81.20 Gaia Fresh install and upgrade and click Download.

-
After the file is downloaded, right-click the record and click Upgrade.
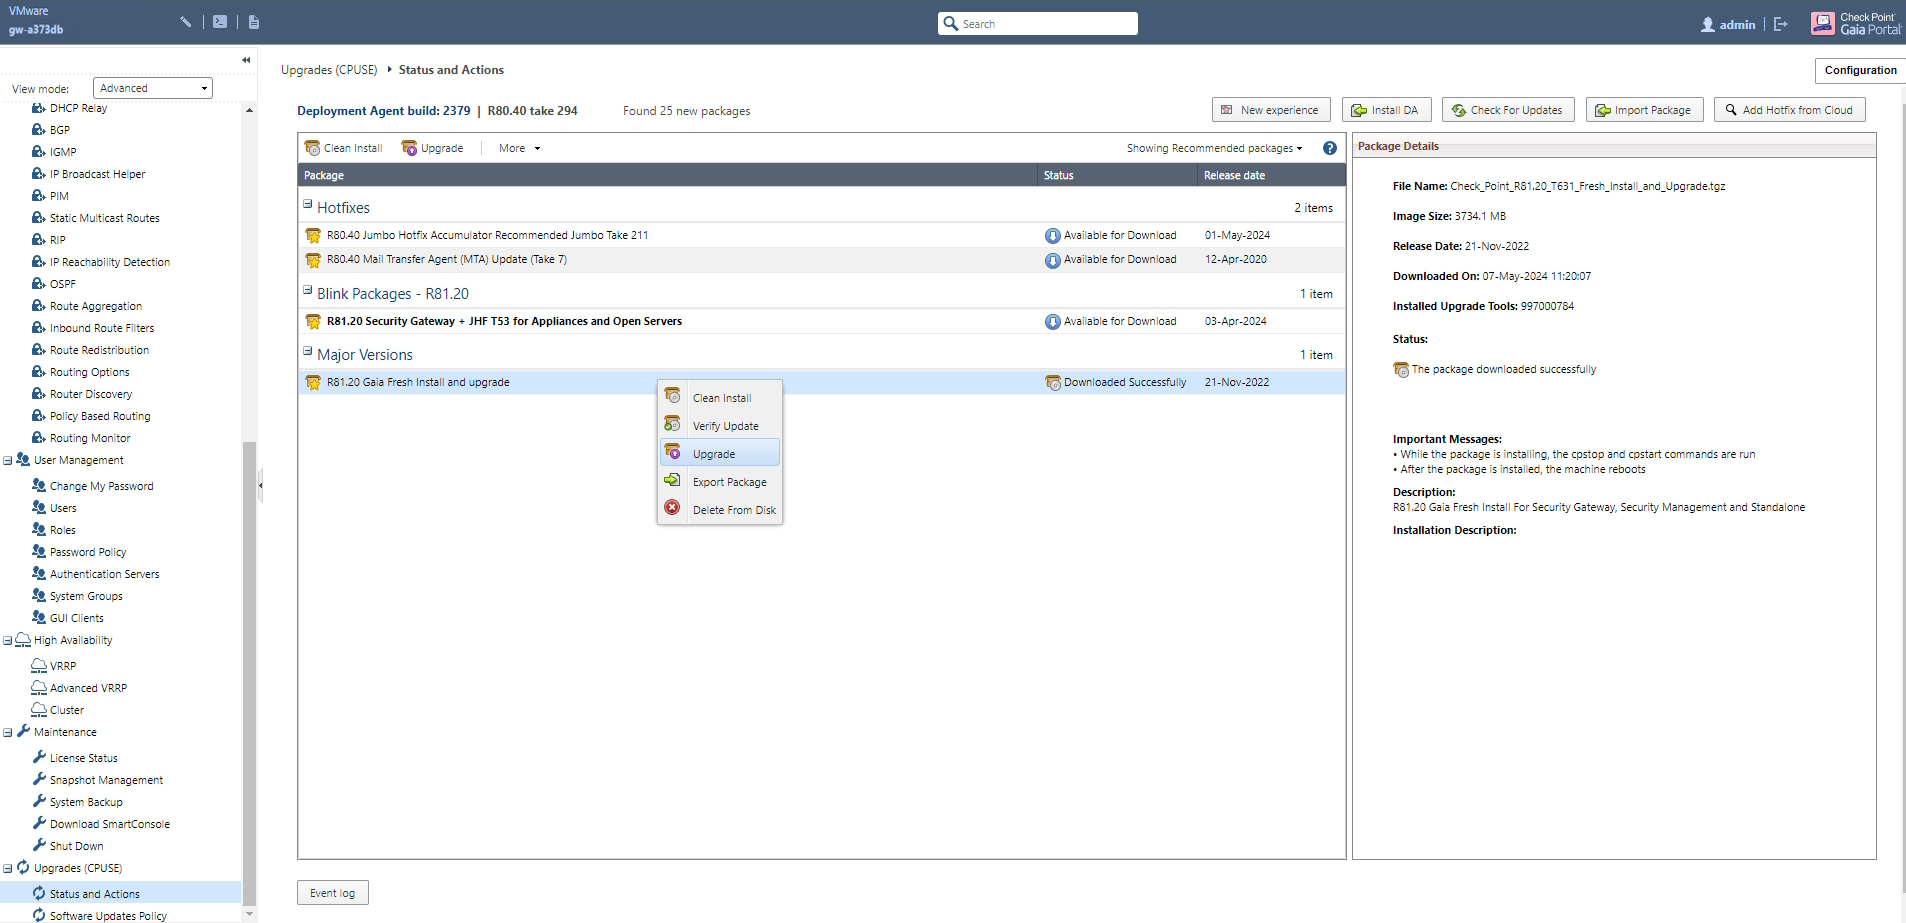
Note - The upgrade process takes about 60 minutes.
After the upgrade process starts (approximately after two minutes), this warning pop-up may appear. Click Continue.

-
-
Install the Mobile Security Connector. Follow step 1-9 in Installing and Configuring Mobile Security Connector.

Important - Make sure to install the relevant jumbo hotfix and reboot Gaia after installing Connector hotfix.
-
Connect to the Gaia VM through ssh and backup R81.20 Connector application yml files. Run:
SBMCBACKUPDIR=/var/log/SBMCBACKUPcp $SBMCDIR/components/api_dispatcher/application.yml $SBMCBACKUPDIR/api_dispatcher_application_r81_20.ymlcp $SBMCDIR/components/pii_protector/application.yml $SBMCBACKUPDIR/pii_protector_application_r81_20.ymlcp $SBMCDIR/components/directory_service/application.yml $SBMCBACKUPDIR/directory_service_application_r81_20.yml -
Restore the backed up files from previous R80.40 Connector installation. Run:
SBMCBACKUPDIR=/var/log/SBMCBACKUPcp $SBMCBACKUPDIR/sbmc_private_key.pem /web/conf/sbmc_private_key.pemcp $SBMCBACKUPDIR/sbmc_public_key.pub /web/conf/sbmc_public_key.pubrm-rf $SBMCDIR/components/pii_filter/confcp-r $SBMCBACKUPDIR/conf $SBMCDIR/components/pii_filter/conf -
Edit
application.ymlfiles:
Note - Do not change the structure or order of the file content. Copy only the values you updated in the original file and that are mentioned in this guide.
-
Update the
$SBMCDIR/components/api_dispatcher/application.ymlconfiguration file with the relevant values from$SBMCBACKUPDIR/api_dispatcher_application.yml -
Update the
$SBMCDIR/components/pii_protector/application.ymlconfiguration file with the relevant values from$SBMCBACKUPDIR/pii_protector_application.yml -
Update the
$SBMCDIR/components/directory_service/application.yml
configuration file with the relevant values from$SBMCBACKUPDIR/directory_service_application.yml
-
-
Restart SBMC:
sbmc_stop
sbmc_start
-
Re-install the CA certificates (noted in step 6) in the Gaia VM Java truststore. See sk182094.
-
Start MDM sync in Mobile Security Administrator Portal:
-
Go to Settings > Integrations.
-
Hover over the MDM card and click
and then click Sync Now.
-
Upgrading Mobile Security Connector from R80.40 to R81.20 - Setting up a new VM
|
|
Important - Before you start the procedure below, make sure you have done steps 1-3 in Upgrading Mobile Security Connector from R80.40 to R81.20. |
-
Install Mobile Security Connector on the new Gaia R81.20 VM. Follow step 1-9 in Installing and Configuring Mobile Security Connector.
-
Log in to Gaia R81.20 VM through ssh.
-
Backup R81.20 Connector application yml files and
pii_filter conffolder. Run:SBMCBACKUPDIR=/var/log/SBMCBACKUP mkdir $SBMCBACKUPDIR cp -r $SBMCDIR/components/pii_filter/conf $SBMCBACKUPDIR/conf cp $SBMCDIR/components/api_dispatcher/application.yml $SBMCBACKUPDIR/api_dispatcher_application_r81_20.yml cp $SBMCDIR/components/pii_protector/application.yml $SBMCBACKUPDIR/pii_protector_application_r81_20.yml cp $SBMCDIR/components/directory_service/application.yml $SBMCBACKUPDIR/directory_service_application_r81_20.yml
-
Log in to your currently configured Connector on Gaia R80.40 VM through ssh.
-
Stop the Connector to prevent PII data loss. Run:
sbmc_stop -
Backup R80.40 Connector
pii_filter conffolder. Run:SBMCBACKUPDIR=/var/log/SBMCBACKUP mkdir $SBMCBACKUPDIR cp -r $SBMCDIR/components/pii_filter/conf $SBMCBACKUPDIR/conf
-
Replace the files in
$SBMCDIR/components/pii_filter/conffolder on R81.20 VM with the files from Gaia R80.40 VM (same folder). -
Follow steps 1-3 in Configure the Mobile Security Connector.
-
Edit these Gaia R81.20 VM Connector
application.ymlfiles:
Note - Do not change the structure or order of the file content. Copy only the values you updated in the original file (on Gaia R80.40 VM) and that are mentioned in this guide.
-
$SBMCDIR/components/api_dispatcher/application.yml -
$SBMCDIR/components/pii_protector/application.yml -
$SBMCDIR/components/directory_service/application.yml
-
-
Restart SBMC:
sbmc_stop
sbmc_start
-
Verify if you have installed any CA certificates in the R80.40 Gaia VM Java truststore.
If you have installed any CA certificates, make a note of them. You need to install them on the new R81.20 VM. For more information, see sk182094.
-
Go to Mobile Security Administrator Portal > Settings > Integrations and update the Connector Configuration with R81.20 VM information:

-
Public key - Upload or copy and paste the public key from Install and Configure Mobile Security Connector section.
-
In Server Address and in HA Server Address (optional), enter the Mobile Security Connector Virtual Machine address in this format:
https://<url or ip_address>/pii_protector -
Click Save.
-
-
Verify whether all PII data is shown as decrypted in Mobile Security Administrator Portal.
Important - If the PII data is not decrypted properly, do not proceed to the next step. Contact Check Point Support to verify the new Connector configuration. Proceeding without resolving this issue may result in loss of devices' decryption information.
-
Start MDM sync in Mobile Security Administrator Portal:
-
Go to Settings > Integrations.
-
Hover over the MDM card and click
 and then click Sync Now.
-
Saving the Encrypted MDM Password
To save the encrypted MDM password in the Connector configuration files:
-
Connect to the VM through
sshand log in to Expert mode. -
Run this command and replace <mdm_password> with your MDM password:
curl_cli --request POST 'http://localhost:7777/json_map?action=hide' --header 'Content-Type: application/json' --data-raw '{"fields":[{"id":"PASSWORD","value":"<mdm_password>","type":"USERNAME"}]}'The output displayed is the encrypted password.
Note - To successfully run the command, make sure to enter the correct input parameters and avoid extra space characters.
-
Edit the settings file
vi /opt/CPsbmc/components/api_dispatcher/application.ymland paste the output password to the relevant MDM configuration.Example:
mdm:
    credentials:
                the relevant mdm you use:
                         password: <paste output password here>