Privacy/Security
Central HTTPS Inspection Root CA
You can generate a centralized root CA certificate for HTTPS inspection to use across all policies in your account. Once generated, you can upload the certificate to your UEM![]() Unified Endpoint Management. An architecture and approach that controls different types of devices such as computers, smartphones and IoT devices from a centralized command point. for deployment to end-user devices.
Unified Endpoint Management. An architecture and approach that controls different types of devices such as computers, smartphones and IoT devices from a centralized command point. for deployment to end-user devices.
Prerequisite
To generate the centralized CA certificate, you must have one of these roles:
-
Admin role in Global Role
-
Admin or Super User role in Specific Service Roles
To generate a centralized root CA certificate:
-
Go to Settings > Privacy/Security.
-
In the Central HTTPS Inspection Root CA section, click Generate Certificate.

-
Do one of these:
-
To generate a CA certificate issued by Check Point, click Generate CA Certificate.
The system generates a certificate valid for one year from the generation date, as shown in Expiration date.

Note - Check Point recommends you renew the CA certificate at least two weeks before the expiration date. To renew the CA certificate, see sk181288.
-
To use a self-signed or a third-party CA certificate, click Upload CA Certificate.
-
In the pop-up window, upload the certificate.
Note -
For the Transport Layer Security (TLS
 Transport Layer Security. A security protocol designed to facilitate privacy and data security for communications over the Internet.) certificate to be valid:
-
The certificate must have a lifecycle of at least 30 days and not longer than 390 days.
-
The certificate must be valid for more than 30 days from the time it is uploaded to the Mobile Security Administrator Portal.
-
-
Enter the certificate password.
-
Click Verify.
-
If there are no errors, click Add.
-
-
-
If you have generated a CA certificate by Check Point, click Download Certificate.
The system downloads the certificate to your computer.
-
Upload the new certificate to the UEM.
For more information, see CA Certificate Deployment Using the UEM section for the relevant UEM in Mobile Security Integration Guide.
-
To revoke the certificate, click Revoke Certificate.

Important - Revoking the centralized certificate will remove it from all policies that use it.
To apply the centralized CA certificate to multiple policies in your tenant, go to HTTPS Settings in Network Protection settings.
Privacy/Security
BYOD Privacy Mode
When you enable BYOD Privacy Mode, administrators can only see that a malicious threat exists, but they cannot see the user affected by it. This ensures the highest user privacy when needed.
BYOD Privacy Mode Disabled:
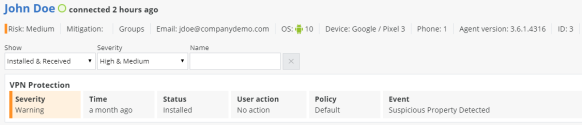
When BYOD Privacy Mode is disabled, the Events & Alerts tab shows the Device Owner and Device Number fields as configured in the Devices tab.

BYOD Privacy Mode Enabled:
When BYOD Privacy Mode is enabled, the Events & Alerts tab does not show the Device Owner and Device ID Number field.
Example:

BYOD Privacy Mode Disabled:
When BYOD Privacy Mode is disabled, the Device Details show the app(s) that put this device at high risk.
BYOD Privacy Mode Enabled:
When BYOD Privacy Mode is enabled, the Device Details does not show the app(s) that put this device at high risk. The administrator will only see that the device is at risk, and its risk level, but not the reason.

BYOD Privacy Mode Disabled:
When BYOD Privacy Mode is disabled, the drill-down into the App Analysis information about the App at Risk displays the app Owner Details.

BYOD Privacy Mode Enabled:
When BYOD Privacy Mode is enabled, the drill-down into the App Analysis information about the App at Risk does not display the app Owner Details.
Enable PII Decryption
Select this checkbox to enable the decryption of Personal Identifiable Information (PII) when you integrate with a Check PointMobile SecurityConnector installed on-premises. For more information on Mobile Security Connector installation, see Harmony Mobile Connector Installation Guide.
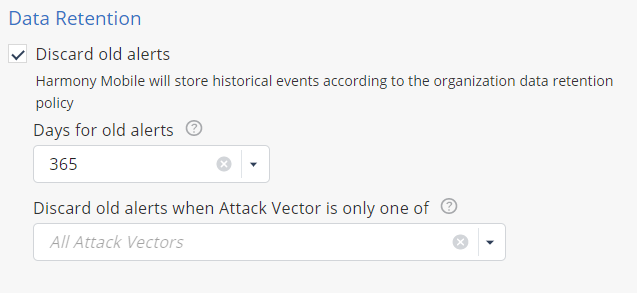
Data Retention
In this section, you can set the time period to discard old alerts. You can also configure it by attack vector.