Devices
The Devices tab lists all organization-protected devices without filters. From this tab, you can add new devices, edit, import and export their details, and remove devices.

|
|
Note - For environments equipped with a Mobile Security Connector and with PII decryption enabled, an icon reflecting the status of the Connector appears on the top-right corner of the Devices screen.
|

The Devices table shows:
|
Item |
Description |
||
|---|---|---|---|
|
ID |
A unique ID generated for each device upon installation of the Harmony Mobile Protect app. The system uses it as a reference to the device (instead of the device actual details for privacy). You can click device IDs that require attention to view the Events & Alerts page filtered for the device. |
||
|
Name (Device Owner) |
Device name given by the administrator when you send the registration link (or by UEM |
||
|
|
The email address registered to the device. When a new device is added, the system sends an email to the email address defined in the registration wizard. Any user logged in to a device using this email address receives a registration request and are directed to download the App from the Google Play Store (for Android) or the Apple App Store (for iOS).
|
||
|
Device Number |
The phone number of the device. It is configured by the administrator or set in UEM during the app installation link creation. This field is optional and is used only for identifying the device; it is not used by the system. |
||
|
OS |
The mobile device's operation system, based on the information received during Harmony Mobile Protect app installation. Values include:
|
||
|
Device Details |
Shows mobile device details such as device manufacturer and model, based on the information received post Harmony Mobile Protect app installation. |
||
|
OS Version |
OS Version on the mobile device, based on the information received post Harmony Mobile Protect installation. |
||
|
Installed Patch |
The security patch version installed on the Android device. |
||
|
Client Version |
The Harmony Mobile Protect app version currently installed on the mobile device. |
||
|
Status |
Displays the current status of the device:
|
||
|
Last Seen |
Indicates one of these:
|
||
|
Member of |
The device groups to which the device is added. Device groups imported from UEM are labeled with the UEM logo. |
||
|
Policy |
Policy enforced on the device.
|
||
|
UEM |
UEM that manages the device. |

Adding a New Device
Overview
You can register devices in the dashboard by:
-
Sending an invitation email from the Devices tab.
The system sends the invitation to the registered email address that users must access from their device. To customize the email content, see Configuring Email and SMS Templates.
-
For iOS devices - Users are redirected to install the Harmony Mobile Protect app from the App Store or to download the Enterprise signed App from the dashboard, based on the dashboard settings configured by Check Point. After installation, users must do the following to activate the app:
-
Download iOS agent from the dashboard.
-
Trust the Enterprise app.
-
Enter the server details and registration code from the registration email.
For more information, see Harmony Mobile Protect app for iOS User Guide.
-
-
For Android devices - Users are redirected to Google Play Store to download the Harmony Mobile Protect app. The system automatically enters all registration information when using the download link in the email from the device.
For more information, see Harmony Mobile Protect app for Android User Guide.
-
-
Adding devices through UEMs. For more information, refer to the specific UEM in the Mobile Security UEM Integration Guide.
|
|
Note - Harmony Mobile Protect app requires certain permissions for the Mobile Security solution to operate on the end-user device. For more information, see Appendix D - Permissions for Harmony Mobile Protect app. |
Procedure
-
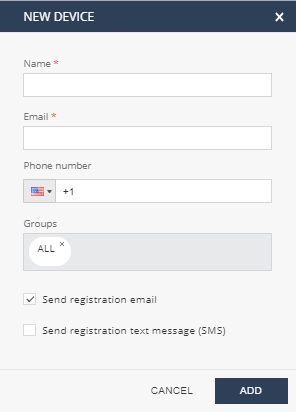
Go to Devices > New and click Add new device.
The New Device window appears.
-
Do these:
-
In the Name field, enter the device name.
-
In the Email field, enter the email address of the device owner.
-
In the Phone number field, enter the phone number of the device owner.
-
In the Group field, enter the device groups to which you want to add the device.
-
-
Click Add.
-
The system sends an email with the registration details and instructions to install the Harmony Mobile Protect app.
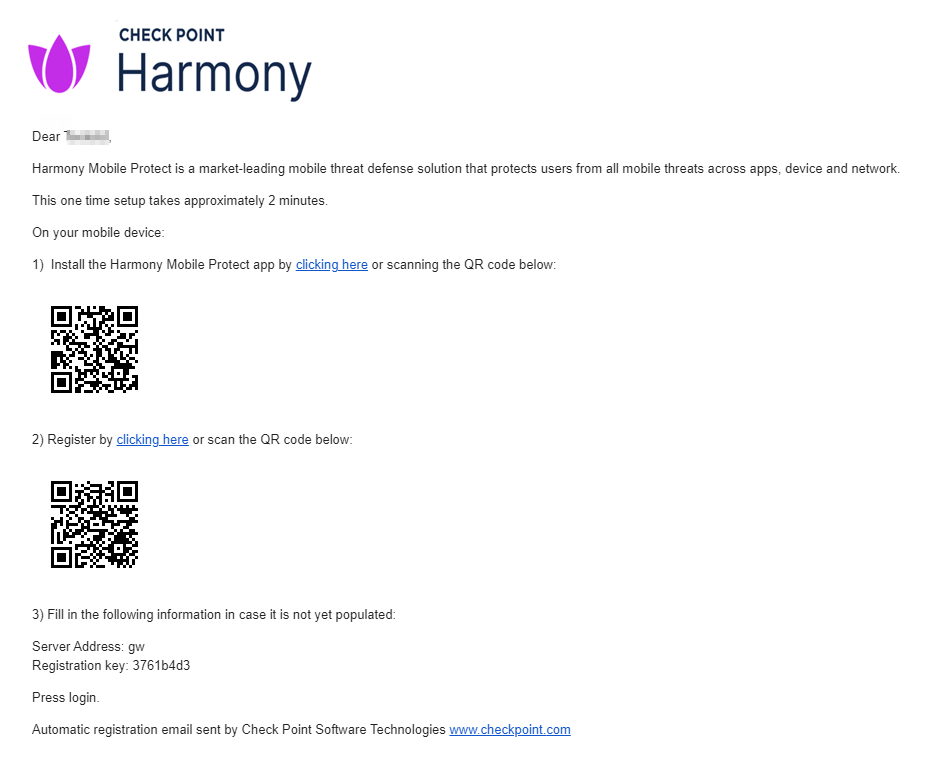
When the device is added to the dashboard, an entry appears in the Devices table with a unique device ID. The device status is displayed as User Notified until the Harmony Mobile Protect app is installed and the device has communicated with the dashboard.

When the App is successfully installed and run from the device, the registration screen appears.
If the registration is successful, the app performs a full device scan automatically. If no malware or malicious configurations are found, the app status appears in green. If the communication with the dashboard is successful, the device entry changes from User Notified to Active, and the device details gets updated.

-
To import devices in bulk from a CSV file, click Import from file.

Important - CSV file format requirements:
-
The file must have a header row in this format:
name,email,number,group,send_reg_email,send_reg_sms -
Mandatory fields:
-
name -
email -
send_reg_email -
send_reg_sms
-
-
If
send_reg_smsis defined as TRUE, you must provide a phone number. -
Use uppercase for TRUE/FALSE
-
For the
groupfield, no need to add the All group in the CSV file as the system adds it automatically. Add only the required additional groups.
Sample CSV template:
name,email,number,group,send_reg_email,send_reg_smsJohn Smith,John@checkpoint.com,+123,,TRUE,TRUEAdam Smith,Adam@checkpoint.com,,Test-Group,TRUE,FALSE -
-
Select the file and click OK.
The system imports the device details to the Devices table.
Adding a Device Group
You can assign devices to appropriate device group when you add them to the system. You can also assign a group to the existing device.
To add a device group:
-
Go to Devices > Groups.

-
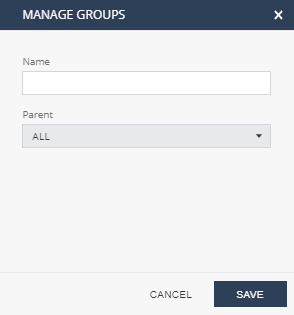
In the Manage Groups window, click
 .
. 
-
Enter the Name of the group and select the Parent group.
-
Click Save.
Devices and device groups are imported from the Device Management platform during the integration.
Viewing Connected UEMs
The Connected UEMs option allows you to view the sync status of the UEMs integrated with your tenant.
To view the connected UEMs:
-
Go to Devices > Connected UEM.
The system shows a log of UEM syncs.
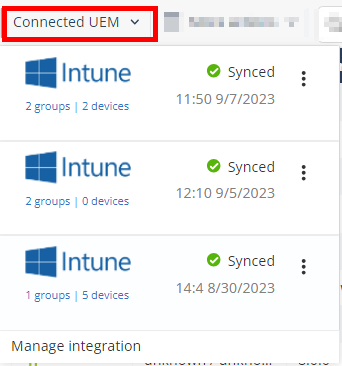
-
To force an immediate device sync without waiting for the next auto sync cycle, click
 and then Sync now.
 -
To temporarily stop or resume the device sync process, click
and then click Pause or Resume.
More Actions to Manage Devices
Go to Devices and click More actions.
Editing a Device
-
Select the device and click More actions > Edit.
The Edit Device window appears.

-
Enter the required details and click Apply.
Generating a Registration Code to Enroll a New Device
-
Select the device and click More actions > Registration code.
The Registration Code window appears.
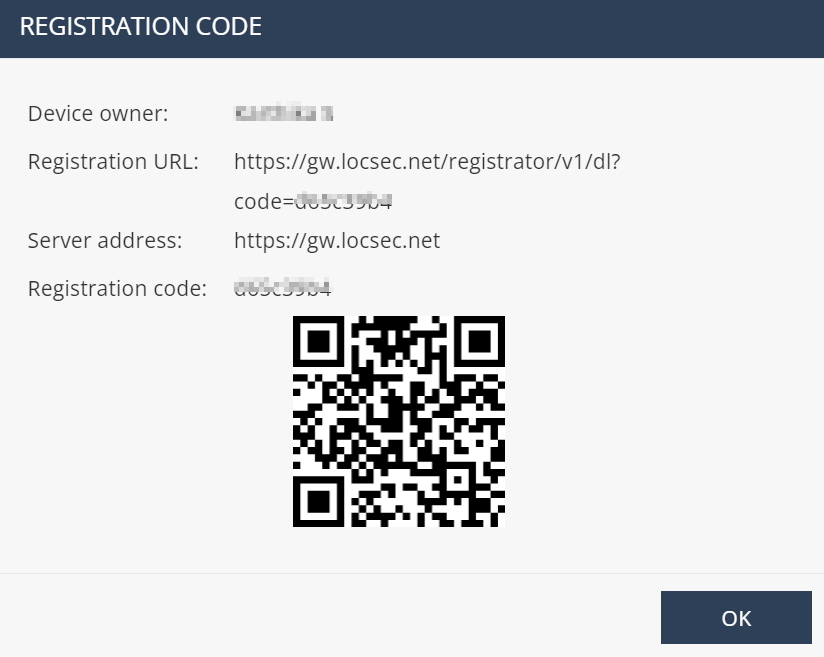
-
Access the Registration URL or scan the QR code on your mobile device.
-
Click OK.
Renewing an Existing Device
The Renew option allows you to renew a device. It deletes a device, automatically adds the same device and send the registration information to the user, all in one click.
To renew a device:
-
Select the device and click More actions > Renew.
The confirmation window appears.
-
Select the method to send registration information to the user and then click Yes.
The system deletes the device, automatically adds the device in the Mobile Security Administrator Portal with Status as User Notified and sends the registration information to the user.
Resending Activation Information to Provisioned Devices
-
Select the device and click More actions > Resend Activation.
The Resend Activation window appears.
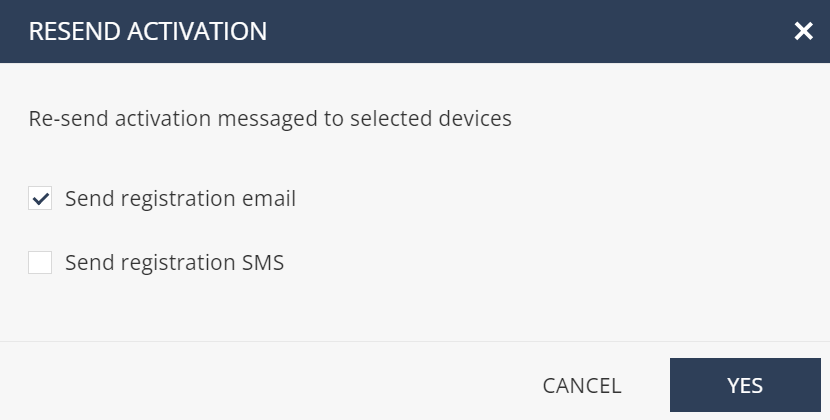
-
Select the method to send registration information to the user and then click Yes.
The system sends the registration information to the user.
Adding/Removing Devices in a Device Group
|
|
Note - This procedure applies only to groups and devices added locally in the Mobile Security Administrator Portal. |
-
In the Devices table, select the devices you want to add or remove.
-
Click More actions > Assign or remove devices from group.
The Add / Remove Devices From Group window appears.
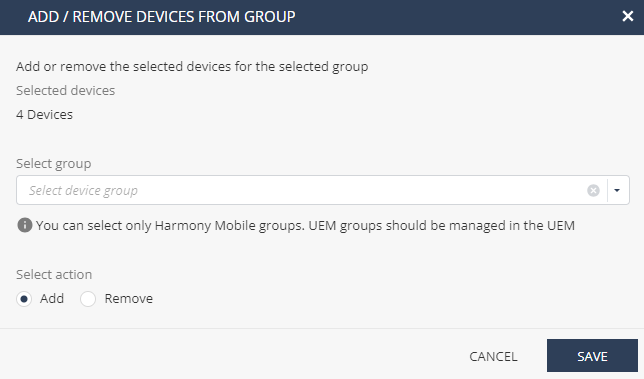
-
Select the device group and the required action.
-
Click Save.
Exporting Devices Information
-
In the Devices table, select the devices you want to export.
-
Click More actions > Export.
The Export Devices window appears.
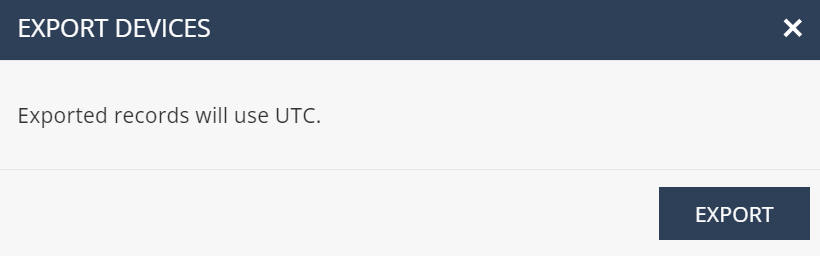
-
Click Export.
The system generates and downloads a CSV file with the device information.
If the number of devices exceeds 10,000, processing the data may take time. So the export is performed offline and an email is sent to the registered address with the link to download the CSV file. The link is valid for 7 days. For privacy reasons, PII data is obfuscated in the CSV file.
-
Click Done.
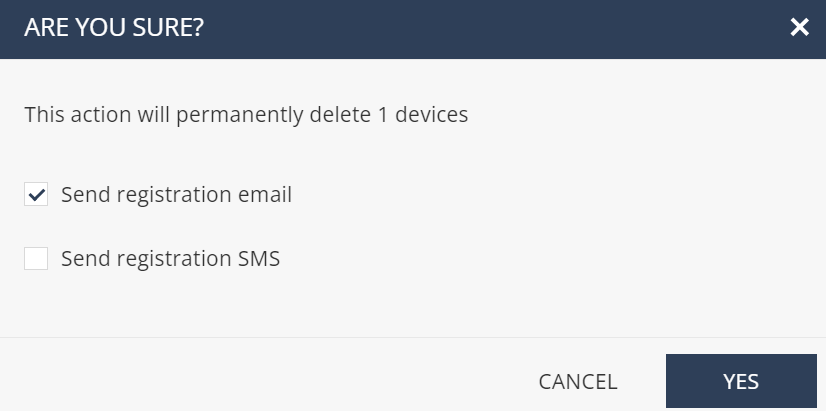
Deleting a Device
-
In the Devices table, select the devices you want to delete.
-
Click More actions > Delete.
The confirmation window appears.
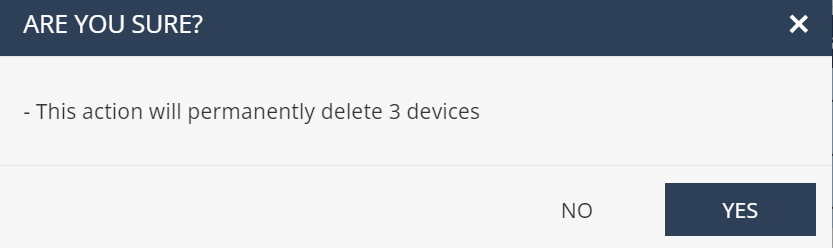
-
Click Yes.
The system deletes the devices from the Mobile Security Administrator Portal.
Sending Notification to Devices
|
|
Note - You can send notifications only to devices with Status as Active. |
-
Select the devices from the Devices table.
-
Click More actions > Send notification to devices.
The Send Notification to Devices window appears.
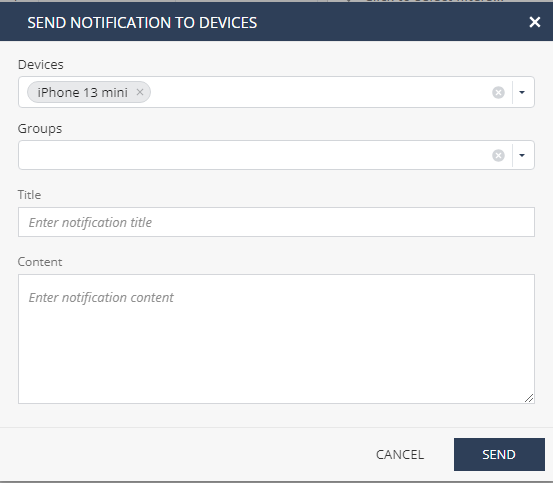
- To send the notification to specific devices, from the Devices list, select the devices.
-
To send the notification to devices in a device group, from the Groups list, select the device group(s).
-
In the Title field, enter a title for the notification.
-
In the Content field, enter the message you want to notify the user.
-
Click Send.
The system sends the notification to the selected device/device groups.
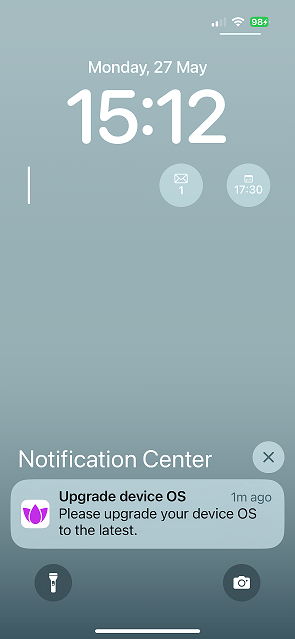

Note - Due to limitations with Android and iOS, Check Point cannot guarantee that notifications will be received or read on mobile devices.
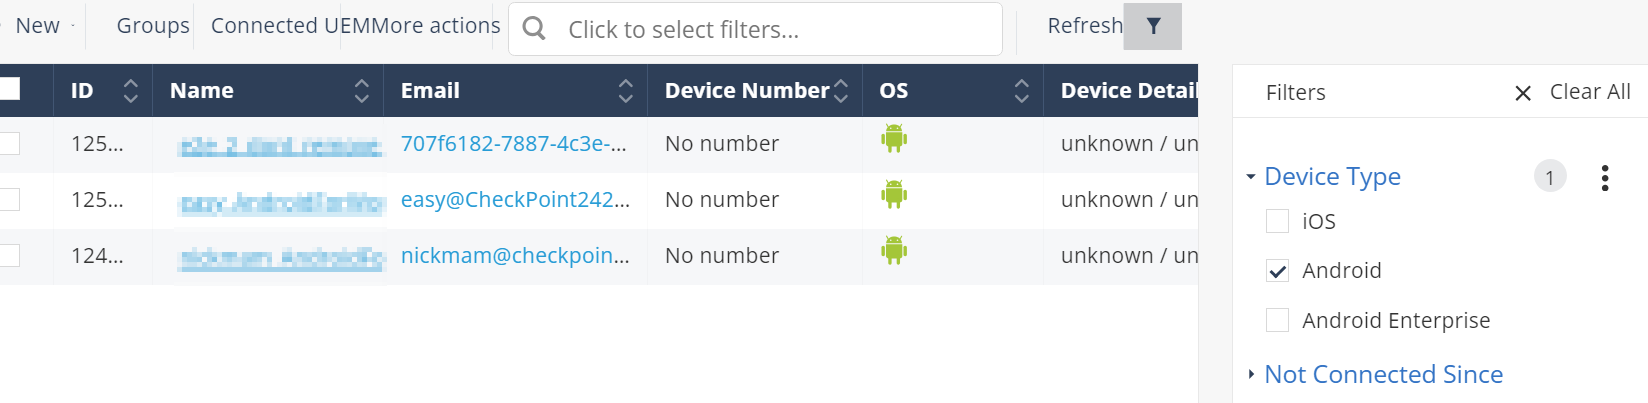
Filtering Devices
To filter the Devices table:
-
Click
 above the Devices table.
 -
On the Filters pane on the right side, select the required filters.
The Devices table shows information based on the selected filters.