Compliance Logs
Compliance![]() Check Point Software Blade on a Management Server to view and apply the Security Best Practices to the managed Security Gateways. This Software Blade includes a library of Check Point-defined Security Best Practices to use as a baseline for good Security Gateway and Policy configuration. Logs show the compliance status of the devices in your organization based on the Desktop Device Posture settings.
Check Point Software Blade on a Management Server to view and apply the Security Best Practices to the managed Security Gateways. This Software Blade includes a library of Check Point-defined Security Best Practices to use as a baseline for good Security Gateway and Policy configuration. Logs show the compliance status of the devices in your organization based on the Desktop Device Posture settings.
|
|
Note - The system logs the event whenever there is a change in the device's compliance status. If there is no change in the device's compliance status in last 24 hours, then the current status is logged. |

To view the Compliance Logs page, go to Logs & Events > Internet & Network Access > Compliance Logs.

| Item | Description |
|---|---|
| Scan time | Date and time when the compliance scan was performed. |
| Status |
Compliance status of the device based on the Desktop Device Posture settings. The supported values are:
|
| User | Email address of the user associated with the device. |
| Device name | Device name. |
| Agent version | Harmony Connect Agent version installed on the device. |
| Origin |
Reason that initiated the compliance scan. The supported values are:
|
| Scan id | A unique ID that identifies the scan (generated by Harmony Connect). Share the ID with Check Point Support in case of an issue for troubleshooting. |
| Operating system | Operating system running on the device. |
|
Agent id |
ID of the Harmony Connect Agent installed on the device. |
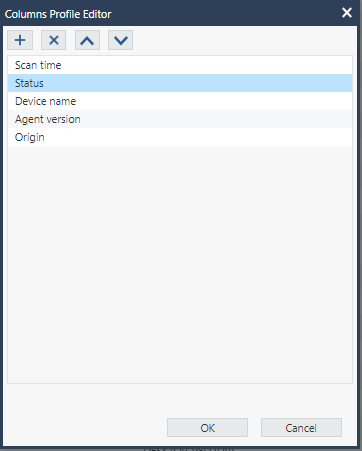
To add, remove or arrange the order of columns:
-
Right-click the header row and click Columns Profile Editor.
The Columns Profile Editor window appears.
-
To add a predefined column to the table, click
 .
.-
Select the columns and click OK.
-
-
To remove a column from the table, select the column and click
 .
. -
To arrange the order of the column in the table, select the column and click
 or
or  .
. -
Click OK to close the window.
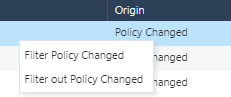
To filter the data in the table:
Right-click any value in the table and click Filter or Filter out. For example, to filter the data for Policy Changed, click Filter Policy Changed under the Origin column. To exclude Policy Changed data from the table, click Filter out Policy Changed.