Integrating Cloud Firewall Security NVA with Azure Virtual WAN
Step 1: Deploy Azure Virtual WAN
-
Log in to the Azure Portal, navigate to the Search resources bar, type Virtual WAN in the search box, and select Enter.

-
Select Virtual WANs if needed and select + Create on the Virtual WANs page.
-
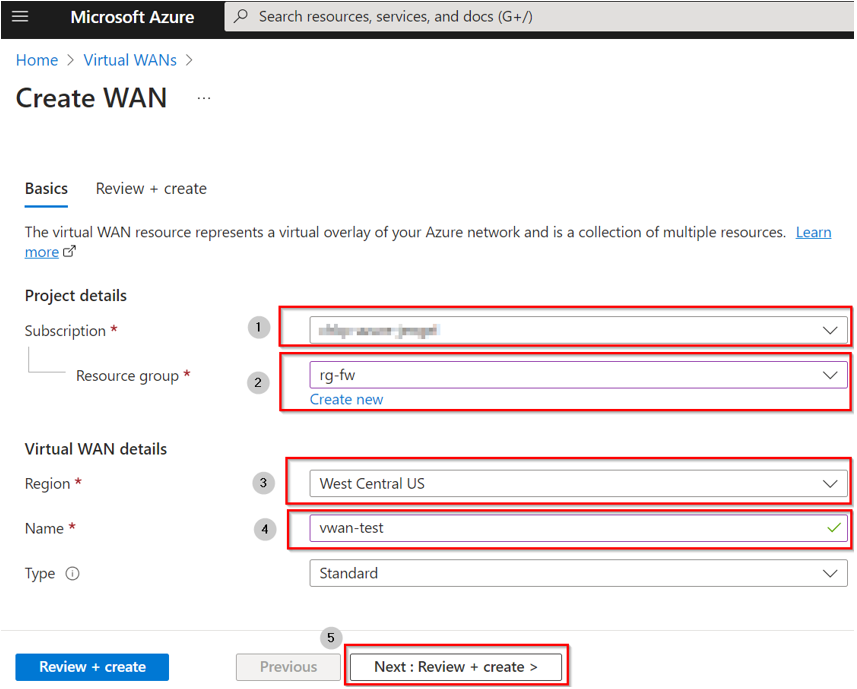
Fill in the necessary fields on the Create WAN page > Basics tab. Keep the Type option as Standard. Click Next : Review + create >.
-
When the validation passes, click Create to create the virtual WAN.
|
|
Important - Terraform and ARM
You can use these templates to automatically complete steps 2-7 of the main flow. |

Step 2: Create an Azure Virtual WAN Hub
-
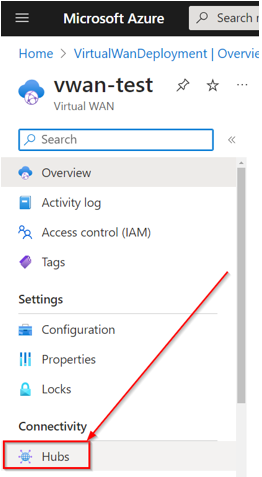
Navigate to the virtual WAN you created. On the virtual WAN left pane, below Connectivity, select Hubs.
-
On the Hubs page, select + New Hub to open the Create virtual hub page. Fill out the applicable fields:
-
Region: Select the region where you want to deploy the virtual hub.
-
Name: The name to assign to the virtual hub.
-
Hub private address space: The hub’s address range in CIDR notation. The minimum address space is /24 to create a hub.

Note - For the SD-WAN
 Software Defined – Wide Area Network (WAN), more information on this solution:
https://www.checkpoint.com/cyber-hub/network-security/what-is-sd-wan/ integration, the minimum address space is /16.
Software Defined – Wide Area Network (WAN), more information on this solution:
https://www.checkpoint.com/cyber-hub/network-security/what-is-sd-wan/ integration, the minimum address space is /16. -
Virtual hub capacity: Select from the drop-down. For more information, see Azure Virtual hub settings.
-
Hub routing preference: Leave as default. For more information, see Azure Virtual hub routing preference.
-
-
Once complete, select Review + create.

-
After validation passes, select Create. (Creating a new hub takes approximately 30 minutes).
-
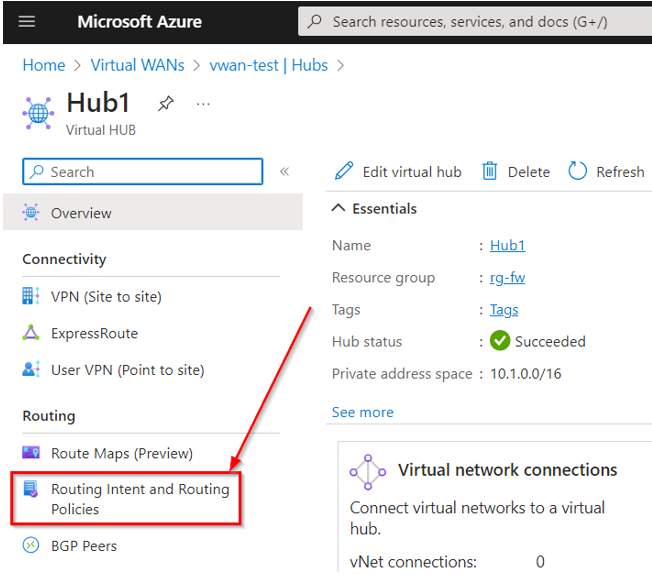
To validate that your Virtual Hub is successfully provisioned, navigate to your Virtual WAN below Connectivity > Hubs, and select the Hub you created.

-
Check the Routing status; if it is still Provisioning, do not proceed.
Once the Routing status states Provisioned, you can proceed to the next step.
|
|
Important - We strongly recommend using Cloud Firewall App to complete steps 3-7 of the main flow. The Cloud Firewall App is an automated deployment solution designed to streamline the installation and configuration of Cloud Firewall Gateways across multiple cloud environments. This application provides a simplified, wizard-driven interface that eliminates the need for extensive cloud expertise and Check Point product knowledge. For deployment and configuration instructions, see the Cloud Firewall App Administration Guide. |
Step 3: Add permissions to the user-assigned managed identity
To deploy an Cloud Firewall NVA, your subscription requires a user-assigned managed identity with these permissions:
-
Microsoft.Network/virtualHubs/read permission - on the hub where the NVA is created.
-
Microsoft.Network/publicIPAddresses/join/action permission - if a Public IP address is attached for Internet ingress.
|
|
Note - For guidance on creating a user-assigned managed identity, refer to the official Microsoft documentation. |
To assign the Microsoft.Network/virtualHubs/read permission to your user-assigned managed identity in Azure:
-
Go to the Azure portal.
-
Navigate to the Virtual Hub resource where you want to assign the permission.
-
Select Access control (IAM) from the left menu.
-
Click Add role assignment.
-
In the Role drop-down menu, select Reader.
-
In the Assign access to drop-down menu, select Managed identity.
-
Select the user-assigned managed identity you want to assign the role to.
-
Click Save to apply the changes.
To assign the Microsoft.Network/publicIPAddresses/join/action permission to your user-assigned managed identity in Azure:
-
Go to the Azure portal.
-
Navigate to the Public IP Address resource (if it exists), or to the resource group where it will be created.
-
Select Access control (IAM) from the left menu.
-
Click Add role assignment.
-
In the Role drop-down menu, select a custom role that includes the Microsoft.Network/publicIPAddresses/join/action permission.
If you prefer not to create a custom role, you can use the predefined Network Contributor role in Azure.
-
In the Assign access to drop-down menu, select Managed identity.
-
Select the user-assigned managed identity you want to assign the role to.
-
Click Save to apply the changes.
Step 4: Deploy new Cloud Firewall NVA in the Virtual WAN Hub
-
Navigate to your Azure Virtual WAN Hub > on the left tree, select Network Virtual Appliance.
-
Click Create Network Virtual Appliance
-
From the Network Virtual Appliance drop down box, select check point and click Create.

-
On the pop-up, select Leave.
-
Click Create on the Cloud Firewall for Azure Virtual WAN screen.
-
On the Create Cloud Firewall for Azure Virtual WAN page, provide this information:
Basics tab
Parameter
Description
Subscription
Azure subscription into which you deploy the NVA object.
Resource group
Azure resource group into which you deploy the NVA object.
Region
Region into which you deploy the NVA object.
Application name
The name of the managed app that is displayed in the Resource Group.
Managed Resource Group
The name of the Azure Managed Resource Group.
Managed Identity tab
Parameter
Description
Subscription
Select the Azure subscription into which you deploy the NVA object.
User-assigned managed identity
Select the user-assigned managed identity for this subscription.
Cloud Firewall NVA Configurations tab
Parameter
Description
Virtual WAN Hub
Select the Virtual WAN Hub to deploy the Cloud Firewall NVA into.
NVA name
Name of the new NVA.
Scale unit
The scale unit determines the size and number of resources deployed. The higher the scale unit, the greater the amount of traffic that can be handled.
Version
The Cloud Firewall Gateway version.
License type
Type of license:
-
Security Enforcement (NGTP) - Check Point Cloud Firewall Gateways (NGTP package).
-
Full Package (NGTX + S1C) - Check Point Cloud Firewall Gateways (NGTX package, i.e. NGTP and Threat Extraction
Check Point Software Blade on a Security Gateway that removes malicious content from files. Acronym: TEX. and Threat Emulation Check Point Software Blade on a Security Gateway that monitors the behavior of files in a sandbox to determine whether or not they are malicious. Acronym: TE.) and Smart-1 Cloud Security Management. -
Full Package Premium (NGTX + S1C++) - Check Point Cloud Firewall Gateways (NGTX package) and Smart-1 Cloud Security Management, Compliance
Check Point Software Blade on a Management Server to view and apply the Security Best Practices to the managed Security Gateways. This Software Blade includes a library of Check Point-defined Security Best Practices to use as a baseline for good Security Gateway and Policy configuration., DLP, SD-WAN, and SmartEvent.
SD-WAN
For the full SD-WAN support, your NVA will be deployed with 3 NICs. To support that, the number of scale unit must be 10 or higher. The default value is 10 Scale Units - NGTP 8 Gbps.
SSH public key source
Select the SSH key source:
-
If you select to generate a new key pair- select an SSH key type and enter a new name for the key pair.
-
If you select to use an existing key stored in Azure - select your key.
-
If you select to use an existing public key - enter the key to the text box.
SSH key type
Select the key format. This parameter depends on the selected SSH public key source.
Key pair name
The key pair name. This parameter depends on the selected SSH public key source.
Stored Keys
Select the stored key pair. This parameter depends on the selected SSH public key source.
Confirm SIC key
Enter the same SIC key for verification.
Quick connect to Smart-1 Cloud
If you select yes (and provide tokens), the NVA Gateways deploy with a secured tunnel to the Security Management Server
Check Point Single-Domain Security Management Server or a Multi-Domain Security Management Server..Smart-1 Cloud Token for instance x
The token you generate in the Smart-1 Cloud portal for the Gateway instance number x.
(x between 1 to 5).
Cloud Firewall Advanced Settings tab
Parameter
Description
Upgrading your CloudGuard NVA deployment?
Select "Yes" if you are upgrading your Cloud Firewall NVA deployment. Note that usage metering is applied to the original and target NVA deployments.
Number of NICs
To support overlay traffic over Express-Route and Internet, use:
-
2 NICs (default option) - this is recommended for most deployments. ExpressRoute is fully supported.
-
3 NICs - choose this option if you want a dedicated interface for the ExpressRoute traffic.
Hub address space CIDR (Read Only)
The CIDR of the hub address space. This is a read-only field that is automatically populated based on the selected hub.
Use public IP for extra NIC
Use public IP address for the extra NIC.
Default shell for the admin user
Select the shell for the admin user.
BGP autonomous system number. (BGP ASN 64512 to 65534 excluding 65515, 65520).
Bootstrap script
Custom script that configures the NVA instance after deployment.
You can find custom scripts here.
Use public IP for ingress (public preview)
Select "Yes" to deploy the NVA with the attached public IP address that is used for ingress traffic.
Create new public IP for ingress traffic
Select "Yes" to create the public IP resource with the NVA.
Public IP resource ID
If you selected "No" in the previous section, enter the existing public IP resource ID here.
Tags tab
Parameter
Description
Tags
Azure tags (Name, Value) that you attach to the selected resources.
Notes:
-
Smart-1 Cloud (Check Point's Security Management Server as a Service) is a recommended option to start using Cloud Firewall Gateways.
-
Follow the instructions in sk180501 to create tokens for each member and paste them into the applicable fields.
-
-
On the Review + Create tab, check the radio box to agree to the terms and conditions and click Create.
-
When the NVA creation completes, go to your Virtual WAN, navigate to the hub you selected in the deployment > on the left tree, select Network Virtual Appliance, and make sure you can see your new NVA and its provisioning state is Succeeded (it can take some time).
-
To see the public IP addresses of your Cloud Firewall NVA machines click on Click here below Instances info. (Make note of these IP addresses for future use).
|
|
Important - Cloud Firewall Gateways deployed in the Virtual WAN hub do not scale in or out in response to demand. If your throughput increases, you must deploy a new Managed Application that supports the required throughput and modify routing intent from old to new. Refer to Upgrading Cloud Firewall NVA for Azure Virtual WAN. |
|
|
Note - During Cloud Firewall deployment in Azure, the system automatically creates a storage account with a name starting with "bootdiag" in the cluster |
Step 5: Connect to the Security Management Server or Smart-1 Cloud (Management-as-a-Service)
These steps are required only if you do not have an installed Check Point Security Management Server or Smart-1 Cloud instance.
If you already have a Check Point Security Management Server installed or Smart-1 Cloud instance configured, skip to Step 5.
|
|
Notes:
|
Deploying a Security Management Server in Azure
|
Item |
Description |
||
|---|---|---|---|
|
1 |
From the Azure Marketplace, deploy this solution to create a Check Point Security Management Server: |
||
|
2 |
Select the Check Point Security Management software plan.
Use these parameters:
|
||
|
3 |
This template deploys the Security Management Server in the selected subnet. When the management instance starts, it automatically executes the Gaia First Time Configuration Wizard. This can take up to 30 minutes. |
Deploying a Security Management Server On-premises
Follow the instructions in the Check Point Installation and Upgrade Guide for your Security Management Server version.
Configuring the Security Management Server
-
Download, install, and configure the latest CME (Cloud Management Extension).
To download and install the CME on the Security Management Server or Multi-Domain Security Management Server, see sk157492.
To configure the CME, see the Cloud Management Extension Administration Guide.
-
Configure the Security Policy
Collection of rules that control network traffic and enforce organization guidelines for data protection and access to resources with packet inspection. in SmartConsole.
|
|
Note - By default, you can access each Check Point Cloud Firewall Gateway and Security Management Server's Gaia Portal |
Configuring a Smart-1 Cloud Instance
If this is your first Check Point deployment, note that the Smart-1 Cloud service is included with Cloud Firewall for Azure Virtual WAN when purchased with these bundles:
-
Full Package
-
Full Package Premium
Primary benefits of using Smart-1 Cloud:
-
Always the latest security management
The newest features are automatically updated in a unified management platform.
-
Zero Maintenance
No installation, no upgrade.
-
On-demand Expansion
Seamlessly expand capacity by supporting additional Gateways and storage.
|
|
Note - You can set up Smart-1 Cloud before configuring the Cloud Firewall NVA Security Gateways in Azure. |
-
Navigate to https://portal.checkpoint.com and click Don’t have an account? Register here.
-
Fill in the Create Your Infinity Account form (required fields have an *) and click Next.
After that, an Account Created Successfully message is displayed and an email is sent to the email address you provided to complete the registration.
-
Log in to the Infinity Portal.
-
Click the menu button in the top left corner and then Management & Smart-1 Cloud below the Hybrid Mesh Network Security column.
-
Select the checkbox to accept the terms of service and click Try Now.
-
Click Get Started.
-
Configure the service and click Create.

You are now ready to connect your NVA Cloud Firewall Gateways.
Step 6: Configure NVA Cloud Firewall Gateways on the Security Management Server or Smart-1 Cloud
There are three options to configure the NVA Cloud Firewall Gateways: with the CME API (recommended), cme_menu, and manually.
For detailed information about Azure vWAN NVA Cloud Firewall Gateways provisioning and configuration, refer to the Cloud Management Extension Administration Guide > Azure Virtual WAN > Configure the NVA with CME API.
API Documentation:
-
SwaggerHub: Azure Virtual WAN
-
Postman Collection: CME API Postman collection
To provision NVA Cloud Firewall Gateways with the CME API:
Send a POST request:
POST https://<Management_IP_address>/web_api/v1.8/cme-api/v1.2.1/azure/virtualWANs/accounts/<account_id>/resourceGroups/<nva_resource_group>/provision/<nva_name>
Required parameters:
-
account_id: Your Azure account name from the CME configuration file.
-
nva_resource_group: The resource group containing your NVA.
-
nva_name: Your NVA's name.
Request body parameters:
-
base64_sic_key: Base64-encoded Secure Internal Communication (SIC) key to use with the Security Management Server.
-
policy: A Security Policy to install on Cloud Firewall Gateways (for example, "Standard").
-
autonomous_threat_prevention: Enable/disable the Autonomous Threat Prevention blade.
-
identity_awareness: Enable/disable the Identity Awareness
Check Point Software Blade on a Security Gateway that enforces network access and audits data based on network location, the identity of the user, and the identity of the computer. Acronym: IDA. blade.
This asynchronous operation returns a request_id to monitor the provisioning status.
You check the status with a GET request:
GET https://<Management_IP_address>/web_api/cme-api/status/<request_id>
Procedure:
-
Connect to the command line on the Security Management Server.
-
Log in to the Expert mode.
-
Run the command:
cme_menu -
On the menu, select Azure (1) > vWAN (2) > Configure NVA gateways on management server (1).
-
Enter the requested parameters.
The logs are stored in the /var/log/CPcme/cme_menu.log file.
For details regarding the automatic configuration, refer to the instructions in the Cloud Management Extension Administration Guide > Azure Virtual WAN guide.
|
|
Note - Make sure the NVA Cloud Firewall objects in SmartConsole have {tags=vwan} in the Comment field (this enables For example:
|

To configure NVA Cloud Firewall Gateways on the Security Management Server:
-
Open SmartConsole and create a new Cloud Firewall Gateway object for each NVA instance.
-
Give each Cloud Firewall Gateway the IP address of a Network Virtual Appliance in Step 4: Deploy new Cloud Firewall NVA in the Virtual WAN Hub, point 3.
-
Disable anti-spoofing on external (eth0) and internal (eth1) interfaces on each Cloud Firewall Gateway.
-
If VPN is enabled, enter the Cloud Firewall Gateway's external IP address in Statically NATed IP.

-
Install the policy.
Note - Make sure not to block Management or SSH access to the Cloud Firewall Gateway from the Internet because it is not possible to connect to the deployed Cloud Firewall Gateway instances with a serial console.
To configure NVA Cloud Firewall Gateways in Smart-1 Cloud
-
Navigate to the Check Point Portal's Welcome page and click Open Streamed SmartConsole.
Note - Make sure pop-up blockers are disabled.
-
A new tab opens. Click Gateways & Servers.
-
Click +Add new Gateway below the Connect Gateways section.
-
Click the large + sign. Repeat this step for each NVA Cloud Firewall Gateway.
-
On the Register Security Gateway screen, give the first NVA Cloud Firewall Gateway a name and click Register (the name cannot include spaces or special characters). Repeat this step for each NVA Cloud Firewall Gateway.
After you add your NVA Cloud Firewall Gateway objects, you see the state: Waiting for Connection.
-
Click Connect Gateway. Repeat this step for each NVA Cloud Firewall Gateway.
-
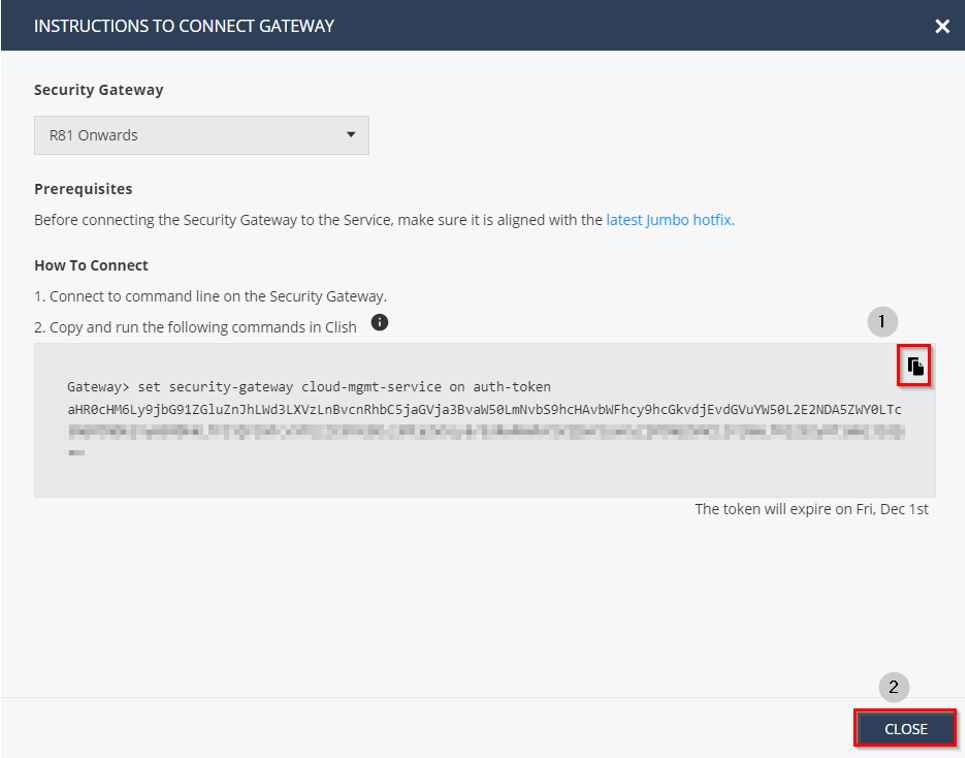
On the Instructions to Connect Gateway screen, click the Copy icon and then click Close.
-
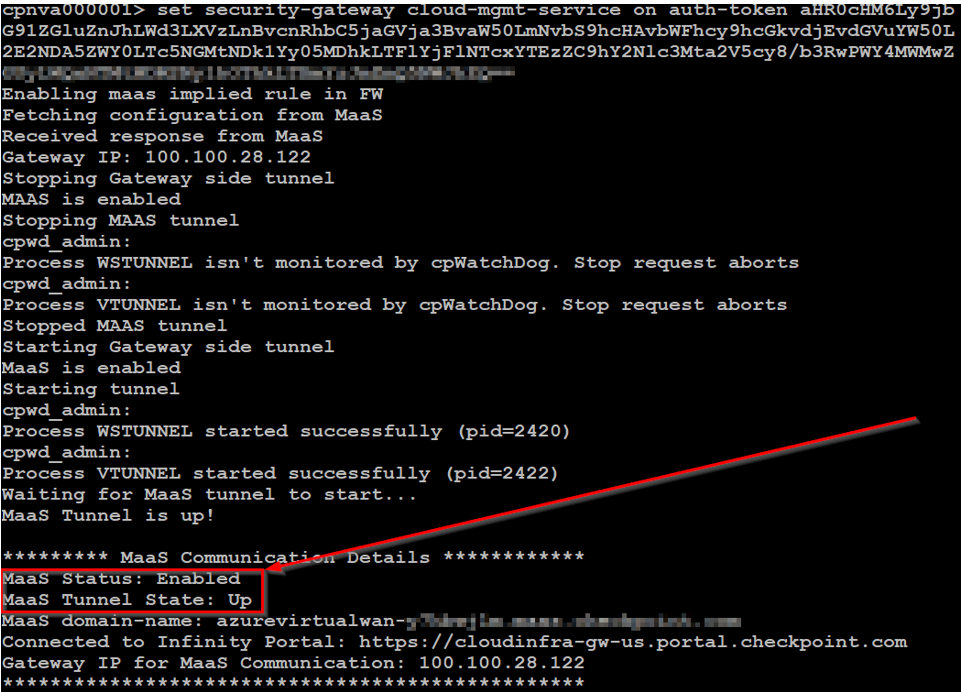
Log in to the related NVA Cloud Firewall Gateways Gaia CLI and paste the command.
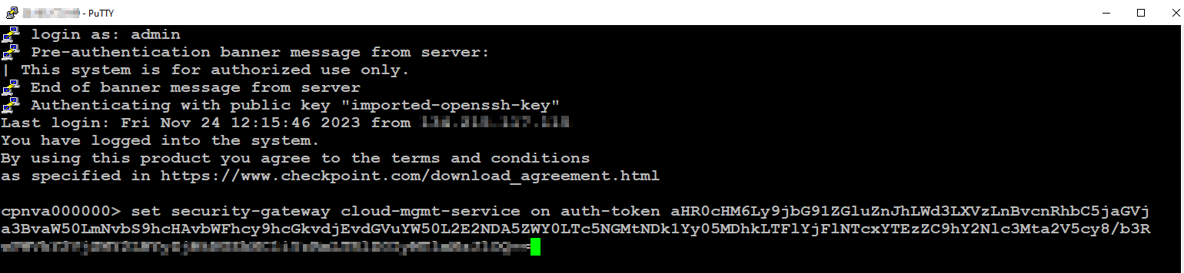
-
The output must show successful connectivity to Smart-1 Cloud, for example:
-
On the Smart-1 Cloud portal, the Cloud Firewall Gateways are in a Pending Trust (SIC) Establishment status.
You are ready to securely connect your NVA Cloud Firewall Gateways to Smart-1 Cloud, install Security Policy on the Cloud Firewall Gateways, and collect logs and other telemetry information
-
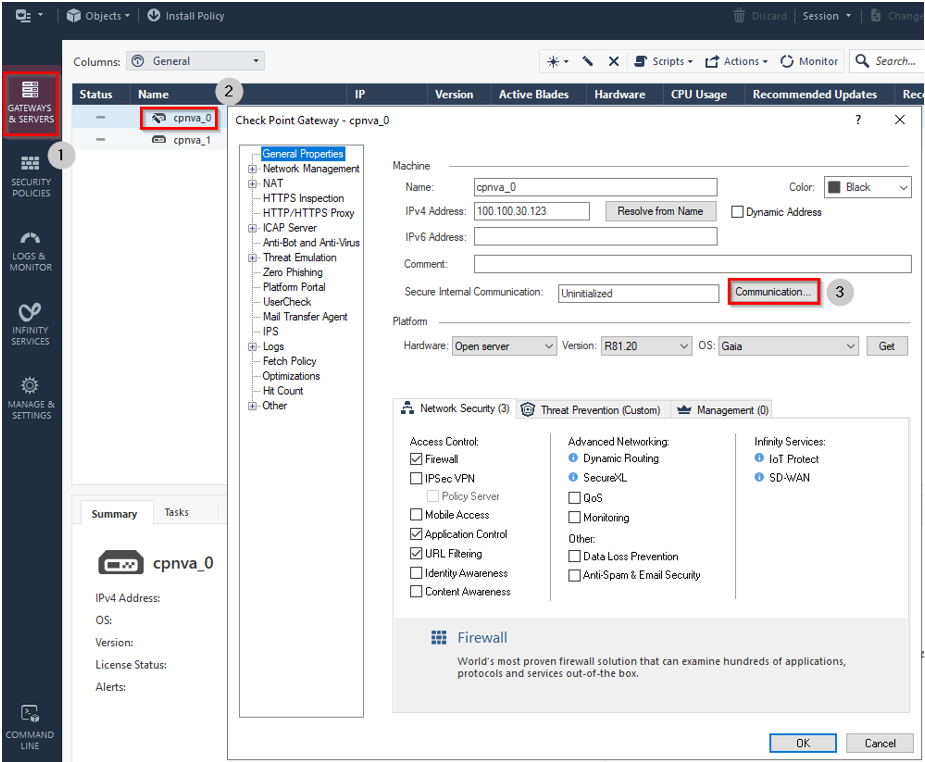
Go to Gateways & Servers and double-click the first NVA Cloud Firewall Gateway to open its properties.
-
Click Communication.
-
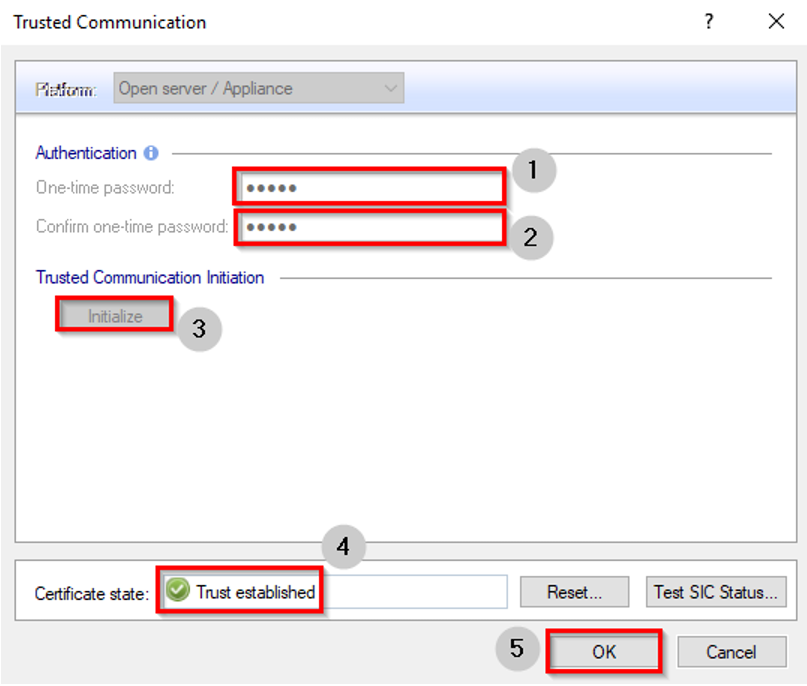
In the One-time password field, enter the SIC key you provided during the initial NVA Cloud Firewall Gateway creation.
-
Click Initialize. If successful, the Certificate state shows Trust established. Click OK.
-
The Topology Results show. Click Close.
-
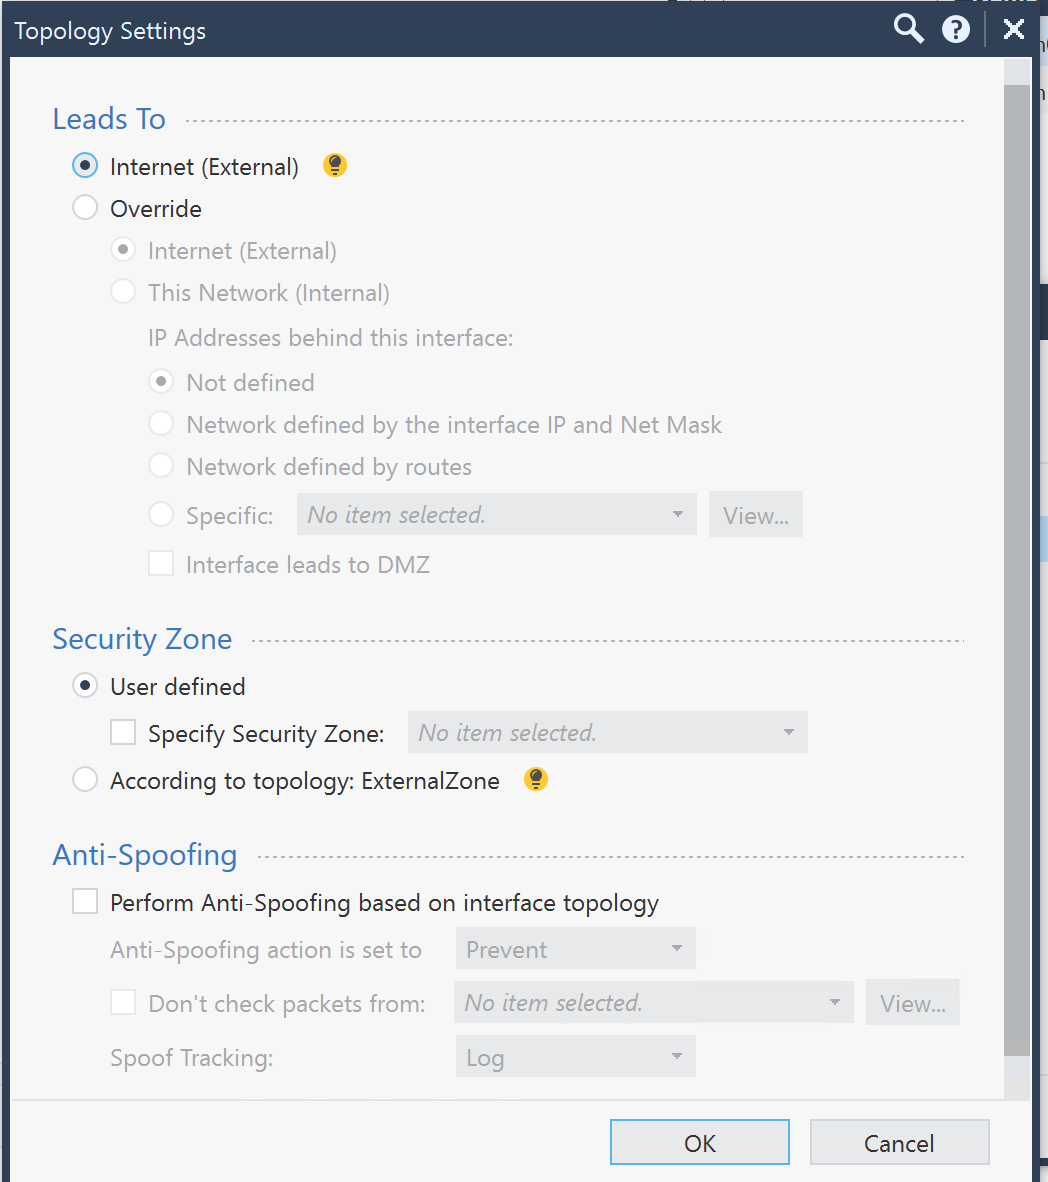
Click Network Management, then double-click on eth0 (repeat for eth1). Then click Modify and clear the checkbox next to Perform Anti-Spoofing based on interface topology. Click OK on the applicable dialog boxes.
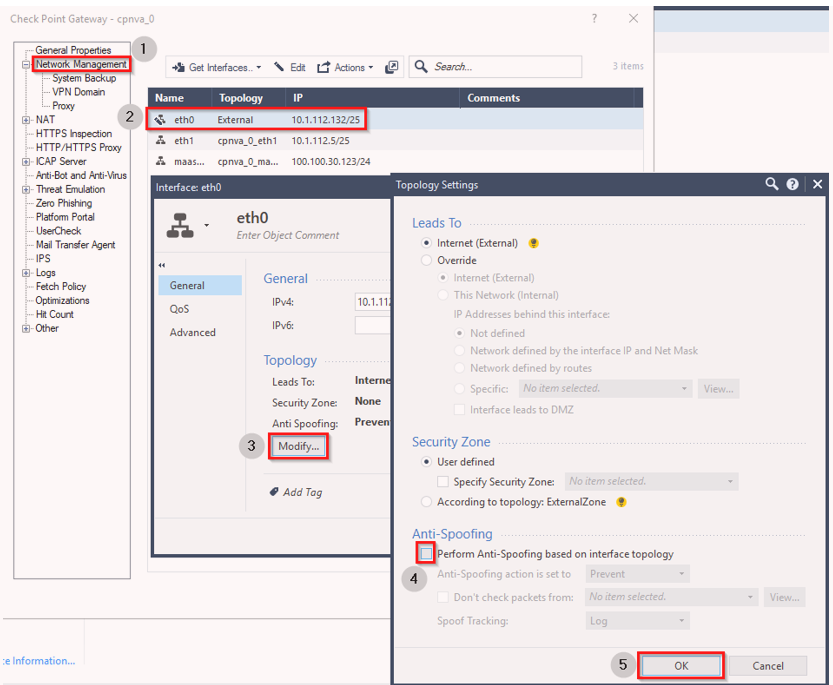
-
Click OK on the main properties screen when you complete the two interfaces (eth0 and eth1).
-
Repeat steps 2 to 8 for all remaining NVA Cloud Firewall Gateways.
-
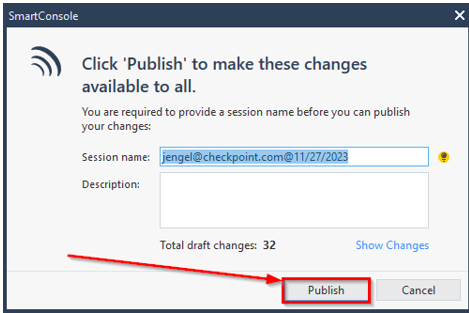
Click Publish to commit the changes to Smart-1 Cloud.
-
In the SmartConsole window, enter a Session name and Description and click Publish again.

You can now create and install a security policy for your NVA Cloud Firewall Gateways. Refer to the Security Management Administration Guide for full guidance on creating a policy that fits your organization's needs.
After you configure your policy, you can install it. On the first policy installation, only the Access Control policy is installed. On the next installations, you can also include the Threat Prevention policy.
After you set Routing Intent in your Hub, the Cloud Firewall Gateways start inspecting traffic.
Step 7: Set Routing Intent and Routing Policies
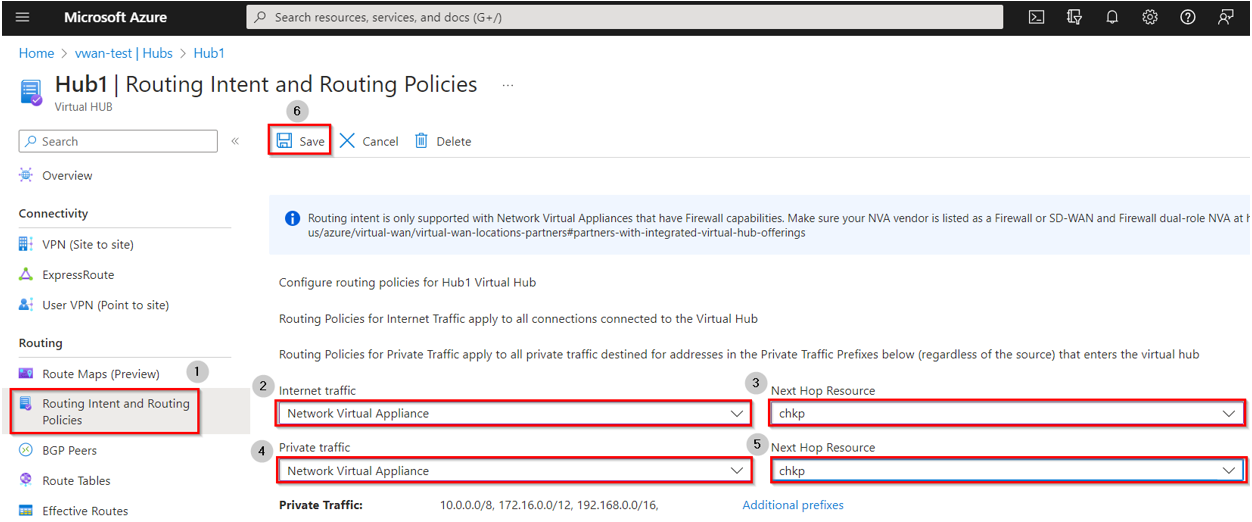
Select your Virtual WAN > Select the applicable virtual hub > on the left tree, select Routing Intent and Routing Policies.
-
For Internet bound Traffic:
In the Internet Traffic drop-down select Network Virtual Appliance, in the Next Hop Resource select the NVA you created and click Save.


-
For private traffic:
In the Private Traffic drop-down select Network Virtual Appliance, in the Next Hop Resource select the NVA you created and click Save.

|
|
Note - To add prefixes for routing intent click on Additional prefixes. |
UDR-Based Traffic Inspection
User Defined Routes (UDRs) enable granular control over traffic flow within your Azure environment — including inter-subnet traffic inspection within the same Virtual Network (VNET). Use this method to steer traffic through the Cloud Firewall Virtual Appliance (NVA) cluster when your security policy requires deep packet inspection at that level.
Prerequisites
Before configuring UDRs, you must obtain the frontend IP address of the Internal Load Balancer (ILB![]() Internal Load Balancer, used to load balance traffic in a virtual network) associated with your Cloud Firewall NVA cluster. This IP address serves as the Next Hop in your UDR configuration.
Internal Load Balancer, used to load balance traffic in a virtual network) associated with your Cloud Firewall NVA cluster. This IP address serves as the Next Hop in your UDR configuration.
Step 1: Retrieve the ILB Frontend IP
Run the following command on the Cloud Firewall NVA:
show configuration routemaps
In the command output, locate the action nexthop ip entry. The IP address listed in that field is your ILB frontend IP.
|
|
Note - If multiple route maps are configured, make sure you identify the entry associated with the correct NVA cluster interface. |
Step 2: Configure the UDR
Use the ILB frontend IP retrieved in Step 1 as the Next Hop IP address when creating or updating your UDR in the Azure portal, Azure CLI, or ARM template.
Step 8: Configure NAT
For outbound traffic, the packets should be NATed behind the Cloud Firewall Gateway's IP address.
Creating Dynamic Objects 'LocalGatewayExternal' and 'LocalGatewayInternal'
For the manual NAT rules, you must create these Dynamic Objects in SmartConsole:
-
LocalGatewayExternal
-
LocalGatewayInternal
Procedure:
-
Click Objects menu > More object types > Network Object > Dynamic Object > New Dynamic Object.
-
Enter this exact name (case-sensitive, no spaces):
LocalGatewayExternal
-
Click OK.
-
Click Objects menu > More object types > Network Object > Dynamic Object > New Dynamic Object.
-
Enter this exact name (case-sensitive, no spaces):
LocalGatewayInternal
-
Click OK.
-
Publish the SmartConsole session.
|
|
Note - The NVA instances IP addresses are automatically associated with the LocalGatewayInternal and LocalGatewayExternal objects. |
Creating Manual NAT Rules
Add these two manual NAT rules to the Access Policy:
-
No NAT for internal communication:
Source
Destination
Port
Xlate Source
Xlate Destination
Xlate Port
Internal Networks Group
Internal Networks Group
Any
Original
Original
Original
-
For Internet access, Hide NAT to external interface:
Source
Destination
Port
Xlate Source
Xlate Destination
Xlate Port
Internal Networks Group
All Internet
Any
LocalGatewayExternal
Original
Original
-
Publish the SmartConsole session.
Step 9: Configure Ingress traffic
Prerequisites:
-
Generate a public IP address with the standard SKU (in the same region as the NVA in the Azure portal).
-
A deployed NVA with attached public IP.
-
NVA instances are configured (See Step 5).
-
See the CME API requirements in the Cloud Management Extension Administration Guide > Azure Virtual WAN.
-
The Cloud Firewall Gateway image version must be at minimum 8120.900631.1522 for R81.20 and 8110.900335.1522 for R81.10.
Configuring rules for ingress traffic
We recommend using CME API to configure ingress rules. For detailed information about configuring ingress rules in Azure vWAN NVA, refer to the Cloud Management Extension Administration Guide > Azure Virtual WAN > Configure Ingress Rules for NVA with CME API.
|
|
Note - In addition to configuring the ingress NAT rules, you must also configure applicable access rules. |
API Documentation:
-
SwaggerHub: Azure Virtual WAN
-
Postman Collection: CME API Postman collection
Adding Ingress Rules
To add ingress rules with the CME API:
Send a POST request:
POST https://<Management_IP_address>/web_api/v1.8/cme-api/v1.2.1/azure/virtualWANs/accounts/<account_id>/resourceGroups/<nva_resource_group>/inboundRules/<nva_name>
Required URL parameters:
|
Parameter Name |
Description |
|---|---|
|
|
Your Azure account name from the CME configuration file. |
|
|
The NVA resource group name.
|
|
|
The NVA name.
|
Rule parameters:
|
Parameter Name |
Description |
|---|---|
|
|
Unique rule |
|
|
Where traffic comes from (IP address). |
|
|
Load Balancer public IP addresses attached to the NVA.
|
|
|
Ports to accept traffic on. |
|
|
TCP or UDP. |
|
|
Notes - This API:
|
This asynchronous operation returns a request_id to track progress.
You check progress using a separate GET request:
GET https://<Management_IP>/web_api/cme-api/status/<request_id>
|
|
Note - If a failure occurs, the response to this GET request includes the cause of the failure and steps to resolve the issue. After resolving the error, submit the POST request again to create the ingress rules. |
Configure Access and NAT Rules
|
|
Important - To enable ingress traffic, in addition to the rules on the Azure side created with CME Management API, you also need to add manually the corresponding access and NAT rules on the Security Management Server. |
Access rule settings:
|
Source |
Destination |
VPN |
Services & Applications |
Action |
Track |
Install On |
|---|---|---|---|---|---|---|
|
Matches the |
Matches the lb_public_ips parameter value from the CME API request. |
Any |
Matches |
Accept |
Log |
NVA Instances |
NAT rule settings:
|
Original Souce |
Original Destination |
Original Services |
Translated Source |
Translated Destination |
Translated Services |
Installed On |
|---|---|---|---|---|---|---|
|
Matches the |
Matches the |
Matches |
LocalGatewayInternal NAT Method: Hide |
The Internal Application Gateway frontend private IP address. |
A listener port and protocol. |
NVA Instances |
Modifying Ingress Rules
To modify ingress rules with the CME API:
Send the same POST request you used for adding new ingress rules.
|
|
Important - This overrides existing rules, so if you want to add new rules without deleting the current ones, include all rules (current and new) in the request body. |
Update access and NAT rules accordingly.
Deleting Ingress Rules
To delete ingress rules with the CME API:
Send a DELETE request:
DELETE https://<Management_IP_address>/web_api/v1.8/cme-api/v1.2.1/azure/virtualWANs/accounts/<account_id>/resourceGroups/<nva_resource_group>/inboundRules/<nva_name>
|
|
Important - This deletes all rules associated with the NVA. |
This asynchronous operation returns a request_id to track progress.
Viewing Ingress Rules
To view ingress rules with the CME API:
Send a GET request:
GET https://<Management_IP_address>/web_api/v1.8/cme-api/v1.2.1/azure/virtualWANs/accounts/<account_id>/resourceGroups/<nva_resource_group>/inboundRules/<nva_name>
This operation returns a list of ingress rules with their status.
Examples:
POST request - adding rules:
|
URL:
Body:
|
Response:
|
|
GET request - tracking progress:
|
URL: |
Response:
|
|
GET request - viewing ingress rules:
|
URL: |
Response:
|
|
Access rule:
NAT rule:
Limitations
-
The CME API is not supported in Azure GOV and Azure China regions.
-
Maximum 600 public IP addresses for load balancing per NVA.
-
Maximum 300 ports per public IP address of a Load Balancer.
-
Maximum 1,500 total ports across all NVA rules.
-
When you use CME API to add ingress rules, the IP addresses for
lb_public_ipsmust be in the same subscription as the NVA.
Attach or detach additional existing public IP addresses to the Network Virtual Appliance (NVA) SLB:
-
Log in to Azure Portal.
-
Enter your virtual WAN and navigate to your Hub.
-
On the left tree, click Network Virtual Appliance.
-
Select the applicable NVA and, below NVA Configuration, click Manage Configuration.
-
On the left tree, click Internet Inbound.
-
Click the Add or Delete button on the top left.
-
For adding IP address only:
-
Select the resource group where you created the public IP address and the public IP address name and click Save.
-
After the process is complete, make sure that the NVA provisioning state is Succeeded.
-
Ingress rules enable ingress traffic through the NVA, and with the ingress menu, you can configure ingress rules on the Security Management Server and on the Azure side.
The ingress menu creates NSG rules on the Azure side and NAT and access rules on the Security Management Server side to enable ingress traffic.
Each generated NAT rule is located in a dedicated NAT section called Automatic Generated Rules: vWAN, and each generated access rule is located in the selected section of the access policy.
|
|
Important - Do not change NAT and access rules manually. |
Requirements:
-
A Security Management Server/Multi-Domain Security Management Server (not Smart-1 Cloud) with a valid license.
-
NVA instances configured in SmartConsole with the {tags=vwan} comment.
-
NVA must have a minimum of one public IP address attached to it.
-
CME Take 271 and higher installed on the Security Management Server.
-
CME account (controller) with a service principle assigned to:
-
NVA’s Managed resource group with Reader and Network Contributor roles.
-
Relevant public IP addresses (or their resource group) with Reader role.
-
-
Terminal with a minimum of 150 characters in width and 40 characters in height (150 columns and 40 lines).
-
Terminal emulator that supports line drawings. Confirmed terminals:
-
MobaXterm
-
Windows Command Line
-
Windows Terminal
-
SecureCRT
-
PuTTY (Need to enable VT100 line drawing support)
-
Procedure:
-
Connect to the command line interface on the Security Management Server.
-
Log in to the Expert mode.
-
Run the command:
cme_menu -
From the menu, select Azure (1) > vWAN (2) > Configure Ingress Rules (Preview) (5).
-
Enter the requested parameters. After you enter the parameters, the ingress menu User Interface starts.
Parameters for NVA configuration:
|
Parameter Name |
Description |
|---|---|
|
|
The Azure account you use to connect to the cloud for data about NVAs. |
|
|
The relevant domain name, only for a Multi-Domain Management server environment. |
|
|
The policy package name to create the ingress NAT and Access rules in. |
|
|
The section in the access policy to create and update the access rules. |
|
|
The NVA you configure with the ingress rules. |
Using the Ingress User Interface
The ingress menu starts after you provide the initial parameters.
In this menu, you can create or edit the ingress rules. Changes are published, and the relevant policy package is installed only when you press the Publish button.
Use the keyboard to navigate and control the menu. The mouse does not work on it.
Controls:
-
Use the arrow keys to navigate between the button and inputs. The relevant input/button is marked in yellow when you select it.
-
Use the Enter key to select an element.
-
When you select an input, its background changes to white, and you can edit it in this mode.
(Some inputs accept certain characters; for example, IP inputs accept characters that are relevant for IP addresses).
-
To exit the menu press Ctrl + C.
To add a rule:
-
Select Add Rule and enter the relevant details
-
Click add.
|
|
Note - When you create a new rule, you must add or discard the rule before you can navigate to a different rule. |
To delete a rule:
Select an existing rule and press Delete.
To edit a rule:
-
Select an existing rule
-
Navigate to the desired input
-
Click Enter and make the changes
-
Click ESC to deselect and save.
|
|
Note - Invalid values are marked in red, and you can only deselect a rule once you fix the values. |
To publish the changes and rules:
Press Publish to publish the changes. If there is an issue, it shows in the message box, and details are added to the logs.
Once the publishing process is completed successfully, press any key to exit the menu.
You can see logs in the file: /var/log/CPcme/cme_menu.log.