Connecting Spokes in Cloud Firewall Security NVA for Azure Virtual WAN
Connect VNET
-
Navigate to your Virtual WAN > on the left tree and select Virtual network connections.
-
Click Add connection.
-
Fill in all the necessary fields and click Create.
Configure Client-to-Site VPN

To configure Client-to-site VPN for Cloud Firewall Security in vWAN Hub, follow these steps:
-
Configure a new user in SmartConsole
 Check Point GUI application used to manage a Check Point environment - configure Security Policies, configure devices, monitor products and events, install updates, and so on.:
-
In SmartConsole top right click New > More > User/Identity > User.
-
In the New User pop-up window, select a template.
-
Create a new user with a Check Point recommended authentication method. Refer to R81.20 Remote Access VPN Administration Guide > User and Client Authentication for Remote Access.
-
Add the user to the all_users group.

-
-
Configure each of the NVA
Network Virtual Appliance - A resource deployed in Azure's Virtual Hub that includes Security Gateways and other networking infrastructure. Cloud Firewall Gateways:-
In SmartConsole > Cloud Firewall Gateway > General Properties, Check the IPSec VPN blade to enable it.
-
Configure VPN Domain in the Cloud Firewall Gateway properties > Network Management > VPN Domain.
Add here the object that is part of the VPN domain.
-
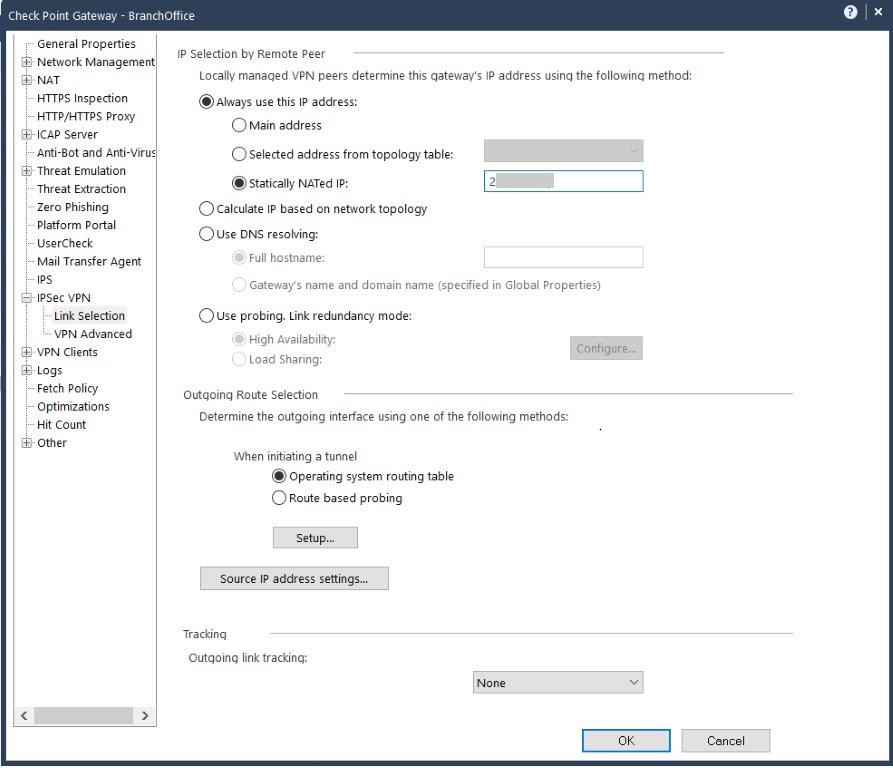
Configure Statically NATed IP in the Cloud Firewall Gateway properties > IPSec VPN > Link Selection.
Enter the NVA public IP address in the Statically NATed IP.
-
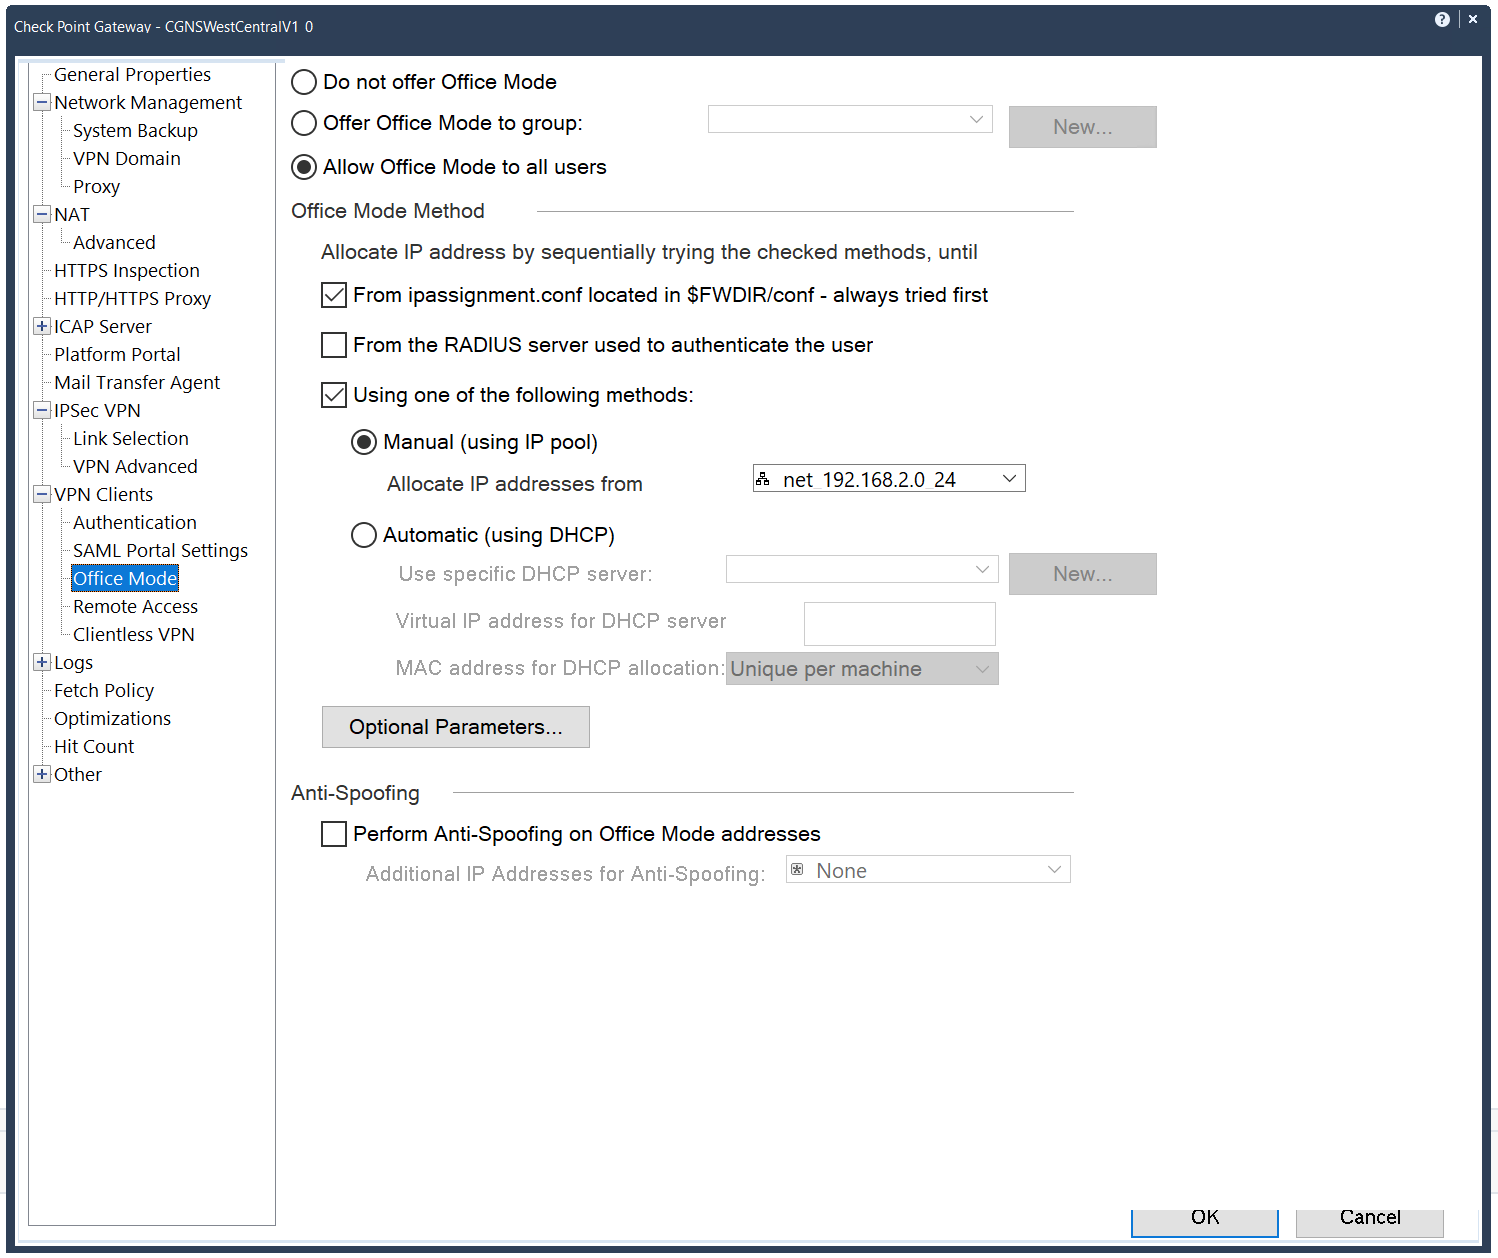
Allocate office mode IP range in the Cloud Firewall Gateway properties > VPN Clients > Office Mode. Client's IP addresses are assigned from this range.
-
-
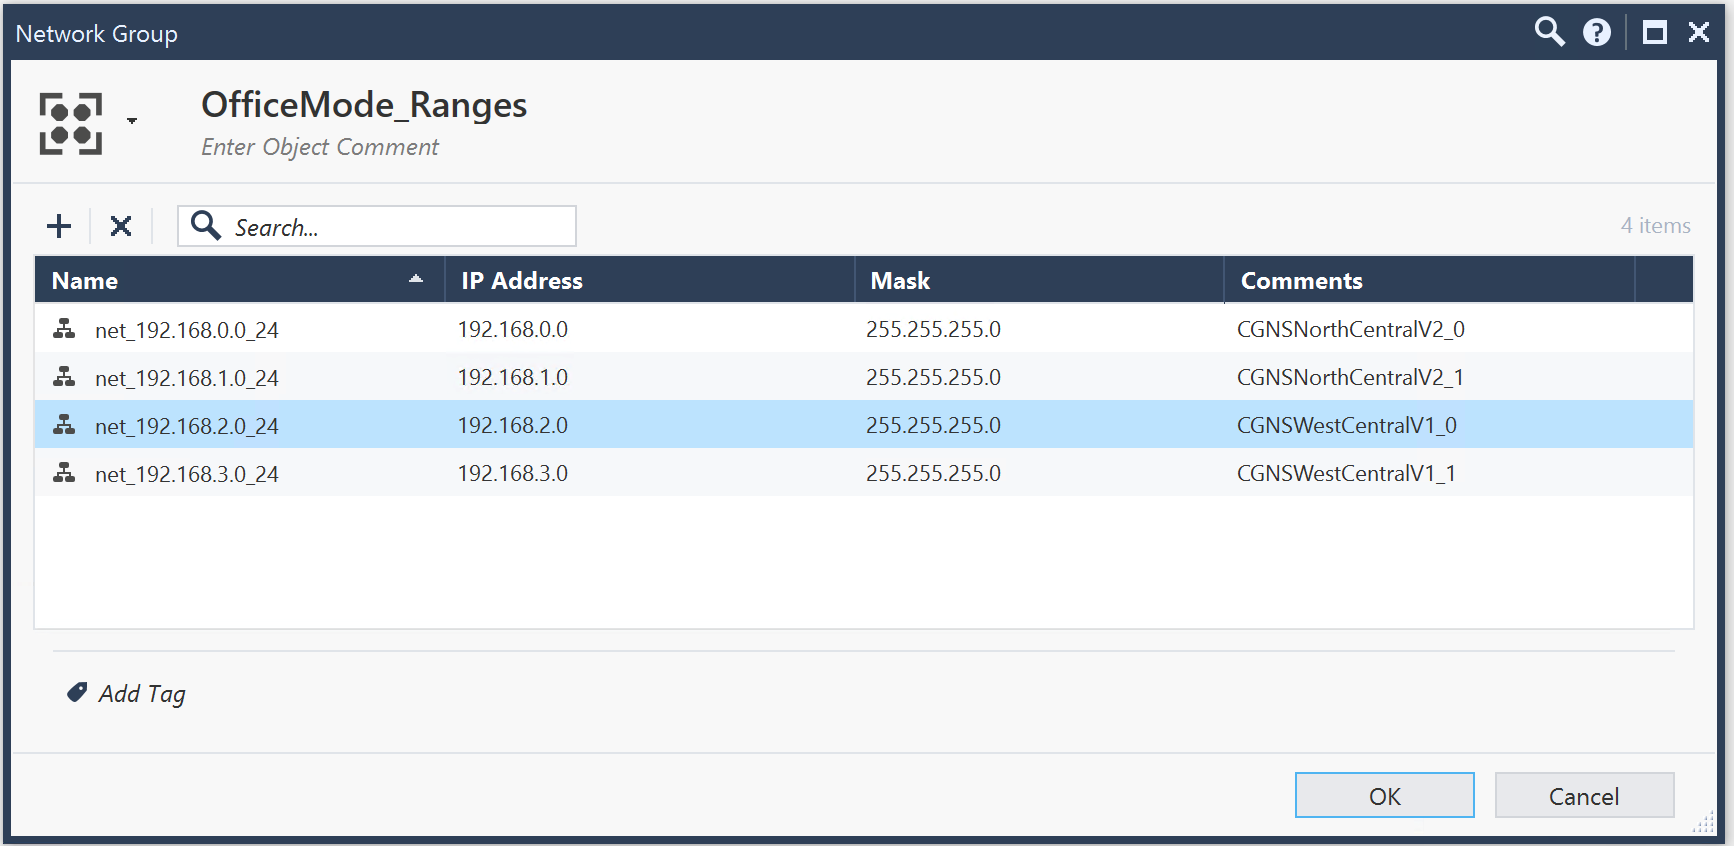
Create a new Network Group with the Office Mode IP address Ranges, for example:
-
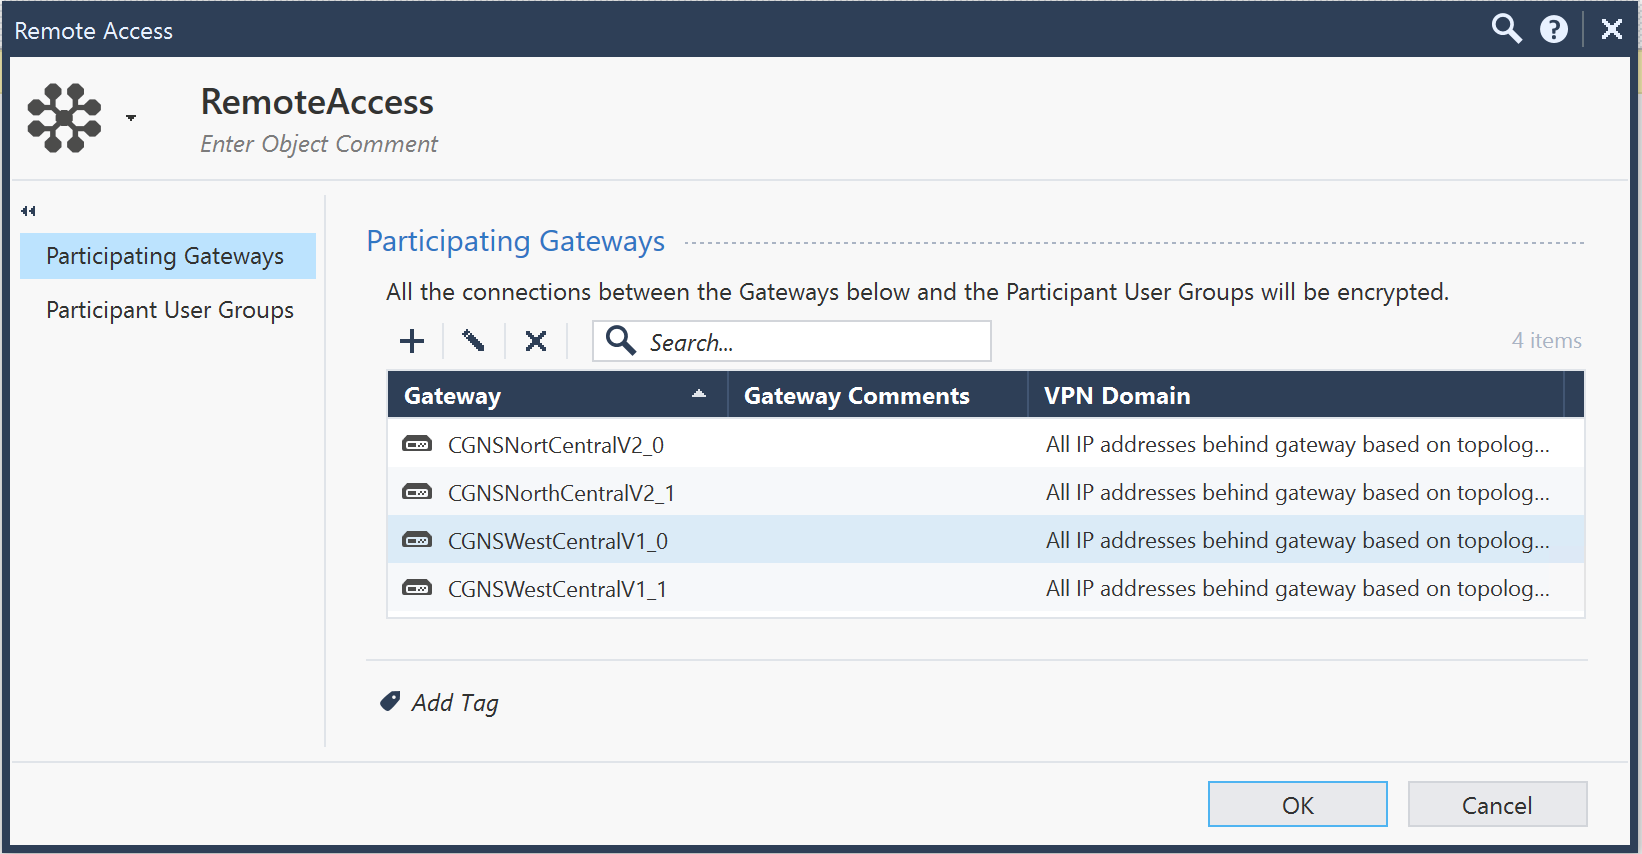
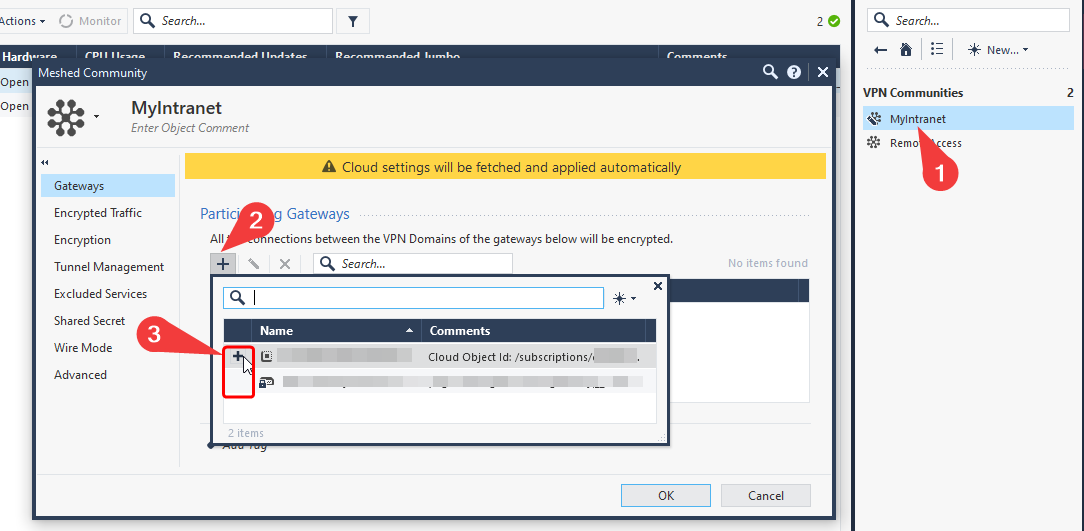
Configure the Remote Access VPN Community: In SmartConsole > Object Categories on the right > VPN Communities > RemoteAccess, add the Participating Gateways, for example:
-
Configure Security and NAT Policy:
-
Configure the Access Control Rules:

-
Configure NAT rules.

Note - If the LocalGatewayInternal and LocalGatewayExternal host objects do not exist, refer to Creating Dynamic Objects 'LocalGatewayExternal' and 'LocalGatewayInternal' to create them.

-
-
Follow the procedure in sk103440 - How to force Remote Access VPN Client to resolve DNS name of VPN Site at every connection.
-
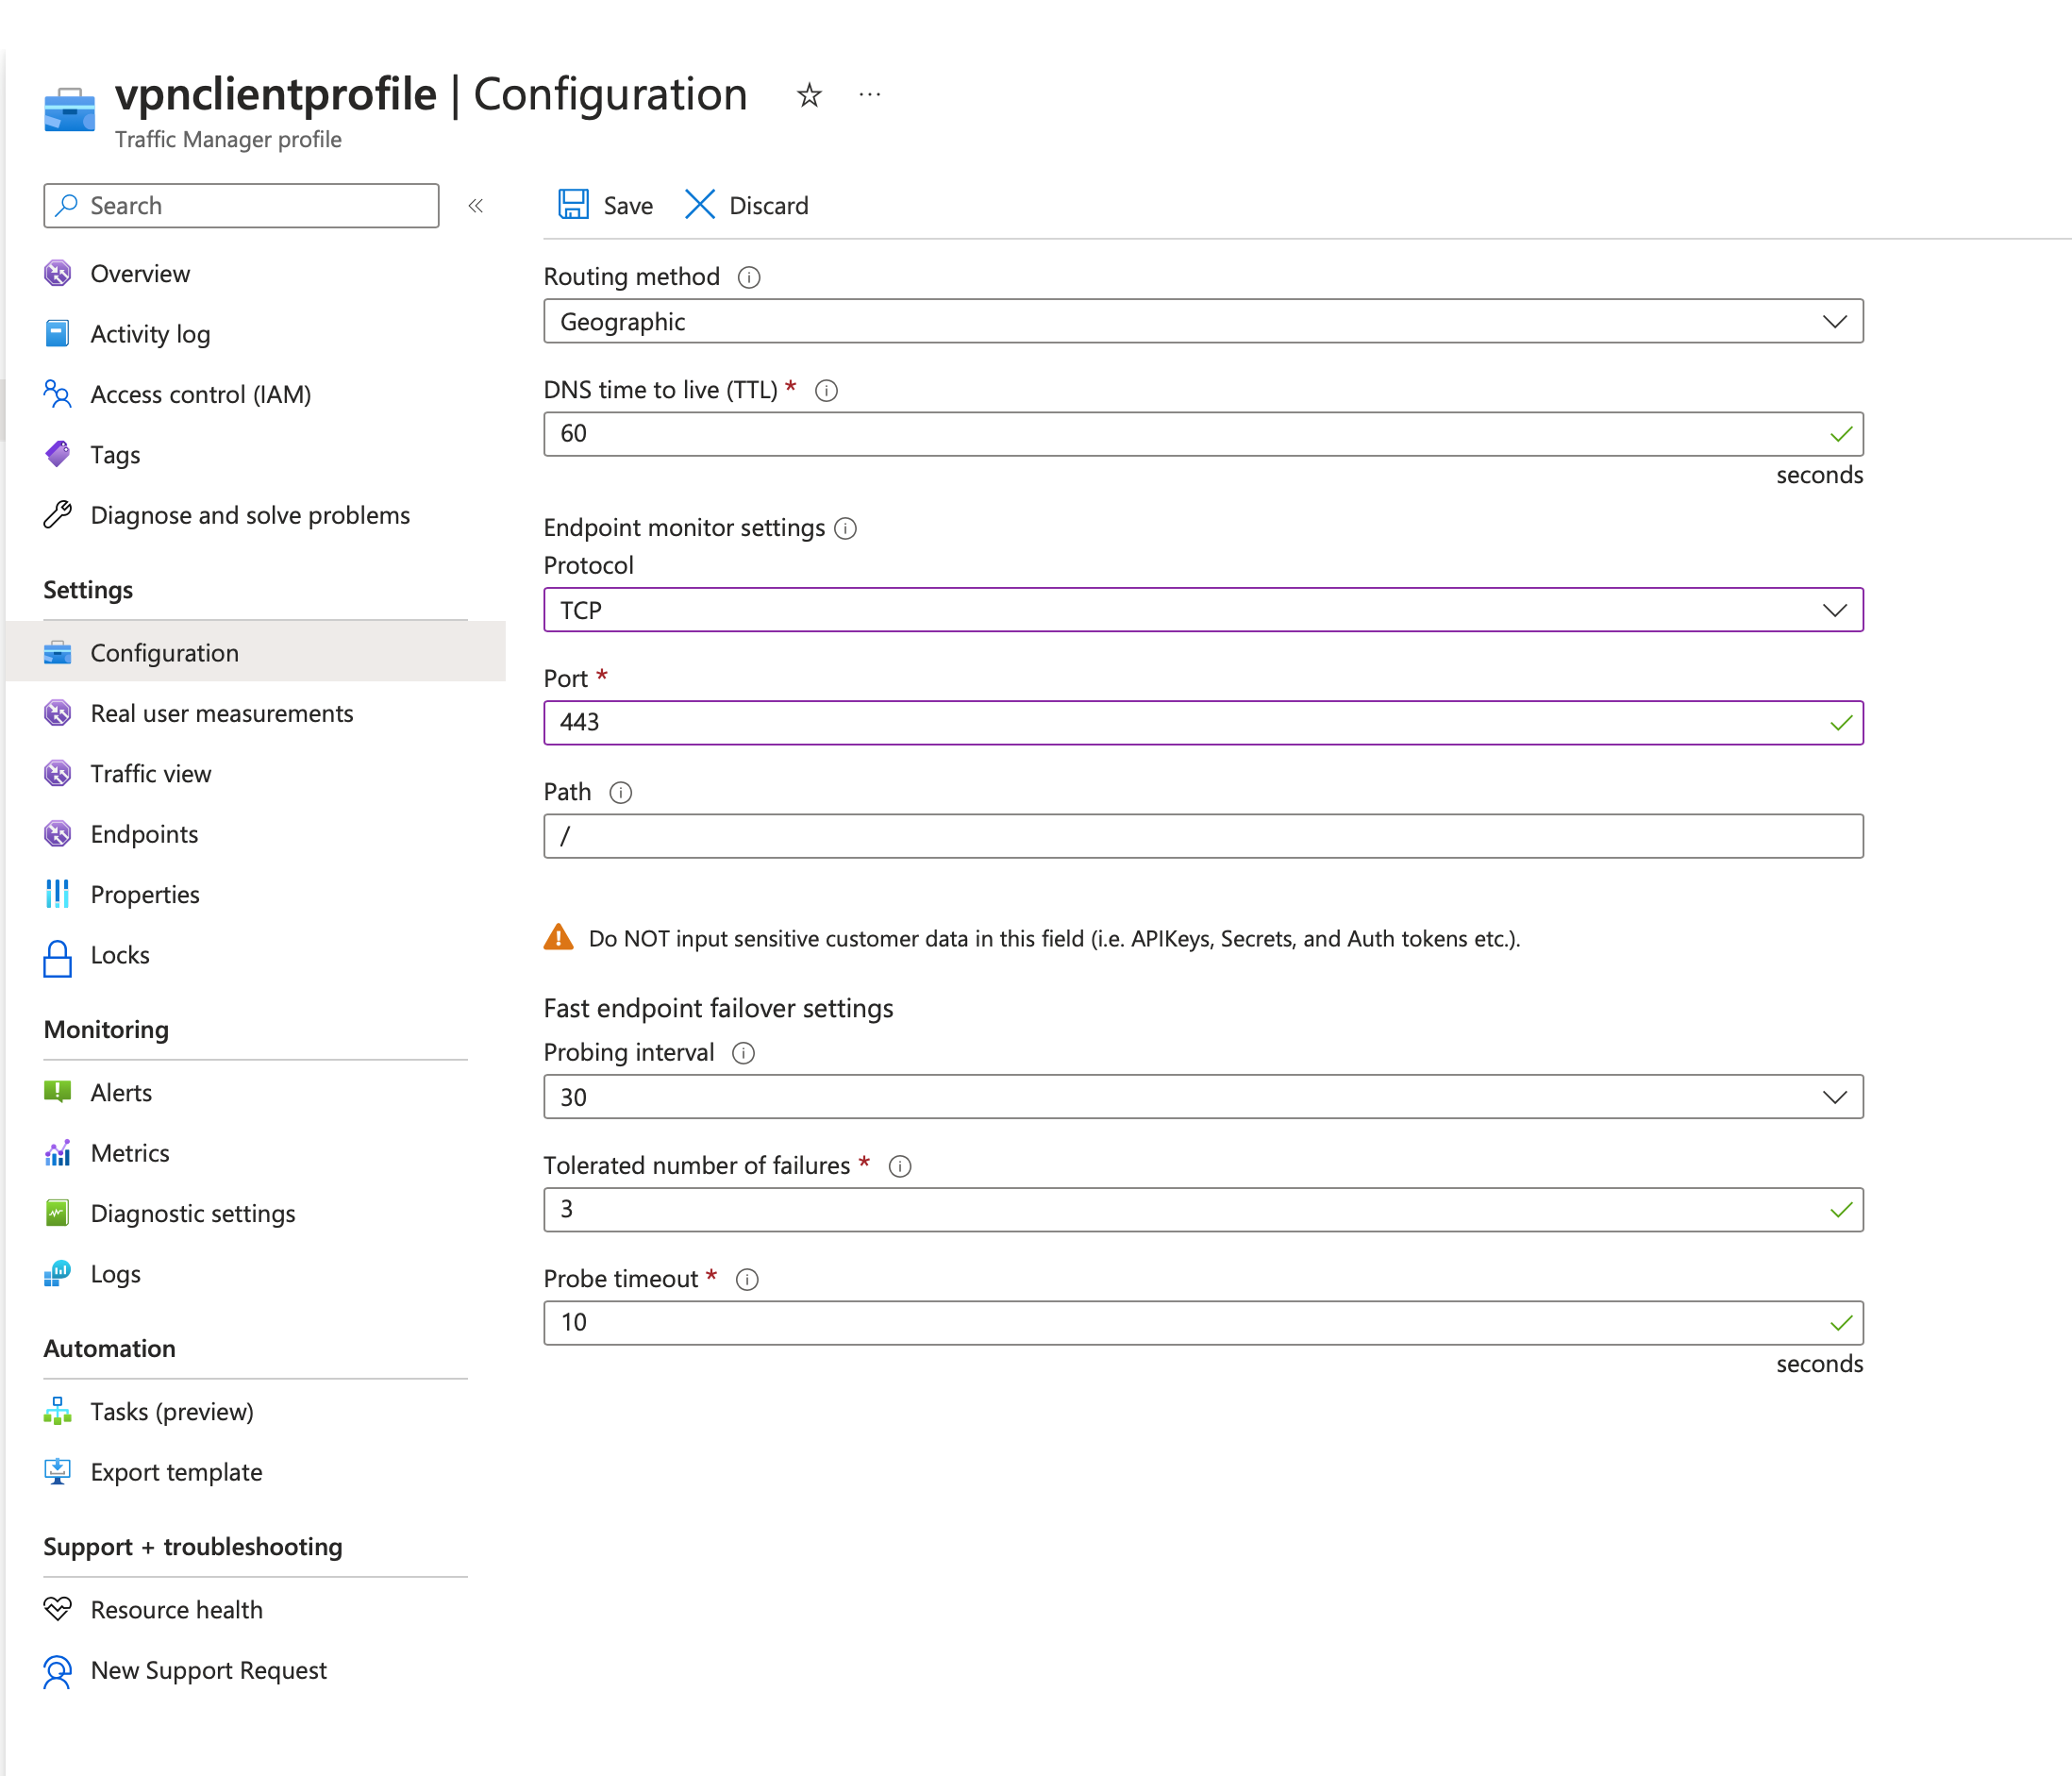
Configure Traffic Manager.
-
From the Azure Portal, search for Traffic Manager Profiles:

-
Create a new Traffic Manager Profile.
-
Configure the Routing method to Geographic or Performance, set the health probes port to TCP 443.
-
Add each Cloud Firewall Gateway as an external endpoint.
-
In the Name field, add the NVA machine name.
-
In the Fully-Qualified Domain Name (FQDN) or IP, add the public IP of the related NVA Instance (Cloud Firewall Gateway).
-
In the Location, Mark the NVA region.
-
Enable health check.

-
-
The Monitor status changes from Checking Endpoint to Online.

-
-
Configure Remote Access VPN Client.
-
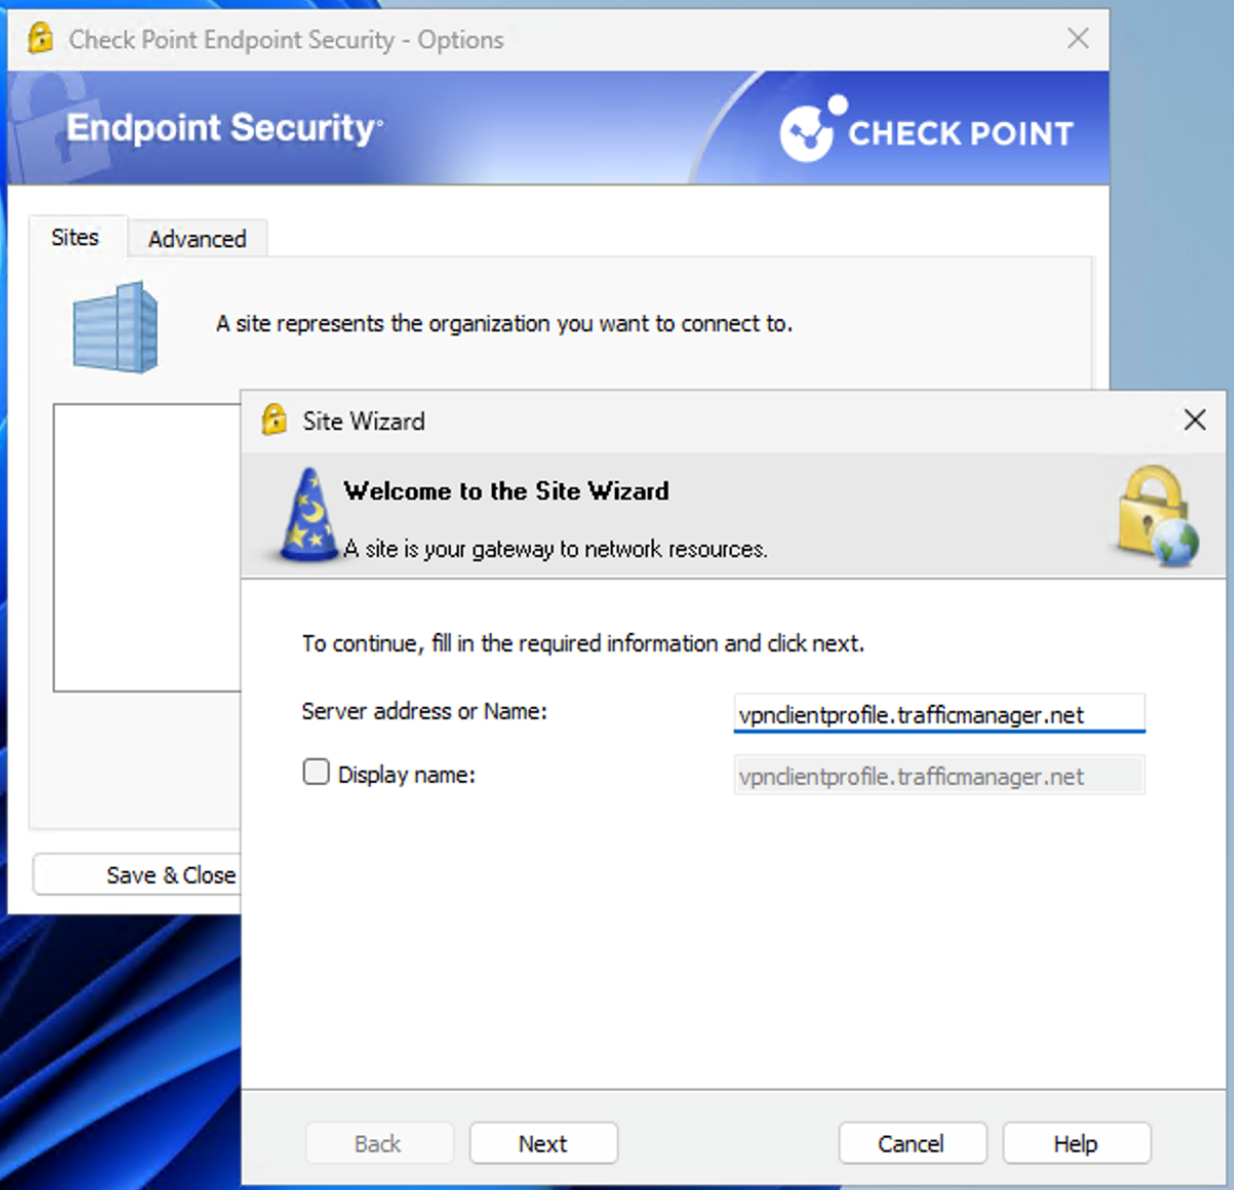
Get the DNS Name from the Traffic Manager Profile overview.

-
Open the Check Point Endpoint Security and create a new site, use the DNS name as address (remove http:// from the address.)
-
On the Site Wizard, select vpn (default) as the preferred log in option.
-
Select Username and Password as the Authentication Method and click Finish to create the site.
-
For more information on the Remote Access solution, refer to the Remote Access VPN R81.20 Administration Guide.
Connect Branch
Configure Site-to-Site VPN from branch office to Azure VPN Gateway
On Azure side:
-
Navigate to your hub and select VPN (Site to site) > Create VPN gateway.
-
Select the wanted scale units and click Create.
-
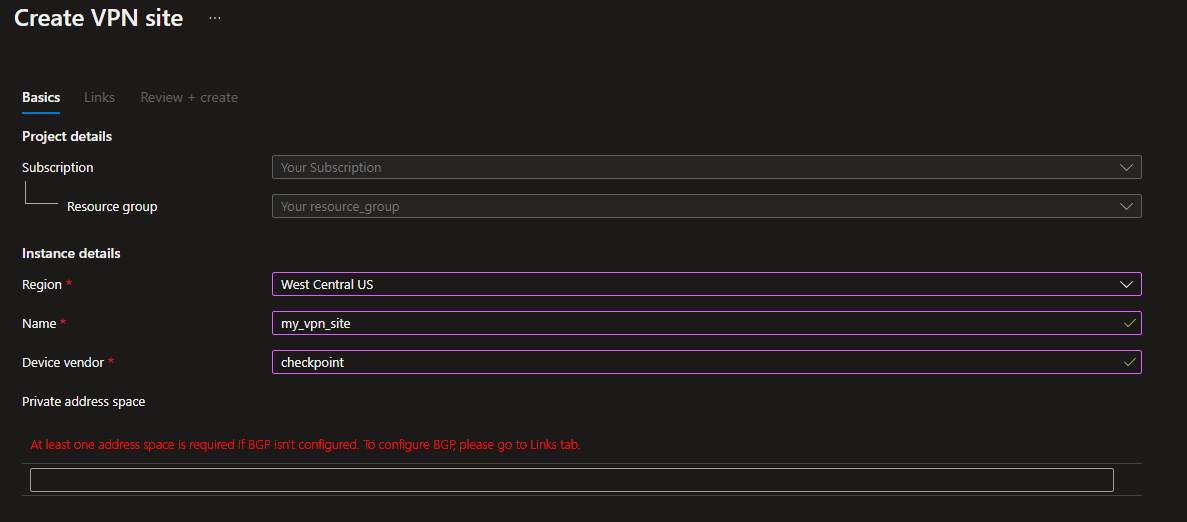
After creating the VPN Gateway, click VPN (Site to site) > create new VPN site.
-
Enter the VPN site details:
-
Select the applicable region.
-
Give the site a name.
-
Type checkpoint for the device vendor.
-
Keep the address space empty.
For example:
-
-
Enter the links details:
-
Link name.
-
Link speed.
-
Link provider name - checkpoint.
-
Link IP - The public IP of the connecting Gateway.
-
Link BGP address - The BGP address you give to the connecting Gateway.
-
Link ASN
Autonomous System Number. - The ASN that the connecting Gateway uses.
-
-
Click Review + create to complete the setup.
-
Connect the VPN site:
-
Navigate to VPN (Site to site) window.
-
Click on the X (if present) to remove the Connected to this hub filter.
-
Select the VPN site you created in the previous step.
-
Click on the Connect VPN sites.
-
In the open menu, enter a password for the VPN on the management site.
-
Click Connect.
-
-
Open SmartConsole and configure the Cloud Firewall Gateway that connects to the VPN based on the steps in Site to Site VPN R81 Administration Guide > Getting Started with Site-to-Site VPN.
On Security Management R81.10 and lower
Follow the instructions in sk176249 - How to configure IPsec VPN tunnel between Check Point Cloud Firewall Gateway and Azure vWAN.
On Security Management R81.20 and higher
-
Connect to the Security Management Server
Dedicated Check Point server that runs Check Point software to manage the objects and policies in a Check Point environment within a single management Domain. Synonym: Single-Domain Security Management Server. with SmartConsole. -
-
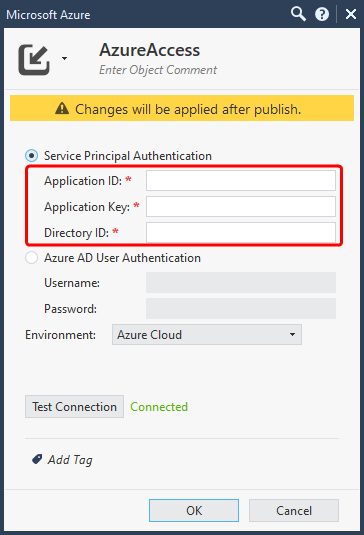
On the objects pane, click New.
-
Select: New > Cloud > Data Center > Microsoft Azure.

-
-
Fill in the related details.
Note - A Service Principal or Azure AD credentials are needed.
-
Select the new object, right-click and select import.

Search for the new VPN Gateway and click the plus sign.
-
Publish the changes.
-
Add the two VPN Gateways to the VPN community:
Click Ok.
-
Install the policy.
Configure route-based VPN
A route-based VPN is a flexible and scalable approach for connecting on-premises networks to Azure Virtual WAN through IPsec tunnels.
To configure route-based VPN, follow the instructions in sk183099 - CloudGuard Network Security for Azure Virtual WAN - Site to Site VPN Configuration Guide.
Configure domain-based VPN
A domain-based VPN connects on-premises networks to Azure Virtual WAN through IPsec tunnels.
To configure domain-based VPN, follow the instructions in sk183099 - Cloud Firewall for Azure Virtual WAN - Site to Site VPN Configuration Guide.
BGP configuration for the on-premises server
After establishing the VPN tunnels, we recommend to configure a route map to import and export the BGP routes.
Configuration example in clish:
set routemap im_azure id 10 on
set routemap ex_azure id 10 on
set bgp external remote-as 65515 import-routemap im_azure preference 10 on
set bgp external remote-as 65515 export-routemap ex_azure preference 10 on
You can customize the route maps to control what routes are advertised or received.
For example, to advertise direct routes, run this command in clish:
set routemap ex_azure id 10 match protocol direct
|
|
Important - When working with BGP, we recommend not to hide the internal network behind the on-premises Gateway (Source NAT), as it can cause traffic issues. |

|
|
Note - You can find here a reference to the BGP configurations in the NVA. |
Disconnect
Disconnect VNET
-
Navigate to your Virtual WAN > on the left tree and select Virtual network connections.
-
Click on the three dots on the Vnet you require to remove > click Delete virtual network connection.
-
Type yes to make sure and click delete.
Disconnect Branch
Use these steps to disconnect a branch:
-
Navigate to your vWAN > select Hubs > select the related Hub > select VPN (Site to Site).
-
Select the branch to disconnect.
-
Click on Disconnect VPN sites.
Deleting the NVA
To remove an NVA, navigate to the resource group the managed app was deployed, select the NVA you wish to remove, and click delete.
Deleting the Virtual Hub
Navigate to the Virtual WAN and select the hub from the overview screen.
|
|
Note - Before you remove the virtual hub, make sure no routes in the route tables are related to the virtual hub. If there are routes in one of the route tables, remove them. |
To remove the virtual hub, simply navigate to the virtual hub resource, and click on Delete.
Deleting Virtual WAN
To remove all the Virtual WAN, make sure that no NVAs and routes stays in it and all the virtual hubs are removed.
To remove the Virtual WAN, navigate to the resource and click Delete.