End-User Daily Quarantine Report (Digest)
The End User Quarantine Report (Digest) is an email notification sent to end users at least once per day. It provides a summary of emails that were delivered to them that were either quarantined or moved to the Junk/Spam folder within the last 24 hours.
This digest enables users to quickly identify important emails that require action, such as:
-
Restoring messages from quarantine
-
Trusting senders, so future emails are delivered to the inbox
-
Reviewing suspicious emails
The quarantine digest serves as a more user-friendly alternative to receiving individual notifications for every quarantined email.
Enabling the End-User Quarantine Digest
To enable the End-User Quarantine Report (Digest):
-
Access the Email SecurityAdministrator Portal.
-
From the left navigation panel, go to Security Settings > User Interaction > Quarantine.
-
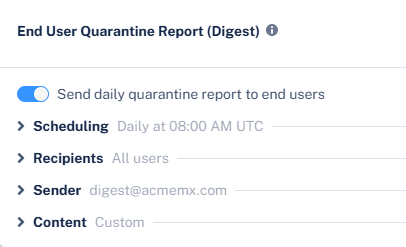
In the End User Quarantine Report (Digest) section, enable the Send daily quarantine report to end users toggle.
-
(Optional) If you want end users to receive only a single periodic summary of all quarantined emails instead of individual notifications for each quarantined email, you can disable individual quarantine notifications. To do that:
-
Go to Security Settings > User Interaction > Quarantine.
-
In the End User Notifications section, enable the required option:
-
Office 365 Users - Stop alerts on individual quarantined emails
-
Google Users - Stop alerts on individual quarantined emails
-

Note - Even if a policy is configured to notify users, enabling the Stop alerts on individual quarantined emails option prevents immediate notifications when an email is quarantined and ensures users only receive the daily quarantine digest.
-
- Click Save and Apply.
Emails Included in the Quarantine Digest
The End-User Quarantine Report (Digest) includes emails that were quarantined or sent to the Junk folder, depending on your configuration.
|
|
Note - In some cases, if administrators or end users have configured advanced rules that move Junk emails to other folders, emails shown in the digest as Junk may no longer be present in the Junk folder. |
An email appears in the digest if the following conditions are met:
-
Emails Quarantined by Check Point
Included if the policy allows the end user to restore the email or request its restoration.
-
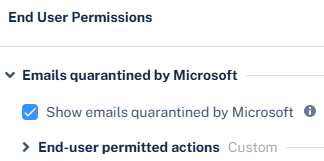
Emails Quarantined by Microsoft
Included if:
-
The Show emails quarantined by Microsoft checkbox is enabled under Security Settings > User Interaction > Quarantine > End User Permissions.
-
The email detection workflow allows the end user to restore the email or request its restoration.
-
-
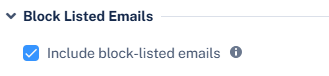
Block-Listed Emails
Included if the Include block-listed emails checkbox is enabled under Security Settings > User Interaction > Quarantine > End User Permissions > Block Listed Emails.
-
Spam Emails Delivered to the Junk Folder
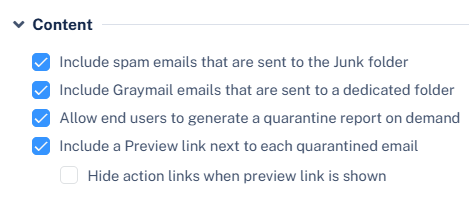
Included if the Include spam emails that are sent to the Junk folder checkbox is enabled under Security Settings > User Interaction > Quarantine > End User Quarantine Report (Digest) > Content.
-
Graymail Emails Delivered to a Dedicated Folder
Included if the Include Graymail emails that are sent to a dedicated folder checkbox is enabled under Security Settings > User Interaction > Quarantine > End User Quarantine Report (Digest) > Content. See Graymail Workflows.
-
Reporting Time Period
Includes only emails that are received within the configured digest reporting time period. See Scheduling and Coverage Timeframe for the Quarantine Digest.
Configuring Recipients for the End‑User Quarantine Digest
By default, the End-User Quarantine Report (Digest) is enabled and sent to all protected users assigned with a Prevent (Inline) or Detect and Remediate policy.
|
|
Notes:
|
Restricting End Users from Receiving the Digest
To send the digest to specific users or groups:
-
Go to Security Settings > User Interaction > Quarantine.
-
In the End User Quarantine Report (Digest) section, expand Recipients.
-
Select All Google Users and specific Office 365 Users or Groups option.
-
Add required users/groups and click Add to Selected.
-
Click Save and Apply.
|
|
Notes:
|
Configuring the Available End User Actions in the Daily Quarantine Digest
The actions available to end users in the Daily Quarantine Report (Digest) depend on how the email was quarantined and the configuration defined in policy.
-
Emails Quarantined by Check Point - The permitted actions are defined in the relevant policies.
For example, if the Threat Detection policy is set to allow users to request a restore for phishing emails, the Request restore action appears next to quarantined phishing emails in the digest.
-
Emails Quarantined by Microsoft - Users can perform actions based on Microsoft’s detection settings.
To configure these permissions:
-
Go to Security Settings > User Interaction > Quarantine.
-
In the End User Permissions section, click Emails quarantined by Microsoft > End-user permitted actions.
The default settings are:
-
Malware - Can request a restore (admin needs to approve)
-
High Confidence Phishing - Can request a restore (admin needs to approve)
-
Phishing - Can request a restore (admin needs to approve)
-
High Confidence Spam - Can restore on their own
-
Spam - Can restore on their own
-
Bulk - Can restore
-
Data Loss Prevention - Can restore
-
Transport Rule - Can restore
-
-
-
Emails Flagged as Spam – The Trust sender action appears if the Threat Detection policy is configured to allow users to trust senders. See Trusted Senders.
This behavior applies regardless of whether the email is quarantined or delivered to the Junk folder.
-
Preview Email – This action allows users to preview quarantined emails in their End-User Portal. See End-User Portal (Email Security Portal).
This action appears if the Include a Preview link next to each quarantined email checkbox is enabled under Security Settings > User Interaction > Quarantine > End User Quarantine Report (Digest) > Content.
Note - For this action to work, ensure the End-User Portal is enabled for your users.
-
Restrict All Actions to the End‑User Portal – When you enable the Preview Email action, you can also enable Hide action links when the preview link is shown under Security Settings > User Interaction > Quarantine > End User Quarantine Report (Digest) > Content.
This ensures that users interact with quarantined emails only through the End‑User Portal.
-
Required Authentication – In some cases, users may need to authenticate to perform actions from the digest. See Authentication for Email Notifications.
Scheduling and Coverage Timeframe for the Quarantine Digest
By default, the Daily Quarantine Report (Digest) is sent once per day at 12:00 AM (GMT +00:00).
You can configure additional daily delivery times to provide users with more frequent visibility into quarantined emails and allow faster restoration of important messages.
To configure scheduling for the digest:
-
Go to Security Settings > User Interaction > Quarantine.
-
In the End User Quarantine Report (Digest) section, expand Scheduling.
-
Select the time and time zone to send the report.
-
In the Daily at section, select a specific time of the day to send the report.
-
To send the report multiple times a day, click + Add More and select the required time.
-
If required, you can configure the report to be sent every hour, up to 24 times per day.
-
-
In the Time zone section, select the required time zone.
-
-
Click Save and Apply.
|
|
Notes:
|
Allowing End Users to Manually Request a Quarantine Digest on Demand
You can allow end users to request a new on-demand digest that includes emails from the previous 24 hours up to the time of the request.
To allow users to request a digest:
-
Go to Security Settings > User Interaction > Quarantine.
-
In the End User Quarantine Report (Digest) section, expand Content.
-
Enable the Allow end users to generate a quarantine report on demand checkbox.
A request link appears at the bottom of the digest email.
Note - Manually requested digests are sent to end users even if they do not contain any quarantined or junk emails.
- Click Save and Apply.
Configuring a Custom Sender for the Quarantine Digest
To configure a custom sender for the digest:
-
Go to Security Settings > User Interaction > Quarantine.
-
In the End User Quarantine Report (Digest) section, expand Sender.
-
Configure the required sender email address for the daily quarantine digest.
-
Friendly-From name
-
If no friendly-from name is required, select None.
Note - Some email clients duplicate the sending address to the Friendly-from name.
-
To use a customized name, select Custom and enter the sender name.
-
-
From address
-
To use the default email address, select Default. The default email address is no-reply@checkpoint.com.
-
To use a custom email address, select Custom and enter the email address.
-
If you use the default sender or any email address under your domain, you must add the
include:spfa.cpmails.com -
The custom domain must be one of the protected domains in your Check Point Portal tenant.
Notes:
-
-
Reply-to address
-
To use From address as the Reply-to address, select Same as From address.
-
To use a custom email address, select Custom and enter the email address.
-
-
-
Click Save and Apply.
Customizing the Text of the Quarantine Digest
You can customize the email subject and body of the End User Quarantine Report (Digest) to include organization‑specific messaging and links.
To customize the digest text:
-
Go to Security Settings > User Interaction > Quarantine.
-
In the End User Quarantine Report (Digest) section, expand Content.
-
In the Email subject and body section, configure the subject and the body of the daily quarantine digest email.
-
In the Subject field, enter the email subject for the daily quarantine digest email notification.
-
In the Body field, enter the required information in the email notification.
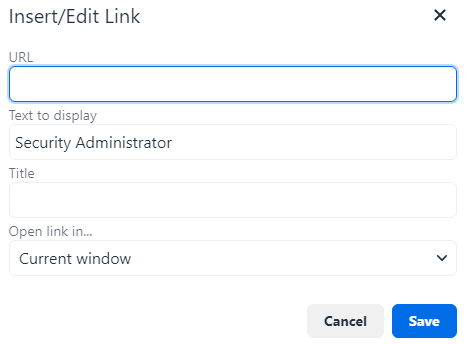
 To add links to the email footer:
-
Place the cursor where you want to add the link.
-
Click the
 icon.
icon.or
Right-click and select
Link. -
In the URL field, enter the URL.
-
In the Text to display field, enter the text that should appear for the link.
-
If required, enter a Title for the link.
-
In the Open link in list, select Current window or New window.
-
Click Save.
-
-
-
Click Save and Apply.
Customizing Action Labels
You can customize the names of the actions that end users see in the digest (for example, Request restore).
To customize action labels:
-
Go to Security Settings > User Interaction > Quarantine.
-
In the End User Quarantine Report (Digest) section, expand Content.
-
In the Actions labels section, enter the required labels for the following.
-
Release
-
Request to Release
-
Trust Sender
-
Release and Trust Sender
-
-
Click Save and Apply.
To manage end user authentication on web browser, see Authentication for Email Notifications.