Office 365 SharePoint
Overview
Office 365 SharePoint empowers teamwork with dynamic and productive team sites for every project team, department, and division. Email Security adds security, privacy, and compliance to Office 365 SharePoint by scanning files shared in SharePoint for malicious content and data loss prevention (DLP) and generates actionable events on malicious content.
|
|
Note - Email Security scans only the organization's Office 365 SharePoint and does not scan files and folders outside the organization, even if the user has access to them. |
How it works
Email Security adds a layer of security that provides these security features for Office 365 SharePoint:
-
Data Leak Prevention (DLP): Protecting uploaded files containing sensitive data
-
Anti-Malware: Scanning of files for malicious content
-
Remediation: Quarantine malicious files and send files containing sensitive data to the vault
Email Security scans files in the following scenarios:
-
A new file is created
-
A file is uploaded
-
A file is modified (edited)
-
A file or directory is shared with new members
|
|
Note - Email Security starts scanning files from the time of installation. Files that existed prior to installation are not scanned retroactively. |
Required Permissions
Email Security requires these permissions to protect Office 365 SharePoint.
Note- All these permissions are required to access your data in the
|
Permissions required from Microsoft |
Functions performed by Email Security |
|---|---|
|
Manage all access reviews |
Allows the app to read, update, delete and perform actions on access reviews, reviewers, decisions, and settings in the organization without a signed-in user. |
|
Read and write all applications |
Allows the app to create, read, update and delete applications and service principals without a signed-in user. Does not allow management of consent grants. |
|
Read and write contacts in all mail boxes |
Allows the app to create, read, update, and delete all contacts in all mailboxes without a signed-in user. |
|
Read and write directory data |
Allows the app to read and write data in your organization's directory, such as users, and groups, without a signed-in user. Does not allow user or group deletion. |
|
Read and write domains |
Allows the app to read and write all domain properties without a signed-in user. Also allows the app to add, verify and remove domains. |
|
Read and write files in all site connections |
Allows the app to read, create, update and delete all files in all site collections without a signed-in user. |
|
Read and write all groups |
Allows the app to create groups, read all group properties and memberships, update group properties and memberships, and delete groups. Also allows the app to read and write group calendar and conversations. All of these operations can be performed by the app without a signed-in user. |
|
Read and write all user mailbox settings |
Allows the app to create, read, update, and delete user's mailbox settings without a signed-in user. Does not include permission to send mail. |
|
Read and write mail in all mailboxes |
Allows the app to create, read, update, and delete mail in all mailboxes without a signed-in user. Does not include permission to send mail. |
|
Send mail as any user |
Allows the app to send mail as any user without a signed-in user. |
|
Read all usage reports |
Allows an app to read all service usage reports without a signed-in user. Services that provide usage reports include Microsoft 365 and Microsoft Entra ID (formerly Azure AD). |
|
Read and update your organization’s security events |
Allows the app to read your organization’s security events without a signed-in user. Also allows the app to update editable properties in security events. |
|
Read and write items in all site collections |
Allows the app to create, read, update, and delete documents and list items in all site collections without a signed-in user. |
|
Read and write all users' full profiles |
Allows the app to read and update user profiles without a signed-in user. |
|
Sign in and read user profile |
Allows users to sign in to the app, and allows the app to read the profile of signed-in users. It also allows the app to read basic company information of signed-in users. |
Activating Office 365 SharePoint
For details about the procedure to activate Office 365 SharePoint, see Activating Office 365 SharePoint.
Deactivating Office 365 SharePoint
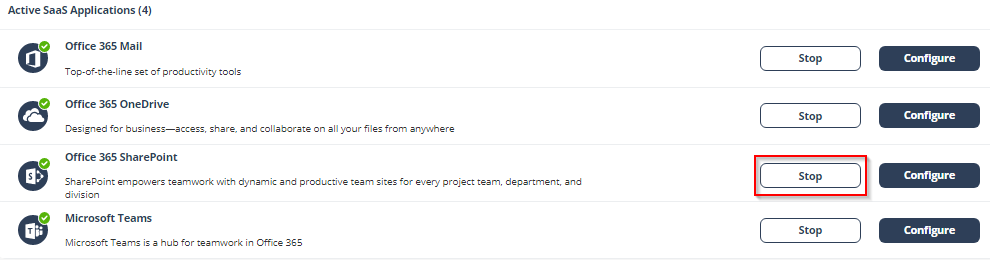
To deactivate Office 365 SharePoint:
-
Navigate to Security Settings > SaaS Applications.
-
Click Stop for Office 365 SharePoint.
Office 365 SharePoint Security Settings
Customizing Quarantine and Vault
Administrators can customize the quarantine and vault folders (folder names, quarantine/vault messages, etc.)
Quarantine folder
The quarantine folder is used to quarantine malware-infected files from SharePoint. The infected files of all the users will be quarantined to a single predefined quarantine folder.
|
|
Notes:
|
Vault folder
A vault folder is used to remediate DLP detections related to SharePoint files. It is a non-shared folder that is created for every SharePoint user.
If a file contains sensitive information that does not comply with your organization's data-sharing policies, it is removed and placed in the vault folder.
|
|
Note - Vault folder is created with the configured folder name in the root directory of each user’s drive. The user can access the file from the vault but cannot share it with others. |
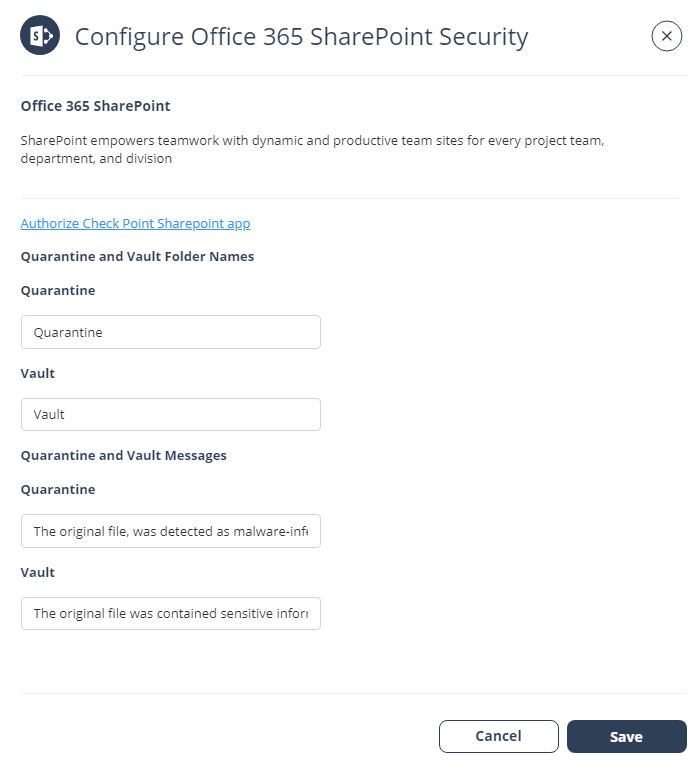
To customize the quarantine and vault folders:
-
Navigate to Security Settings > SaaS Applications.
-
Click Configure for Office 365 SharePoint.
-
Under Quarantine, enter the required quarantine folder name.
-
Under Vault, enter the required vault name.
-
Click Save.
Configuring Microsoft Teams File Scanning for E1/E3 Tenants
Email Security supports scanning files shared in Microsoft Teams for tenants with Microsoft 365 E1 and E3 licenses.
This capability allows administrators to extend existing Office 365 OneDrive and Office 365 SharePoint protection to Microsoft Teams files without requiring full Microsoft Teams SaaS protection.
The feature enables file-only scanning for Microsoft Teams in E1/E3 environments and uses the existing OneDrive and SharePoint integration.
Supported Protection Policies
The system scans files shared in Microsoft Teams channels and includes the following policies:
-
Malware Protection
-
Data Loss Prevention (DLP)
Notes
The feature scans files only and does not scan Microsoft Teams messages.
Teams SaaS activation is not required to use this feature.
Microsoft Teams files are stored in both Microsoft OneDrive (private chats) and SharePoint (channel files). To ensure full protection coverage, Email Security recommends to enable scanning for OneDrive and SharePoint.
Configuration
To enable Microsoft Teams file scanning through OneDrive:
Go to:
Security Settings → SaaS Applications → Configure OneDrive
Select the checkbox:
Scan conversation files in Microsoft Teams
Click Save.
Configuring Office 365 SharePoint Policy
Malware Policy
By default, the Office 365 SharePoint malware policy scans the uploaded files for malicious content.
Supported Actions
Office 365 SharePoint malware policy supports these actions:
-
Quarantine of malware-infected files.
-
Alert owner: Sends an email notification to the user who uploaded a file that contains malicious content.
-
Alert admin(s): Sends an email notification to the admin(s) about the malicious files.
Configuring Malware Policy
To configure Malware policy:
-
Access the Email Security Administrator Portal.
-
From the left navigation panel, click Policy.
-
Click Create New Policy Rule.
-
From the Choose SaaS drop-down list, select Office 365 SharePoint.
-
From the Choose Security drop-down list, select Malware and click Next.
-
Select the desired protection mode:
-
Detect and Remediate
-
Detect
(Optional) If required, you can change the Rule Name.
-
-
In the Scope section, select the users and/or group of users for whom the policy is applicable:
-
To apply the policy to all users and groups in your organization, enable All Users and Groups checkbox.
-
To apply the policy to specific users or groups, select the users/ groups and click Add to Selected.
-
To exclude specific users or groups from the policy, select the required users/groups and click Add to Excluded.
-
-
In the Blades section, select the required threat detection blades for the policy.

Note - To select all the blades available for malware detection, enable All running threat detection blades checkbox.
-
Scroll down to Attachments section and select the required workflow for the policy in the Suspected malware attachments workflow.
-
Quarantine. User is not alerted (admin can restore)
-
Do nothing
Note - The Workflows are available only when Detect and Remediate protection mode is enabled.
-
-
To quarantine malware-infected files, enable the Quarantine drive files checkbox under Alerts.
Note - This option is available only in Detect and Remediate protection mode.
-
To remove malware-infected files, enable the Remove malicious files checkbox under Alerts.
Notes:
-
If you enable Remove malicious files checkbox, malicious files will be removed permanently, and you cannot restore them.
-
For a policy, you can only enable Quarantine drive files or Remove malicious files.
-
-
Configure Alerts for the policy.

-
To quarantine malware-infected files, enable the Quarantine malicious files checkbox in the Alerts section.
Note -This option is available only in Detect and Remediate protection mode.
-
To clean malicious files, enable the Clean Files (Threat Extraction) checkbox. See File Cleaning (Threat Extraction) for Office 365 OneDrive and Office 365 SharePoint.
Note - If the Clean files (Threat Extraction) checkbox is not available in your Check Point Portal account (tenant), contact Check Point Support .
-
To send email alerts to the file owner of malware, enable the Alert file owner of malware checkbox.
-
To send email alerts to admins about malware, enable the Alert admin(s) checkbox.
To configure alerts to the specific users, click Select Users next to the Alert admin(s).
-
To remove malware-infected files, enable the Remove malicious files checkbox in the Alerts section.
Note - If you enable the Remove malicious files checkbox, malicious files will be removed permanently, and you cannot restore them.
Notes:
-
For a policy, you can only enable Quarantine malicious files or Remove malicious files.
-
Even when the alerts are enabled here in the policy, the administrator only receives email alerts for security events when Receive Alerts role is enabled in the Specific Service Role. For more details about managing roles and permissions in the Check Point Portal, refer to Global Settings > Users in Check Point Portal Administration Guide.
-
-
Click Save and Apply.
DLP Policy
By default, the DLP policy scans the uploaded files to SharePoint for potentially leaked information, such as credit card number and Social Security Number (SSN).
Supported Actions
Office 365 SharePoint DLP policy supports these actions:
-
Send files with sensitive data to the vault.
-
Alert owner: Sends an email notification to the user who uploaded a file that contains sensitive information.
-
Alert admin(s): Sends an email notification to the admin(s) about the files that contain sensitive information.
Configuring DLP Policy for SharePoint
To configure DLP policy:
-
Click Policy on the left panel of the Email Security Administrator Portal.
-
Click Add a New Policy Rule.
-
From the Choose SaaS drop-down list, select Office 365 SharePoint.
-
From the Choose Security drop-down list, select DLP and click Next.
-
Select the desired protection mode (Detect and Remediate or Detect).
If required, you can change the Rule Name.
-
Choose Scope for the policy.
-
To apply the policy to specific users or groups, select the users and groups and click Add to Selected.
-
To apply the policy to all users and groups in your organization, enable All Users and Groups checkbox.
-
To exclude specific users or groups from the policy, select the users/groups and click Add to Excluded.
-
-
Under DLP Criteria, select the DLP categories required for the policy.
For more information about the DLP Data Types and categories, see Appendix E: DLP Built-in Data Types and Categories.
-
Select the sensitivity level required for the policy.
-
Very high (hit count > 0)
-
High (hit count > 2)
-
Medium (hit count > 5)
-
Low (hit count > 10)
-
Very Low (hit count > 20)
-
-
To exclude DLP policy for the messages and files shared only with the internal users, enable the Skip Internal items checkbox.
-
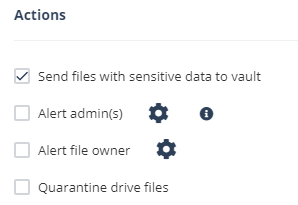
Configure Actions for the policy.
-
To send a detected file with sensitive data to its owner’s vault, enable the Send files with sensitive data to vault checkbox.
Note - This option will be available only in Detect and Remediate protection mode.
-
To send email alerts to admins about DLP, enable the Alert admin(s) checkbox.
-
To send email alerts to the file owner about DLP, enable the Alert file owner(s) checkbox.
-
To quarantine drive files, enable the Quarantine drive files checkbox.
Notes:
-
For a policy, you can only enable Send file with sensitive data to vault or Quarantine drive files.
-
Even when the alerts are enabled here in the policy, the administrator only receives email alerts for security events when Receive Alerts role is enabled in the Specific Service Role. For more details about managing roles and permissions in the Check Point Portal, refer to Global Settings > Users in Check Point Portal Administration Guide.
-
To customize the email alert templates, click on the gear icon to the right of the alert.
-
-
Click Save and Apply.
Viewing Office 365 SharePoint Security Events
Email Security records the SharePoint detections as security events. The event type depends on the type of policy that created the event. You can handle the security events in different ways, whether they are detected/prevented automatically or discovered by the administrators after not being prevented.
The Events screen shows a detailed view of all the security events.
|
|
Note - For files marked as malware by Microsoft, scan results are unavailable and access to these files is prevented by Microsoft. |

File Cleaning (Threat Extraction) for Office 365 OneDrive and Office 365 SharePoint
File cleaning (Threat Extraction) uses a Content Disarm and Reconstruction (CDR) engine as an additional layer of security alongside the Anti-Malware engine to prevent malware attacks and their spread among internal users.
The system scans every file uploaded to or edited in Office 365 OneDrive or SharePoint.
-
If malware is detected, Email Security applies the malware workflow.
-
If no malware is found, it sanitizes the file by removing active components that may conceal undetected threats.
If required, administrators can restore the original file to ensure business continuity.
For more information about file cleaning, see Attachment Cleaning (Threat Extraction).
Configuring File Cleaning (Threat Extraction) for Office 365 OneDrive or Office 365 SharePoint
To configure file cleaning for Office 365 OneDrive or Office 365 Sharepoint:
-
Access the Email Security Administrator Portal.
-
From the left navigation panel, click Policy.
-
Open the existing malware policy for the required SaaS application (Office 365 OneDrive or Office 365 SharePoint).
-
Select the policy protection mode as Detect and Remediate.
-
Scroll-down to the Alerts section, and select the Clean Files (Threat Extraction) checkbox.
Note - If the Clean files (Threat Extraction) checkbox is not available in your Check Point Portal account (tenant), contact Check Point Support .
-
Click Save and Apply.
Cleaned Office 365 OneDrive / Office 365 SharePoint Files
When Email Security cleans files in Office 365 OneDrive or Office 365 SharePoint, it makes the following changes to the files:
-
Adds the string .cleaned to the file name (For example, file.doc becomes file.cleaned.doc).
-
Removes all active content from the file.
For more information about supported file types and details of the components removed from the files, see Supported file types for Attachment Cleaning (Threat Extraction).
Restoring the Original File
Administrators can restore the original file through the Email Security Administrator Portal. To do that:
-
Go to User Interaction > Quarantined Items.
-
From the drop-down list next to the Quarantined Items, select Office 365 OneDrive or Office 365 SharePoint.
-
Open the relevant File Info page, and click the Restore Original File option to restore the original file.

Note - If an end user needs access to the original file (without cleaning), they must contact an administrator, as there is no option available for them to restore it on their own.
If multiple versions of the same file exist, only the first (original) version can be restored. See Restoring Files that are Cleaned Multiple Times.
Restoring Files that are Cleaned Multiple Times
When you restore a file, Email Security always restores the first version it scanned, regardless of how many times the file was edited or cleaned later.
Since the file is cleaned every time it’s modified, the version restored may be older than the one the end user last saw.
For example, if you restore a file, the system will restore the original version of the file—potentially older than the version they last accessed. The file is cleaned each time it is modified, ensuring security at every stage.
Viewing Cleaned Files for Office 365 OneDrive and Office 365 SharePoint
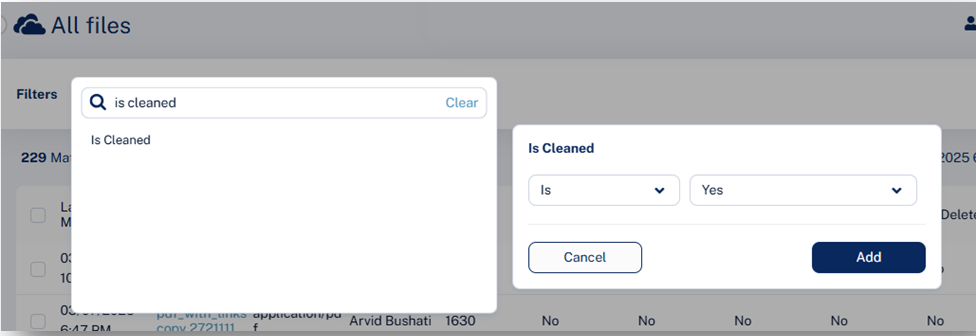
To view Office 365 OneDrive or Office 365 SharePoint files that are cleaned by Email Security:
-
Go to Analytics > Custom Queries.
-
Click Create New Query at the to right corner.
-
In the Select Template for New Query page that appears, select Office 365 OneDrive or Office 365 SharePoint, then click All Files.
-
In the All Files page that appears, click Add Filters in the left top corner.
-
Select Is Cleaned is Yes, and click Add.