Email Archiving
Overview
Archiving provides organizations with a variety of tools for one or more of these reasons:
-
Business continuity and disaster recovery
-
Email Backup and recovery of emails deleted by end-users or because of technical malfunction
-
Regulatory compliance and records management
-
Litigation and Legal Discovery
-
Prove chain of custody and keep the authenticity of emails.
Required Permissions
To access, filter and take actions on the archived emails, an administrator requires these roles and permissions:
-
Admin role assigned under Global Roles or Specific Service Roles.
-
View All Sensitive Data role assigned under Specific Service Roles for Email Security.
For more information on roles and permissions, see Managing Users, Roles and their Permissions.
Activating Email Archiving
After your purchase request is processed, Archiving gets activated automatically.
After activation, Archiving starts archiving all the emails sent from and received by the protected user’s mailboxes (users that are assigned Email Security license). For more information on assigning licenses, see Limiting license consumption and security inspection to a specific group.
|
|
Note - Though Archiving starts archiving the emails immediately, it might take up to 48 hours for these emails to be available in the Archiving Search. |
If required, administrators can import the archived emails from an external source. See Importing Emails to Archive.
Deactivating Email Archiving
To deactivate Archiving or to delete the archive storage, contact Check Point Support.
Archived Emails
After activating Archiving, all the internal, outgoing and incoming emails (sent or received) from protected users will be archived.
For users not licensed for Email Security, the emails will not be archived.
Emails that were sent before activating Archiving are not archived. To import historical emails to the Archiving, see Importing Emails to Archive.
By default, the archived emails are stored for a period of 7 years and will be automatically deleted afterwards. To change the retention period, see Customizing the Retention Period of Archived Emails.
Email Security encrypts and stores the archived emails in the same region as your Email Security tenant
To view how to set the region when creating the account, see Getting Started in the Check Point Portal Administration Guide.
To view the region in which your tenant in the Check Point Portal is created, see Account Settings in the Check Point Portal Administration Guide.
Customizing the Retention Period of Archived Emails
By default, the archived emails are stored for a period of 7 years and will be automatically deleted afterwards.
To customize the retention period of archived emails:
-
Go to Security Settings > Security Engines.
-
Click Configure for
Configure
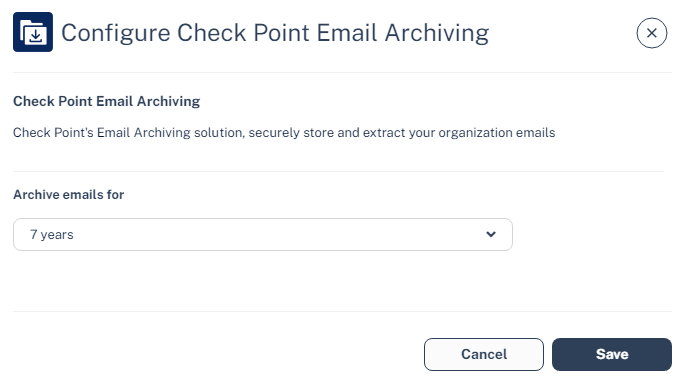
-
In the Archive emails for dropdown, select the number of years to retain the emails.
-
1 year
-
2 years
-
3 years
-
5 years
-
7 years (default)
-
10 years
-
-
Click Save.
|
|
Notes:
|
Viewing Archived Emails
From the Archiving Search screen, administrators can use filters, and search for the required emails. The Archiving Search screen gives a detailed view of all the archived emails (whether they have been archived or imported from an external source).
|
|
Note - After the emails are archived, it takes up to 48 hours for the archived emails to appear in the Archiving Search. |
Importing Emails to Archive
Administrators can import emails from the email archiving solutions they used in the past or from other sources.
Supported Archiving import file format and size
Before importing the existing email archive to the
-
Export the existing emails as EML files with a maximum size of 150 MB per file.
-
Group your EML files and compress them into ZIP files with a maximum size of 25 GB per ZIP file.
-
Follow the procedure below to import emails to Archiving.

Notes:
-
To import the emails to Archiving, the combined size of all uploaded ZIP files must be less than 6 TB.
For example, you can upload up to 100 ZIP files, each with a maximum size of 25 GB, or alternatively, upload 250 ZIP files, each with a maximum size of 10 GB.
-
The ZIP files should contain only EML files, without any subfolders.
-
You can follow the same procedure multiple times to upload ZIP files totaling up to 12 TB, 18 TB, and so on. If you need to upload an archive significantly larger than that, contact Check Point Support.
-
To import emails to Archiving:
-
Go to Archiving.
-
From the top, select the Archiving Search tab.
-
Click Import Archive.
Note - If Import Archive is not available in your
-
In the Import Emails to Archive window that appears, click Get credentials to receive credentials to a temporary upload path.
Note - This upload path and credentials are valid only for 30 days.
-
Use the path and credentials (Host name, user name and password) to log in to SFTP.
-
Upload the ZIP file(s) to the uploads folder.
-
After uploading all the files, click Done uploading.
-
Click Confirm to initiate the import.
Note - After importing the emails, it takes up to 48 hours for the archived emails to appear in the Archive Search.
Exporting Emails from Archive
If required, administrators can export the archived emails from Archive. Each archive export creates encrypted ZIP file(s), which includes EML files. If the export file size exceeds 10 GB, then the export is divided into multiple ZIP files with each file size not exceeding 10 GB.
To export archived emails:
-
Go to Archiving.
-
From the top, select the Archiving Search tab.
-
Using filters, refine the search criteria for the required emails.
-
Select the emails to export, and click Export.
-
In the Export Archive Emails window that appears, enter the required Export Name and Passphrase for the archive export.
-
Click OK.
Note - The export process could take several hours. After it is complete, the administrator who initiated the export process receives an email notification.
The export process could take several hours. After it is complete, the administrator who initiated the export process receives an email notification
-
To download the archive export file(s), go to Archiving Export tab.
-
Click Download for the required export file(s).
Note - The link to download the exported file(s) will only be available for 7 days after the export is completed.
Auditing
Email Security audits all the archive search, archive import, archive export, and archive download actions and adds them to the System Logs (Security Settings > System Logs).