DMARC
Introduction
Email Security provides DMARC Management as an add-on to help manage DMARC and SPF.
DMARC Management helps organizations make sure all legitimate senders are allowed so that you can confidently apply a restrictive policy tag in your organization's DMARC DNS record.
The organization’s DMARC DNS record – specifically the p tag - states what should be done with emails that fail authentication checks.
Three possible values to the p tag in the DMARC record:
-
none – recipients should report failures, but should also deliver emails allegedly from the domain even if they fail authentication.
-
quarantine – recipients should quarantine emails that fail authentication. They would usually be marked as spam.
-
reject – recipients should not even accept the email and never deliver it to their end users.
Since this is usually a difficult task, most organizations do not have a DMARC policy (p) tag at all or assign the value none to it.
Benefits
DMARC Management helps you safely transition to a restrictive DMARC policy. It includes:
-
Visibility to all the services sending emails on behalf of your domains and subdomains
-
Search all DMARC failed emails sent on the organization's behalf
-
Actionable DMARC record change recommendations.
Accessing the DMARC Management
To access the DMARC management page:
-
Access the Email Security Administrator Portal.
-
From the left navigation panel, click DMARC > Overview.

Note - DMARC Management is a licensed add-on feature.
-
If you already purchased the DMARC Add-on, the DMARC option appears in the left navigation panel.
-
If you do not see the DMARC option, you can access it from the Add-ons Store in the left navigation panel.
-
To purchase or enable the add-on, contact Check Point Support.
-
For Managed Service Providers (MSPs), an administrator must assign the DMARC license in the MSP portal.
-
Prerequisites
Periodically, email receivers send aggregated reports containing information on all emails they received from your domain, the IP address from which they received the emails, and the authentication results (SPF and DKIM) for each IP address. These reports are sent to the email addresses (RUA mailbox) defined in your domain's DNS DMARC record with the rua tag.
Sample DMARC record content:

Email Security needs to get the aggregated DMARC RUA reports. To do that, you must configure the rua tag of your DMARC record:
|
|
Notes:
|
|
Present RUA value |
Change to |
|---|---|
|
An internal mailbox |
Email Security reads the value from the DNS record and monitors the internal mailbox. |
|
A hosted mailbox |
If you wish to use a hosted mailbox, you must add a For more information, see RUA Mailbox Hosted by Check Point. |
RUA Mailbox Hosted by Check Point
Organizations that send large amounts of emails to external recipients often get a lot of DMARC RUA reports in a short period of time. The amount is so large that Microsoft and Google often reject some of them to meet their maximum allowed incoming email rate.
Email Security automatically creates a dedicated RUA mailbox for every tenant (account) in the Email Security Administrator Portal.
|
|
Note - The hosted RUA Mailbox is compliant with RFC 7489, section-7.1. |
To use the dedicated RUA mailbox:
-
Access the Email Security Administrator Portal and click DMARC > Overview.
-
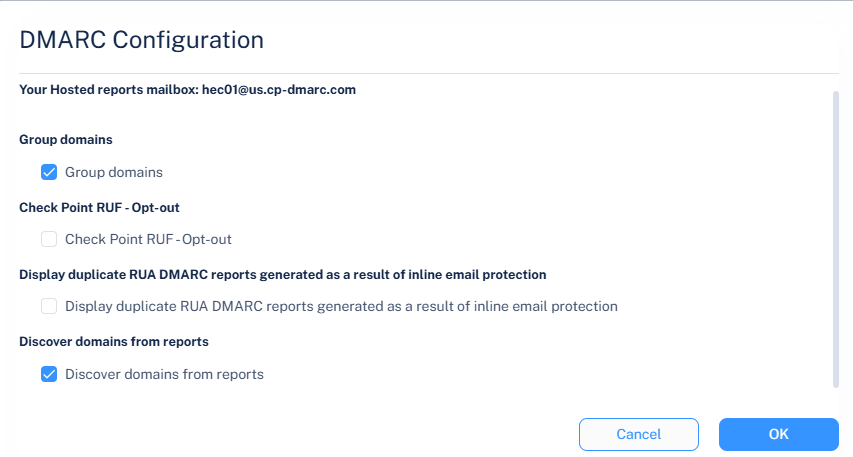
From the top of the page, click Configuration.

The DMARC Configuration pop-up appears..
-
From the Your Hosted reports mailbox field, copy the dedicated RUA mailbox created for your tenant (account).

-
Click OK.
-
Add the RUA mailbox to the list of email addresses for the rua tag in your DMARC DNS record.
Note - DNS changes might take up to 24 hours to reflect in the Email Security Administrator Portal.
Discovering Domains from RUA Reports
Email Security can automatically discover domains based on RUA reports found in your environment.
By default, the Discover domains from reports checkbox is enabled. When you disable it, the system removes all currently discovered domains from the domain list, except for verified and manually added domains, and does not discover new domains from incoming RUA reports.
Domains that are not SaaS-verified, previously discovered through RUA reports, and are actively managed for SPF or DKIM continue to be managed in the background. You can make these domains visible again by adding them manually.
When you re-enable the Discover domains from reports checkbox, the system resumes discovering new domains from incoming RUA reports, and all previously discovered data becomes visible again. Rediscovery may take up to an hour and depends on receiving new or recent RUA reports.
To enable discover of domains from RUA reports:
-
Access the Email Security Administrator Portal.
-
From the left navigation panel, go to DMARC > Overview.
-
Click Configuration at the top of the page.
The DMARC Configuration pop-up appears.
-
Disable the Display duplicate RUA DMARC reports generated as a result of inline email protection checkbox to do not display the duplicated reports.
-
In the Discover domains from reports section, select the Discover domains from reports checkbox.
-
Click OK.
Virtual RUF Reports
Virtual RUF reports provide administrators with message-level visibility for emails that fail DMARC authentication.
Many email providers do not send DMARC failure (RUF/forensic) reports. As a result, administrators often cannot identify which specific message failed DMARC authentication or determine the reason for the failure.
When Email Security detects an email that fails DMARC while it is being processed in the Email Security network, it generates a virtual RUF report based on the available message details. These virtual reports enable administrators to troubleshoot and investigate issues more quickly while supporting shared insights across the
If
Opting out reduces forensic visibility for DMARC failures and limits the ability to benefit from collective insights gathered across the
External Reporting Authorization Record
To make sure that the DMARC records for your domain are accepted by
It creates a domain name in the format: <your_domain>.com._report._dmarc.dmarc-cp.com. In this domain, a TXT record is added with this content: "v=DMARC1":
|
Text |
Description |
|---|---|
|
TXT |
<your_domain>.com._report._dmarc.dmarc-cp.com |
|
|
Note - This process could take a couple of hours after |
Adding a New Domain
To add a new domain to the monitored domains list:
-
Click Add Domain at the top of the page.
-
In the pop-up that appears, enter the domain name in the New Domain section.
-
Click OK.
Note - It may take up to 24 hours for the system to start monitoring the domain.
DMARC Widgets
The Overview page displays the following graphs for the selected time frame:
Top Domains Success
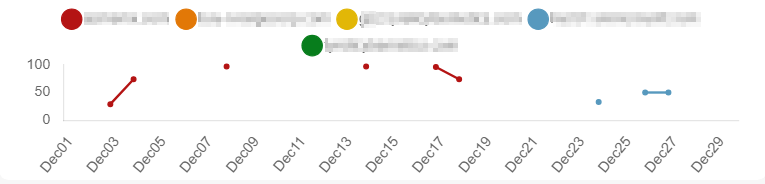
The Top Domains Success widget shows the domains with the highest success rate within your organization for the selected timeframe.
Top Domains Failures
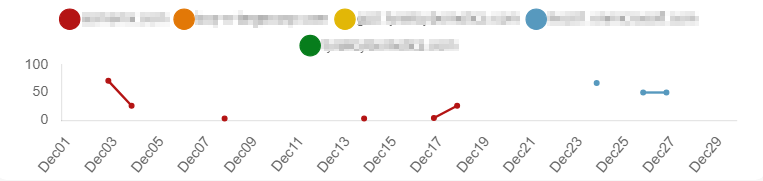
The Top Domains Failures widget shows the domains with the highest failure rates within your organization for the selected timeframe.
Top Sending Domains
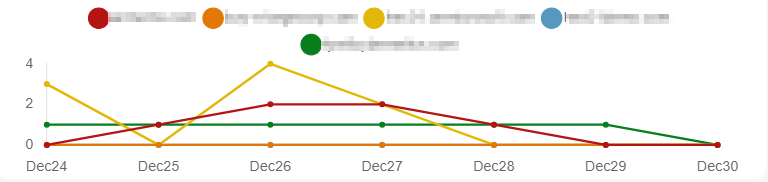
The Top Sending Domains widget shows the domains that have sent the most number of emails within your organization for the selected timeframe.
Reviewing the DMARC Status of your Domains
The Overview page shows a list of all the organization's protected domains and subdomains.
To view the Overview page, click DMARC > Overview.
To export the details to a CSV, click Export to CSV in the top-right corner above the table.
|
|
Note - You can export up to 50k entries at a time. |
|
Column |
Description |
||
|---|---|---|---|
|
Status |
Monitoring status of the domain.
|
||
|
Domain |
Domain name. |
||
|
DMARC % Success |
The percentage of emails that pass DMARC (DKIM and SPF) out of the total number of reported emails sent by the domain. |
||
|
SPF Monitoring |
Monitoring status of the domain.
|
||
|
DMARC Policy |
The recommended enforcement on emails that failed DMARC sent on behalf of the sub domain. It is a description of the value defined in the policy (p) tag in the subdomain DMARC record.
|
||
|
Reported Emails |
The total number of reported emails for the domain. |
||
|
DMARC Failed Emails |
The total number of failed DMARC emails for the domain. |
||
|
Tags |
Custom annotation tags added to the domain. |
 - DMARC policy is in place and the reports are being received properly.
 - DMARC policy is in place but no reports were received in the last 72 hours.
 - DMARC policy is in place, trying to receive the first report.
 - No DMARC policy is in place and cannot monitor the domain.
Changing View to Top Level Domains
By default, the Overview page shows the status of different subdomains. To change the DMARC status view to aggregate the results based on top level domains, click Group Domains.
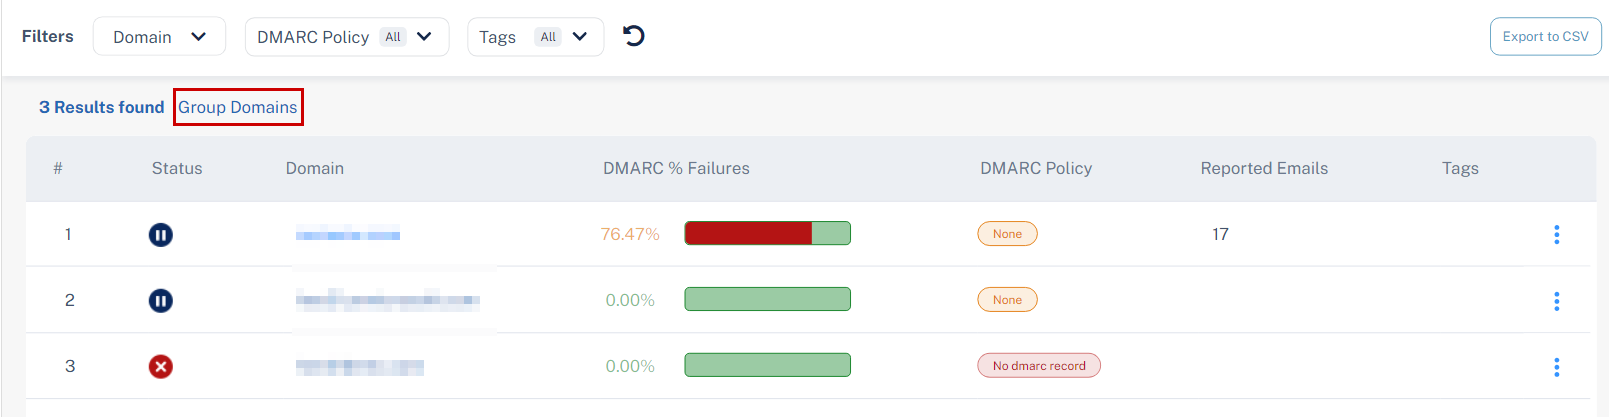
While viewing the aggregated results based on top level domains, to clear the aggregated results and view the status of different sub domains, click Ungroup Domains.
Annotating / Tagging Domains and Sending Sources
While analyzing the subdomains, administrators need to annotate domains to differentiate between them.
To add a custom tag to a domain or subdomain:
-
Click the
 icon in the last column of the domain.
 -
Click Update Tags.
-
In the Tags field, enter one or more tags separated by a comma.

-
Click OK.
|
|
Note - Annotating / tagging domains does not impact the DMARC status of the domain and does not change the domain’s DNS. |
Investigating Domains and Sending Sources
Investigating the DMARC Status of Domains
The Overview page allows you to drill down to domains and analyze the sources sending emails on the organization's behalf.
To analyze the DMARC status of a domain, click the domain from the table. The system shows these details describing the different sending sources:
|
Column |
Description |
|---|---|
|
New |
Indicates if the source has recently started sending emails on behalf of the domain.
To see the first instance of the domain sending emails on behalf of the domain, hover over the source name / IP address. |
|
Sent via Source |
The service provider used to send the email. To investigate the IP addresses from which the sending source sent emails on behalf of the domain, see Investigating a Specific Sending Source. |
|
Reported Emails |
The number of reported emails sent from this source on behalf of the domain. |
|
Reported Failed Emails |
The number of emails sent from this source, which failed DMARC authentication. |
|
DMARC % Failures |
The percentage of emails that failed DMARC out of the total number of reported emails sent from the source. |
|
SPF % Failures |
The percentage of emails that failed SPF out of the total number of reported emails sent from the source. |
|
DKIM % Failures |
The percentage of emails that failed DKIM out of the total number of reported emails sent from the source. |
|
SPF Not Aligned |
The percentage of the emails whose SPF is not aligned out of the total number of reported emails sent from the source. |
|
DKIM Not Aligned |
The percentage of the emails whose DKIM is not aligned out of the total number of reported emails sent from the source. |
|
Number of Reporters |
The number of unique servers that reported emails being sent from this source. |
|
Distinct IP Addresses |
The number of unique IP addresses used by the source to send emails. |
|
Tags |
Tags assigned to the source. See Annotating / Tagging Domains and Sending Sources. |
Investigating a Specific Sending Source
You can drill down to a specific sending source for a particular domain to investigate the IP addresses from which the sending source sent emails on behalf of the domain.
To do that, after you drill down to the specific domain, click on one of the source names in the Sent via Source column. The system shows these details:
|
Column |
Description |
|---|---|
|
IP Address |
IP address of the sending source. For more information about the IP address, see Investigating a Single Sending IP Address. |
|
Location |
The geo-location of the IP address. |
|
Reported Emails |
The number of reported emails sent from this IP address by the source. |
|
Reported Failed Emails |
The number of emails sent from this IP address, which failed DMARC authentication. |
|
DMARC % Failures |
The percentage of emails that failed DMARC out of the total number of emails sent from the IP address. |
|
SPF % Failures |
The percentage of emails that failed SPF out of the total number of emails sent from the IP address. |
|
DKIM % Failed |
The percentage of emails that failed DKIM out of the total number of reported emails sent from the IP address. |
|
Number of Reporters |
The number of unique organizations that reported emails being sent from this IP address. |
|
Number of Envelope |
The number of unique envelops to values in emails sent from this IP address. |
Investigating a Single Sending IP Address
To view more information about the IP address of a specific sending source, click the IP address in the table. The system shows these details for the IP address:
|
Column |
Description |
|---|---|
|
IP |
IP address |
|
Host name |
Host name |
|
Location |
The geo-location of the IP address. |
|
ASN |
Autonomous System Number (ASN) of the IP address. |
Viewing Specific RUA Reports
To view a specific RUA report:
-
Click DMARC > RUA Explorer.
The system shows a table with all the RUA reports received.

-
Click on the link in the Report ID column to view its raw XML content.
Improving your Domains’ DMARC Enforcement
The Recommendations page shows a list of actionable recommendations to safely configure a restrictive DMARC policy for your domains and helps to maintain SPF and DKIM hygiene.
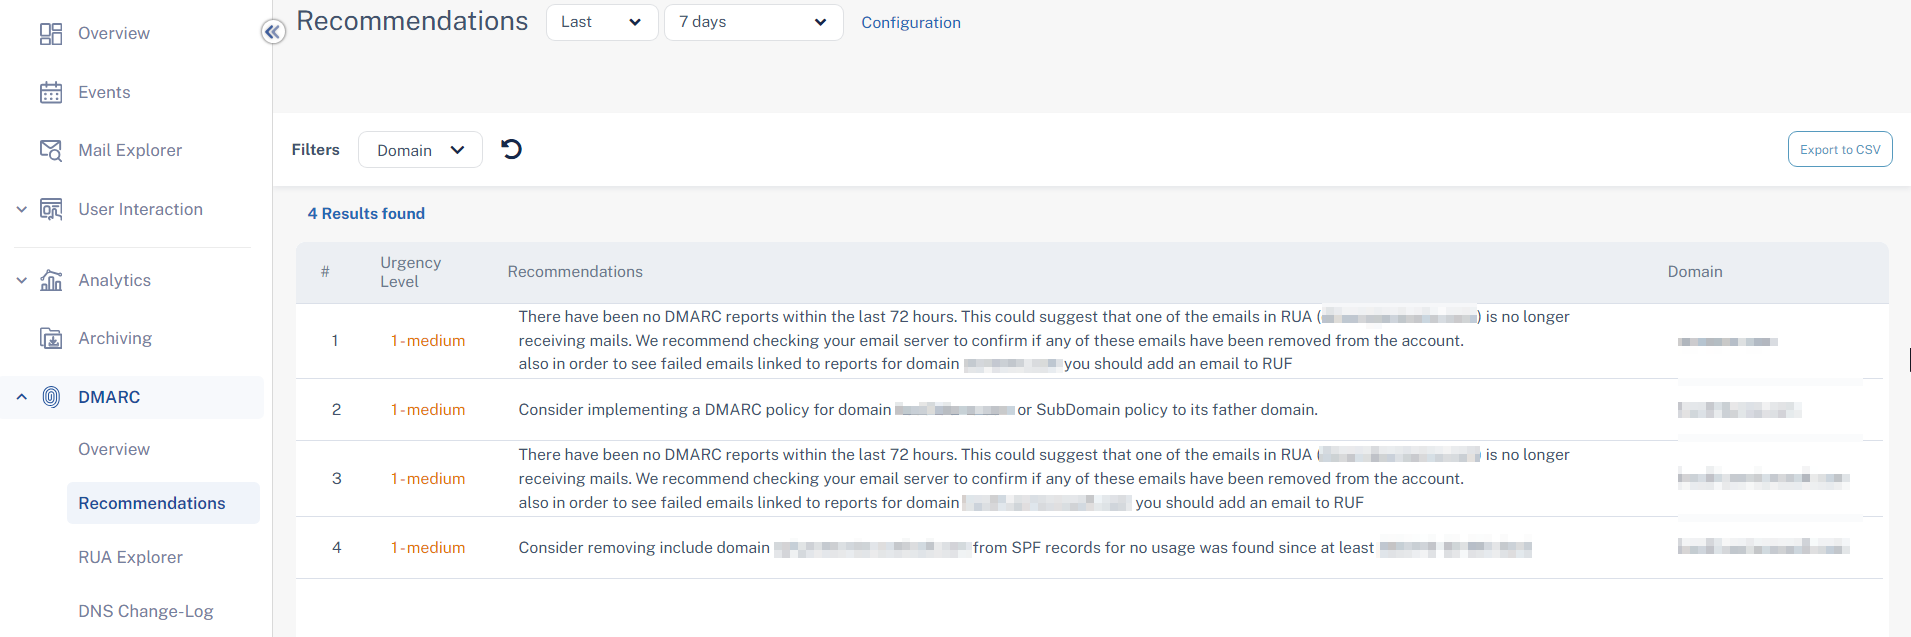
To view the Recommendations page, click DMARC > Recommendations.
To export the data in CSV format, click Export to CSV.
Possible recommendations:
-
Adding IP addresses to SPF
-
Properly configuring RUA mailboxes for your domains
-
Implementing a DMARC policy where p=none
-
Implementing a restrictive policy for certain domains
-
This is done when the percentage of DMARC failures is below 3%
-
-
and so on.
Monitoring SPF and DMARC Changes
The DNS Change-Log page shows changes to the SPF records and the DMARC policies of your domains.
|
|
Note - The system synchronizes and updates SPF records every hour to keep them up to date. |
To view the DNS Change-Log page, click DMARC > DNS Change-Log.
|
Column |
Description |
|---|---|
|
Date |
The date and time of the change. |
|
Domain |
The domain whose SPF / DMARC record has changed. |
|
Type |
The record type that was changed.
|
|
Current Value |
The value after the change. |
|
Changes |
The previous value and the new value. |
|
Comments |
The custom comments added for the change. |
Annotating / Commenting on SPF and DMARC Changes
You and your team can add custom comments to every change. This is helpful in investigating or auditing a specific event.
To add comments to a specific change:
-
Click the
icon in the last column of the change. -
Click Update Comment.
The DMARC Action pop-up appears.
-
In the Comments field, enter the comments.
-
Click OK.