SPF Management
SPF Management is included as part of the DMARC add-on.
SPF records ensure emails are sent from an authorized server by comparing the sender's IP address with the domain's DNS records.
Benefits
-
Overcome SPF limitations with simplified management.
-
Configure SPF settings directly in your Email Security Administrator Portal.
-
Seamlessly integrate with the DMARC solution for ongoing monitoring and issue resolution.
High-Level Procedure
-
Add the authorized sending sources through the Email Security Administrator Portal. See Adding New Source to SPF Records.
-
Activate SPF Management by updating the DNS SPF record with the required include statement. See Activating SPF Management.
-
-
Modify sending sources as needed through the Email Security Administrator Portal. See Managing Sending Sources.
-
Reviewing the SPF Status of your Domains
The SPF Management page shows a list of all the organization's protected domains and sub-domains.
To view the SPF Management page, access the Email Security Administrator Portal and click DMARC > SPF Management.
| Column | Description | ||
|---|---|---|---|
|
Domain |
Domain name. |
||
|
SPF Monitoring |
Monitoring status of the domain.
|
||
|
SPF% Success |
The percentage of emails that pass SPF out of the total number of reported emails sent by the domain. |
||
|
Managed sources |
Number of managed sources in the domain. |
||
|
Last Updated |
The date and time of the last update. |
||
|
Hosted Domain |
Name of the hosted domain. |
Activating SPF Management
Email Security uses the SPF Macro Mechanism, which allows an unlimited number of SPF entries to be defined.
To activate the SPF Management for Email Security, edit your organizational domain's DNS SPF record to include this statement:
include:{code}.spf.checkpoint-spf.com
or replace it entirely with this SPF record:
v=spf1 include:{code}.spf.checkpoint-spf.com ~all
where {code} is the unique code specific to your organization. You can find the code from the Instructions widget.
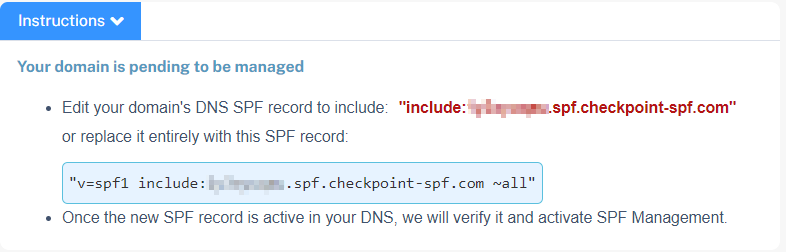
Once the new SPF record is active in your DNS, Email Security verifies it and activates SPF Management.
|
|
Note - If you use Microsoft deployments as part of DMARC onboarding, the SPF entry for Outlook will be included along with the Check Point SPF reference. For example, |
Adding New Source to SPF Records
To manually add a new source to your SPF record:
-
On the SPF Management page, click the domain to which you need to add a source.
-
Click Insert Source next to the Instructions at the top of the page.
-
In the pop-up that appears, select the mechanism from the Mechanism list.
-
ip4: Matches specified IPV4 or IPV6 addresses
-
ip6: Matches specified IPV4 or IPV6 addresses
-
include: Use SPF rules from another domain
-
a: Matches domain's A or AAAA records
-
mx: Matches domain's MX records
-
exists: Matches if a DNS query returns a result
-
-
In the Value field, enter the value relevant to the selected Mechanism.
Examples of Value for different Mechanisms:
-
ip4:
-
Single IP: 192.0.2.1
-
Subnet: 192.0.2.1/16
-
-
ip6:
-
Single IP: 2001:0db8:85a3:0000:0000:8a2e:0370:7334
-
Subnet: 2001:db8::/32
-
-
include: _spf.example.com
-
a: Specify a domain or leave it blank
-
mx: Specify a domain or leave it blank
-
exists: %{i}._spf.example.com
-
-
In the Notes field, enter the description as required.
-
Click OK.
To add a new source to your SPF record from a list of known sources:
-
On the SPF Management page, click the domain to which you need to add a source.
-
Click Add Source from List next to the Instructions at the top of the page.
-
In the Source section, select the required source and click OK.
|
|
Note - If you add a source from a predefined list (for example, Atlassian) or add a domain/subdomain, the system automatically updates the DNS records every few minutes or hours. For example, if you add an IP address to a subdomain, the system automatically updates it through the SPF management mechanism. |
Configuring the SPF Record
By using these SPF qualifiers in the SPF record, you can define the action for emails sent from unauthorized sources.
-
Fail (-all): Rejects the email (Recommended).
-
SoftFail (~all): Flags the email as a SoftFail and may be rejected.
-
Allow (+all): Allows the email.

Important -
-
None: It defines no specific action.

Note - Ensure that your domain has a default SPF policy.
Defining the SPF Record
You should configure the main SPF record with the appropriate policy in your DNS settings.
|
|
Note - Since SPF is managed at the DNS level, you do not need to configure the policy in the Email Security Administrator Portal. These settings will not impact the SPF evaluation result. |
Managing Sending Sources
You can manage your authorized sending sources as required. To do that, click the ![]() icon from the last column of the Sending Sources table.
icon from the last column of the Sending Sources table.
-
To insert the source, click Insert Source Above / Below. In the pop-up that appears, select the required options and click OK.
You can also click Insert Source directly next to the Instructions at the top of the page. In the pop-up that appears, select the required options and click OK.
-
To delete a source, click Delete Source. In the confirmation pop-up that appears, click OK.
-
To update the source, click Update Source. In the pop-up that appears, make the necessary changes and click OK.
-
To modify the prefix of the all element in your SPF record, click Update Prefix. In the Update Prefix pop-up that appears, make the necessary changes and click OK.
Note - This option is available only for sources with a preconfigured prefix.
After making the changes, click Save & Update to generate the SPF record based on the configured sources.
|
Column |
Description |
|---|---|
|
Status |
Status of the sending source.
|
|
Prefix |
Action for the email source. |
|
Type |
Type of the element. |
|
Value |
Value of the mechanism. |
|
Notes |
Description of the sending source. |
|
Warnings |
Description of the warnings, if any. |
 - Active
 - Non-Active