Cloud SMTP Relay
Overview
Check Point’s Cloud SMTP Relay provides a secure and scalable solution for organizations to send outbound emails from internal systems, applications, and services.
By using standard authentication and encryption mechanisms such as SPF, DKIM, DMARC, and TLS, the Cloud SMTP Relay ensures that emails are properly validated, protected, and delivered reliably while maintaining sender reputation and high deliverability rates.
Check Point Cloud SMTP Relay accepts SMTP connections only when they are encrypted with TLS. If your internal sender cannot use TLS (for example, a printer, scanner, or legacy application), configure an internal SMTP relay (Postfix) to forward email to Check Point Cloud SMTP Relay over a TLS-encrypted connection. See Appendix M: Configuring Postfix as an Internal SMTP Relay for Non‑TLS Senders to Check Point Cloud SMTP Relay.
Administrators can configure and monitor domain-level settings directly in the Email Security Administrator Portal.
|
|
Note - The Cloud SMTP Relay feature is currently in EA (Early Access). To enable it, contact Check Point Support. |
Benefits of Combined IP-Based and Basic SMTP Authentication for Relay Sources
-
Supports services that do not use dedicated static IP addresses or that send emails from shared or dynamic IP ranges, where IP-based authentication alone is insufficient. In such cases, you can use Basic SMTP Authentication without IP-based restrictions. See Adding a New Relay Source.
-
Provide stronger service-level authentication by allowing each sending service to authenticate with its own credentials instead of relying solely on the source IP address.
-
You can configure Basic SMTP authentication independently, without requiring IP-based allowlisting. You can also combine authentication with IP-based filtering for enhanced security and access control.
-
Enhances access control by allowing customers to restrict relay usage. It adds an additional security layer by requiring both approved source IP addresses and valid Basic SMTP Authentication credentials over TLS before granting relay access.
-
Improves service separation and accountability by supporting the use of separate credentials for different services or applications, making it easier to manage, audit, rotate, or revoke access for each service independently.
SMTP Relay Configuration Flow
The setup process for Cloud SMTP Relay involves the following steps:
Access the Domains Section
-
Access the Email Security Administrator Portal.
-
From the left navigation panel, go to Security Settings > Relay > Domains.
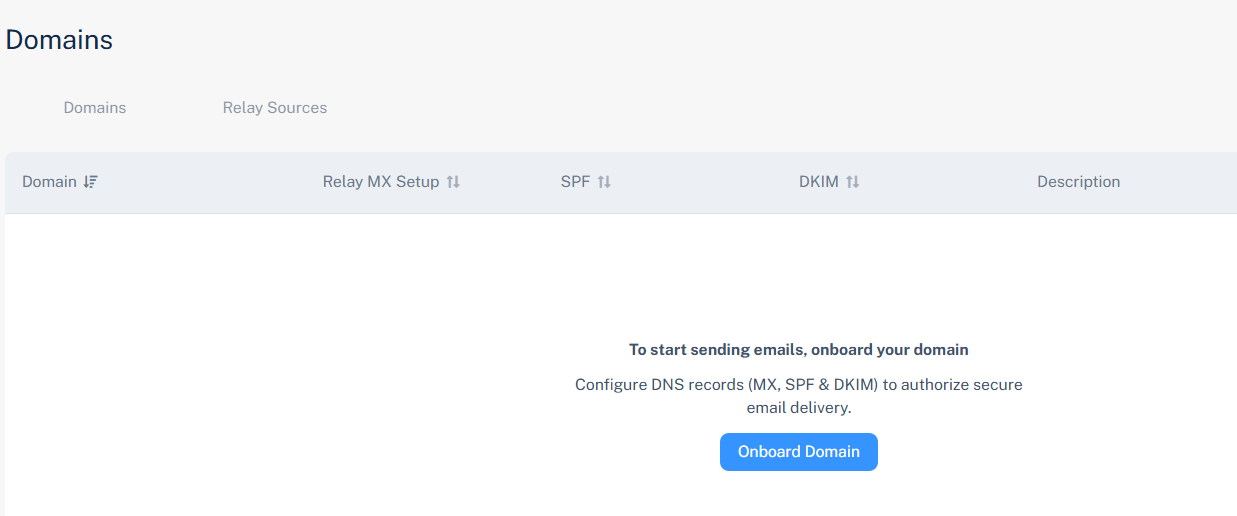
Domains Table
The Domains table displays all domains associated with your tenant, including their current relay status and configuration progress.

|
Name |
Description |
|---|---|
| Domain | Shows the domain address. |
| Relay MX Setup | Status of the Relay MX record setup. |
| SPF | Status of the SPF record setup. |
| DKIM | Status of the DKIM record setup. |
|
Description |
Description relevant to the domain. |
For example, a domain such as example.com may show Not Verified for Relay MX Setup and Not Configured for SPF and DKIM until DNS entries are added and verified.
Configure a Domain
Onboard a Domain
To send outbound emails, onboard your domain and configure DNS records (MX, SPF, and DKIM) to authorize secure email delivery.
To onboard a new domain:
-
Go to Security Settings > Relay > Domains.
-
Click Onboard Domain.
The Onboard Domain pop-up appears.

-
In the Domain address field, enter the domain address you want to send emails from.
-
In the Type section:
-
External (Default) - Sends emails to recipients outside your organization.
-
-
In the Description field, enter the required description.
-
Click Onboard.
Configure DNS Records
|
|
Note - The detection of these DNS records can take up to 72 hours. |
Configure the Relay MX Record
You must configure an MX record in your domain’s DNS to enable secure mail delivery through the Check Point relay infrastructure.
To configure the relay MX record:
-
Go to Security Settings > Relay > Domains.
-
Click the
 icon for the required domain.
 -
Select Configure MX.
-
In the Set Up Relay MX pop-up that appears, follow the instructions provided below:

DNS Record Example:
Entry
Value
Type MX Host cpmails.test.com Value Add the value based on your region, see Supported Regions.
TTL 1 hour 
Note - This configuration applies only to the relay subdomain (for example, cpmail.example.com) and does not modify your main domain’s MX record.
-
After the record is added to your domain’s DNS, click Verify to confirm the configuration.
Supported Regions
|
Region |
Value |
|---|---|
| United States |
|
| Asia Pacific |
|
| Europe |
|
Configure the SPF Record
Configure the SPF record in your domain’s DNS to allow Check Point to send emails on behalf of your domain, prevent spoofing, and improve deliverability.
To configure the SPF record:
-
Go to Security Settings > Relay > Domains.
-
Click the
icon for the required domain. -
Click Configure SPF.
The Configure SPF pop-up appears.

-
In the DNS Entry section, add or update the SPF record as shown below:
SPF Record Example:
Entry
Value
Type MX Name/Host cpmails.example.com TTL 3600 Value/Points to v=spf1 include:spfr.cpmails.com ~all -
After the DNS record is created, click Verify to validate and activate the configuration.
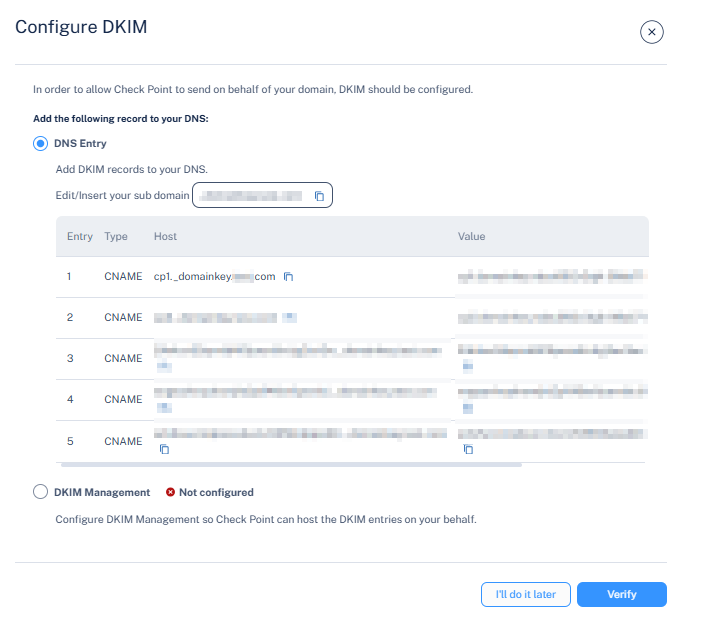
Configure the DKIM Record
DKIM ensures that emails sent through the relay are cryptographically signed, validating authenticity and preventing tampering.
Configure the DKIM record in your domain’s DNS to allow Check Point to send emails on behalf of your domain.
To configure the DKIM record:
-
Go to Security Settings > Relay > Domains.
-
Click the
icon for the required domain. -
Click Configure DKIM.
The Configure DKIM pop-up appears.
-
In the DNS Entry section, add or update the DKIM record for your domain as shown below:
Note - Ensure that you enter all five DKIM records into your domain's DNS
DKIM Record Example:
Entry
Value
Type CNAME Name/Host cp1._domainkey.example.com TTL 3600 Value cp2.domainkey.hfgfbfddf921-hfgfb5dsas.cp-mta.com -
After the DNS record is created, click Verify to validate and activate the configuration.
After the DNS changes are verified, the corresponding domain status changes to Verified. The relay becomes active and ready for outbound email traffic.
Re-checking DNS Records
After a domain is added, Email Security automatically validates its DNS records for up to 72 hours.
If validation is not completed within this period, the process stops automatically.
To resume the validation:
-
Go to Security Settings > Relay > Domains.
-
Click the
icon for the domain you want to re-check. -
Click Re-Check DNS Records.
The system then restarts the validation process for up to another 72 hours.
Access the Relay Sources Section
-
Access the Email Security Administrator Portal.
-
From the left navigation panel, go to Security Settings > Relay > Relay Sources.
Relay Sources Table
The Relay Sources Table displays all IP addresses of your email sending system and the statuses of the relay to route outbound traffic through Cloud Email Relay.

|
Name |
Description |
|---|---|
| Source name | Shows the name of the relay source. |
| IP | Shows your sending IP address that the relay will receive emails from or the network range of your authorized sending system. |
| Type | Status of the SPF record setup. |
| Status | Status of the relay source. |
|
Description |
Description relevant to the relay source. |
Configure a Relay Source
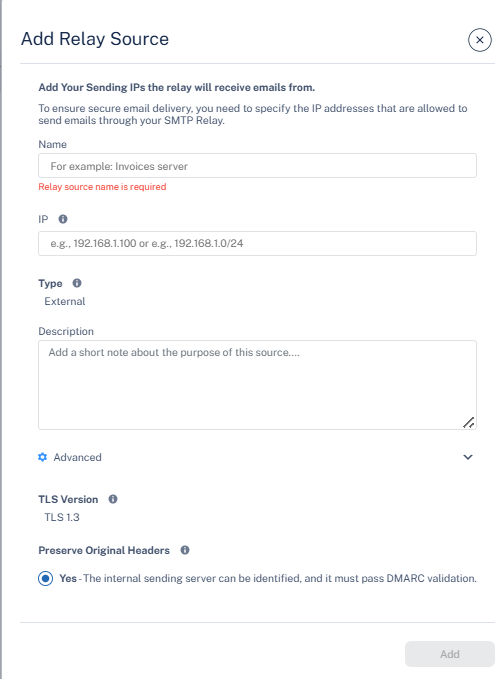
Adding a New Relay Source
Administrators can add, modify, or remove relay sources that specify the sending systems or IP addresses permitted to connect to the SMTP relay.
-
Access the Email Security Administrator Portal.
-
From the left navigation panel, go to Security Settings > Relay > Relay Sources.
-
Click Add Relay Sources.
-
In the Add Relay Source pop-up that appears, configure the following fields as required:
-
In the Name field, enter a descriptive identifier for the relay source. For example, Invoice Server, CRM Platform, and Internal Relay Gateway.
-
Configure the Authentication Method section, see Benefits of Combined IP-Based and Basic SMTP Authentication for Relay Sources.
-
In the IP field, enter your sending IP address that the relay will receive emails from or the network range (CIDR format) of the authorized sending system. For example,192.168.1.100 or 192.168.1.0/24.
-
To authenticate using SMTP username and password, select the Basic SMTP Authentication checkbox.
-
By default, the User Name and Password are generated automatically.
-
To regenerate a new credentials, click the eye icon in the Password field and then click Re-Generate. The system generates new credentials.
Note - Save the password immediately after it is generated. After this step, you cannot view or change it.
-
To copy the credentials, click Copy Credentials.
Note - If both IP-based authentication and Basic SMTP Authentication options are selected, the system grants access only when both the source IP address and the authentication credentials pass validation.
-
-
In the Type section, by default, the system specifies External, which means the relay source will send messages to recipients outside your organization.
-
(Optional) In the Description field, enter the required description about the relay source purpose or usage. For example, Marketing campaign emails, Finance system alerts.
-
Expand the Advanced section.
-
TLS Version - The version is set to TLS 1.3 and ensures encrypted email transmission between the relay and the recipient servers.
Notes:
-
Supported SMTP ports: 25, 465 or 587 (all connections require TLS).
-
Email Security supports both TLS 1.2 and TLS 1.3 to accept messages from the sending server.
If your environment includes legacy systems that do not support modern TLS versions, you can add a secure TLS adapter:
-
Option 1 – TLS proxy/server: Deploy a small server that accepts SMTP from the legacy system and then connects to the relay using TLS 1.2 or TLS 1.3.
-
Option 2 – Firewall / gateway with TLS termination: Use a firewall or gateway that terminates TLS and forward SMTP traffic from your internal systems to the relay over TLS 1.2 or TLS 1.3.
In both cases, TLS is enforced on the connection to our relay, and the unencrypted or older-protocol segment remains limited to your internal network and is controlled by your own security policies.
-
-
Preserve original headers? - By default, No is enabled, meaning original message headers from the internal sender are retained and enable identification of the internal sending server, but require valid SPF, DKIM, and DMARC alignment.
-
-
Click Add.
Activate Cloud Email Relay
After adding a new relay source, you have to activate the Cloud Email Relay to get the SMTP connection details required to route outbound emails through Check Point’s Cloud Email Relay service.
To activate a cloud email relay:
-
Go to Security Settings > Relay > Relay Sources.
-
Click the
icon next to the relay source you want to activate. -
Click Enable source.

The Activate Cloud Email Relay confirmation pop-up displays the relay host details:

Entry
Value
Relay host The hostname of the Check Point Cloud SMTP relay server used to send outbound emails. See Supported Regions.
For example: us-east-1.cp-mta.com
Port The port number used for SMTP transmission.
Default: 25 (supports STARTTLS)
STARTTLS ensures secure encryption for outgoing messages.
Notes:
-
Review the displayed relay host and port configuration.
-
Go to Domains > Relay Sources and verify that your domain and sending IP addresses are properly configured.
-
Ensure that SPF, DKIM, and authentication records align with the relay configuration.
-
-
Click Activate.
When Cloud SMTP Relay is activated, it begins processing and delivering outbound emails from the configured relay sources through Check Point’s Cloud SMTP infrastructure. All emails are scanned for spam and malware based on your configured domain, IP, and authentication settings before delivery to recipients.
Activating a Cloud Email Relay finalizes the SMTP relay configuration, allowing trusted mail servers or applications to use the Check Point Cloud Relay for outbound delivery, and it ensures authenticated, encrypted transmission and centralized email control.
|
|
Note - Before activating a Cloud Email Relay, ensure all domains, IP addresses, and authentication settings are correctly configured before proceeding. |
Managing Domains and Relay Sources
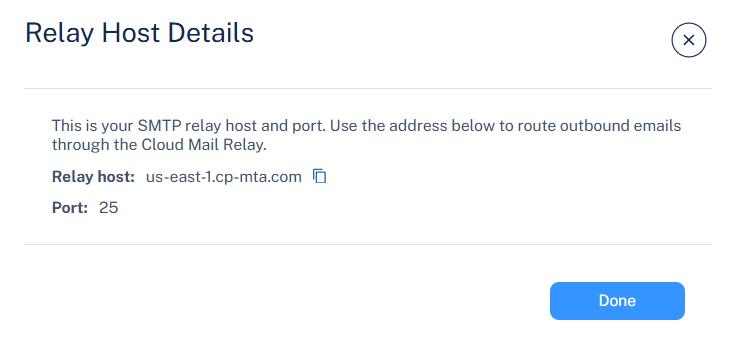
Reviewing the Relay Host Details
To view relay host details:
-
Go to Security Settings > Relay > Relay Sources.
-
Click the
icon for the relay source you want to view. -
Click View relay host.
The Relay Host Details pop-up appears and provides the following information.
Entry
Value
Relay host The hostname of the Check Point Cloud SMTP relay server used to send outbound emails.
For example: us-east-1.cp-mta.com
Port The port number used for SMTP transmission.
Default:25 (supports STARTTLS)
STARTTLS ensures secure encryption for outgoing messages.
-
Click Done.
Deleting a Domain
To delete a domain:
-
Go to Security Settings > Relay > Domains.
-
Click the
icon for the domain you want to delete. -
Click Delete.
-
In the Delete confirmation pop-up that appears, click Yes.
Disabling a Relay Source
To disable a relay source:
-
Go to Security Settings > Relay > Relay Sources.
-
Click the
icon for the relay source you want to disable. -
Click Disable Source.
-
In the Disable confirmation pop-up that appears, click Disable.
Note - Disabling a relay source prevents that IP from sending emails through Cloud Email Relay.
Deleting a Relay Source
To delete a relay source:
-
Go to Security Settings > Relay > Relay Sources.
-
Click the
icon for the relay source you want to delete. -
Click Delete.
-
In the Delete ESTP confirmation pop-up that appears, click Delete.

Note - Deleting a relay source permanently removes all associated configurations in Email Security. Emails sent from that IP will no longer be relayed through Cloud Email Relay.
Deliverability Reporting
The Deliverability Reporting page provides detailed visibility into the delivery status of outbound emails processed through the Cloud SMTP Relay.
It allows administrators to:
-
Monitor outbound email delivery
-
Track performance
-
Identify delivery failures
-
Analyze trends such as bounces, rejections, or delays.
Using built-in filters and customizable columns, administrators can quickly isolate emails by delivery status, sender, recipient, or subject, making it easier to troubleshoot deliverability issues and maintain a strong sender reputation.
|
|
Note - If an email provider does not update their user reporting emails as spam or phishing, these reports will not appear in the Deliverability Reporting page. |
To view and monitor outbound emails processed through the cloud SMTP relay:
-
Access the Email SecurityAdministrator Portal.
-
From the left navigation panel, go to Security Settings > Relay > Deliverability.

Column Name
Description
Sent Show the date and time when the email was sent. Status Shows the status of the email delivery.
-
Rejected – Email refused by the recipient's mail server.
-
Hard Bounce – Permanent delivery failure (invalid address or domain).
-
Soft Bounce – Temporary delivery issue (mailbox full, server busy).
-
Delivered – Email successfully accepted by the recipient.
-
Expired – Delivery retries failed and the email expired.
-
Pending – Email queued for delivery.
-
Hard Bounce (OOB) – Out-of-band permanent delivery failure.
-
Delayed – Email still retrying for delivery.
-
Blocked Recipient – Blocked by policy or reputation filter.
-
Detected as Spam - Email flagged as spam by the security engine.
-
Detected as Malware - Email flagged as malware by the security engine.
-
Reported as Spam – The recipient reported the email as spam.
Sender
Shows the sender domain address.
Recipient
Shows the recipient's email address.
Subject
Shows the email subject line.
-
Sender Domain Selection and DNS Requirements
When multiple domains or subdomains are configured, the system selects the deepest configured subdomain as the sending domain.
For example, if an email is sent from example.com and only example.com is configured, the system uses example.com as the sending domain.
If both example.com and marketing.example.com are configured, the system uses marketing.example.com as the sending domain.
Each configured domain or subdomain must be configured separately in DNS. Subdomains do not automatically inherit DNS settings from their parent domain.
Sender Domain Evaluation
The system evaluates both:
-
The SMTP envelope sender (MAIL FROM)
-
The parsed From header
|
|
Note - These two domains must belong to the same configured parent domain. |
Behavior:
-
The SMTP envelope sender is rewritten to match the configured sending domain.
-
The visible From header is preserved as received.
In practice:
-
The SMTP envelope sender is changed to a managed bounce/return-path domain under the configured domain.
-
The From header retains the original sender identity.
-
The system selects the deepest configured domain that matches the message.
Examples:
Customer configured domain: example.com
Original sender: marketing.example.com
Customer > Relay
-
MAIL FROM: example.com
-
From: example.com
Relay > Internet
-
MAIL FROM: example.com
-
From: example.com
Explanation
Since only example.com is configured, the relay uses the parent domain for the rewritten envelope sender.
Customer configured domain: marketing.example.com
Original sender: marketing.example.com
Customer > Relay
-
MAIL FROM: example.com
-
From: example.com
Relay > Internet
-
MAIL FROM: marketing.example.com
-
From: example.com
Explanation
Because marketing.example.com is configured and is the deepest matching configured domain, the system uses it for the rewritten envelope sender.
Customer configured domain: example.com and marketing.example.com
Original sender:
-
MAIL FROM: example.com
-
From: example.com
Customer > Relay
-
MAIL FROM: example.com
-
From: example.com
Relay > Internet
-
MAIL FROM: example.com
-
From: example.com
-
DKIM: d=marketing.example.com
Explanation
-
The SMTP envelope sender and the From header are under the same parent domain, so the system allows the message.
-
The visible From header remains marketing.example.com.
-
The SMTP envelope sender is rewritten to the configured sending domain.
-
DKIM is signed using marketing.example.com.
Customer configured domain: example.com
Original sender:
-
MAIL FROM: example.com
-
From: example.com
Customer > Relay
-
MAIL FROM: example.com
-
From: example.com
Relay > Internet
-
MAIL FROM: example.com
-
From: example.com
-
DKIM: d=example.com
-
SPF: example.com
Explanation
-
Since only the parent domain is configured, the system rewrites the SMTP envelope sender to example.com.
-
The visible From header remains marketing.example.com.
-
DKIM is signed with the configured parent domain, example.com.