Cloud SEG
Overview
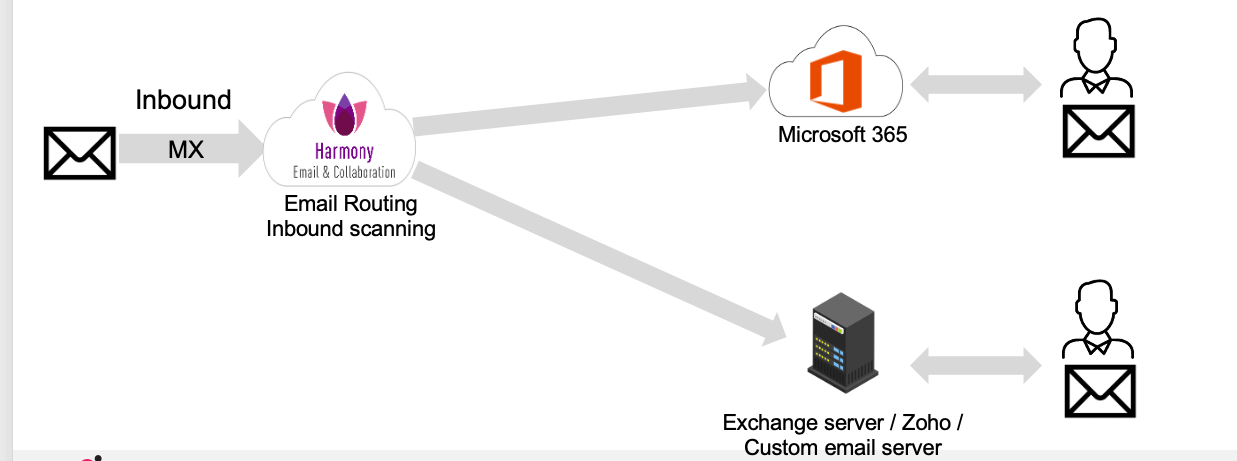
The Check Point Email Cloud SEG (Secure Email Gateway) solution provides inbound email protection by placing Cloud SEG in the customer’s mail flow as the first hop for incoming messages. The customer updates their MX record to route inbound email to Check Point Email Security, where messages are scanned, and security verdicts are applied before delivery.
After inspection, Cloud SEG routes legitimate messages to the customer’s mail environment, which can be:
-
Microsoft Office 365
-
On‑premises Microsoft Exchange Servers
-
Custom email servers
Check Point uses user synchronization to maintain recipient and user information for routing, policy enforcement, and protection.
Cloud SEG enables Email Security to support customers that require SEG-style mail routing, including hybrid environments, centralized mail-flow configurations, and non-Microsoft architectures.
|
|
Notes:
|
Supported Deployment Scenarios
Cloud SEG provides advanced email security for customers who cannot deploy a purely API‑based email security solution.
Common reasons customers may require the SEG deployment model include:
-
Support for currently unsupported architectures, including:
-
Classic hybrid deployments
-
Centralized mail‑flow environments
-
Fully on‑premises environments
-
-
Support for additional email vendors beyond the currently supported API integrations.
-
Customer preference to maintain an existing SEG architecture.
Prerequisites
During Cloud SEG onboarding, select the SEG onboarding flow and do not install the Microsoft application separately.
Cloud SEG Onboarding Workflow
The Cloud SEG onboarding process includes the following steps:
Accessing the Cloud SEG Configuration
To access the Cloud SEG configuration:
-
Access the Email Security Administration Guide.
-
From the left navigation panel, go to Security Settings > SEG & Relay > Domains.
Configuring Cloud SEG for a Domain
Configuring Email Servers and Users
To configure email servers and users:
-
Go to Security Settings > SEG & Relay > Domains.
-
Click the
 icon for the required domain and select Configure SEG.
The SEG Onboarding page appears.
-
To configure the Email Servers & Users section, click:
-
Email servers
The Select Email servers page appears.
-
Configure the following email servers as required:

Notes:
-
You can add multiple email servers of different types, and servers of the same type.
-
There is no limit on the number of email servers that can be configured within a single tenant, provided all users are synchronized from a single central Active Directory.
For example, Five different Exchange servers can be created in a single tenant while using a common central AD for user synchronization.
-
 Office 365 Mail
-
Select the Office 365 Mail checkbox.
-
Click Add New Office 365 Mail.
-
In the Name field, enter the required name (for example, Microsoft Office 365 Mail Endpoint).
-
In the Inbound Host / IP(s) field, enter Microsoft Office 365 / EOP mail routing endpoint for this domain (for example, example-com.mail.protection.outlook.com).
Note - You can add more than one Host or IP address, separated by commas.
-
Click Save.
-
-
Microsoft Exchange Server
-
Select the Microsoft Exchange Server checkbox.
-
Click Add New Microsoft Exchange Server.
-
In the Name field, enter the required name.
-
In the Inbound Host / IP(s) field, enter the destination host or IP address to which Cloud SEG routes inbound email.
Note - You can add more than one Host or IP address, separated by commas.
-
In the Inbound Port field, enter the port number.
-
Click Save.
-
-
Custom Email Server
-
Select the Custom checkbox.
-
Click Add New Custom.
-
In the Name field, enter the required name (for example, Zoho or IceWarp Mail Endpoint).
-
In the Inbound Host / IP(s) field, enter the destination host or IP address to which Cloud SEG routes inbound email.
Note - You can add more than one Host or IP address, separated by commas.
-
In the Inbound Port field, enter the port number.
-
Click Save.
-
-
-
After configuring the required email servers, click Save.
-
-
Users Sync
The Sync users page appears.
-
Select the required directory source for user synchronization:
-
Microsoft Entra ID (Azure AD): Sign in to your Microsoft account and approve the required permissions for Check Point. See Prerequisites.
-
Manual import: Export the user data from the on‑premises Active Directory and then manually import the data into Check Point Email Security. Upload a CSV file in the supported format.
Note - To perform a manual import, contact Check Point Support.
-
-
After selecting the required synchronization method, click Proceed to Sync Update.
Note - The synchronization process can take a few hours to complete. Once this capability is productized, the process will be updated accordingly.
-
-
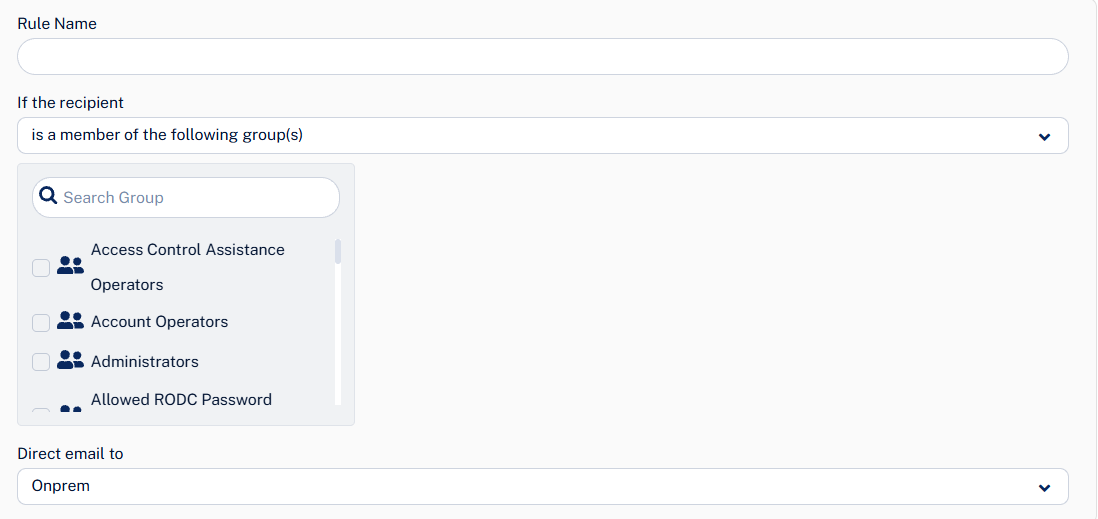
Routing
The Routing Rules page appears.
-
Click Add Rule.
-
In the Rule Name field, enter the required rule name.
-
From the If the recipient dropdown, select the required option:
-
is a member of the following group(s): Select the required user groups to which the email server will be routed.
-
-
From the Direct email dropdown, select the required email serverto which the email traffic is routed.
-
Click Save.
Notes:
-
Routing rule changes apply to all domains.
-
All users and recipient groups expected to receive inbound email through Cloud SEG must be configured in Routing Rules.
-
Inbound email for users not configured in the routing rules is rejected.
-
-
Configuring DNS Records
To configure DNS records:
-
Go to Security Settings > SEG & Relay > Domains.
-
Click the
icon for the required domain and select Configure SEG.The SEG Onboarding page appears.
-
Configure the DNS Configure section.
-
Relay MX - To configure the Relay MX record, see Configure the Relay MX Record.
-
SPF - To configure SPF the record, see Configure the SPF Record.
-
DKIM - To configure the DKIM record, see Configure the DKIM Record.
-
-
Click Verify.
Activating Inbound Email Traffic
To activate inbound email traffic:
-
Go to Security Settings > SEG & Relay > Domains.
-
Click the
icon for the required domain and select Configure SEG.The SEG Onboarding page appears.
-
To configure the Activate Email section, click Inbound.
-
In the Activate Inbound Email Traffic page that appears, follow the on-screen instructions to complete the inbound mail flow activation process.
-
Step 1: Complete the required actions for each email server.
-
Set Microsoft Office 365 Mail
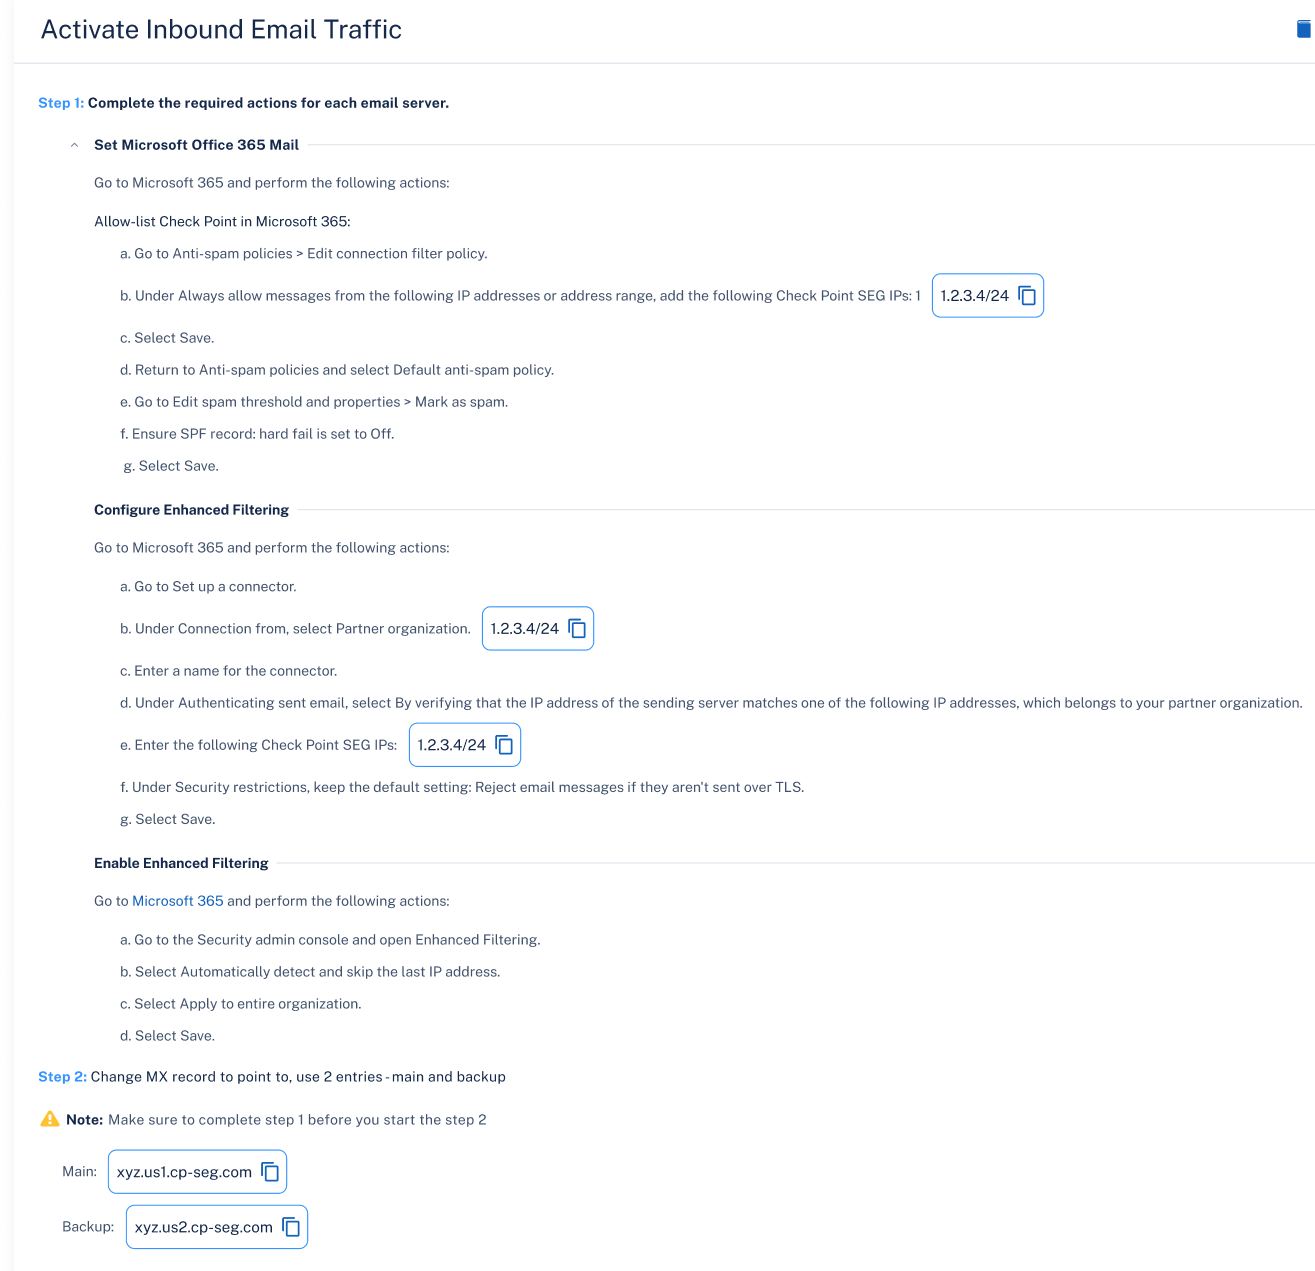
Go to Microsoft 365 and perform the following actions:
-
Allow-list Check Point in Microsoft 365:
-
Go to Anti-spam policies > Edit connection filter policy.
-
Under Always allow messages from the following IP addresses or address range, add the Check Point SEG IP(s).
For example, 1.2.3.4/24
-
Select Save.
-
Return to Anti-spam policies and select Default anti-spam policy.
-
Go to Edit spam threshold and properties > Mark as spam.
-
Ensure SPF record: hard fail is set to Off.
-
Select Save.
-
-
Configure Enhanced Filtering:
-
Go to Set up a connector.
-
Under Connection from, select Partner organization.
-
Enter a name for the connector.
-
Under Authenticating sent email, select By verifying that the IP address of the sending server matches one of the following IP addresses, which belongs to your partner organization.
-
Enter the Check Point SEG IPs:
For example, 1.2.3.4/24
-
Under Security restrictions, keep the default setting: Reject email messages if they aren't sent over TLS.
-
Select Save.
-
-
Enable Enhanced Filtering:
-
Go to the Security admin console and open Enhanced Filtering.
-
Select Automatically detect and skip the last IP address.
-
Select Apply to entire organization.
-
Select Save.
-
-
-
Set Exchange Server

Go to Exchange Management Shell and perform the following action:
-
Create an inbound connector for Check Point SEG:
-
Run the following command:
New-ReceiveConnector -Name "Check Point SEG Inbound Connector" -Usage Partner -RemoteIPRanges [IP Ranges] -Bindings 0.0.0.0:25 -TransportRole FrontendTransport -Server [ServerName] -RequireTLS $true -PermissionGroups AnonymousUsers | ForEach-Object { Add-ADPermission -Identity $_.Identity -User "NT AUTHORITY\ANONYMOUS LOGON" -ExtendedRights "ms-Exch-SMTP-Accept-Any-Recipient", "ms-Exch-Accept-Headers-Routing" } -
Replace the IP Ranges with the Check Point SEG IP ranges.
-
Replace the ServerName with the Exchange server name.
-
Verify that the connector was created successfully.
-
-
-
-
Step 2: Change MX record to point to, use 2 entries - main and backup
Note - Ensure that you complete step 1 before you start the step 2.
For example:
-
Main:
xyz-us1-cp-seg.com
-
Backup:
xyz-us2-cp-seg.com
-
-
-
Click Activate.
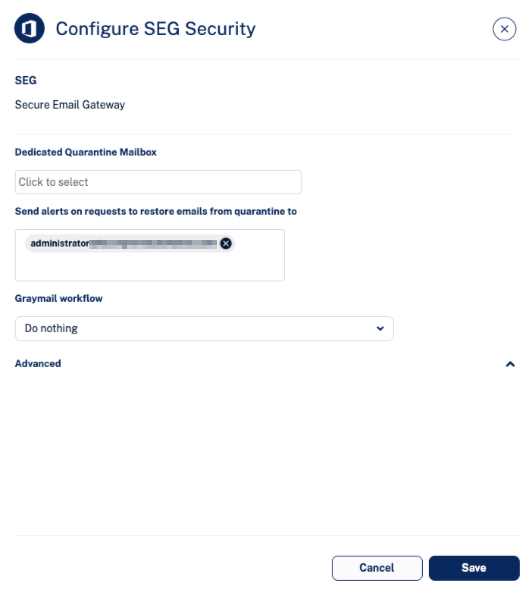
Configuring Quarantine Restore Request Notifications for Cloud SEG
For on-premises deployments that use manual user synchronization, you must configure an email address for quarantine restore requests notifications before configuring the SEG Security policy.
To configure quarantine restore request notifications:
-
Go to Security Settings > SaaS Applications.
-
Click Configure for SEG.
The Configure SEG Security pop-up appears.
-
In the Send alerts on requests to restore emails from quarantine to field, enter the email address.
-
Click Save.