Shared Signature Server for Anti-Malware
Endpoint computers (1) can get the latest Anti-Malware signatures from a shared location (2) on an Endpoint Security client computer (3) that acts as a Shared Signature Server. This capability makes it possible to protect non-persistent virtual desktops (1) in a Virtual Desktop Infrastructure (VDI) environment (4). Each non-persistent virtual desktop runs an Endpoint Security Client, and gets the Anti-Malware signatures from a shared folder (2) on the Shared Signature Server (3) that is a persistent virtual machine.
The numbers in the text refer to the diagram:

The Shared Signature Server (3) gets the latest signatures from one of these sources:
-
An Endpoint Security Management Server or Endpoint Policy Server (5).
-
Over the Internet from the Check Point Signature server (6). The domain name of that server is
kav8.checkpoint.com.
The Shared Signature Server must run on a persistent virtual machine, preferably on the same VDI host storage (4) as the clients.
In SmartEndpoint you need to configure two Anti-Malware policy rules. One rule for the Shared Signature Server and one rule for the non-persistent virtual desktops.
|
|
Note - Here you can learn how to use SmartEndpoint to configure the Shared Signature Server for Anti-Malware. To learn how to set up all the other requirements for Endpoint Security in VDI environments, see the Endpoint Security VDI Administration Guide. |

Configuring the Shared Signature Server and Clients
Configure one Computer Group for the Shared Signature Server, and one Computer Group for the clients. Then, define one Anti-Malware policy rule for the Shared Signature Server, and one rule for the clients.
-
In the Users and Computers tree, click Global Actions > New Virtual Group.
-
In the New Virtual Group window:
-
Enter a name for the group.
-
Optional: Enter a Comment.
-
Select Computer Group.
-
-
Click Next.
-
In the Select Entities window, select the Endpoint Security computer that is the Shared Signature ServerS.
-
Click Finish.
-
Create a new Virtual Group of type Computers Group.
-
In the Select Entities window, select all the non-persistant virtual desktops with Endpoint Security, that are created with the Golden Image.
-
In the Anti-Malware policy, right-click the rule Default Anti-Malware settings for the entire organization and select Clone Rule.
-
The Create Rule Wizard opens.
-
Click Next.
-
In the Select Entities page, select the Computer Group of the Shared Signature Server.
-
Click Next.
-
In the Change Rule Action page, click Signature Update and select Edit Shared Action.
-
In Signature Source, select one of the following:
-
Local Endpoint Servers - Get updates from the Endpoint Security Management Server or an Endpoint Policy Server.
-
Other External source - Get updates over the Internet. For example, to get updates from the Check Point Signature server, enter
kav8.checkpoint.com
-
-
In Set as Shared Signature Server, enter the path of the shared folder, for example
C:\temp\Signatures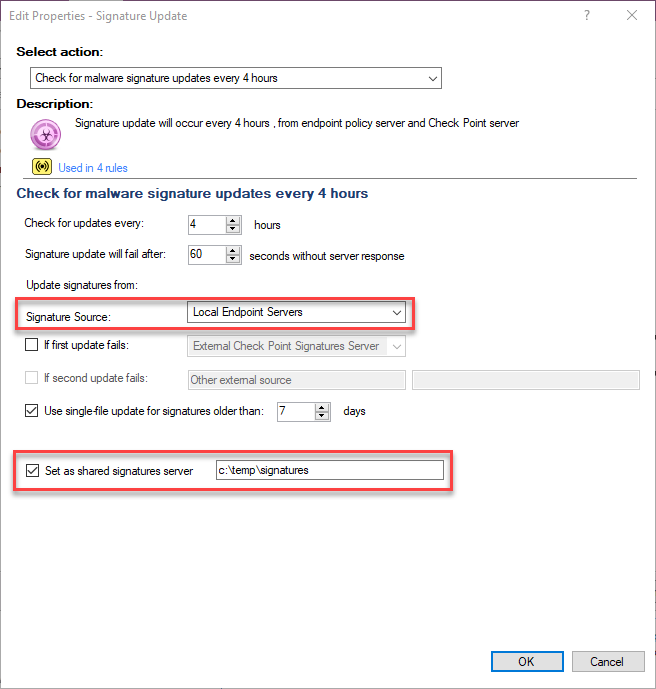
-
Click Next.
-
In the Name and comment page, enter a descriptive Name for the rule.
-
Click Finish.
-
Right-click the rule Default Anti-Malware settings for the entire organization and select Clone Rule.
-
The Create Rule Wizard opens.
-
Click Next
-
In the Select Entities page, select the Computer Group of the clients on non-persistent desktops.
-
Click Next.
-
In the Change Rule Action page, click Signature Update and select Edit Shared Action.
-
In Signature Source, select Shared Signature Server.
-
Enter the shared location of the signatures on the server, in the format
\\<client name or IP address>\folder
For example\\192.168.18.5\Signatures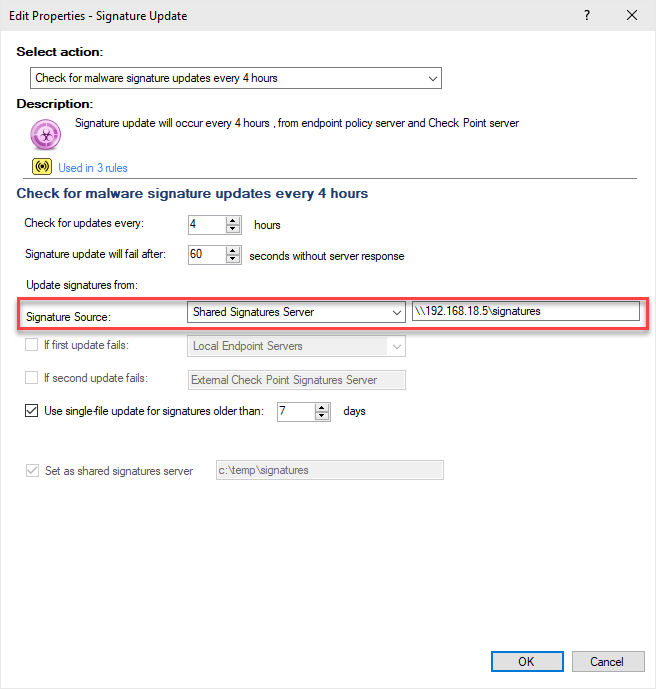
-
Click Next.
-
In the Name and comment page, enter a descriptive Name for the rule.
-
Click Finish.
-
In the Policy tab, go to the Policy Toolbar.
-
Click Install
