


|
|
|
In This Section: |
To challenge today's malware landscape, Check Point's comprehensive Threat Prevention solution offers a multi-layered, pre- and post-infection defense approach and a consolidated platform that enables enterprise security to detect and block modern malware. These Threat Prevention Software Blades are available:
Each Software Blade gives unique network protections. When combined, they supply a strong Threat Prevention solution. Data from malicious attacks are shared between the Threat Prevention Software Blades and help to keep your network safe. For example, the signatures from threats that Threat Emulation identifies are added to the Anti-Virus database.
The ThreatSpect engine is a unique multi-tiered engine that analyzes network traffic and correlates information across multiple layers to find bots and other malware. It combines information on remote operators, unique botnet traffic patterns and behavior to identify thousands of different botnet families and outbreak types.
The ThreatCloud repository contains more than 250 million addresses that were analyzed for bot discovery and more than 2,000 different botnet communication patterns. The ThreatSpect engine uses this information to classify bots and viruses.
The Security Gateway gets automatic binary signature and reputation updates from the ThreatCloud repository. It can query the cloud for new, unclassified IP/URL/DNS resources that it finds.
The layers of the ThreatSpect engine:
The Threat Wiki is an easy-to-use tool that lets you search and filter the ThreatCloud repository to find more information about identified malware. You can filter by category, tag, malware family, and search for malware.
To show the Threat Wiki:
The Threat Wiki web page opens.
The Check Point IPS Software Blade analyzes traffic for possible risks, to enhance the network security of your organization. The IPS detection engine has multiple defense layers, detects and prevents against known threats, and often protects against future ones.
For example IPS protects against drive-by downloads, where a user can go to a legitimate web site and unknowingly download malware. The malware can exploit a browser vulnerability that lets it create a special HTTP response that sends the malware to the client. The firewall allows the HTTP traffic from the web site and the computer is at risk for this malware. IPS protects the computer, because it identifies and then blocks the drive-by download connection.
To enable the IPS Software Blade on a Security Gateway:
The General Properties window opens.
Check Point IPS provides instant protection based on pre-defined Threat Prevention Profiles. You can also configure a custom Threat Prevention profile to give the exact level of protection for your organization.
When you install an Access Control policy on the Security Gateways, they immediately begin to enforce IPS protection on network traffic.
SmartConsole includes these default Threat Prevention profiles:
Using the Optimized Profile
The Optimized profile is activated by default, because it gives excellent security with good gateway performance. These are the goals of the Optimized profile:
Newly downloaded IPS protections are set to Detect the intrusion attempts. They are activated according to the IPS Updates Policy.
For additional granularity, in the Additional Activation section of the Profile configuration window, you can select IPS protections to activate and to deactivate. The IPS protections are arranged into categories such as Product, Vendor, Threat Year, and others, for the ease of search. The gateways enforce activated protections, and do not enforce deactivated protections, regardless of the general profile protection settings.
To configure the IPS settings for a Threat Prevention profile:
The Profiles page opens.
Note - These categories are different from the protections in the Additional Activation page.
These categories will only filter out or add protections that comply with the activation mode thresholds (Confidence, Severity, Performance).
For example, if a protection is inactive because of its Performance rating, it will not be enabled even if its category is in Protections to activate.
To assign an IPS profile:
The IPS Protections summary lets you quickly browse all IPS protections and their settings. The IPS Protections window lets you use the specified categories and tags to easily filter for IPS protections. For example, the Vendor category contains the Oracle tag with the IPS protections for Oracle products. You can also:
To show the IPS protections:
To filter the protections:
The Filters pane opens and shows IPS protections categories.
A window opens and shows the IPS protections categories.
The category is added to the Filters pane.
These are some of the default columns in the IPS protections summary table.
Column |
Description |
|---|---|
Protection |
Name of the protection. |
Industry Reference |
International CVE or CVE candidate name for attack. |
Performance Impact |
How this protection affects the performance of a Security Gateway. |
Severity |
Probable severity of a successful attack on your environment. |
Confidence Level |
How confident IPS is in recognizing the attack. |
profile_name |
The Activation setting for the protection for each IPS profile. |
To manually activate a protection for a profile:
The IPS Protections page opens.
Note - Only the IPS profiles selected in the policy are shown by default.
The Protection Details window opens.
You can remove the manually activated IPS protections and restore them to the settings in the Threat Prevention profile.
To remove IPS protection overrides:
The IPS Protections page opens.
Press CTRL to select more than one protection.
A warning message opens.
You can configure exceptions for a protection with the Prevent action. IPS does not identify the traffic. We recommend that you use IPS exceptions to allow traffic that is legitimate for some computers or services can match the protection criteria for malware. You can also create an exception for a server that does not comply with RFC standards.
To add a new exception:
The Profile window opens.
A bot is malicious software that can infect your computer. It is possible to infect a computer when you open attachments that exploit a vulnerability, or go to a web site that results in a malicious download.
When a bot infects a computer, it:
One bot can often create multiple threats. Bots are frequently used as part of Advanced Persistent Threats (APTs) where cyber criminals try to damage individuals or organizations.
The Anti-Bot Software Blade detects and prevents these bot and botnet threats. A botnet is a collection of compromised and infected computers.
The Anti-Bot Software Blade uses these procedures to identify bot infected computers:
These web sites are constantly changing and new sites are added on an hourly basis. Bots can attempt to connect to thousands of potentially dangerous sites. It is a challenge to know which sites are legitimate and which are not.
These communication fingerprints are different for each family and can be used to identify a botnet family. Research is done for each botnet family to identify the unique language that it uses. There are thousands of existing different botnet families and new ones are constantly emerging.
Identify specified actions for a bot such as, when the computer sends spam or participates in DoS attacks.
To enable the Anti-Bot Software Blade on a Security Gateway:
The General Properties window of the gateway opens.
The Anti-Bot and Anti-Virus First Time Activation window opens.
The Anti-Virus Software Blade inspects connections to the Internet and scans file transfers and downloads to the internal network to find and prevent malware attacks. It also gives pre-infection protection from external malware and malicious servers.
The Protections browser shows information about the Anti-Bot and Anti-Virus protections.
To show the Protections browser:
A detailed summary of the protections is shown in the table.
The table of protections has these fields:
Column |
Description |
|---|---|
Protection |
Name of the protection type. |
Blade |
The Software Blade, by which the protection is used - Anti-Bot or Anti-Virus. |
Engine |
Layer of the ThreatSpect engine that is protecting the network. |
Known Today |
Number of known protections. |
Last Update |
The date when the most recent update. |
When you select a protection in the table, the summary and the activation information are shown in the bottom part of the screen. The Summary tab is shown by default. To see the activation information, click the Activations tab.
The table in the Activations tab view shows information in the table with these fields:
Column |
Description |
|---|---|
Profile |
The profile name. |
Action |
The action that is configured in the profile for the selected protection:
Protections can have more than one action. The Action column shows the percentage of protections set to each action. |
There is one Rule Base for Anti-Bot and Anti-Virus. The Anti-Bot and Anti-Virus rules use the Malware database and network objects. Security Gateways that have Identity Awareness enabled can also use Access Role objects as the Protected Scope in a rule. The Access Role objects let you easily make rules for individuals or different groups of users.
The first Anti-Bot or Anti-Virus rule that matches the traffic is applied. There are no implied rules in this Rule Base, all traffic is allowed unless it is explicitly blocked. A rule that is set to the Prevent action, blocks activity and communication for that malware.
When necessary, you can add an exception directly to a rule. The object in the Protected Scope, can have a different Action from the specified Anti-Bot and Anti-Virus rule. Here are some examples of exception rules:
These are the fields that manage the rules for the Anti-Bot and Anti-Virus threat prevention policy.
Field |
Description |
|---|---|
No. |
Rule number in the Rule Base. An exception rule contains the letter E and a digit that represents the exception number. For example, E-2.2 is the second exception for the second rule. |
Name |
Name that the system administrator gives this rule. |
Protected Scope |
Objects that are protected against bots and viruses. Traffic to and from these objects is inspected even if the objects did not open the connection. |
Protection |
For rules, the value for this field is always N/A. The protections are set according the profile in the Action field. For exceptions, set this field to one or more specified protections. |
Action |
For rules, the value for this field is an Anti-Bot and Anti-Virus profile. For exceptions, set this field to Prevent or Detect. |
Track |
Tracking and logging action that is done when traffic matches the rule. |
Install On |
Network objects that get this rule. The default setting is All and installs the policy on all Security Gateways that have Anti-Bot and Anti-Virus enabled. |
This table shows a sample Anti-Bot and Anti-Virus Rule Base. (The Install On column is not shown and is set to All.)
No. |
Name |
Protected Scope |
Protection |
Action |
Track |
|---|---|---|---|---|---|
1 |
High Security |
Finance_ Corporate_ Corporate_ |
- n/a |
High_Security_ |
Log Packet Capture |
2 |
Malware Rule |
Any |
- n/a |
Optimized |
Log |
E-2.1 |
R&D Server |
Server_1 |
Backdoor.Win32.Shark.A |
Detect |
Log |
E-2.2 |
Users_3 |
Users_3 |
Adware.Win32.CashFiesta.A RogueSoftware.Win32. Trojan.Win32.Agent.BA |
Detect |
Log |
Rule number 1, High Security - Traffic for the Finance server and two corporate networks are inspected for bots and viruses according to the settings in the High_Security profile. The traffic is logged and the packets are captured for analysis in the Logs & Monitor > Logs view.
Rule number 2, Malware Rule - All traffic in the network is inspected for bots and viruses according to the settings in the Optimized profile.
Exception 2.1 to rule 2, R&D Server - A global exception rule for the Server_1 object, that only detects the Backdoor.Win32.Shark.A protection.
Exception 2.2 to rule 2, Users_3 - An exception rule for the Users_3 Access Role, that sets some protections to Detect instead of Prevent.
Cyber-threats continue to multiply and now it is easier than ever for criminals to create new malware that can easily bypass existing protections. On a daily basis, these criminals can change the malware signature and make it virtually impossible for signature based products to protect networks against infection. Threat Emulation can protect your network against new malware, zero-day vulnerabilities and targeted attacks.
Threat Emulation gives networks the necessary protection against unknown threats in files that are downloaded from the Internet or attached to emails. When emulation is done on a file:
You can securely send files to the Check Point ThreatCloud for emulation. The ThreatCloud is always up-to-date with the latest Threat Emulation releases.
Sample ThreatCloud Emulation Workflow
Sample ThreatCloud Deployment
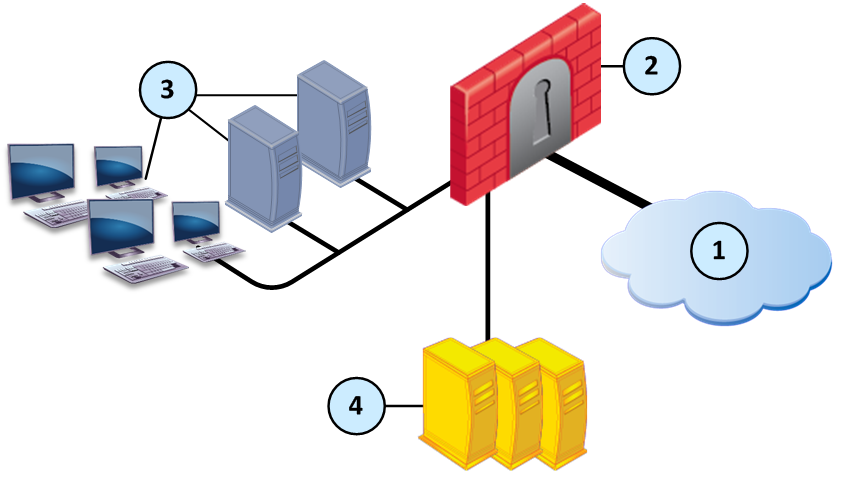
Item |
Description |
|---|---|
1 |
Internet and external networks |
2 |
Perimeter Security Gateway |
3 |
Computers and servers in the internal network |
4 |
Check Point ThreatCloud servers |
Files are sent to the Check Point ThreatCloud over a secure SSL connection for emulation. The emulation in the ThreatCloud is identical to emulation in the internal network, but it uses only a small amount of CPU, RAM, and disk space of the Security Gateway. The ThreatCloud is always up-to-date with all available operating system environments.
Best Practice - For ThreatCloud emulation, it is necessary that the Security Gateway connects to the Internet. Make sure that the DNS and proxy settings are configured correctly in Global Properties.
To enable ThreatCloud emulation:
The Gateway Properties window opens.
The Threat Emulation First Time Configuration Wizard opens and shows the Emulation Location page.
The Summary page opens.
The Gateway Properties window closes.
The Threat Prevention profile applies to these Software Blades:
Note - If you make changes to IPS and one of the other Threat Prevention Software Blades, you must install both the Access Control and Threat Prevention policy.
After you enable the IPS and Threat Prevention Software Blades on the Security Gateways, configure the Threat Prevention policy.
This is the high-level workflow create and deploy a Threat Prevention policy:
Check Point defined the Optimized profile to give excellent security with good performance for the gateway.
These are the goals of the Optimized profile, and the settings that achieve those goals:
Goal |
Parameter |
Setting |
|---|---|---|
Apply settings to the IPS and Threat Prevention Software Blades |
Blades Activation |
Activate the profile for IPS, Anti-Bot, Anti-Virus, and Threat Emulation. |
Do not have a critical effect on performance |
Performance impact |
Activate protections that have a Medium or lower effect on performance. |
Protect against important threats |
Severity |
Protect against threats with a severity of Medium or above. |
Reduces false-positives |
Confidence |
Set to Prevent the protections with an attack confidence of Medium or High. Set to Detect the protections with a confidence of Low. |
Newly downloaded IPS protections are set to Detect. They are activated according to the IPS Newly Updated Protections.
To get quickly up and running with IPS without making changes to the IPS profile, install this Threat Prevention Rule Base with the Optimized profile:
Name |
Protected Scope |
Action |
Track |
Install On |
|---|---|---|---|---|
Out-of-the-box Threat Prevention policy |
Any |
Optimized |
Log |
Policy Targets |
This section shows some sample IPS and Threat Prevention policies for different scenarios.
Getting up and Running with IPS and Threat Prevention
Scenario: I want to quickly protect my organization against intrusions
IPS Policy
Name |
Source |
Destination |
Services |
Action |
Install On |
|---|---|---|---|---|---|
Out-of-the- |
Any |
Any |
Any |
Optimized profile with these settings:
|
One or more Security Gateways with IPS enabled |
Note - Install the Access Control and Threat Prevention policies.
Threat Prevention Policy
Name |
Protected Scope |
Action |
Track |
Install On |
|---|---|---|---|---|
Out-of-the-box Threat Prevention policy |
Any |
Optimized profile with these settings:
|
Log Packet Capture |
Policy Targets |
This scenario used the Optimized Threat Prevention profile.
Note - The Protection/Site column is used only for protection exceptions.
Monitoring bot activity without blocking traffic
Scenario: I want to monitor bot activity in my organization without blocking traffic at all. How can I do this?
Add this rule above the Out-of-the-box Threat Prevention policy to monitor bot activity:
Name |
Protected Scope |
Action |
Track |
Install On |
|---|---|---|---|---|
Monitor bot activity |
Any |
A profile, with these changes relative to the Recommended_Profile: Confidence (Low\Medium\High): Prevent\Prevent\Prevent |
Log Packet Capture |
Policy Targets |
Blocking bots
Scenario: I want to block bots in my organization. How can I do this?
You can block bots using the out-of-the-box Threat Prevention policy rule, with the Optimized profile:
Name |
Protected Scope |
Action |
Track |
Install On |
|---|---|---|---|---|
Out-of-the-box Threat Prevention policy |
Any |
Optimized profile |
Log Packet Capture |
Policy Targets |
Blocking viruses and malware
Scenario: I want to block viruses and malware in my organization. How can I do this?
You can block viruses using the out-of-the-box Threat Prevention policy rule, with the Optimized profile:
Name |
Protected Scope |
Action |
Track |
Install On |
|---|---|---|---|---|
Out-of-the-box Threat Prevention policy |
Any |
Optimized profile |
Log Packet Capture |
Policy Targets |
Disabling some protections for one server
Scenario: The protection Backdoor.Win32.Agent.AH detects malware on a server (Server_1). How can I disable this protection for this server only?
Add an exception to the specified Anti-Bot rule. This policy monitors bots activity in the organization without blocking traffic, but disables the Backdoor.Win32.Agent.AH protection on Server_1.
Name |
Protected Scope |
Protection |
Action |
Track |
Install On |
|---|---|---|---|---|---|
Monitor Bot |
Any |
- N/A |
A profile based on the Optimized profile, with these changes: Confidence (Low\Medium\High): Prevent\Prevent\Prevent |
Log Packet Capture |
Policy Targets |
Exclude Server_1 |
Server_1 |
Backdoor.Win32. |
Detect |
Log |
Server_1 |
A Threat Prevention profile determines which protections are activated, and which Software Blades are enabled for the specified rule or policy. The protections that the profile activates depend on the:
A Threat Prevention profile applies to one or more of these Software Blades: IPS, Anti-Bot, Anti-Virus, and Threat Emulation.
You can change the settings of the IPS and Threat Prevention profile according to your requirements.
To edit a profile:
The Profiles page opens.
The Threat Prevention policy determines how the system inspects connections for bots and viruses. The primary component of the policy is the Rule Base. The rules use the Malware database and network objects.
If you enable Identity Awareness on your gateways, you can also use Access Role objects as the scope in a rule. This lets you easily make rules for individuals or different groups of users.
There are no implied rules in the Rule Base. All traffic is allowed unless it is explicitly blocked.
When you enable the IPS or one of the Threat Prevention Software Blades, a predefined rule is added to the Rule Base. The rule defines that all traffic for all network objects, regardless of who opened the connection, (the protected scope value equals any) is inspected for all protections according to the recommended profile. By default, logs are generated and the rule is installed on all Security Gateways that use a Threat Prevention Software Blade.
Note - You cannot edit the settings of the predefined rule for the IPS Security Gateway.
The result of this rule (according to the Optimized profile) is that:
Use the Logs & Monitor page to show logs related to IPS and Threat Prevention traffic. Use the data there to better understand the use of these Software Blades in your environment and create an effective Rule Base. You can also directly update the Rule Base from this page.
You can add more exceptions that prevent or detect specified protections or have different tracking settings.
Here are examples of how to create different types of Anti-Bot rules.
Create and manage the policy for the Anti-Bot Software Blade as part of the Threat Prevention Policy.
Click the Add Rule button to get started.
Scenario: I want to block bots in my organization. How can I do this?
In this example you will install this default Threat Policy rule that uses the recommended policy, or create a new rule.
Protected Scope |
Action |
Track |
Install On |
|---|---|---|---|
Any |
Optimized |
Log |
Policy Targets |
To block bots in your organization:
The First Time Activation window opens.
You can block bots using the out-of-the-box Threat Prevention policy rule, with the default Optimized Profile and the previous rule.
Alternatively, add a new Threat Prevention rule:
A new rule is added to the Threat Prevention policy. The Software Blade applies the first rule that matches the traffic.
Scenario: I want to monitor bot activity in my organization without blocking traffic at all. How can I do this?
In this example, you will create this Threat Prevention rule, and install the Threat Prevention policy:
Name |
Protected Scope |
Action |
Track |
Install On |
|---|---|---|---|---|
Monitor bot activity |
Any |
A profile that has these changes relative to the Optimized profile: Confidence (High\Medium\Low): Detect\Detect\Detect |
Log |
Policy Targets |
To monitor all bot activity:
The Profiles page opens.
This profile detects protections that are identified as an attack with low, medium or high confidence and have a medium or lower performance impact.
The first rule that matches is applied.
Scenario: The protection Backdoor.Win32.Agent.AH detects malware on a server (Server_1). How can I disable this protection for this server only?
In this example, create this Threat Prevention rule, and install the Threat Prevention policy:
Name |
Protected Scope |
Protection/Site |
Action |
Track |
Install On |
|---|---|---|---|---|---|
Monitor Bot Activity |
Any |
- N/A |
Optimized Profile |
Log |
Policy Targets |
Exclude |
Server_1 |
Backdoor.Win32.Agent.AH |
Detect |
Log |
Policy Targets |
To add an exception to a rule:
Note - To add EICAR files as exceptions, you must add them as Whitelist Files. Adding EICAR files through Exceptions in Policy rules will still get them blocked.
Here are examples of how to create different types of Anti-Virus rules.
You can also use Anti-Virus rules to disable a specified malware protection.
Create and manage the policy for the Anti-Virus Software Blade as part of the Threat Prevention Policy.
Add a new rule to the Threat Prevention policy.
To block viruses and malware in your organization:
The First Time Activation window opens.
A new rule is added to the Threat Prevention policy. The Software Blade applies the first rule that matches the traffic.
The Anti-Bot, Anti-Virus and Threat Emulation Software Blades have a dedicated Threat Prevention policy. You can install this policy separately from the policy installation of the Access Control Software Blades. Install only the Threat Prevention policy to minimize the performance impact on the Security Gateways.
Settings for the IPS Software Blade are installed with the Access Control policy.
You can update the IPS, Anti-Bot, Anti-Virus and Threat Emulation Rule Base to give immediate coverage for new malware threats.
To install the Threat Prevention and Access Control policies:
The Install Policy window opens showing the installation targets (Security Gateways).
If the gateway is a member of a cluster, install the policy on all the members. The Security Management Server makes sure that it can install the policy on all the members before it installs the policy on one of them. If the policy cannot be installed on one of the members, policy installation fails for all of them.
The IPS protection database and the Malware database automatically download updates at regular intervals. This ensures that you have the latest IPS protections, and the most current data and newly added signatures and URL reputations in your Anti-Bot and Anti-Virus policy.
The Malware database only updates if you have a valid Anti-Bot, Threat Emulation and/or Anti-Virus contract.
By default, updates for Anti-Virus and Anti-Bot run on the Security Gateway every two hours. For IPS and Threat Emulation you must configure an update schedule. You can change the update schedule or choose to manually update the Security Gateway. The updates are stored in a few files on each Security Gateway.
Check Point constantly develops and improves its protections against the latest threats. You can manually update the database with latest IPS protections.
Note - The Security Gateways with IPS enabled only get the updates after you install the Policy.
For troubleshooting or for performance tuning, you can revert to an earlier IPS protection package.
To manually update the IPS protections:
To revert to an earlier protection package:
You can change the default automatic schedule for when updates are automatically downloaded and installed. If you have Security Gateways in different time zones, they are not synchronized when one updates and the other did not yet update.
To configure Threat Prevention scheduled updates:
The Scheduled Update window opens.
Employees waste more and more time to sort through bulk emails commonly known as spam. The amount of resources (disk space, network bandwidth, CPU) devoted to handling spam also increases from year to year. In addition, unwanted emails continue to grow and can be an unexpected security threat to networks. Cyber-criminals can use emails to let viruses and malware into your network. The Anti-Spam and Mail Software Blade gives system administrators an easy and central tool to eliminate most of the spam that reaches their networks.
Use the Overview page in the Anti-Spam & Mail tab of the SmartDashboard to enable Anti-Spam on a Security Gateway.
To enable Anti-Spam:
SmartDashboard opens and shows the Overview page in the Anti-Spam & Mail tab.
The Anti-Spam Enforcing Gateways window opens.
Feature |
Setting |
Description |
|---|---|---|
Content based Anti-Spam |
High protection |
Identifies spam based on email content |
IP Reputation Anti-Spam |
High protection |
Identifies spam based on IP address database of known spammers |
Block List Anti-Spam |
Block |
Identifies spam based on domains or IP addresses that you define |
Mail Anti-Virus |
Block |
Scans and filters emails for viruses and other malware |
Zero hour malware protection |
Off |
Does not scan the Internet to identify and filter new virus email attacks |
The Zero hour malware protection feature is set to Off because enabling the feature has a negative effect on network performance.

