


|
|
|
In This Section: |
This section explains how to configure advanced Threat Prevention settings that are in the Engine Settings window, including: inspection engines, the Check Point Online Web Service (ThreatCloud repository), internal email whitelist, file type support for Threat Extraction and Threat Emulation and more.
To get to the Engine Settings window, go to Manage & Settings > Blades > Threat Prevention > Advanced Settings.
The Threat Prevention Engine Settings window opens.
Select the behavior of the ThreatSpect engine if it is overloaded or fails during inspection. For example, if the Anti-Bot inspection is terminated in the middle because of an internal failure. By default, in such a situation all traffic is allowed.
The Check Point Online Web Service is used by the ThreatSpect engine for updated resource categorization. The responses the Security Gateway gets are cached locally to optimize performance.
Gateway traffic generates a large amount of activity. To make sure that the amount of logs is manageable, by default, logs are consolidated by session. A session is a period that starts when a user first accesses an application or a site. During a session, the gateway records one log for each application or site that a user accesses. All activity that the user does within the session is included in the log. For connections that are allowed or blocked in the Anti-Bot, Threat Emulation, and Anti-Virus Rule Base, the default session is 10 hours (600 minutes).
To adjust the length of a session:
The Suspicious Mail engine scans outgoing emails. You can create a list of email addresses or domains whose internal emails are not inspected by Anti-Bot.
To add an email address or domain whose internal emails are not scanned by Anti-Bot:
In this window, you can also edit or remove the entries in the list.
You can select the file types that are sent for emulation for all the Threat Prevention profiles. Each profile defines an Inspect or Bypass action for the file types.
To select Threat Emulation file types that are supported in Threat Prevention profiles:
The Threat Prevention Engine Settings window opens.
The File Types Support window opens.
The Emulation supported on column shows the emulation environments that support the file type.
Advanced engine settings let you configure file type support and mail signatures for the Threat Extraction.
To configure file type support:
The Threat Prevention Engine Settings window opens.
The Threat Extraction Supported File Types window opens.
To configure mail signatures:
The Threat Extraction Mail Signatures window opens.
Use this window to configure text for:
The first signature is always attached to mail that has had threats extracted.
A link to the original files is added if the email recipient is allowed to access it.
Predefined field codes can be inserted into the signature text, such as:
The link opens the UserCheck Portal. The portal shows a list of attachments the recipient can download.
Use this ID to send the recipient the file. You can also find the ID in the logs.
On the gateway, run the command: scrub send_orig_email
To configure file type support:
The Threat Extraction Supported File Types window opens.
To configure mail signatures:
The Threat Extraction Mail Signatures window opens.
Use this window to configure text for:
The first signature is always attached to an email that had threats extracted.
The second signature is added to the first if the email recipient has access to the original file.
You can insert predefined field codes into the signature text, such as:
The link opens the UserCheck Portal. The portal shows a list of attachments the recipient can download.
Use this ID to send the file to the recipient. You can also find the ID in the logs.
On the gateway, run the command: scrub send_orig_email
SNORT is a popular, open source, Network Intrusion Detection System (NIDS). For more information about SNORT see snort.org.
Check Point supports the use of SNORT rules as both the GUI and the SmartDomain Manager API’s options.
When you import a SNORT rule, it becomes a part of the IPS database.
You can perform these actions on a Check Point Management Server:
Make sure you have the SNORT rule file. It holds SNORT rules and usually has the extension: .rules
In a Multi-Domain Security Management environment, import SNORT rules to the Security Management Server. Then assign Global policy to the Domain Management Servers. This downloads the new SNORT protections to the Domain Management Servers.
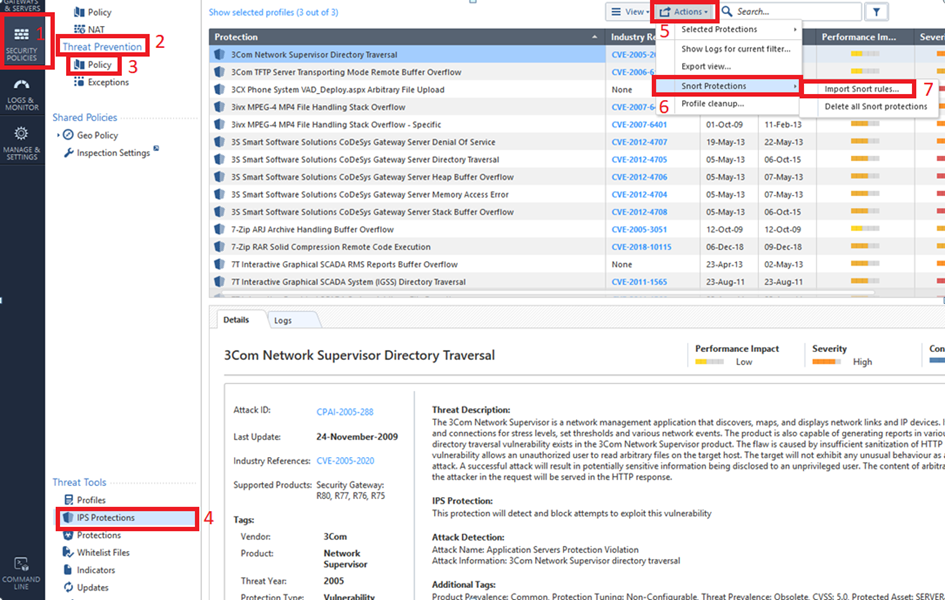
To import SNORT Protection rules to the Security Management Server:
The tool converts the rules to Check Point syntax and updates the protections database.
Important - SmartConsole shows the converted SNORT rules as IPS protections whose names start with Snort imported.
To override the profile settings for a specific SNORT protection, see Action on SNORT Protection Rules.
To delete SNORT protection rules from the Security Management Server:

Make sure you have the SNORT rule file. It holds SNORT rules and usually has the extension: .rules
In a Multi-Domain Security Management environment, import SNORT rules to the Multi-Domain Server. Then assign Global policy to the Domain Management Servers. This downloads the new SNORT protections to the Domain Management Servers.
To import SNORT rules to the Multi-Domain Server:
The tool converts the rules to Check Point syntax and updates the protections database.
Important - SmartConsole shows the converted SNORT rules as IPS protections whose names start with Snort imported.
To override the profile settings for a specific SNORT protection, see Action on SNORT Protection Rules.
To delete SNORT protection rules from the Multi-Domain Server:
The Security Gateway enforces SNORT protection rules based on the profile which is installed on the Security Gateway. For example, if the profile installed on the Security Gateway is Optimized, by default the Security Gateway does not enforce SNORT protection rules, because their performance impact is High and the allowed performance impact defined in the Optimized profile is Medium or lower.
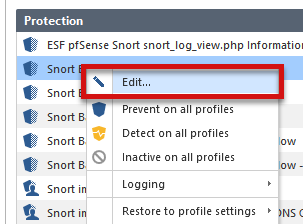
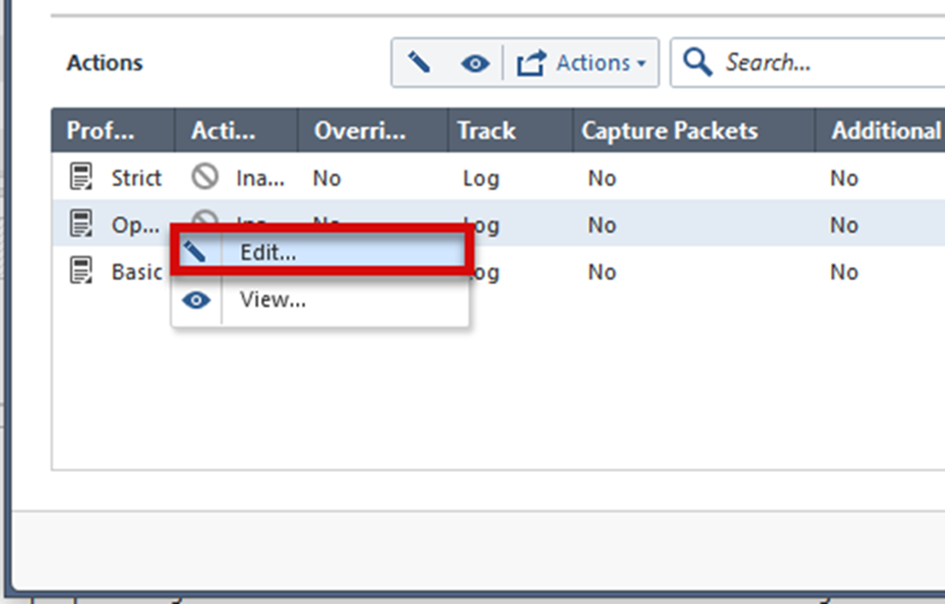
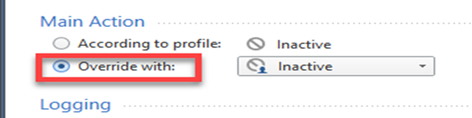
To override the profile settings for a specific SNORT protection:
Note - The SNORT protection names start with Snort imported.
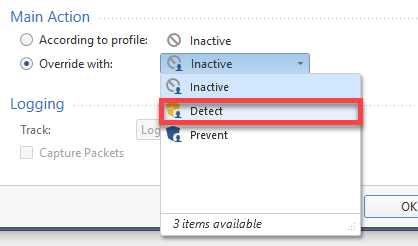
Note - The images here follow the example described above. If you are on a different profile, or want a different action, change steps 2 or 4 accordingly.
These alternative methods on the Management Server let you can add and delete SNORT protection rules:
mgmt_cliAdding SNORT Rules
The applicable command accepts two arguments:
The command returns:
Upon success: |
0 |
Upon failure: |
1 along with several parameters describing the error upon failure |
Examples:
mgmt_climgmt_cli add threat-protections package-path "/path/to/community.rules" package-format "snort" --version 1.2 --format json
add threat-protections package-path "/path/to/community.rules" package-format "snort" --version 1.2 --format json
mgmt add threat-protections package-path "/path/to/community.rules" package-format "snort" --version 1.2 --format json
Note - The --format json part is optional. By default, the output is presented in plain text.
A post request must:
https://<ip-address-of mgmt-server>:<port>/web_api/v1.2/add-threat-protectionsThe server returns:
Upon success: |
Status code 200 |
Upon failure: |
The appropriate status code |
Example:
POST {{server}}/v1.2/add-threat-protections Content-Type: application/json X-chkp-sid: {{session}} { "package-path" : "/path/to/community.rules", "package-format" : "snort" } |
Deleting SNORT Protections
The applicable command accepts one argument "package-format", which always takes the string value "snort".
The command returns:
Upon success: |
0 |
Upon failure: |
1 along with several parameters describing the error upon failure |
Examples:
mgmt_climgmt_cli delete threat-protections package-format "snort" --version 1.2
delete threat-protections package-format "snort" --version 1.2
mgmt delete threat-protections package-format "snort" --version 1.2
A POST Request must be send to this URL:
https://<IP-address-of-mgmt-server>:<port>/web_api/v1.2/delete-threat-protections
With the request headers Content-Type set to application/json and X-chkp-sid set to the unique session identifier returned by the login request. The argument package-format must be sent in the request body.
The server returns:
Upon success: |
Status code 200 |
Upon failure: |
The appropriate status code |
Example:
POST {{server}}/v1.2/delete-threat-protections Content-Type: application/json X-chkp-sid: {{session}} { "package-format" : "snort" } |
You can write your own SNORT rules and then import them to a Check Point Management Server to become IPS protections . For more information about SNORT, see snort.org.
Check Point supports SNORT 2.9 version and lower.
SNORT rules use signatures to define attacks. A SNORT rule has a rule header and rule options.
The name of the imported SNORT protection is the value of the msg field in the original SNORT rule.
SNORT Rule Syntax:
<Action> <Protocol> <Source IP Address> <Source Port> <Direction> <Destination IP Address> <Destination Port> (msg:"<Text>"; <Keyword>:"<Option>";)
SNORT rules have two logical parts: Rule Header and Rule Options.
<Action> <Protocol> <Address> <Port> <Direction> <Address> <Port>
<keyword>:"<option>"
Example:
alert tcp any any -> any 1:65535 (msg:"Possible exploit"; content:"|90|";)
Where:
alertTCPanyany->anyPossible exploitcontent|90|Supported Snort syntax:
These are the generally supported syntax components. There are some limitations.
Keyword |
Description |
|---|---|
|
Specifies the original length of the content that is specified in a protected_content rule digest |
|
Lets Example:
|
|
Lets rules track states during a transport protocol session. Used in conjunction with conversation tracking from the Session preprocessor. Example:
|
|
Tests a byte field for a specific value (with operator). Example:
|
|
Lets you write rules that skip over specific portions of the length-encoded protocols and perform detection in very specific locations. Example:
|
|
Verifies that the payload has data at a specified location. Example:
|
|
Does not block traffic even if the rule matches. Used with the “flow bits” key word to set a flag without performing a block. Example: alert tcp $HTTP_SERVERS any -> $EXTERNAL_NET 21 (msg: "Does not match state in FTP path"; flow: established, to_server; content: "targetfile"; nocase; fast_pattern; flow bits: isset,INFTPPATH;no_match; sid: 55555555;) |
Note - Make sure that SNORT Rules with the same flowbits flag have the same content in the msg field. Otherwise, they will not be under the same protection.
Debugging:
The $FWDIR/log/SnortConvertor.elg file on the Management Server contains is updated with the debug messages from the last SnortConvertor run import of SNORT rules.
To find failed rule debugs in this file, search for: Failed to convert rule
This syntax is not supported and will not convert:
?!byte_test <,>,=,&,^http_method allPORT HTTP_PORTSanyThe conversion will change the behavior of these macros and syntax.
HOME_NET anyEXTERNAL_NET anyHTTP_SERVERS anyThese combinations of keywords and modifiers are implemented differently in the IPS blade as Snort protection rules than in SNORT Rules. Best Practice - Test them before activating them in a production environment.
rawbytes B http_uri Uhttp_raw_uri I http_stat_msg Yhttp_stat_code S pcre http_header Hpcrehttp_raw_headerD pcre depth offsetpcre pcre pcre http_header Hpcre http_raw_header Dpcre http_stat_msg Y pcre http_stat_code S pcre http_uri U pcre depth offsetpcreHTTP_PORTS http_client_body Ppcre {}byte_test http_header H urilen http_uri U http_raw_uri I pcre http_uri Upcre http_raw_uri Ipcre In addition to the conventional metadata service options, checkpoint supports additional keywords specifically for SSL traffic.
Snort rules for SSL traffic can be defined using the metadata keyword.
In the Snort rule options add:
metadata: service <ssl service>;
Example:
alert tcp any any -> any 443
Options for <ssl service> are as follows:
Service |
Description |
|---|---|
sslHello |
The sslHello service will search the Client Hello or Sever Hello depending on the flow. |
sslCertificate |
The sslCertificate service will search the Client Certificate or Sever Certificate depending on the flow. |
sslKeyx |
The sslKeyx service will search the Client Key Exchange or Sever Key Exchange depending on the flow. |
sslHeartbeat |
The sslHeartbeat will search the SSL heartbeats. |
sslCiphersuite |
The sslCiphersuite will search the Cipher Suite sent by the client. |
When you use the sslHello, sslCertificate or sslKeyx services, it is necessary to define a flow direction as either flow: to_server or flow: from_server.
Note: These services and content modifiers are unique to checkpoint and will not be supported by other Snort engines.
IPS is a robust solution which protects your network from threats. Implementation of the recommendations in this chapter will help maintain optimal security and performance.
During the tuning process, keep in mind that Check Point bases its assessment of performance impact and severity on an industry standard blend of traffic, which places greater weight on protocols such as HTTP, DNS, and SMTP. If your network traffic has high levels of other network protocols, you need to take that into consideration when you assess the inspection impact on the gateway or severity of risk to an attack.
A Check Point Security Gateway performs many functions in order to secure your network. At times of high network traffic load, these security functions may weigh on the gateway's ability to quickly pass traffic. IPS includes features which balance security needs with the need to maintain high network performance.
To help you integrate IPS into your environment, enable Bypass Under Load on the Gateway to disengage IPS activities during times of heavy network usage. IPS inspection can make a difference in connectivity and performance. Usually, the time it takes to inspect packets is not noticeable, but under heavy loads it may be a critical issue. IPS allows traffic to pass through the gateway without inspection, and IPS then resumes inspection after gateway's resources return to acceptable levels.
Best Practice - Because IPS protections are temporarily disabled, apply Bypass Under Load only during the initial deployment of Threat Prevention. After you optimize the protections and performance of your Gateway, disable this feature to make sure that your network is protected against attacks.
To bypass IPS inspection under heavy load:
The gateway window opens and shows the General Properties page.
The IPS Policy settings allow you to control the entire body of protections by making a few basic decisions. Activating a large number of protections, including those with low severity or a low confidence level, protects against a wide range of attacks, but it can also create a volume of logs and alerts that is difficult to manage. That level of security may be necessary for highly sensitive data and resources; however it may create unintended system resource and log management challenges when applied to data and resources that do not require high security.
Best Practice - adjust the IPS Policy settings to focus the inspection effort in the most efficient manner. Once system performance and log generation reaches a comfortable level, the IPS Policy settings can be changed to include more protections and increase the level of security. Individual protections can be set to override the IPS Policy settings.
For more information on IPS Policy, see Automatically Activating Protections.
|
Note - A careful risk assessment should be performed before disabling any IPS protections. |
IPS protections are categorized according to severity. An administrator may decide that certain attacks present minimal risk to a network environment, also known as low severity attacks. Consider turning on only protections with a higher severity to focus the system resources and logging on defending against attacks that pose greater risk.
Although the IPS protections are designed with advanced methods of detecting attacks, broad protection definitions are required to detect certain attacks that are more elusive. These low confidence protections may inspect and generate logs in response to traffic that are system anomalies or homegrown applications, but not an actual attack. Consider turning on only protections with higher confidence levels to focus on protections that detect attacks with certainty.
IPS Network Exceptions can also be helpful to avoid logging non-threatening traffic.
IPS is designed to provide analysis of traffic while maintaining multi-gigabit throughput. Some protections may require more system resources to inspect traffic for attacks. Consider turning on only protections with lower impact to reduce the amount system resources used by the gateway.
Check Point SecureXL improves gateway performance. For more information on how to optimize network performance, see the R80.30 Performance Tuning Administration Guide.
For Security Gateways running on multi-core hardware, CoreXL lets the gateway to leverage the multiple cores to more efficiently handle network traffic. For more information on CoreXL and optimizing the CoreXL configuration, see the R80.30 Performance Tuning Administration Guide.
Whitelist is a list of files that are trusted. Check Point Threat Prevention engine does not inspect trusted files for malware, viruses, and bots, which helps decrease resource utilization on the gateway.
Whitelist is a list of files that are trusted. Check Point Threat Prevention engine does not inspect trusted files for malware, viruses, and bots, which helps decrease resource utilization on the gateway.
To add a file to the Whitelist:
The Whitelist Files page opens.
The New File Exception window opens.
To edit attribute of a file from the Whitelist:
The Whitelist Files page opens.
To remove a file from the Whitelist:
The Whitelist Files page opens.
Threat Indicators lets you add feeds to the Anti-Bot and Anti-Virus engines, in addition to the feeds included in the Check Point packages and ThreatCloud feeds.
You can add indicator files in two ways:
An Indicator is a set of observables which represent a malicious activity in an operational cyber domain, with relevant information on how to interpret it and how to handle it.
An Observable is an event or a stateful property that can be observed in an operational cyber domain. For example: IP address, MD5 file signature, URL, Mail sender address.
Threat Indicators demonstrate an attack by:
Indicators are derived from intelligence, self-analysis, governments, partners, and so on.
Indicator files must be in CSV or STIX XML (STIX 1.0) format:
Each record in CSV Check Point format and the STIX XML (STIX 1.0) format has these fields (files in CSV format which is not the Check Point format does not have to include all these fields, see Importing Automated Custom Intelligence Feeds):
Field |
Description |
Valid Values |
Value Criteria |
Optional |
|---|---|---|---|---|
UNIQ-NAME |
Name of the observable |
Free text |
Must be unique |
No |
VALUE |
A valid value for the type of the observable |
As provided in this table |
Value of parameter |
No |
TYPE |
Type of the observable |
|
Not case sensitive |
No |
CONFIDENCE |
Degree of confidence the observable presents |
|
Default - high |
Yes |
SEVERITY |
Degree of threat the observable presents |
|
Default - high |
Yes |
PRODUCT |
Check Point Software Blade that processes the observable |
|
AV - Check Point Anti-Virus Software Blade (default) AB - Check Point Anti-Bot Software Blade Note - only the Anti-Virus Software Blade can process MD5 observables. |
Yes |
COMMENT |
|
Free text |
|
Yes |
Notes:
These are the valid values for each observable type:
Observable Type |
Validation Criteria |
|---|---|
URL |
Any valid URL |
Domain |
Any URL domain |
IP |
Standard IPv4 address |
IP Range |
A range of valid IPv4 addresses, separated by a hyphen: |
MD5 |
Any valid MD5 |
Mail-subject |
Any non-empty text string |
Mail-to Mail-from Mail-cc Mail-reply-to |
Can be one of these:
|
Notes:
stix:STIX_Package stix:STIX_Header stix:Title stix:Description stix:Indicators stix:Indicator indicator:Title indicator:Type indicator:Description indicator:Observable cybox:Object cybox:Properties FileObj:Hashes |
cyboxCommon:Hash cyboxCommon:Type cyboxCommon:Simple_Hash_Value stix:Observables cybox:Observable URIObj:Value URIObject:Value AddressObject:Address_Value AddressObj:Address_Value AddressObj:AddressObjectType AddressObjet:AddressObjectType cybox:Title |
<cyboxCommon:Simple_Hash_Value condition="Equals" apply_condition="ANY">
#! DESCRIPTION = indi file,,,,,,
"#! REFERENCE = Indicator Bulletin; Feb 20, 2014",,,,,,
# FILE FORMAT:,,,,,,
"# All lines beginning ""#"" are comments",,,,,,
"# All lines beginning ""#!"" are metadata read by the SW",,,,,,
"# UNIQ-NAME,VALUE,TYPE,CONFIDENCE,SEVERITY,PRODUCT,COMMENT",,,,,,
observ1,8d9b6b8912a2ed175b77acd40cbe9a73,MD5,medium,medium,AV,FILENAME:WUC
Invitation Letter Guests.doc
observ2,76700f862a0c241b8f4b754f76957bda,MD5,high,high,AV,FILENAME:essais~.swf|
NOTE:FWS type Flash file
observ7,http://somemaliciousdomain.com/uploadfiles/upload/exp.swf?info=
789c333432d333b4d4b330d133b7b230b03000001b39033b&infosize=00840000
,URL,high,high,AV,IPV4ADDR:196.168.25.25
observ8,svr01.passport.ServeUser.com,Domain,low,high,AB,TCP:80|
IPV4ADDR:172.18.18.25|NOTE:Embedded EXE Remote C&C and Encoded Data
observ9,somemaliciousdomain2.com,Domain,,low,AV,TCP:8080|IPV4ADDR:172.22.14.10
observ10,http://www.bogusdomain.com/search?q=%24%2B%25&form=MOZSBR&pc=
MOZI,URL,low,low,AB,IPV4ADDR:172.25.1.5
observ11,http://somebogussolution.com/register/card/log.asp?isnew=-1&LocalInfo=
Microsoft%20Windows%20XP%20Service%20Pack%202&szHostName=
ADAM-E512679EFD&tmp3=tmp3,URL,medium,,AB,
observ14,172.16.47.44,IP,high,medium,AB,TCP:8080
observ15,172.16.73.69,IP,medium,medium,AV,TCP:443|NOTE:Related to Flash
exploitation
observ16,abc@def.com,mail-to,,high,AV,"NOTE:truncated; samples have appended to
the subject the string ""PH000000NNNNNNN"" where NNNNNNN is a varying number"
observ34,stamdomain.com,domain,,,AB,
observ35,stamdomain.com,mail-from,high,medium,AV,
observ37,xyz.com,mail-from,medium,medium,AB,
observ38,@xyz.com,mail-from,medium,medium,AB,
observ39,a@xyz.com,mail-from,medium,medium,AB,
<stix:STIX_Package
xmlns:xsi="http://www.w3.org/2001/XMLSchema-instance"
xmlns:stix="http://stix.mitre.org/stix-1"
xmlns:indicator="http://stix.mitre.org/Indicator-2"
xmlns:stixVocabs="http://stix.mitre.org/default_vocabularies-1"
xmlns:FileObj="http://cybox.mitre.org/objects#FileObject-2"
xmlns:cybox="http://cybox.mitre.org/cybox-2"
xmlns:cyboxCommon="http://cybox.mitre.org/common-2"
xmlns:cyboxVocabs="http://cybox.mitre.org/default_vocabularies-2"
xmlns:example="http://example.com/"
xsi:schemaLocation="
http://stix.mitre.org/stix-1 ../stix_core.xsd
http://stix.mitre.org/Indicator-2 ../indicator.xsd
http://stix.mitre.org/default_vocabularies-1 ../stix_default_vocabularies.xsd
http://cybox.mitre.org/objects#FileObject-2 ../cybox/objects/File_Object.xsd
http://cybox.mitre.org/default_vocabularies-2 ../cybox/cybox_default_vocabularies.xsd"
id="example:STIXPackage-ac823873-4c51-4dd1-936e-a39d40151cc3"
version="1.0.1">
<stix:STIX_Header>
<stix:Title>Example file watchlist</stix:Title>
<stix:Package_Intent xsi:type="stixVocabs:PackageIntentVocab-1.0">Indicators - Watchlist</stix:Package_Intent>
</stix:STIX_Header>
<stix:Indicators>
<stix:Indicator xsi:type="indicator:IndicatorType" id="example:Indicator-611935aa-4db5-4b63-88ac-ac651634f09b">
<indicator:Type xsi:type="stixVocabs:IndicatorTypeVocab-1.0">File Hash Watchlist</indicator:Type>
<indicator:Description>Indicator that contains malicious file hashes.</indicator:Description>
<indicator:Observable id="example:Observable-c9ca84dc-4542-4292-af54-3c5c914ccbbc">
<cybox:Object id="example:Object-c670b175-bfa3-48e9-a218-aa7c55f1f884">
<cybox:Properties xsi:type="FileObj:FileObjectType">
<FileObj:Hashes>
<cyboxCommon:Hash>
<cyboxCommon:Type xsi:type="cyboxVocabs:HashNameVocab-1.0" condition="Equals">MD5</cyboxCommon:Type>
<cyboxCommon:Simple_Hash_Value condition="Equals" apply_condition="ANY">0522e955aaee70b102e843f14c13a92c##comma##0522e955aaee70b102e843f14c13a92d##comma##0522e955aaee70b102e843f14c13a92e</cyboxCommon:Simple_Hash_Value>
</cyboxCommon:Hash>
</FileObj:Hashes>
</cybox:Properties>
</cybox:Object>
</indicator:Observable>
</stix:Indicator>
</stix:Indicators>
</stix:STIX_Package>
When you manually upload threat indicator files through SmartConsole, the files must be in a CSV Check Point format or STIX XML (STIX 1.0) format. The files must contain records of equal size. If an Indicator file has records which do not have the same number of fields, it does not load. See Supported Indicator Files for the required fields and observable values.
Syntax rules of CSV Indicator files in Check Point format:
<text>To load Indicator files through SmartConsole:
The Indicators page opens.
The Indicators configuration window opens.
Each Indicator must have a unique name.
The content of each file must be unique. You cannot load duplicate files.
If you leave an optional field empty, a warning notifies you that the default values are used in the empty fields. Click OK. The Indicator file loads.
To delete Indicators:
You can edit properties of an Indicator object, except for the file it uses. If you want an Indicator to use a different file, you must delete it and create a new one.
You can upload indicator files through the CLI in Check Point CSV format and other CSV formats, and in STIX XML (STIX 1.0) format.
The Feed's resource can be one of these:
http://10.0.0.1/my_feeds/stix_feed.xml"export EXT_IOC_NO_SSL_VALIDATION=1"--transport local_file --resource "/home/admin/my_feed.csv"--transport local_directory --resource "/home/admin/my_feed_folder"Use these commands to upload and manage threat indicator files through the CLI:
Parameter |
Description |
Example |
|
Push feeds now |
|
|
Print all existing feeds |
|
|
Print specific feed details |
|
|
Print fetching interval |
|
|
Set interval for fetching in seconds *Feed fetching interval - the same for all feeds |
|
|
Print scanning mode |
|
|
Set scanning mode - on/off |
|
|
Add a new feed Mandatory fields:
Optional fields:
(if you do not specify a proxy flag - the gateway proxy is used)
|
Examples:
|
|
Modify existing feed Fields that are not mentioned stay as they were before |
|
|
Delete existing feed |
|
Examples:
[Expert@HostName:0]# ioc_feeds add --feed_name remote_csv_feed --transport http --resource "http://10.10.1.100/ioc/ioc_csv_file.csv" --feed_action Prevent
[Expert@HostName:0]# ioc_feeds add --feed_name ioc_stix_file --transport local_file --resource "/home/admin/ioc/ioc_stix_file.xml"
[Expert@HostName:0]# ioc_feeds show
[Expert@HostName:0]# ioc_feeds delete --feed_name ioc_stix_file
[Expert@HostName:0]# ioc_feeds add --feed_name remote_stix_file --transport http --resource "http://www.public_indicators.com/ioc_stix_file.xml" --test true
You can import threat indicator feeds from external sources directly to the Security Gateway. The gateway automatically pulls and enforces an indicator file, over HTTP or HTTPS, or by reading from a local file or folder. There is no need to install policy to enforce the feeds, but you must import the files on each gateway separately.
Automated custom intelligence feeds support STIX XML (STIX 1.0) files, CSV files in Check Point format, and CSV files in other formats. To import Threat Indicator files in CSV format that is different than the Check Point CSV format, follow the syntax rules provided in this section.
Syntax Rules:
Use --format
Use --comment
Note: comment specified within the square brackets of --format--comment
For example:
If the Value observable is in the 3rd place in your csv row, enter:
--format [value:#3]
For example, if you want the value of the Type observable to be the domain specified in every csv row, enter:
--format [type:domain]
Examples:
|
If you enter this command, the gateway takes the domain specified in the first place of every row, and ignores anything that starts with # and the word Site.
ioc_feeds add --feed_name domain_list --transport https --resource "https://isc.sans.edu/feeds/suspiciousdomains_High.txt" --format [type:domain,value:1] --comment "#, Site"
# category Descriptive tag name for this entry. For this report, # the text sshpwauth will appear. # # A commented footer section shows an aggregate account of ASNs and # addresses seen in the current report # 3 | organization A | 18.30.10.26 | 2018-12-15 08:16:39 | sshpwauth 3 | organization B | 18.30.21.197 | 2018-12-28 17:43:41 | sshpwauth 17 | organization C | 128.46.80.71 | 2019-01-04 17:56:00 | sshpwauth 111| organization D | 128.197.31.119 | 2019-01-10 03:12: 18| sshpwauth
|
If you enter this command, the gateway takes the IP address from the 3rd place in the row, takes the comment from the second place in the row, and ignores all content preceded by #:
ioc_feeds add --feed_name ip_list_with_spaces --transport local_file --resource "/home/admin/ioc/ip_list_with_spaces.txt" --format [value:#3,comment:#2,type:ip] --comment [#] --delimiter "|"
To learn more about Custom Intelligence Feeds, see sk132193.
When you configure Virtual Systems to use a Threat Prevention Software Blade, make sure the Software Blade:
Where applicable, make sure the routing, DNS, and proxy settings for the VSX Gateway (VS0) are configured correctly.
To enable Anti-Bot, Anti-Virus or IPS on Virtual Systems:
To enable Threat Emulation on Virtual Systems:
To enable Threat Extraction on Virtual Systems:
The Virtual System Properties window opens.
The Threat Extraction First Time Activation Wizard opens.
If you want Threat Extraction to scan email attachments, you must enable the MTA and configure the Domain and Next Hop.
If you do not want Threat Extraction to scan email attachments, select Skip this configuration now, and then click Next.
In the Security Policies view, go to Threat Prevention > Threat Tools > Profiles > double-click a profile > go to <to_tcb> > General > Protocol, and select Web (HTTP/HTTPS).
This policy is called:
<Name of the VSX Gateway or VSX Cluster object_VSX
For more information, see sk106496 and sk79700.
You can run commands from the CLI (Command Line Interface) to install Threat Prevention policy and for IPS and advanced Threat Emulation management.
In any case of conflict between the CLI commands and the SmartConsole configuration, the CLI commands will be enforced.
Description: Run this command on the Security Management Server to install the Threat Prevention policy on the specified Security Gateways.
Syntax: mgmt_cli install-policy <>
Note: For more information, see Management API Reference.
Description: Use this command to manually send files for threat emulation. The command has to be run from expert mode. For a complete explanation of all the available parameters, run te_add_file
Syntax: te_add_file -f=<file path> -d=<directory path>
Parameter |
Description |
|---|---|
-f= |
Specifies the path to the file. You must include the file name at the end of the path. |
-d= |
Specifies the path to a directory. The command takes all the files in the directory and sends them for emulation. |
Example: te_add_file -f=/home/admin/test.pdf
[Expert@gaia]# te_add_file -f=/home/admin/test.pdf
# Sending files... Wait for response: True
# Trying to connect to ted...
# Connected to ted...Ready to send...
# File path: /home/admin/test.pdf
# File type: pdf
# Got response from ted...
(
:event_id ("{000000A5-006D-0045-9D15-D6896862D148}")
:action (drop)
:confidence (high)
:done (0)
:file_path ("/home/admin/test.pdf")
:md5_string (61baabd6fc12e01ff73ceacc07c84f9a)
)
# Got response from ted...
(
:event_id ("{000000A5-006D-0045-9D15-D6896862D148}")
:action (drop)
:confidence (high)
:done (1)
:file_path ("/home/admin/test.pdf")
:md5_string (61baabd6fc12e01ff73ceacc07c84f9a)
)
/home/admin/test.pdf
Verdict: drop Time: 1 *
Total Files: 1
Verdicts distribution:
drop: 1
# Done 1 files in 1 seconds...Bye Bye...
Comments: ted is the Threat Emulation daemon.
Use the tecli
Description: Resets the emulation statistics for the Security Gateway or appliance.
Syntax: tecli advanced clear
Description: Deletes all the records in the local cache.
Syntax: tecli cache clean
Description: Controls the sizing mode tool that lets you estimate the resources that Threat Emulation will use in your network.
Syntax: tecli control sizing {enable|disable|status}
Note: For more about using sizing mode, go to sk93598.
Description: Enable and disable debug mode for Threat Emulation.
Syntax: tecli debug {on|off|scan local {enable|disable}}
Parameter |
Description |
|---|---|
|
Enables debug mode |
|
Disables debug mode |
|
Enables the appliance or Security Gateway to scan local connection |
|
Disables the appliance or Security Gateway to scan local connection |
Example:
tecli d otecli debug on
tecli d s l e tecli debug scan local enable
tecli showtecli show
Command |
Description |
|---|---|
|
Shows emulation statistics |
|
Shows information about ThreatCloud emulation |
|
Shows the quota for ThreatCloud emulation |
|
Shows the current status of the emulation queue |
|
Shows all the parts of file emulation |
Description: Shows data and statistics about your ThreatCloud account.
Syntax: tecli show cloud {identity|info|quota}
Parameter |
Description |
|---|---|
|
Shows data about how the Security Gateway or Emulation appliance connects to the ThreatCloud |
|
Shows data about your file emulation in the ThreatCloud |
|
Shows data about your ThreatCloud monthly emulation quota |
Example:
tecli s c id tecli show cloud identity
tecli s c in tecli show cloud info
Description: Shows data about Threat Emulation queue and VMs (Virtual Machines).
Syntax: tecli show emulator {emulations|vm {synopsis|detailed|id <ID>}}
Parameter |
Description |
|---|---|
|
Shows the current status of the emulation queue |
|
Shows a summary of the VMs |
|
Shows data and details of the VMs |
|
Shows data for the VM with this ID |
Example:
tecli s e etecli show emulator emulations
tecli s e v s tecli show emulator vm synopsis
Description: Shows data and statistics about files and rules that Threat Emulation is downloading.
Syntax: tecli show downloads {all|images|dr|sa|raw|types}
Parameter |
Description |
|---|---|
|
Shows the status of all downloads |
|
Shows download status of operating system images |
|
Shows download status of malware detection rules |
|
Shows download status of static analysis rules |
|
Shows download status of general Threat Emulation files |
|
Shows the file extensions that are being sent for emulation |
Example:
tecli s d atecli show downloads all
tecli s d i tecli show downloads images
Description Shows data and statistics about the Emulation appliance
Syntax tecli s r itecli show remote information
Description: Shows statistics to the Emulation appliance or Security Gateway.
Syntax: tecli s stecli show statistics
Results:
Description: Shows data about file emulation for each time interval.
Syntax: tecli show throughput {minute|hour|day|month}
Parameter |
Description |
|---|---|
|
Shows how many files completed emulation for each minute |
|
Shows how many files completed emulation for each hour |
|
Shows how many files completed emulation for each day |
|
Shows how many files completed emulation for each month |
Example:
tecli s t mitecli show throughput minute
tecli s t motecli show throughput month
Description: Shows all the parts of file emulation:
The output shows the number of files for each task in the emulation part.
Syntax: tecli u a tecli show unit all
Results:
# tecli s u a [prepare] - system state (15) - policy (15) - file (1) - contract (1) - cache inquirer (1) [processing] - duplicate (1) - static analysis (1) - emulator (1) - cloud emulation (1) - remote emulation (1) [finalizing] - forensics (15) - cache updater (15) - threat cloud sharing (15) - threat cloud statistics (15) - file saver (15) - logger (15) - local filter counter (15) |
You can use these CLI commands to manage IPS on your Security Gateways. You must be in expert mode to use the commands.
To see all available commands:
Command |
Description |
|
|---|---|---|
ips on|off [-n] |
Enable or disable IPS on the Security Gateway. |
|
-n |
Empty templates table (applies fwaccel off; fwaccel on immediately). Otherwise, this command takes effect in a few minutes. |
|
ips stat |
Show the IPS status of the Security Gateway. |
|
ips bypass stat |
Show the Bypass Under Load status. |
|
ips bypass on|off |
Enable or disable Bypass Under Load. |
|
ips bypass set cpu|mem low|high <threshold> |
Set the Bypass Under Load threshold. |
|
threshold |
Valid range is 1 to 99. Unit is percent. |
|
ips debug [-e filter] -o <output_file> |
Create an IPS debug file. |
|
ips refreshcap |
Refresh the sample capture repository. |
|
ips stats [<ip_address> -m] [-g <seconds>] [<ip_address> <seconds>] |
Print IPS and Pattern Matcher performance statistics. Without arguments, runs on current Security Gateway for 20 seconds. This is a resource intensive command. Do not run it on a system with a high load. |
|
-m |
Analyzes input statistics file from Security Gateway. Give IP address of the Security Gateway. Run from the management server. |
|
-g |
Collect statistics for current Security Gateway. |
|
seconds |
period in which statistics are gathered |
|
ips pmstats reset |
Reset pattern matcher statistics. |
|
ips pmstats -o <output_file> |
Print pattern matcher statistics. |
|

