


|
|
|
In This Section: |
The main SmartProvisioning window has a tree pane with separate nodes, each with its own purpose:
The information in the Status View pane depends on whether you select Action Status or Critical Notifications.
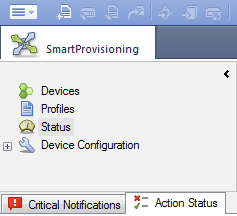
Action Status
You can see the Action Status for each action you do on a device:
Critical Notifications
For each device that has a critical status or error, you can view the gateway status, its Security Policy (if the device is a SmartLSM Security Gateway), and its Provisioning Profile (if it is assigned to a Provisioning Profile).
Gateway Status Indicators
Indicator |
Description |
|---|---|
OK |
Gateway is up and performing correctly |
Waiting |
SmartProvisioning is waiting for status from the Security Management Server or Domain Management Server |
Unknown |
Status of gateway is unknown |
Not Responding |
Gateway has not communicated with Security Management Server or Domain Management Server |
Needs Attention |
Gateway has an issue and needs to be examined |
Untrusted |
SIC Trust is not established between gateway and Security Management Server or Domain Management Server |
Policy Status Indicators
Indicator |
Description |
|---|---|
OK |
Gateway is up and performing correctly |
Waiting |
SmartProvisioning is waiting for status from Security Management Server or Domain Management Server |
Unknown |
Status of gateway is unknown |
Not installed |
Security policy is not installed on this gateway |
Not updated |
Installed security policy has been changed; gateway should fetch new policy from Security Management Server or Domain Management Server |
May be out of date |
Security Policy was not retrieved within the fetch interval |
Provisioning Profile Indicators
Indicator |
Description |
|---|---|
OK |
SmartProvisioning Agent is installed and operating |
Needs Attention |
Device has an issue and needs to be examined |
Agent is in local mode |
Device is in maintenance mode |
Uninitialized |
Device has not yet received any provisioning configurations |
Unknown |
Status of provisioning is unknown |
This section is a reference for the menus and toolbar buttons in SmartProvisioning. The available menu commands depend on the list that is displayed in the work space.
To access menu options, click the Launch Menu button on the toolbar and then access the specified menu.
For example, the File > New command enables you to create new SmartLSM Security Gateways when the Devices work space is displayed. When the Profiles work space is displayed, File > New enables you to create a new Provisioning Profile.
The table below lists the menus and explains their commands. Some of the commands have toolbar buttons that you can use to access the same functionality.
Menu |
Command |
Description |
For further information |
|---|---|---|---|
File |
New |
Define new SmartLSM Security Gateway/Cluster or Provisioning Profile |
See: Adding Check Point Appliance/Open Server Security Gateways Adding UTM-1 Edge SmartLSM Security Gateways Check Point Small Office Appliance Centrally Managed Gateways |
|
Export to file |
Export objects list to file |
See Export to File |
|
Exit |
Close SmartProvisioning |
|
Edit |
Edit gateway |
Edit selected gateway |
|
|
Delete SmartLSM Gateway |
Delete selected gateway; only for devices with SmartLSM Security Profiles |
|
|
Profile Details |
Edit selected Provisioning Profile |
|
|
Find |
Find specific object in visible list |
See Find |
View
|
Toolbar |
Show/Hide Toolbar |
|
Status bar |
Show/Hide Status View pane |
||
Status View |
Show/Hide Status View pane |
See Status View |
|
Menu Bar |
Show/Hide Menu Bar above Toolbar |
|
|
Clear All Filters |
Clears all the configured filters |
||
Show/Hide columns |
Open the Show/Hide Columns window and select the data to be displayed in the work space |
||
Manage |
Custom Commands |
Add/Edit user-defined executables to run on remote gateways |
|
|
Select SSH Application |
Provide pathname to SSH application for remote management of devices |
See SSH Applications |
Actions |
Push Settings and Actions |
Immediate execute of Backup and fetch of profile settings |
See Applying Changes |
|
Get Actual Settings |
Fetch configuration settings from device to management server |
|
|
Push Policy |
Push values resolved in SmartProvisioning to SmartLSM Security Gateway |
|
|
Push Dynamic Objects |
Push values resolved in SmartProvisioning to SmartLSM Security Gateway |
|
|
Stop Gateway |
Stop Check Point services on selected gateway |
See Remotely Controlling Gateways
|
|
Start Gateway |
Start Check Point services on selected gateway |
|
|
Restart Gateway |
Restart Check Point services on selected gateway |
|
|
Reboot Gateway |
Reboot the device |
|
|
Get Status Details |
Open Gateway Status Details |
|
|
Packages |
Software management |
|
|
Updated Selected Corporate Office Gateway |
Update selected CO (available when CO gateway is selected) |
|
|
Backup |
Create a backup image |
|
|
Define UTM-1 Edge Cluster |
Configure two UTM-1 Edge SmartLSM Security Gateways for high availability |
|
|
Remove UTM-1 Edge Cluster |
Disassociate the two members of a UTM-1 Edge Cluster |
|
Window |
Access SmartEvent |
||
Help |
View version information and open online help |
||
This section describes SmartProvisioning customizations and general functions.
You can search for strings in SmartProvisioning.
To open the Find window:
You can customize the information displayed in Device lists.
To customize Device list columns:
You can filter a Devices workspace for more convenient displays.
To filter the list:
You can filter columns in Devices and Devices Configuration displays according to the content of that column.
To filter a column:
The Advanced Filter window opens.
If you prefer to track your managed devices in other programs, you can export the SmartProvisioning objects list.
To export SmartProvisioning data to a file:
The Export to File window opens.
The file is created. A dialog box opens, with the message
File '<pathname>' created successfully
SSH applications let you connect to devices remotely.
If you did not yet open an SSH application, you can provide the path from within SmartProvisioning. The first time you select an SSH application, select a default application from the Launch Menu > Manage > Select SSH Application. Each subsequent time that you want to open an SSH terminal, you can right-click the required device and select Launch SSH Terminal.
To select an SSH application for the first time:
After you selected a default SSH application for the first time, you can launch it from any supported device.
To launch the default SSH application from a device:
The SSH terminal opens and automatically calls the object's IP address from its last known IP address.
You can use the Web management portal to manage Security Gateways. This is especially useful with remote gateways that need individual changes, or system administration management.
To use the Portal to manage a Security Gateway:
A web browser opens to:
https://<IP_address> - for Gaia devices.
https://<IP_address>:981 - for UTM-1 Edge devices.
https://<IP_address>:4434 - for Small Office Appliance devices.
The features available from the Portal enable you to manage networking, routing, servers, and many other local device configurations.

