


|
|
|
Check Point Mobile Access has a range of flexible clients and features that let users access internal resources from remote locations. All these solutions include these features:
For more information about the newest versions of Mobile Access solutions and clients, go to sk67820.
Check Point remote access solutions use IPsec and SSL encryption protocols to create secure connections. All Check Point clients can work through NAT devices, hotspots, and proxies in situations with complex topologies, such as airports or hotels. These are the types of installations for remote access solutions:
The Mobile Access Portal is a clientless SSL VPN solution that supplies secure access to web-based resources. After users authenticate to the portal, they can access Mobile Access applications such as Outlook Web App and a corporate wiki.
SSL Network Extender is an on-demand SSL VPN client and is installed on the computer or mobile device from an Internet browser. It supplies secure access to internal network resources.
This is a high-level workflow to configure remote access to Mobile Access applications and resources.
Users can access mobile applications through the configured Mobile Access portal with the defined authentication method.
Enable Mobile Access |
|
Configure settings in Mobile Access wizard |
|
Select the policy type and add rules to policy |
|
Update the Authentication settings |
|
|
|
|
|
|
|
Users can access internal resources |
|
Users download app, open it, and enter settings |
|
Generate a certificate for the clients |
|
Install the Access Control Policy |
This is a sample deployment of a Mobile Access Security Gateway with an AD and Exchange server in the internal network.
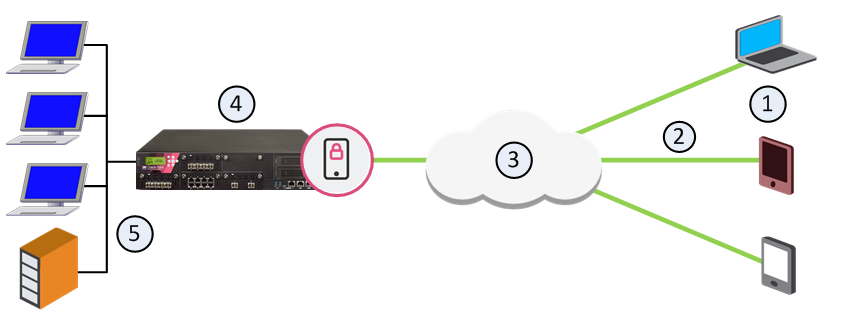
Item |
Description |
|---|---|
1 |
Mobile devices |
2 |
Mobile Access tunnels |
3 |
Internet (external networks) |
4 |
Mobile Access Security Gateway |
5 |
Internal network resources, AD and Exchange servers |
In this sample Mobile Access deployment, a mobile device uses a Mobile Access tunnel to connect to the internal network. The Mobile Access Security Gateway decrypts the packets and authenticates the user. The connection is allowed and the mobile device connects to the internal network resources.
This procedure describes how to enable and configure the Mobile Access Software Blade on a Security Gateway with the Configuration wizard. For this sample configuration, the AD user group Mobile_Access contains all the users that are allowed to connect to the internal network. The deployment is based on the Sample Mobile Access Deployment.
This configuration lets these clients connect to internal resources:
To configure Mobile Access:
The General Properties window opens.
The Mobile Access page of the Mobile Access Configuration Wizard opens.
The Web Portal page opens.
https://<gw_IPv4>/sslvpn The Applications page opens.
The Mobile Access portal shows links to the Demo web and Outlook Web App applications. The client on the mobile device shows links to the other applications.
The Active Directory page opens.
The Security Gateway makes sure that it can connect to the AD server.
The Users page opens.
Click Add and then select the group Mobile_Access.
The Mobile Access Configuration Wizard closes.
The Gateway Properties window closes.
The Mobile Access Configuration Wizard enables and configures the Mobile Access Software Blade. It is necessary to add Firewall rules to allow connections from the VPN clients on the computers and devices. Create a Host Node object for the Exchange server, all of the other objects are predefined.
Name |
Source |
Destination |
VPN |
Service |
Action |
Install On |
Track |
|---|---|---|---|---|---|---|---|
Mobile Access Users |
Any |
ExchngSrvr |
RemoteAccess |
HTTP |
Accept |
MobileAccessGW |
Log |
All connections from the RemoteAccess VPN community to the Exchange server are allowed. These are the only protocols that are allowed: HTTP, HTTPS, and MS Exchange. This rule is installed on Security Gateways in the MobileAccessGW group.
Use the Security Policies page in SmartConsole to define rules that let users access Mobile Access applications. The applications that are selected in the Configuration Wizard are automatically added to this page. You can also create and edit the rules that include these SmartConsole objects:
Enable the SSO (Single Sign On) feature to let users authenticate one time for applications that they use during Mobile Access sessions. The credentials that users enter to log in to the Mobile Access portal can be re-used automatically to authenticate to different Mobile Access applications. SSO user credentials are securely stored on the Mobile Access Security Gateway for that session and are used again if users log in from different remote devices. After the session is completed, the credentials are stored in a database file.
By default, SSO is enabled on new Mobile Access applications that use HTTP. Most Web applications authenticate users with specified Web forms. You can configure SSO for an application to use the authentication credentials from the Mobile Access portal. It is not necessary for users to log in again to each application.
To configure SSO:
The Single Sign On page opens.
The application properties window opens and shows the Single Sign On page.
The Advanced window opens.


