Using User Directory
User Directory lets you integrate LDAP and other external user management servers with Check Point products and security solutions. These are some of the Software Blades that work with User Directory:
- Mobile Access
- Identity Awareness
- Data Loss Prevention
User Directory Features
- Use LDAP servers to manage user information for the network
- Security Gateways can retrieve CRLs (Certificate Revocation Lists)
- Security Management Server can use LDAP information to authenticate users
- High Availability can duplicate and backup user information across multiple LDAP servers
- Create multiple Account Units to work with distributed databases
- Use profiles to support multiple LDAP vendors
- Encrypt User Directory connections
Deploying User Directory
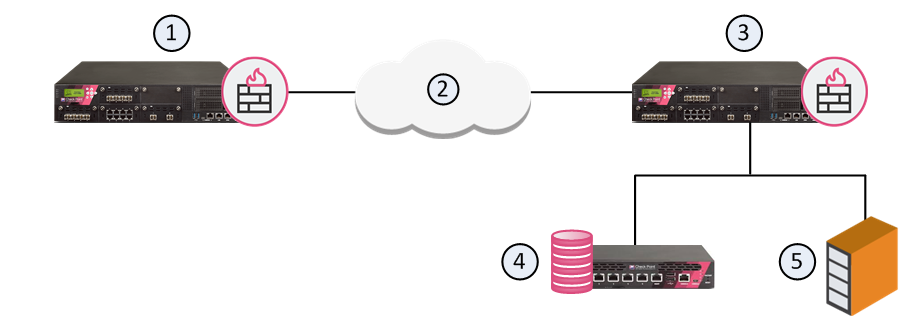
User Directory integrates the Security Management Server and an LDAP server and lets the Security Gateways use the LDAP information.
Item
|
Description
|
1
|
Security Gateway - Retrieves LDAP user information and CRLs
|
2
|
Internet
|
3
|
Security Gateway - Queries LDAP user information, retrieves CRLs, and does bind operations for authentication
|
4
|
Security Management Server - Uses User Directory to manage user information
|
5
|
LDAP server - Server that holds one or more Account Units
|
Account Units
An Account Unit represents branches of user information on one or more LDAP servers. The Account Unit is the interface between the LDAP servers and the Security Management Server and Security Gateways.
You can have a number of Account Units representing one or more LDAP servers. Users are divided among the branches of one Account Unit, or between different Account Units.
Note - When you enable the Identity Awareness and Mobile Access Software Blades, SmartConsole opens a First Time Configuration Wizard. The window of this wizard lets you create a new AD Account Unit. After you complete the wizard, SmartConsole creates the AD object and Account Unit.
Working with LDAP Account Units
Use the window in SmartConsole to edit an existing Account Unit or to create a new one manually.
To edit an existing LDAP Account Unit:
- In SmartConsole, open the (press the keys).
- Select > .
- Right-click the LDAP Account Unit and select .
The window opens.
- Edit the settings in these tabs:
- - Configure how the Security Management Server uses the Account Unit
- - Manage LDAP servers that are used by this Account Unit
- - Configure the LDAP server for the Security Management Server to query and the branches to use
- - Configure the authentication scheme for the Account Unit
- Click .
- Install the Access Control Policy.
To create a new LDAP Account Unit:
- In the tab, click .
The window opens.
- Configure the settings on these tabs:
- - Configure how the Security Management Server uses the Account Unit
- - Manage LDAP servers that are used by this Account Unit
- - Configure the LDAP server for the Security Management Server to query and the branches to use
- - Configure the authentication scheme for the Account Unit
- Click .
- Install the Access Control Policy.
General Tab
These are the configuration fields in the tab:
- - Name for the Account Unit
- - Optional comment
- - Optional color associated with the Account Unit
- - LDAP vendor
- - Domain of the Active Directory servers, when the same user name is used in multiple Account Units (this value is also necessary for AD Query and SSO)
- - Prefix for non-Active Directory servers, when the same user name is used in multiple Account Units
- - Select applicable options:
- - Encoding for LDAP user information in non-English languages
- - Click to configure Kerberos SSO for Active Directory - , , , and
Servers Tab
You can add, edit, or delete LDAP server objects.
To configure an LDAP server for the Account Unit:
- To add a new server, click . To edit an existing one, select it from the table and click .
The window opens.
- From the drop-down menu, select the server object.
If necessary, create a new SmartConsole server object:
- Click .
- In the window opens, enter the settings for the LDAP server.
- Click .
- Enter the login credentials and the .
- Select access permissions for the Check Point Gateways:
- In the tab, configure the optional SSL encryption settings. To learn about these settings, see the Help. Click or press F1 in the tab.
- Click .
To remove an LDAP server from the Account Unit:
- Select a server from the table.
- Click .
If all the configured servers use the same login credentials, you can modify those simultaneously.
To configure the login credentials for all the servers simultaneously:
- Click .
The window opens.
- Enter the login credentials.
- Click .
Objects Management Tab
Configure the LDAP server for the Security Management Server to query and the branches to fetch.
Note - Make sure there is LDAP connectivity between the Security Management Server and the LDAP Server that holds the management directory.
To configure LDAP query parameters:
- From the drop-down menu, select the LDAP server object.
- Click .
The Security Management Server queries and shows the LDAP branches.
- Configure :
- To add a branch, click and in the LDAP Branch Definition window that opens, enter a new
- To edit a branch, click and in the LDAP Branch Definition window that opens, modify the
- To delete a branch, select it and click
- Select , if necessary (optional).
- Configure the number of that are stored in the LDAP database (the default is 500).
Authentication Tab
These are the configuration fields in the Authentication tab:
- - Select to use one path for all the LDAP group objects (only one query is necessary for the group objects)
- - Select one or more authentication schemes allowed to authenticate users in this Account Unit - , , , , or
- Users' default values - The default settings for new LDAP users:
- - Template that you created
- - one of the authentication schemes selected in the section
- (optional):
- - Number of , after which the account gets locked
- - Number of , after which the locked account becomes unlocked
- - Pre-shared secret key for IKE users in this Account Unit
Enabling User Directory
Configure SmartConsole to enable the Security Management Server to manage users in the Account Unit. You cannot use the SmartConsole User Database when the User Directory LDAP server is enabled.
For more about using the SmartConsole User Database, see the R80.30 Security Management Administration Guide.
To enable User Directory on the Security Management Server:
- From the Menu, select .
The window opens.
- In the view, select .
- Configure other login and password settings.
- Click .
- Make sure that the User Directory Software Blade is enabled:
- In SmartConsole, open the (Ctrl+E).
- Go to > .
- Double-click the Security Management Server object.
The object properties window opens.
- Make sure that in the tab of the view, and are selected.
- Click .
- Click .
- Install the policy.
Managing LDAP Information
User Directory lets you use SmartDashboard to manage information about users and OUs (Organizational Units) that are stored on the LDAP server.
To manage LDAP information from SmartDashboard:
- In SmartConsole, go to .
- Click .
SmartDashboard opens.
- From the object tree, select .
- Double-click the Account Unit.
The LDAP domain is shown.
- Double-click the LDAP branch.
The Security Management Server queries the LDAP server and SmartDashboard shows the LDAP objects.
- Expand the pane.
- Double-click the LDAP object.
The pane shows the user information.
- Right-click a user and select .
The window opens.
- Edit the user information and settings and then click .
To Learn More About Adding Users to the Policy
To learn more about adding users to the Policy, see these guides:


