


|
|
|
In This Section: |
The UserCheck client is installed on endpoint computers to communicate with the gateway and show UserCheck interaction notifications to users.
It works with the Data Loss Prevention and Content Awareness Software Blades.
Notifications of incidents can be sent by email (for SMTP traffic) or shown in a popup from the UserCheck client in the system tray (for SMTP, HTTP and FTP).
UserCheck client adds the option to send notifications for applications that are not in a web browser, such as Skype, iTunes, or browser add-ons (such as radio toolbars). The UserCheck client can also work together with the UserCheck portal to show notifications on the computer itself when:
Users select an option in the notification message to respond in real-time.
For Data Loss Prevention (DLP), administrators with full permissions or the View/Release/Discard DLP messages permission can also send or discard incidents from the SmartConsole Logs & Monitor > Logs view.
Workflow for installing and configuring UserCheck clients:
See UserCheck Client Requirements in the R80.30 Release Notes.
Enable UserCheck and the UserCheck client on the gateway in the Properties window of the gateway object in SmartConsole. This is necessary to let clients communicate with the gateway.
To enable UserCheck and the UserCheck client on the gateway:
The gateway window opens and shows the General Properties page.
This enables UserCheck notifications from the gateway.
This enables UserCheck notifications from the client.
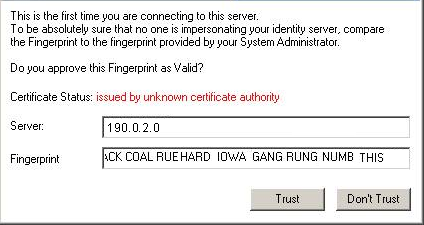
In an environment with UserCheck clients, the gateway acts as a server for the clients. Each client must be able to discover the server and create trust with it.
To create trust, the client makes sure that the server is the correct one. It compares the server fingerprint calculated during the SSL handshake with the expected fingerprint. If the server does not have the expected fingerprint, the client asks the user to manually confirm that the server is correct.
Here is a summary of the methods that you can use for clients to discover and trust the server. More details are described later in this section.
|
Requires AD |
Manual User Trust (one time) Required? |
Multi- |
Client Remains Signed? |
Still works after Gateway Changes |
Level |
Recommended for... |
|---|---|---|---|---|---|---|---|
File name based |
No |
Yes |
No |
Yes |
No |
Very Simple |
Single Security Gateway deployments |
AD based |
Yes |
No |
Yes |
Yes |
Yes |
Simple |
Deployments with AD that you can modify |
DNS based |
No |
Yes |
Partially (per DNS server) |
Yes |
Yes |
Simple |
Deployments without AD With an AD you cannot change, and a DNS that you can change |
Remote registry |
No |
No |
Yes |
Yes |
Yes |
Moderate |
Where remote registry is used for other purposes |
This option is the easiest to deploy, and works out-of-the-box. It requires that users manually click Trust to trust the server the first time they connect. You can use this option if your deployment has only one Security Gateway with the relevant Software Blades.
How does it work?
When a user downloads the UserCheck client, the address of the Security Gateway is inserted in the filename. During installation, the client finds if there is a different discovery method configured (AD based, DNS based, or local registry). If no method is configured, and the gateway can be reached, it is used as the server. In the UserCheck Settings window, you can see that the server you connect to is the same as the Security Gateway in the UserCheck client filename.
Users must manually make sure that the trust data is valid, because the filename can be easily changed.
You can manually change the name of the MSI file before it is installed on a computer. This connects the UserCheck client to a different gateway.
To rename the MSI file:
Where GWname - is the DNS name of the gateway.
Optional: Use UserCheck_~GWname-port.msi
Where port is the port number of notifications. For example, UserCheck_~mygw-18300.msi.
|
Notes - The prefix does not have to be "UserCheck". The important part of the syntax is underscore tilde (_~), which indicates that the next string is the DNS of the gateway. If you want to add the port number for the notifications to the client from the gateway, the hyphen (-) indicates that the next string is the port number. |
If your client computers are members of an Active Directory domain and you have administrative access to this domain, you can use the Distributed Configuration tool to configure connectivity and trust rules.
The Distributed Configuration tool has three windows:
To enable Active Directory based configuration for clients:
From the command line on that computer, run the client configuration tool with the AD utility.
For example, on a Windows 7 computer:
"C:\Users\<user name>\Local Settings\Application Data\Checkpoint\UserCheck\UserCheck.exe" -adtool
The Check Point UserCheck - Distributed Configuration tool opens.
By default, your AD username is shown. If you do not have administrator permissions, click Change user and enter administrator credentials.
The Identity Server Configuration window opens.
The identity of the AD Server for the UserCheck client is written in the Active Directory and given to all clients.
|
Note - The entire configuration is written under a hive named Check Point under the Program Data branch in the AD database that is added in the first run of the tool. Adding this hive does not affect other AD based applications or features. |
If you use the Distributed Configuration tool and you configure the client to Automatically discover the server, the client fetches the rule lists. Each time it must connect to a server, it tries to match itself against a rule, from top to bottom.
When the tool matches a rule, it uses the servers shown in the rule, according to the priority specified.
The configuration in this example means:
‘192.168.0.1 – 192.168.0.255’US-GW1BAK-GS2US-GW1‘UK-SITE’UK-GW1UK-GW2BAK-GS2BAK-GS2Use the Add, Edit and Remove buttons to change the server connectivity rules.
The Trusted Gateways window shows the list of servers that are trusted - no messages open when users connect to them.
You can add, edit or delete a server. If you have connectivity to the server, you can get the name and fingerprint. Enter its IP address and click Fetch Fingerprint in the Server Trust Configuration window. If you do not have connectivity to the server, enter the same name and fingerprint that is shown when you connect to that server.
If you configure the client to Automatic Discovery (the default), it looks for a server by issuing a DNS SRV query for the address of the gateway (the DNS suffix is added automatically). You can configure the address in your DNS server.
To configure DNS based configuration on the DNS server:
To configure Load Sharing for the Security Gateway, create multiple SRV records with the same priority.
To configure High Availability, create multiple SRV records with different priorities.
|
Note - If you configure AD based and DNS based configuration, the results are combined according to the specified priority (from the lowest to highest). |
To troubleshoot issues in DNS based configuration, you can see the SRV records that are stored on the DNS server.
To see SRV records on the DNS server:
Run:
C:\> nslookup> set type=srv> checkpoint_dlp._tcp
The result is:
|
If you have a way to deploy registry entries to your client computers, for example, Active Directory or GPO updates, you can deploy the Security Gateway addresses and trust parameters before you install the clients. Clients can then use the deployed settings immediately after installation.
To configure the remote registry option:
HKEY_CURRENT_USERHKEY_CURRENT_USERDefaultGatewayDefaultGatewayEnabledTo get the MSI file:
|
Important - Before you can download the client msi file, the UserCheck portal must be up. The portal is up only after a Policy installation. |
After configuring the clients to connect to the gateway, install the clients on the user machines. You can use any method of MSI or EXE mass deployment and installation that you choose. For example, you can send users an email with a link to install the client. When a user clicks the link, the MSI file automatically installs the client on the computer.
Alternatively, users can download the installation package from the regular DLP UserCheck notifications.
To install the client for all user accounts on a Windows computer, see sk96107.
The installation is silent and generally, no reboot is required.
When the client is first installed, the tray icon indicates that it is not connected. When the client connects to the gateway, the tray icon shows that the client is active.
The first time that the client connects to the gateway, it asks for verification from the user and approval of the fingerprint.
Best Practices:
If UserCheck for DLP is enabled on the gateway, users are required to enter their username and password after the client installs.
Example of message to users about the UserCheck client installation (for DLP):
Dear Users,
Our company has implemented a Data Loss Prevention automation to protect our confidential data from unintentional leakage. Soon you will be asked to verify the connection between a small client that we will install on your computer and the computer that will send you notifications.
This client will pop up notifications if you try to send a message that contains protected data. It might let you to send the data anyway, if you are sure that it does not violate our data-security guidelines.
When the client is installed, you will see a window that asks if you trust the DLP server. Check that the server is SERVER NAME and then click Trust.
In the next window, enter your username and password, and then click OK.
|
Note - If the UserCheck client is not connected to the gateway, the behavior is as if the client was never installed. Email notifications are sent for SMTP incidents and the Portal is used for HTTP incidents. |
You can see and edit Check Point users from Users and Administrators in the navigation tree.
To enable Check Point password authentication:
SmartConsole Configuration
UserCheck Client Configuration
Ask your users to configure their UserCheck client:
If users require assistance to troubleshoot issues with the UserCheck client, you can ask them to send you the logs.
To configure the client to generate logs:
The Settings window opens.
To send UserCheck logs from the client:
The Status window opens.
The default email client opens, with an archive of the collected logs attached.
To configure Global Properties, Inspection Settings and Advanced Settings for Blades:
You can configure inspection settings for the Firewall:
The Security Management Server comes with two preconfigured inspection profiles for the Firewall:
When you configure a Security Gateway, the Default Inspection profile is enabled for it. You can also assign the Recommended Inspection profile to the Security Gateway, or to create a custom profile and assign it to the Security Gateway.
To activate the Inspection Settings, install the Access Control Policy.
Note - In a pre-R80 SmartConsole, Inspection Settings are configured as IPS Protections.
To configure Inspection Settings:
The Inspection Settings window opens.
You can:
To edit a setting:
The settings window opens.
Select Capture Packets, if you want to be able to examine packets that were blocked in Drop rules.
For advanced configuration of SYN attacks, please see sk120476.
To view settings for a certain profile:
Only settings for the selected profiles are shown.
You can add, edit, clone, or delete custom Inspection Settings profiles.
To edit a custom Inspection Settings profile:
To add a new Inspection Settings profile:
To assign an Inspection Settings profile to a Security Gateway:
To configure exceptions to inspection settings:
The Exception Rule window opens.
To enforce the changes, install the Access Control Policy.

