Print Download PDF Send Feedback

Previous

Next

Managing Domains

In This Section:

Creating a New Domain

Changing an Existing Domain Configuration

Connecting to a Domain Management Server

Working with Cross-Domain Management

Changing an Existing Multi-Domain Server

Setting the Domain Management Server Display Format

A Domain Management Server is the functional equivalent of a Security Management Server in a single-domain environment. You connect directly to a Domain Management Server with SmartConsole to manage a Domain and its components:

This chapter shows how to create and manage Domains and Domain Management Servers. Also included in this chapter are procedures for creating and configuring a Secondary Multi-Domain Server.

Creating a New Domain

Use this procedure to create a new Domain together with the first Domain Management Server for this Domain.

To create a new Domain:

  1. Connect to the Multi-Domain Server with SmartConsole.
  2. In the Multi-Domain > Domains view, click New.
  3. In the Domain window, enter a unique Domain name.
  4. Click the + icon in the General > Domain Servers section.

    In a High Availability deployment, you must select a Multi-Domain Server from the list.

    1. Enter a unique Domain Management Server name or accept the default name.
    2. Enter the Domain Management Server IP address, or click Resolve IP to get the IP Address from the Multi-Domain Server address pool.
    3. Accept the default Domain Management Server type and click OK.
    4. Click Trusted Clients and select one or more trusted clients from the list that can connect to this Domain Management Server.
    5. Optional: Click Additional Information and enter contact information for the person responsible for this Domain Management Server.
  5. Click OK to save the new Domain and Domain Management Server.

Notes:

Assigning Trusted Clients to Domains

You must assign all Domains to one or more trusted SmartConsole clients before you can connect to them. If you do not do this, an error message will show when you try to connect.

Each Domain assignment identifies trusted SmartConsole clients based on one of these criteria:

To assign a trusted client to a Domain:

  1. Connect to the Multi-Domain Server with SmartConsole
  2. Select Multi-Domain > Permissions & Administrators > Trusted Clients.
  3. Click New.
  4. In the New Trusted Client window, enter a unique name for this Domain assignment.
  5. Select an identification criterion from the Type list and enter the applicable information.
  6. Add one or more Domains to the Domain Assignment list.
  7. Optional: Select Multi-Domain Server Trusted Client to apply this assignment to Multi-Domain Servers in addition to the specified Domains.

To add another Domain to an existing trusted client:

  1. Select Multi-Domain > Permissions & Administrators > Trusted Clients.
  2. Double-click the trusted client name.
  3. In the Trusted Client window, add one or more Domains to the Domains Assignment list.

To change a Domain assignment:

  1. Select Multi-Domain > Permissions & Administrators > Trusted Clients.
  2. Double-click an existing trusted client name.
  3. Select an identification criterion from the Type list and enter or change the applicable information.
  4. Add or delete one or more Domains in the Domain Assignment list.
  5. Optional: Select Multi-Domain Server Trusted Client to apply this assignment to Multi-Domain Servers in addition to the specified Domains.

Configuring Automatic Domain IP Address Assignment

You can configure a Multi-Domain Server to assign an IP address to Domain Management Servers managed by this Multi-Domain Server from a predefined pool of IP addresses. This makes sure that the assigned IP address is not in use by other Multi-Domain Servers or Domain Management Servers.

To configure a Multi-Domain Server to assign IP addresses to Domain Management Servers:

  1. In the Multi-Domain view, right-click a Multi-Domain Server and select Edit.

    The Multi-Domain Server window opens.

  2. From the navigation tree, select Multi-Domain.
  3. In the IP Range section, enter the first and last IP address in the range.
  4. Click OK.

Changing an Existing Domain Configuration

To change an existing Domain configuration:

  1. Connect to the Multi-Domain Server with SmartConsole.
  2. In the Multi-Domain > Domains view, double-click the applicable Domain.
  3. In the Domain window, select the Domain Management Server and click the pencil icon (edit).

    Note - You cannot change the Domain name. If you try to do this, an error message shows.

  4. Add, delete or change the other Domain definitions as necessary.

Deleting a Domain Management Server

To Delete a Domain Management Server:

  1. Connect to the Multi-Domain Server with SmartConsole and go to the Domains view.
  2. Right click a Domain Management Server in the grid, and then select Delete.

Deleting a Domain

To delete a Domain:

  1. In the Domains section, right-click a Domain.
  2. Select Delete from the context menu.

This action automatically deletes the active and secondary Domain Management Servers, Domain Log Servers, and the Domain object.

Connecting to a Domain Management Server

To connect directly to a Domain:

  1. Login to SmartConsole.
  2. In the Welcome screen, select a Domain from the list, and then click Proceed.

    SmartConsole opens with the active Domain Management Server in the Gateways & Servers view.

To connect to a Domain Management Server from the SmartConsole Multi-Domain view:

  1. Connect to a Multi-Domain Server with SmartConsole.
  2. In the Multi-Domain > Domains view, right-click the active Domain Management Server in the grid.
  3. Select Connect to Domain Server.

Note - In a High Availability deployment, you can only make changes to a Domain from the active Domain Management Server. The active Domain Management Server shows with a black icon. If you connect to a standby Domain Management Server (white icon), SmartConsole opens in the Read Only mode.

Working with Cross-Domain Management

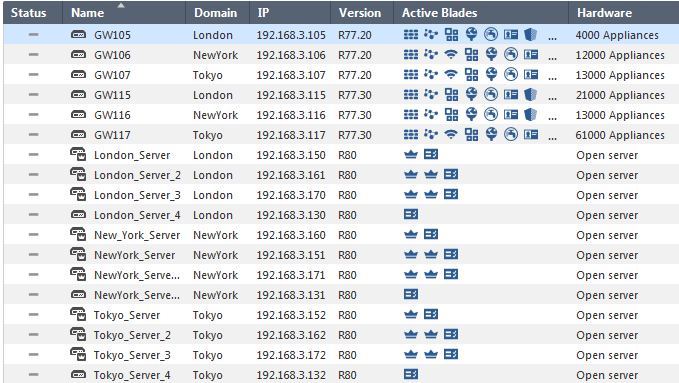
The Multi-Domain Management Gateways & Servers view lets administrators see and work with Domain Management Servers, Security Gateways, and other objects for all Domains in one convenient window. You must have the applicable permissions to see and work with these objects.

To open the Gateways & Servers view:

  1. Connect to a Multi-Domain Server with SmartConsole.
  2. Click Gateways & Servers.

    The Gateways & Servers view shows all Security Gateway and Domain Management Server objects.

To work with a Security Gateway, double-click Security Gateway object. A SmartConsole instance for the applicable Domain Management Server opens and automatically shows the Gateway window for the selected Security Gateway. In a High Availability environment, the Active Domain Management Server opens.

To work with a Domain, double-click its Domain Management Server object. A SmartConsole instance for the applicable opens and automatically shows the Host window for the selected Domain Management Server. In a High Availability environment, make sure that you select the Active Domain Management Server, which opens in the Read/Write mode. Standby Domain Management Servers open as Read-Only and you cannot make any changes to Domain objects.

Changing an Existing Multi-Domain Server

You can change the settings for an existing Multi-Domain Server or Multi-Domain Log Server.

To change the settings for an existing Multi-Domain Server:

  1. Double-click the Multi-Domain Server or Multi-Domain Log Server in the top row of the Domains grid.
  2. In the Multi-Domain Server window, change the parameters in the General, Multi-Domain and Log Settings views.

Note - You cannot change the Multi-Domain Server name.

Setting the Domain Management Server Display Format

You can change how Domain Management Servers show in the Domains grid.

To set the Domain Management Server display format:

  1. Go to Multi-Domain > Preferences.
  2. Select a display format:
    • Domain Management Server Name and IP (default)
    • Domain Management Server IP
    • Domain Management Server Name