


|
|
|
In This Section: |
Best Practice - In a distributed environment with multiple Identity Awareness Security Gateways and AD Query, we recommend to consider Identity Sharing configuration.
In this configuration, Identity Awareness Security Gateways can share the identity information that they acquire with other Identity Awareness Security Gateways. You can configure Identity Sharing across multiple Security Gateways if the gateways have Identity Awareness enabled.
Use-case scenario without the Identity Sharing (sk149255):
Identity Agents can be connected to only one Identity Awareness Security Gateway. If no sharing is enabled it will not work with other Identity Awareness Security Gateways.
For example, when the traffic goes through several Security Gateways, double authentication might be required (e.g. in captive portal).
Each Security Gateway is connected to an identity source, for example with ADQuery. Each Security Gateway will query the Active Directory. Each Gateway will perform the group membership query once a login event is observed and calculate the Access Role object.
Solution
Identity Awareness Security Gateways (configured as Policy Decision Points) acquire identity information and share it with other Identity Awareness Security Gateways (configured as Policy Enforcement Points). Traffic passes through many Security Gateways, but the User is only identified once. Only one Identity Awareness Security Gateway performs the group membership query and calculates the Access Role object. This reduces the load on the identity sources and/or on User Directory.
PDP - Policy Decision Point (Identity Server):
PEP - Policy Enforcement Point (Identity Gateway):
Identity Sharing Configurations
There are multiple ways to deploy Identity Sharing:
To configure Identity Sharing Configuration, define:
Smart-Pull Sharing Method
In this method, identities are sent to the PEP only when the PEP needs them, i.e. requests or pulls them from the PDP. In larger deployments not all identities acquired by PDPs are needed by all of the PEPs. For instance, small branch offices with a small number of users do not require storing of all of the identities acquired by the PDP located in the headquarters site. Storing unnecessary identities will consume more space on the PEP and create more unnecessary transactions between the PDP and the PEP over the network.
Smart-Pull sharing method divides into the 3 following Operation mode stages:
1. Identity Acquisition
# pdp network info command shows all the networks published by the PDP.The PDP does not publish the identities to the PEPs yet.
2. Sub-Network Registration
When a user initiates a connection through the PEP, where the policy requires an identity element, the PEP searches for the identity in its local database.
If the identity is not found, the PEP checks to see if there is a PDP that knows that the Class C network needed to resolve the identity.
If the identity is found, then:
pep show network registration command on the PEP shows the 255.255.255.240 networks, to which the PEP is registered.pdp network registered command on the PDP shows the distribution of the PEPs to 255.255.255.240 networks.3. Identity Propagation
Push Sharing Method
This method is straight-forward: a PDP publishes each identity when it is acquired to the PEP.
Note - It is the only sharing method for the Identity Awareness Security Gateway that runs both as PDP and PEP.
Monitoring Identity Sharing
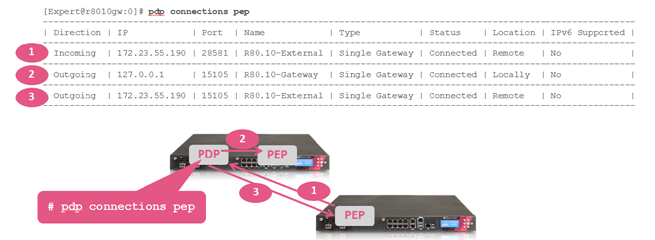
With Identity Sharing, there is always a connection from PDP to PEP, presented below as 'Outgoing'.
The 'Outgoing' (2) is the local connection PDP -> PEP running on the same Security Gateway.
With the Smart-Pull sharing method, when the Identity Sharing is used between PDP and remote PEP, with the Smart Pull sharing method there is an additional connection PEP->PDP presented below as 'Incoming' (1).
Monitoring Identity Sharing
With Identity Sharing, there is always a connection from PDP to PEP, presented below as 'Outgoing'.
The 'Outgoing' (2) is the local connection PDP -> PEP running on the same Security Gateway.
With the Smart-Pull sharing method, when the Identity Sharing is used between PDP and remote PEP, there is an additional connection PEP->PDP presented below as 'Incoming' (1).
The Deployment Scenarios section has more details.
Create a separate LDAP Account Unit for each domain in the forest (subdomain). You cannot add domain controllers from two different subdomains into the same LDAP Account Unit.
You can use the Identity Awareness Configuration Wizard to define one subdomain. This automatically creates an LDAP Account Unit that you can easily configure for more settings. You must manually create all other domains that you want Identity Awareness to relate to, from Servers and OPSEC in the Objects tree > Servers > New > LDAP Account Unit.
When you create an LDAP Account Unit for each domain in the forest:
For example, if the domain is ACME.COM, the subdomain is SUB.ACME.COM, and the administrator is John_Doe:
If the admin is a Domain administrator, Username is: SUB.ACME.COM\John_Doe
If the admin is an Enterprise administrator, Username is: ACME.COM\John_Doe
Note - In the wizard, this is the Username field. In the LDAP Account Unit, go to LDAP Server Properties tab > Add > Username.
DC=DOMAIN_NAME,DC=DOMAIN_SUFFIXDC=SUB_DOMAIN_NAME,DC=DOMAIN_NAME,DC=DOMAIN_SUFFIXDC=ACME,DC=local to DC=SUB,DC=ACME,DC=localTo support non-English user names on an Identity Awareness Gateway, you must set a parameter in the LDAP Account Unit object in SmartConsole.
It is not necessary to set this parameter when you enable Identity Awareness on the Security Management Server or Log Server.
To set non-English language support:
Identity Awareness supports the use of LDAP nested groups. When a group is nested in another group, users in the nested group are identified as part of the parent group. For example, if you make Group_B a member of Group_A, Group_B members will be identified by Identity Awareness as being part of Group A.
There are three ways to configure nested group queries:
You configure the nested group query options through the Security Gateway CLI:
Command |
Description |
|---|---|
|
Shows status |
|
Sets recursive nested groups (like R.77x) |
|
Sets per-user nested groups |
|
Sets multi per-group nested groups |
If Security Management Server is not currently connected to your Active Directory environment, Identity Awareness Gateway can act as Active Directory Proxy and let you use the Identity Awareness User Picker in the Access Role object.
Note - The Identity Awareness Gateway needs to be connected to your Active Directory server.
Workflow to configure this feature:
Step |
Instructions |
|---|---|
1 |
In SmartConsole, create a new Host object for each Active Directory Domain Controller in your Active Directory environment:
|
2 |
In SmartConsole, install the Access Policy on the Identity Awareness Gateway. |
3A |
In SmartConsole, configure an LDAP Account Unit object:
|
3B |
Configure the LDAP Account Unit object. Go to the General tab.
|
3C |
Continue configuring the LDAP Account Unit object. Go to the Servers tab.
Note - The order, in which these LDAP Servers are displayed is also the default order, in which they will be queried. You can configure the desired priority for these LDAP Servers. |
3D |
Continue configuring the LDAP Account Unit object. Go to the Objects Management tab.
|
3E |
Continue configuring the LDAP Account Unit object. (Optional) Go to the Authentication tab.
|
3F |
Complete the configuration of the new LDAP Account Unit object: Click OK to close the LDAP Account Unit Properties window. |
4 |
(Optional) You can configure the Security Gateway to encrypt the LDAP communication with your Domain Controller:
|
5 |
Enable the Identity Awareness Software Blade on the Security Gateway.
|
Notes about the Identity Awareness Gateway as Active Directory Proxy feature:
This feature does not support Virtual Systems that belong to a different domain than the VSX Gateway or VSX Cluster (context VS0).

