


|
|
|
You can configure virtual LAN (VLAN) interfaces on Ethernet interfaces. VLAN interfaces let you configure subnets with a secure private link to Security Gateways and Management Servers using your existing topology. With VLAN interfaces, you can multiplex Ethernet traffic into many channels using one cable.
This section shows you how to configure VLAN interfaces using the Gaia Portal and the Gaia Clish.
Step |
Description |
|---|---|
1 |
In the navigation tree, click Network Management > Network Interfaces. |
2 |
Make sure that the physical interface, on which you add a VLAN interface, does not have an IP address. |
3 |
Click Add > VLAN. To configure an existing VLAN interface, select the VLAN interface and click Edit. |
4 |
In the Add VLAN (or Edit VLAN) window, select the Enable option to set the VLAN interface to UP. |
5 |
On the IPv4 tab, enter the IPv4 address and subnet mask. You can optionally select the Obtain IPv4 Address automatically option. |
6 |
On the IPv6 tab, enter the IPv6 address and mask length. You can optionally select the Obtain IPv6 Address automatically option. Important - First, you must enable the IPv6 Support and reboot. |
7 |
On the VLAN tab, enter or select a VLAN ID (VLAN tag) between 2 and 4094. |
8 |
In the Member Of field, select the physical interface related to this VLAN. |
Note - You cannot change the VLAN ID or physical interface for an existing VLAN interface. To change these parameters, delete the VLAN interface and then create a New VLAN interface.
Description
Add, configure and delete VLAN interfaces.
Note - Make sure that the physical interface, on which you wish to add a VLAN interface, does not have an IP address.
Syntax
add interface <Name of Physical Interface> vlan <VLAN ID> |
set interface <Name of Physical Interface>.<VLAN ID> comments "Text" ipv4-address <IPv4 Address> subnet-mask <Mask> mask-length <Mask Length> ipv6-address <IPv6 Address> mask-length <Mask Length> ipv6-autoconfig {on | off} mtu <68-16000 | 1280-16000> state {on | off} |
show interface<SPACE><TAB> |
show interface <Name of VLAN Interface> |
delete interface <Name of Physical Interface> vlan <VLAN ID> |
Important - After you add, configure, or delete features, run the save config command to save the settings permanently.
Note - You cannot change the VLAN ID or physical interface for an existing VLAN interface. To change these parameters, delete the VLAN interface and then create a new VLAN interface.
Parameters
Parameter |
Description |
|---|---|
<Name of Physical Interface> |
Specifies a physical interface. |
|
Defines the optional comment.
|
<VLAN ID> |
Configures the ID of the VLAN interface (integer between 2 and 4094). |
<IPv4 Address> |
Assigns the IPv4 address. |
<IPv6 Address> |
Assigns the IPv6 address. Important - First, you must enable the IPv6 Support and reboot. |
|
Configures the IPv4 subnet mask using the dotted decimal notation (X.X.X.X). |
|
Configures the IPv4 or IPv6 subnet mask length using CIDR notation (/xx) - integer between 2 and 32. |
|
Configures if this interface gets an IPv6 address from a DHCPv6 Server:
Important - First, you must enable the IPv6 Support and reboot. |
|
Configures the Maximum Transmission Unit size for an interface. For IPv4:
For IPv6:
|
|
Configures interface's state:
|
Example
gaia> add interface vlan eth1
gaia> set interface eth1.99 ipv4-address 99.99.99.1 subnet-mask 255.255.255.0
gaia> set interface eth1.99 ipv6-address 209:99:1 mask-length 64
gaia> delete interface eth1 vlan 99 |
VLAN traffic can pass through a Bridge interface in Access mode, or in Trunk mode:
Example topology:
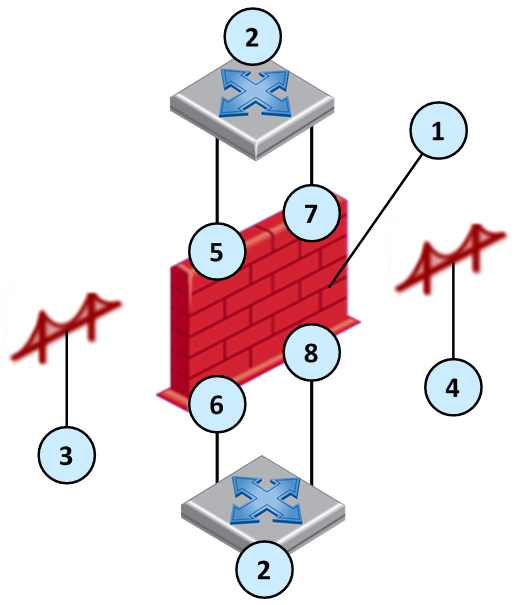
Item |
Description |
|---|---|
1 |
Security Gateway |
2 |
Switch |
3 |
Access mode bridge 1 with VLAN translation |
4 |
Access mode bridge 2 with VLAN translation |
5 |
VLAN 3 (eth 1.3) |
6 |
VLAN 33 (eth 2.33) |
7 |
VLAN 2 (eth 1.2) |
8 |
VLAN 22 (eth 2.22) |
Access Mode VLAN
If you configure the switch ports in Access Mode, create the Bridge interface with two VLAN interfaces as its slaves. For VLAN translation, use different numbered VLAN interfaces to create the Bridge interface. You can build multiple VLAN translation bridges on the same Security Gateway.
Note - VLAN translation is not supported over bridged ports of a FONIC (Fail-Open NIC, see sk85560).
Trunk Mode VLAN
If you configure the switch ports as VLAN trunk, the Check Point Bridge interface should not interfere with the VLANs. To configure a Bridge interface with VLAN trunk, create the Bridge interface with two physical (non-VLAN) interfaces as its slaves.
Note - VLAN translation is not supported in Trunk mode.

