


|
|
|
In This Section: |
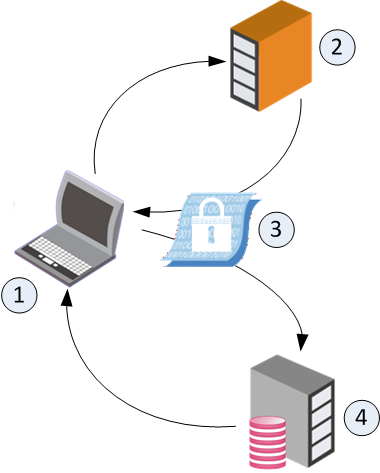
When an Endpoint Security client connects to the Endpoint Security Management Server, an authentication process identifies the endpoint client and the user currently working on that computer.
The Endpoint Security system can function in these authentication modes:
The authentication process:
The default behavior after Security Management Server installation is Unauthenticated mode. It is recommended that you use this mode when you are evaluating Endpoint Security, in a lab environment. Change to Strong Authentication mode just before moving to a production environment. It is not recommended to continue to work in Unauthenticated mode after moving to production in a live environment.
|
Important - If you use Active Directory Authentication, then Full Disk Encryption and Media Encryption & Port Protection are only supported on endpoint computers that are part of Active Directory. If you have endpoint computers in your environment that are not part of Active Directory, Full Disk Encryption and Media Encryption & Port Protection will not work on them. |
Make sure you configure Strong Authentication for your production environment. Do not set up Strong Authentication before you are ready to move to production. When you are ready to move to production, follow this process.
Workflow for Configuring Strong Authentication:
Endpoint Security Strong Authentication uses the Kerberos network authentication protocol.
To enable the Active Directory server to validate the identity of clients that authenticate themselves using Kerberos, run the ktpass.exe command on the Active Directory Server. By running the ktpass command, you create a user that is mapped to the ktpass service. This creates a Principal Name for the AD server. The Principal Name must have the following format: ServiceName/realm@REALM
|
Important - After you create the user that is mapped to the |
To prepare the Active Directory Server for authentication:
C:\Windows\System32 and run ktpass.exe.Syntax:
ktpass princ ServiceName/realm@REALM mapuser <userName>@REALM pass <userPass> out <name of outFile>
Example:
ktpass princ tst/nac1.com@NAC1.COM mapuser auth-user@NAC1.COM pass 123456 out outfile.keytab
Explanations:
Syntax |
Example value |
Explanation |
|---|---|---|
|
|
Name of the service. |
|
|
Domain name of the Active Directory server. The first instance is in lower case. The second in upper case. |
|
|
The Active Directory domain user. |
|
|
Password for user. |
|
|
Name of the encrypted keytab file. |
vno) and encryption type (etype). sample output:
WARNING: pType and account type do not match. This might cause problems. Key created. Output keytab to outfile.log: Keytab version: 0x502 keysize 74 tst/nac1.com@NAC1.COM ptype 0 (KRB5_NT_UNKNOWN) vno 7 etype 0x17 (RC4-H |
|||
|
Important - We recommend that you do not use DES-based encryption for the Active Directory Domain Controller server, as it is not secure. If you choose to use DES encryption and your environment has Windows 7 clients, see sk64300. |
||
|
Notes -
|
||
Configure the settings in SmartEndpoint for client to server authentication.
|
Important - Use the Unauthenticated mode only for evaluation purposes. Never use this mode for production environments. Configure the authentication settings before moving to production. |
How the Authentication Settings are Used in Deployment Packages
When you configure client package profiles, you choose an authentication account. The SSO Configuration details are included in the client deployment package, allowing the server to authenticate the client.
To configure authentication settings:
The Authentication Settings Properties window opens.
The New Authentication Principal Properties window opens.
ktpass.exe, that you configured in Step 1 of 3: Configuring the Active Directory Server for Authentication:
Field |
Description |
|---|---|
Domain name |
Active Directory domain name. For example: |
Principle Name |
Authentication service name in the format: This value must match the name that was configured in Active Directory > New Object. For example: |
Version Key |
Enter the version number according to the Active Directory output in the For example: |
Encryption method |
Select the encryption method according to the Active Directory output in the For example: |
Password |
Enter (and confirm) the password of the Active Directory Domain Admin user you created for Endpoint Security use. For example: |
|
Important - After turning on Strong Authentication, wait one minute before initiating any client operations. It will take time for the clients and the Endpoint Security Management Server to synchronize. During this time, the environment will remain unauthenticated, and some operations will fail. The exact amount of time depends on the synchronization interval. |
After you have finished configuring strong authentication for Active Directory, save your changes.
The User Principal Name (UPN) is the username in "email format" for use in Windows Active Directory (AD). The user’s personal username is separated from a domain name by the "@" sign.
UPN suffixes are part of AD logon names. For example, if the logon name is administrator@ad.example.com, the part of the name to the right of the ampersand is known as the UPN suffix. In this case ad.example.com
When you configure a new user account in AD, you are given the option to select a UPN suffix, which by default will be the DNS name for your AD domain. It can be useful to have a selection of UPN suffixes available. If your AD domain name is ad.example.com, it might be more convenient to assign users a UPN suffix of example.com. To make additional UPN suffixes available, you need to add them to AD.
When configuring Strong Authentication for Active Directory communication between the Endpoint Security client and the Endpoint Security Management Server, you can configure multiple UPN suffixes for the Active Directory domain name.
To Configure Additional UPN Suffixes for Active Directory Authentication
The Authentication Settings Properties window opens.
The New Authentication Principal Properties window opens.
nac1.com add an alternative domain name such as ad.nac1.comTo troubleshoot problems related to Active Directory Authentication, use the Authentication log on the Endpoint Security Management Server or Endpoint Policy Server in $UEPMDIR/logs/Authentication.log.
To see full debugging information in the Authentication.log file on a Gaia server:
export TDERROR_ALL_KERBEROS_SERVER=5.uepm_stop uepm_start
Results in Authentication.log
ERROR: Config file contains no principals. |
The database was cleaned or the process to include authentication in the client package was faulty. To fix:
Permission denied in replay cache code |
Restart the Endpoint Security server.
Clock skew too great |
To ensure that authentication occurs even if the clocks of the client, the Endpoint Security Management Server and the Active Directory server are out of synch, define an acceptable skew. By default, the authentication clock skew is 3600 seconds. You can change the Endpoint Security settings. In $UEPMDIR/engine/conf/global.properties, add this line:authentication.clockSkew.secs=<seconds>, where you replace <seconds> with the clock skew in seconds that you want to allow.
Key version number for principal in key table is incorrect |
Update the Key version number in the Active Directory SSO Configuration window. You might have changed the user that is mapped to the ktpass service.
To turn off full debugging information on the Gaia server:
unset TDERROR_ALL_KERBEROS_SERVER
echo $TDERROR_ALL_KERBEROS_SERVER
uepm_stop uepm_start
The Authentication.log file for each Endpoint Security client is on the client computer at %DADIR%/logs.
A normal log is:
[KERBEROS_CLIENT(KerberosLogger_Events)] : Credentials acquired for |
If the Authentication.log file on the client shows:
No authority could be contacted for authentication. |
The Endpoint Agent cannot find a Domain Controller to supply credentials. To fix this:
To authenticate with device credentials, restart the computer.
If the Authentication.log file on the client shows:
The specified target is unknown or unreachable. |
Check the service name. Make sure that there are no typing errors and that the format is correct. If there was an error, correct it in the Check Point Endpoint Security Management.

