


|
|
|
What can I do here?
Use this window to configure the interface's topology.
|
Getting Here - Gateways & Servers> Select gateway > Edit > Network Management > Click the Expand button > Select an interface > Edit > Topology section > Modify |
An interface can be defined as being External (leading to the Internet) or Internal (leading to the LAN).
The type of network that the interface Leads To:
If you Override the default setting:
VPN Tunnel Interfaces
If the interface is part of a VPN Tunnel, then the interface Leads To a Point to Point network. The interface is one end of the point to point connection. All traffic in the network behind the interface is part of the point to point connection. Click Override to define a specific network.
This feature is supported only for Security Gateways R77.20 and above. Once selected, the range of IP addresses behind the internal interface is automatically calculated every second (default value) without the need for the administrator to click Get Interfaces and install a policy.
To configure dynamic topology updates:
This default update value is configured in SmartConsole > Preferences and set to one second. The value set here applies to all internal interfaces for all gateways in the domain.
To set the update value for a specific interface:
Dynamic Anti-Spoofing
When Anti-Spoofing is selected and you click Get interfaces, the Security Gateway generates a list of valid IP addresses based on the IP address and netmask of the interface and the routes assigned to the interface.
Anti-Spoofing drops packets with a source IP address that does not belong to the network behind the packet’s interface. For example, packets with an internal IP address that comes from an external interface.
When the Network defined by routes option is selected along with Perform Anti-Spoofing based on interface topology, you get Dynamic Anti-Spoofing. The valid IP addresses range is automatically calculated without the administrator having to do click Get Interfaces or install a policy.
IP spoofing replaces the untrusted source IP address with a fake, trusted one, to hijack connections to your network. Attackers use IP spoofing to send malware and bots to your protected network, to execute DoS attacks, or to gain unauthorized access.
Anti-Spoofing detects if a packet with an IP address that is behind a certain interface, arrives from a different interface. For example, if a packet from an external network has an internal IP address, Anti-Spoofing blocks that packet.
Example:
The diagram shows a Gateway with interfaces 2 and 3, and 4, and some example networks behind the interfaces.
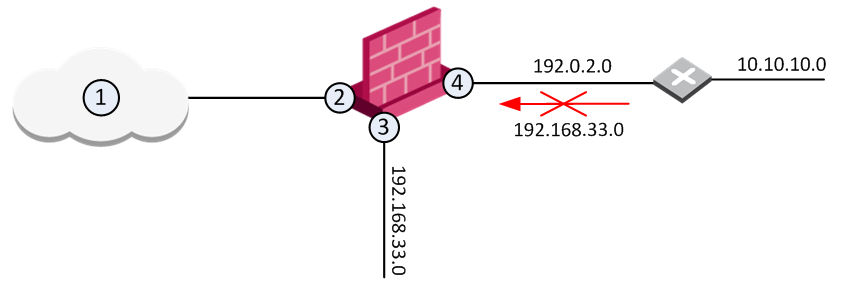
For the Gateway, anti-spoofing makes sure that
If an incoming packet to B has a source IP address in network 192.168.33.0, the packet is blocked, because the source address is spoofed.
When you configure Anti-Spoofing protection on a Check Point Security Gateway interface, the Anti-Spoofing is done based on the interface topology. The interface topology defines where the interface Leads To (for example, External (Internet) or Internal), and the Security Zone of interface.
Make sure to configure Anti-Spoofing protection on all the interfaces of the Security Gateway, including internal interfaces.
To configure Anti-Spoofing for an interface:
The Gateway Properties window opens.
The gateway network topology shows. If SmartConsole fails to automatically retrieve the topology, make sure that the details in the General Properties section are correct and the Security Gateway, the Security Management Server, and the SmartConsole can communicate with each other.
The interface properties window opens.
The Topology Settings window opens.
If you Override the default setting:
For each interface, repeat the configuration steps. When finished, install the Access Control policy.

