


|
|
|
In This Section: |
Check Point supports different methods of authenticating end users and administrators.
Security Gateways authenticate individual users. The Security Management Server authenticates administrators.
Users and Administrators authenticate using credentials. All the methods required a username and password.
Users and administrators can be stored in the Check Point User Database or on an LDAP server.
The following sections describe the supported authentication methods.
Check Point password is a static password that is configured in SmartConsole. For administrators, the password is stored in the local database on the Security Management Server. For users, it is stored on the local database on the Security Gateway. No additional software is required.
OS Password is stored on the operating system of the computer on which the Security Gateway (for users) or Security Management Server (for administrators) is installed. You can also use passwords that are stored in a Windows domain. No additional software is required.
Remote Authentication Dial-In User Service (RADIUS) is an external authentication method that provides security and scalability by separating the authentication function from the access server.
Using RADIUS, the Security Gateway forwards authentication requests by remote users to the RADIUS server. For administrators, the Security Management Server forwards the authentication requests. The RADIUS server, which stores user account information, does the authentication.
The RADIUS protocol uses UDP to communicate with the gateway or the Security Management Server.
RADIUS servers and RADIUS server group objects are defined in SmartConsole.
SecurID requires users to both possess a token authenticator and to supply a PIN or password. Token authenticators generate one-time passwords that are synchronized to an RSA ACE/server and may come in the form of hardware or software. Hardware tokens are key-ring or credit card-sized devices, while software tokens reside on the PC or device from which the user wants to authenticate. All tokens generate a random, one-time use access code that changes approximately every minute. When a user attempts to authenticate to a protected resource, the one-time use code must be validated by the ACE/server.
Using SecurID, the Security Gateway forwards authentication requests by remote users to the ACE/server. For administrators, it is the Security Management Server that forwards the requests. ACE manages the database of RSA users and their assigned hard or soft tokens. The gateway or the Security Management Server act as an ACE/Agent 5.0 and direct all access requests to the RSA ACE/server for authentication. For additional information on agent configuration, refer to ACE/server documentation.
There are no specific parameters required for the SecurID authentication method.
Terminal Access Controller Access Control System (TACACS) provides access control for routers, network access servers and other networked devices through one or more centralized servers.
TACACS is an external authentication method that provides verification services. Using TACACS, the Security Gateway forwards authentication requests by remote users to the TACACS server. For administrators, it is the Security Management Server that forwards the requests. The TACACS server, which stores user account information, authenticates users. The system supports physical card key devices or token cards and Kerberos secret key authentication. TACACS encrypts the user name, password, authentication services and accounting information of all authentication requests to ensure secure communication.
These instructions show how to configure authentication methods for users. For administrators, see Configuring Authentication Methods for Administrators.
For background information about the authentication methods, see Authentication Methods for Users and Administrators.
The Security Gateway lets you control access privileges for authenticated RADIUS users, based on the administrator's assignment of users to RADIUS groups. These groups are used in the Security Rule Base to restrict or give users access to specified resources. Users are unaware of the groups to which they belong.
To use RADIUS groups, you must define a return attribute in the RADIUS user profile of the RADIUS server. This attribute is returned to the Security Gateway and contains the group name (for example, RAD_<group to which the RADIUS users belong>) to which the users belong.
Use these RADIUS attributes (refer to RFC 2865):
Sample workflow for SecurID authentication configuration:
The procedure for doing this is different for Internal Users (that are defined in the internal User Database on the Security Management Server) and for External Users.
To configure a Security Gateway to use SecurID:
/var/ace/sdconf.rec on UNIX, Linux or IPSO%SystemRoot%\System32\sdconf.rec on 32-bit Windows %SystemRoot%\SysWOW64\sdconf.rec on 64-bit WindowsOn a Virtual System, follow the instructions in sk97908.
To define a user group:
The New User Group window opens.
Make sure the group is empty.
To configure SecurID authentication settings for Internal Users:
Internal users are users that are defined in the internal User Database on the Security Management Server.
The New User window opens.
To configure SecurID authentication settings for External Users:
External users are users that are not defined in the internal Users Database on the Security Management Server.
Legacy SmartDashboard opens.
In the External User Profile name field, leave the default name generic*.
In the Expiration Date field, set the applicable date.
In the External User Profile name field, enter the applicable name. This name will be used to authenticate users on the ACE/Server.
In the Expiration Date field, set the applicable date.
In the Domain Name matching definitions section, configure the applicable settings.
From the Authentication Scheme drop-down list, select SecurID.
To complete the SecurID authentication configuration:
On a Virtual System, follow the instructions in sk107281.
When a Security Gateway has multiple interfaces, the SecurID agent on the Security Gateway sometimes uses the wrong interface IP to decrypt the reply from the ACE/Server, and authentication fails.
To overcome this problem, place a new text file, named sdopts.rec in the same directory as sdconf.rec. The file should contain the CLIENT_IP=<ip> line, where <ip> is the primary IP address of the Security Gateway, as defined on the ACE/Server. This is the IP address of the interface to which the server is routed.
To configure a Security Gateway to use TACACS+ authentication, you must set up the server and enable its use on the Security Gateway.
To define a TACACS+ server:
Best Practice: The default is TACACS, but TACACS+ is recommended.
To enable TACACS on the Security Gateway:
To enable TACACS authentication for users:
When you create a new user account, TACACS is the default selected authentication.
Users defined in SmartConsole are saved to the User Database on the Security Management Server, together with the user authentication schemes and encryption keys. Then, the user database is installed on Security Gateways and Check Point hosts:
The user database does not contain information about users defined elsewhere than on the Security Management Server (such as users in external User Directory groups), but it does contain information about the external groups themselves (for example, on which Account Unit the external group is defined). Changes to external groups take effect only after the policy is installed, or the user database is downloaded from the management server.
To create a new user:
The New User window opens.
Important! If you do not select an authentication method, the user cannot log in or use network resources.
To change an existing user:
The User Properties window opens.
Required settings:
If you generate a user certificate with a non-Check Point Certificate Authority, enter the Common Name (CN) component of the Distinguished Name (DN). For example, if the DN is: [CN = James, O = My Organization, C = My Country],
enter James as the user name. If you use Common Names as user names, they must contain exactly one string with no spaces.
Optional settings:
Select an Authentication Scheme:
In the Allowed locations section:
Source - Click Add, to add selected objects to this user's permitted resources. The user can get data and traffic from these objects.
Destination - Click Add, to add selected objects to this user's permitted destinations. The user can send data and traffic to these objects.
From and To - Enter start time and end time of an expected workday. This user will not be authenticated if a login attempt is made on a time outside the given range.
Days in week or Daily - Select the days that the user can authenticate and access resources. This user will not be authenticated if a login attempt is made on an unselected day.
Generate and register SIC certificates for user accounts. This authenticates the user in the Check Point system. Use certificates with required authentication for added access control.
To create a new certificate:
p12 file:.p12 certificate file with a private password for the user. When prompted, enter and confirm the certificate password.If a user will not be in the system for some time (for example, going on an extended leave), you can revoke the certificate. This leaves the user account in the system, but it cannot be accessed until you renew the certificate.
To revoke a certificate, select the certificate and click Revoke.
If the user will access resources from a remote location, traffic between the remote user and internal resources will be encrypted. Configure encryption settings for remote access users.
To configure encryption:
The encryption Properties window opens.
The next steps are for IKE Phase 2. The options can be different for different methods.
If a user account is about to expire, notifications show when you open the properties of the user in SmartConsole.
To configure the default expiration settings:
The Global Properties window opens.
Expiration warnings in the SmartConsole User object show this number of days before an account expires. During this time, if the user account is to be active for longer, you can edit the user account expiration configuration. This will avoid loss of working time.
To delete a user:
The confirmation window opens.
User groups are collections of user accounts. Add the user group to the Source or Destination of a rule. You cannot add individual users to a rule.
You can also edit user groups, and delete user groups that are not used in the Rule Base.
To create a new user group:
The New User Group window opens.
To add new users or other user groups to a group:
The User Group window opens.
Check Point User Directory integrates LDAP, and other external user management technologies, with the Check Point solution. If you have a large user count, we recommend that you use an external user management database such as LDAP for enhanced Security Management Server performance.
You can choose to manage Domains on the Check Point users' database, or to implement an external LDAP server.
Note - User Directory requires a special license. If you have the Mobile Access Software Blade, you have the User Directory license.
User Directory lets you configure:
Identity Awareness uses User Directory.
Identity Awareness lets you enforce network access and audit data, based on network location, the identity of the user, and the identity of the computer. You can use Identity Awareness in the Access Control, Threat Prevention and DLP Rule Bases.
Before you begin, plan your use of User Directory.
The User Directory default schema is a description of the structure of the data in a user directory. It has user definitions defined for an LDAP server. This schema does not have Security Management Server or Security Gateway specific data, such as IKE-related attributes, authentication methods, or values for remote users.
You can use the default User Directory schema, if all users have the same authentication method and are defined according to a default template. But if users in the database have different definitions, it is better to apply a Check Point schema to the LDAP server.
In This Section |
The Check Point Schema adds Security Management server and Security Gateway specific data to the structure in the LDAP server. Use the Check Point Schema to extend the definition of objects with user authentication functionality.
For example, an Object Class entitled fw1Person is part of the Check Point schema. This Object Class has mandatory and optional attributes to add to the definition of the Person attribute. Another example is fw1Template. This is a standalone attribute that defines a template of user information.
When schema checking is enabled, User Directory requires that every Check Point object class and its associated attributes is defined in the directory schema.
Before you work with User Directory, make sure that schema checking is disabled. Otherwise the integration will fail. After the Check Point object classes and attributes are applied to the User Directory server's schema, you must enable schema checking again.
Each of the proprietary object classes and attributes (all of which begin with "fw1") has a proprietary Object Identifier (OID), listed below.
Object Class OIDs
object class |
OID |
|---|---|
fw1template |
1.3.114.7.4.2.0.1 |
fw1person |
1.3.114.7.4.2.0.2 |
The OIDs for the proprietary attributes begin with the same prefix ("1.3.114.7.4.2.0.X"). Only the value of "X" is different for each attribute. See Attributes for the value of "X".
Attributes: |
The entry's name. This is also referred to as "Common Name". For users this can be different from the uid attribute, the name used to login to the Security Gateway. This attribute is also used to build the User Directory entry's distinguished name, that is, it is the RDN of the DN.
The user's login name, that is, the name used to login to the Security Gateway. This attribute is passed to the external authentication system in all authentication methods except for "Internal Password", and must be defined for all these authentication methods.
The login name is used by the Security Management Server to search the User Directory server(s). For this reason, each user entry should have its own unique uid value.
It is also possible to login to the Security Gateway using the full DN. The DN can be used when there is an ambiguity with this attribute or in "Internal Password" when this attribute may be missing. The DN can also be used when the same user (with the same uid) is defined in more than one Account Unit on different User Directory servers.
Descriptive text about the user.
default |
|---|
"no value" |
User's email address.
default |
|---|
"no value" |
An entry can have zero or more values for this attribute.
Must be given if the authentication method (fw1auth-method) is "Internal Password". The value can be hashed using "crypt". In this case the syntax of this attribute is:
"{crypt}xxyyyyyyyyyyy"
where "xx" is the "salt" and "yyyyyyyyyyy" is the hashed password.
It is possible (but not recommended) to store the password without hashing. However, if hashing is specified in the User Directory server, you should not specify hashing here, in order to prevent the password from being hashed twice. You should also use SSL in this case, to prevent sending an unencrypted password.
The Security Gateway never reads this attribute, though it does write it. Instead, the User Directory bind operation is used to verify a password.
One of these:
RADIUS, TACACS, SecurID, OS Password, Defender
This default value for this attribute is overridden by Default authentication scheme in the Authentication tab of the Account Unit window in SmartConsole. For example: a User Directory server can contain User Directory entries that are all of the object-class "person" even though the proprietary object-class "fw1person" was not added to the server's schema. If Default authentication scheme in SmartConsole is "Internal Password", all the users will be authenticated using the password stored in the "userPassword" attribute.
"X" in OID |
fw1person |
fw1template |
default |
|---|---|---|---|
1 |
y |
y |
"undefined" |
The name of the server that will do the authentication. This field must be given if fw1auth-method is "RADIUS" or "TACACS". For all other values of fw1auth-method, it is ignored. Its meaning is given below:
method |
meaning |
|---|---|
RADIUS |
name of a RADIUS server, a group of RADIUS servers, or "Any" |
TACACS |
name of a TACACS server |
"X" in OID |
fw1template |
|---|---|
2 |
y |
The date on which the password was last modified. The format is yyyymmdd (for example, 20 August 1998 is 19980820). A password can be modified through the Security Gateway as a part of the authentication process.
"X" in OID |
fw1person |
fw1template |
default |
|---|---|---|---|
3 |
y |
y |
If no value is given, then the password has never been modified. |
The last date on which the user can login to a Security Gateway, or "no value" if there is no expiration date. The format is yyyymmdd (for example, 20 August 1998 is 19980820). The default is "no value".
"X" in OID |
fw1person |
fw1template |
default |
|---|---|---|---|
8 |
y |
y |
"no value" |
The time from which the user can login to a Security Gateway. The format is hh:mm (for example, 8:15 AM is 08:15).
"X" in OID |
fw1person |
fw1template |
default |
|---|---|---|---|
9 |
y |
y |
"00:00" |
The time until which the user can login to a Security Gateway. The format is hh:mm (for example, 8:15 AM is 08:15).
"X" in OID |
fw1person |
fw1template |
default |
|---|---|---|---|
10 |
y |
y |
"23:59" |
The days on which the user can login to a Security Gateway. Can have the values "SUN","MON", and so on.
"X" in OID |
fw1person |
fw1template |
default |
|---|---|---|---|
11 |
y |
y |
all days of the week |
The names of one or more network objects from which the user can run a client, or "Any" to remove this limitation, or "no value" if there is no such client. The names should match the name of network objects defined in Security Management server.
"X" in OID |
fw1person |
fw1template |
default |
|---|---|---|---|
12 |
y |
y |
"no value" |
The names of one or more network objects which the user can access, or "Any" to remove this limitation, or "no value" if there is no such network object. The names should match the name of network objects defined on the Security Management server.
"X" in OID |
fw1person |
fw1template |
default |
|---|---|---|---|
13 |
y |
y |
"no value" |
Not currently used.
"X" in OID |
fw1person |
fw1template |
default |
|---|---|---|---|
14 |
y |
y |
"no value" |
The algorithm used to encrypt the session key in SecuRemote. Can be "CLEAR", "FWZ1", "DES" or "Any".
"X" in OID |
fw1person |
fw1template |
default |
|---|---|---|---|
15 |
y |
y |
"Any" |
The algorithm used to encrypt the data in SecuRemote. Can be "CLEAR", "FWZ1", "DES" or "Any".
"X" in OID |
fw1person |
fw1template |
default |
|---|---|---|---|
16 |
y |
y |
"Any" |
The algorithm used to sign the data in SecuRemote. Can be "none" or "MD5".
"X" in OID |
fw1person |
fw1template |
default |
|---|---|---|---|
17 |
y |
y |
"none" |
The number of minutes after which a SecuRemote user must re-authenticate himself or herself to the Security Gateway.
"X" in OID |
fw1person |
fw1template |
|---|---|---|
18 |
y |
y |
The exception to generate on successful authentication via SecuRemote. Can be "none", "cryptlog" or "cryptalert".
"X" in OID |
fw1person |
fw1template |
default |
|---|---|---|---|
19 |
y |
y |
"none" |
This flag is used to resolve a problem related to group membership.
The group membership of a user is stored in the group entries to which it belongs, in the user entry itself, or in both entries. Therefore there is no clear indication in the user entry if information from the template about group relationship should be used.
If this flag is "TRUE", then the user is taken to be a member of all the groups to which the template is a member. This is in addition to all the groups in which the user is directly a member.
"X" in OID |
fw1person |
fw1template |
default |
|---|---|---|---|
20 |
y |
y |
"False" |
The key encryption methods for SecuRemote users using IKE. This can be one or more of: "DES", "3DES". A user using IKE (formerly known as ISAMP) may have both methods defined.
"X" in OID |
fw1person |
fw1template |
default |
|---|---|---|---|
21 |
y |
y |
"DES", "3DES" |
The allowed authentication methods for SecuRemote users using IKE, (formerly known as ISAMP). This can be one or more of: "preshared", "signatures".
"X" in OID |
fw1person |
fw1template |
default |
|---|---|---|---|
22 |
y |
y |
"signatures" |
The data integrity method for SecuRemote users using IKE, (formerly known as ISAMP). This can be one or more of: "MD5", "SHA1". A user using IKE must have both methods defined.
"X" in OID |
fw1person |
fw1template |
default |
|---|---|---|---|
23 |
y |
y |
"MD5", "SHA1" |
The IPSec Transform method for SecuRemote users using IKE, (formerly known as ISAMP). This can be one of: "AH", "ESP".
"X" in OID |
fw1person |
fw1template |
default |
|---|---|---|---|
24 |
y |
y |
"ESP" |
The data integrity method for SecuRemote users using IKE, (formerly known as ISAMP). This can be one of: "MD5", "SHA1".
"X" in OID |
fw1person |
fw1template |
default |
|---|---|---|---|
25 |
y |
y |
"SHA1" |
The pre-shared secret for SecuRemote users using IKE, (formerly known as ISAMP).
The value can be calculated using the fw ikecrypt command line.
"X" in OID |
fw1person |
fw1template |
|---|---|---|
26 |
y |
y |
The data encryption method for SecuRemote users using IKE, (formerly known as ISAMP).
"X" in OID |
fw1person |
fw1template |
default |
|---|---|---|---|
27 |
y |
y |
"DES" |
The encryption method allowed for SecuRemote users. This can be one or more of: "FWZ", "ISAKMP" (meaning IKE).
"X" in OID |
fw1person |
fw1template |
default |
|---|---|---|---|
28 |
y |
y |
"FWZ" |
Defines when and by whom the password should and can be changed.
"X" in OID |
fw1person |
|---|---|
29 |
y |
Number of allowed wrong passwords entered sequentially.
"X" in OID |
fw1person |
|---|---|
30 |
y |
Time of the last login failure.
"X" in OID |
fw1person |
|---|---|
31 |
4 |
DN of the template that the user is a member of.
"X" in OID |
fw1person |
|---|---|
33 |
4 |
To add the propriety schema to your Netscape directory server, use the file schema.ldif in the $FWDIR/lib/ldap directory.
|
Important - This deletes the objectclass definition from the schema and adds the updated one in its place. |
We recommend that you back up the User Directory server before you run the command.
The ldif file:
fw1person and fw1templatefw1person and fw1templateTo change the Netscape LDAP schema, run the ldapmodify command with the schema.ldif file.
On some server versions, the delete objectclass operation can return an error, even if it was successful. Use ldapmodify with the -c (continuous) option.
The User Directory profile is a configurable LDAP policy that lets you define more exact User Directory requests and enhances communication with the server. Profiles control most of the LDAP server-specific knowledge. You can manage diverse technical solutions, to integrate LDAP servers from different vendors.
Use User Directory profiles to make sure that the user management attributes of a Security Management Server are correct for its associated LDAP server. For example, if you have a certified OPSEC User Directory server, apply the OPSEC_DS profile to get enhanced OPSEC-specific attributes.
LDAP servers have difference object repositories, schemas, and object relations.
cn attribute in the User object's Relatively Distinguished Name (RDN) while others use uid.memberOf describes which group the user belongs to, while standard LDAP methods define the member attribute in the group object itself.accountExpires user attribute, but other servers require the Check Point attribute fw1expirationdate, which is part of the Check Point defined fw1person objectclass.These profiles are defined by default:
Profiles have these major categories:
Some of these categories list the same entry with different values, to let the server behave according to type of operation. You can change certain parameters of the default profiles for finer granularity and performance tuning.
To apply a profile:
To change a profile:
User Directory servers organize groups and members through different means and relations. User Directory operations are performed by Check Point on users, groups of users, and user templates where the template is defined as a group entry and users are its members. The mode in which groups/templates and users are defined has a profound effect on the performance of some of the Check Point functionality when fetching user information. There are three different modes:
The most effective mode is the "MemberOf" and "Both" modes where users' group membership information is available on the user itself and no additional User Directory queries are necessary.
Set the user-to-group membership mode in the profile objects for each User Directory server in objects_5_0.C.
GroupMembership attribute to one of the following values: Member, MemberOf, Both accordingly.TemplateMembership attribute to one of the following values: Member, MemberOf accordingly.After successfully converting the database, set the User Directory server profile in objects_5_0.C to the proper membership setting and start the Security Management server. Make sure to install policy/user database on all gateways to enable the new configuration.
Attributes: |
The unique username User Directory attribute (uid). In addition, when fetching users by the username, this attribute is used for query.
default |
Other |
|---|---|
|
One value allowed |
This user password is User Directory attribute.
default |
Other |
|---|---|
|
One value allowed |
The object class for Check Point User Directory templates. If you change the default value with another objectclass, make sure to extend that objectclass schema definition with relevant attributes from fw1template.
default |
Other |
|---|---|
fw1template |
Multiple values allowed |
The account expiration date is User Directory attribute. This could be a Check Point extended attribute or an existing attribute.
default |
Other |
|---|---|
|
One value allowed |
Expiration date format. This format will be applied to the value defined at ExpirationDateAttr.
default |
Other |
|---|---|
CP format is yyyymmdd |
One value allowed |
The format of the password modified date is User Directory attribute. This formation will be applied to the value defined at PsswdDateAttr.
default |
Other |
|---|---|
|
One value allowed |
The password last modified date is User Directory attribute.
default |
Other |
|---|---|
|
One value allowed |
User Directory attribute to store and read bad password authentication count.
default |
Other |
|---|---|
fw1BadPwdCount |
One value allowed |
If 0, the sent password will not be encrypted. If 1, the sent password will be encrypted with the algorithm specified in the DefaultCryptAlgorithm.
default |
Other |
|---|---|
if not using encrypted password, SSL is recommended |
One value allowed
|
The algorithm used to encrypt a password before updating the User Directory server with a new password.
default |
Other |
|---|---|
|
One value allowed |
The text to prefix to the encrypted password when updating the User Directory server with a modified password.
default |
Other |
|---|---|
{Crypt} (for Netscape_DS) |
One value allowed |
User Directory attribute to store and read the user phone number.
default |
Other |
|---|---|
internationalisednumber |
One value allowed |
General purpose attribute translation map, to resolve problems related to peculiarities of different server types. For example, an X.500 server does not allow the "-" character in an attribute name. To enable the Check Point attributes containing "-", specify a translation entry: (e.g., "fw1-expiration =fw1expiration").
default |
Other |
|---|---|
none |
Multiple values allowed |
All attribute names listed here will be removed from the default list of attributes included in read/write operations. This is most useful in cases where these attributes are not supported by the User Directory server schema, which might fail the entire operation. This is especially relevant when the User Directory server schema is not extended with the Check Point schema extension.
Default |
Other |
|---|---|
There are no values by default. In case the User Directory server was not extended by the Check Point schema, the best thing to do is to list here all the new Check Point schema attributes. |
Multiple values allowed |
Use this attribute to define which type of objects (objectclass) is queried when the object tree branches are displayed after the Account Unit is opened in SmartConsole.
Default |
Other |
|---|---|
|
Multiple values allowed |
If One is set, an ORed query will be sent and every object that matches the criteria will be displayed as a branch. If All, an ANDed query will be sent and only objects of all types will be displayed.
Default |
Other |
|---|---|
One |
One value allowed |
This attribute defines what objects should be displayed with an organization object icon. A new object type specified here should also be in BranchObjectClass.
Default |
Other |
|---|---|
organization |
Multiple values allowed |
This attribute defines what objects should be displayed with an organization object icon. A new object type specified here should also be in BranchObjectClass.
Default |
Other |
|---|---|
|
Multiple values allowed |
This attribute defines what objects should be displayed with a Domain object icon. A new object type specified here should also be in BranchObjectClass.
Default |
Other |
|---|---|
Domain |
Multiple values allowed |
This attribute defines what objects should be read as user objects. The user icon will be displayed on the tree for object types specified here.
Default |
Other |
|---|---|
OrganizationalPerson InertOrgPerson FW1 Person (most servers) |
Multiple values allowed |
If 'one' is set, an ORed query will be sent and every object that matches one of the types will be displayed as a user. If 'all' and ANDed query will be sent and only objects of all types will be displayed.
Default |
Other |
|---|---|
One |
One value allowed |
This attribute defines what objects should be read as groups. The group icon will be displayed on the tree for objects of types specified here.
Default |
Other |
|---|---|
Groupofnames Groupofuniquenames (most servers) Group Groupofnames (in Microsoft_AD) |
Multiple values allowed |
If 'one' is set an ORed query will be sent and every object that matches one of the types will be displayed as a user. If 'all' an ANDed query will be sent and only objects of all types will be displayed.
GroupMembership
Default |
Other |
|---|---|
One |
One value allowed |
Defines the relationship Mode between the group and its members (user or template objects) when reading group membership.
Default |
Other |
|---|---|
|
One value allowed |
Defines what User Directory attribute to use when reading group membership from the user or template object if GroupMembership mode is 'MemberOf' or 'Both' you may be required to extend the user/template object schema in order to use this attribute.
Default |
Other |
|---|---|
MemberOf |
One value allowed |
Defines the user to template membership mode when reading user template membership information.
Default |
Other |
|---|---|
|
One value allowed |
Defines which attribute to use when reading the User members from the template object, as User DNs, if the TemplateMembership mode is Member.
Default |
Other |
|---|---|
member |
Multiple values allowed |
Defines which attribute to use when reading from the User object the template DN associated with the user, if the TemplateMembership mode is MemberOf.
Default |
Other |
|---|---|
member |
Multiple values allowed |
This value will be used as the attribute name in the Relatively Distinguished Name (RDN) when you create a new organizational unit in SmartConsole.
Default |
Other |
|---|---|
o |
One value allowed |
This value is used as the attribute name in the Relatively Distinguished Name (RDN) when you create a new organizational Unit in SmartConsole.
Default |
Other |
|---|---|
ou |
One value allowed |
This value is used as the attribute name in the Relatively Distinguished Name (RDN), when you create a new User object in SmartConsole.
Default |
Other |
|---|---|
cn |
One value allowed |
This value is used as the attribute name for the RDN, when you create a new Group object in SmartConsole.
Default |
Other |
|---|---|
cn |
One value allowed |
This value is used as the attribute name for the RDN, when you create a new Domain object in SmartConsole.
Default |
Other |
|---|---|
dc |
One value allowed |
This field is relevant when you create objects in SmartConsole. The format of this field is Objectclass:name:value meaning that if the object created is of type ObjectClass then additional attributes will be included in the created object with name 'name' and value 'value'.
Default |
Other |
|---|---|
user:userAccountControl:66048 For Microsoft_AD This means that when a user object is created an extra attribute is included automatically: userAccountControl with the value 66048 |
Multiple values allowed |
This field is used when you modify a group in SmartConsole. The format of this field is ObjectClass:memberattr meaning that for each group objectclass there is a group membership attribute mapping. List here all the possible mappings for this User Directory server profile. When a group is modified, based on the group's objectclass the right group membership mapping is used.
Default |
Other |
|---|---|
groupOfNames:member groupOfUniqueNames:uniqueMember (All other servers) |
Multiple values allowed |
This determines which ObjectClass to use when creating/modifying an OrganizationalUnit object. These values can be different from the read counterpart.
Default |
Other |
|---|---|
OrganizationalUnit |
Multiple values allowed |
This determines which ObjectClass to use when creating and/or modifying an Organization object. These values can be different from the read counterpart.
Default |
Other |
|---|---|
Organization |
Multiple values allowed |
This determines which ObjectClass to use when creating and/or modifying a user object. These values can be different from the read counterpart.
Default |
Other |
|---|---|
User (in Microsoft_AD) person organizationalPerson inetOrgPerson fw1Person (All other servers) |
Multiple values allowed |
Determines which ObjectClass to use when creating and/or modifying a domain context object. These values can be different from the read counterpart.
Default |
Other |
|---|---|
Domain |
Multiple values allowed |
The Microsoft Windows 2000 advanced server (or later) includes a sophisticated User Directory server that can be adjusted to work as a user database for the Security Management server.
By default, the Active Directory services are disabled. In order to enable the directory services:
dcpromo command from the Start > Run menu, orThe Active Directory has the following structure:
|
Most of the user objects and group objects created by Windows 2000 tools are stored under the CN=Users, DCROOT branch, others under CN=Builtin, DCROOT branch, but these objects can be created under other branches as well.
The branch CN=Schema, CN=Configuration, DCROOT contains all schema definitions.
Check Point can take advantage of an existing Active Directory object as well as add new types. For users, the existing user can be used "as is" or be extended with fw1person as an auxiliary of "User" for full feature granularity. The existing Active Directory "Group" type is supported "as is". A User Directory template can be created by adding the fw1template objectclass. This information is downloaded to the directory using the schema_microsoft_ad.ldif file (see Adding New Attributes to the Active Directory).
Performance
The number of queries performed on the directory server is significantly low with Active Directory. This is achieved by having a different object relations model. The Active Directory group-related information is stored inside the user object. Therefore, when fetching the user object no additional query is necessary to assign the user with the group. The same is true for users and templates.
Manageability
SmartConsole allows the creation and management of existing and new objects. However, some specific Active Directory fields are not enabled in SmartConsole.
Enforcement
It is possible to work with the existing Active Directory objects without extending the schema. This is made possible by defining an Internal Template object and assigning it with the User Directory Account Unit defined on the Active Directory server.
For example, if you wish to enable all users with IKE+Hybrid based on the Active Directory passwords, create a new template with the IKE properties enabled and "Check Point password" as the authentication method.
To modify the Active Directory schema, add a new registry DWORD key named Schema Update Allowed with the value different from zero under HKLM\System\CurrentControlSet\Services\NTDS\Parameters.
Delegating control over the directory to a specific user or group is important since by default the Administrator is not allowed to modify the schema or even manage directory objects through User Directory protocol.
To delegate control over the directory:
The Delegation of Control wizard window is displayed.
Modify the file with the Active Directory schema, to use SmartConsole to configure the Active Directory users.
To extend the Active Directory schema:
$FWDIR/lib/ldap.schmea_microsoft_ad.ldif to the C:\ drive in the Active Directory server.DOMAINNAME, and replace it with the name of your domain in LDIF format.For example, the domain sample.checkpoint.com in LDIF format is: DC=sample,DC=checkpoint,DC=com
- at the end of the modify section. This is an example of the modify section.
|
ldifde -i -f c:/schema_microsoft_ad.ldifBelow is the example in LDAP Data Interchange (LDIF) format that adds one attribute to the Microsoft Active Directory:
|
All Check Point attributes can be added in the same way.
The definitions of all attributes in LDIF format are contained in the schema_microsoft_ad.ldif file located in the $FWDIR/lib/ldap directory.
Before attempting to run the ldapmodify command, edit schema_microsoft_ad.ldif and replace all instances of DCROOT with the domain root of your organization. For example if your domain is support.checkpoint.com, replace DCROOT with dc=support,dc=checkpoint,dc=com.
After modifying the file, run the ldapmodify command to load the file into the directory. For example if you use the Administrator account of the dc=support,dc=checkpoint,dc=com domain the command syntax will be as follows:
Note - A shell script is available for UNIX gateways. The script is at: $FWDIR/lib/ldap/update_schema_microsoft_ad
|
When a gateway requires user information for authentication, it goes through this process:
If there is more than one Account Unit, the Account Units are queried concurrently. The results of the query are taken from the first Account Unit to meet the conditions, or from all the Account Units which meet the conditions.
Use queries to get User Directory user or group data. For best performance, query Account Units when there are open connections. Some connections are kept open by the gateways, to make sure the user belongs to a group that is permitted to do a specified operation.
To query User Directory:
SmartDashboard opens.
The LDAP Query Search window opens.
Click Advanced to select specified objects types, such as Users, groups, or templates.
Query conditions:
If you create a query where:
The server queries the User Directory with this filter:
|
The Security Management server and the gateways can work with multiple LDAP servers concurrently. For example, if a gateway needs to find user information, and it does not know where the specified user is defined, it queries all the LDAP servers in the system. (Sometimes a gateway can find the location of a user by looking at the user DN, when working with certificates.)
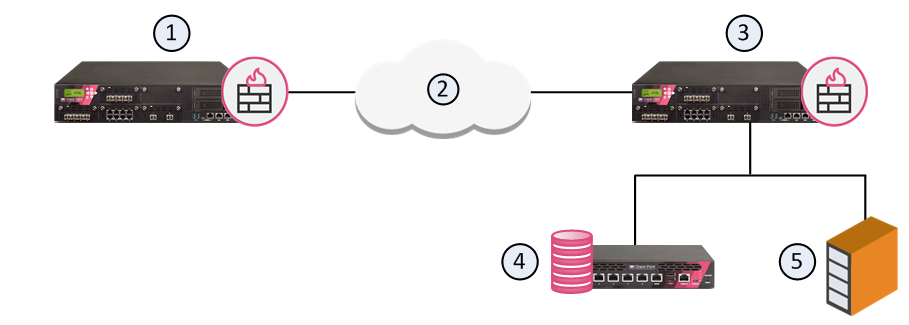
User Directory integrates the Security Management Server and an LDAP server and lets the Security Gateways use the LDAP information.
Item |
Description |
|---|---|
1 |
Security Gateway - Retrieves LDAP user information and CRLs |
2 |
Internet |
3 |
Security Gateway - Queries LDAP user information, retrieves CRLs, and does bind operations for authentication |
4 |
Security Management Server - Uses User Directory to manage user information |
5 |
LDAP server - Server that holds one or more Account Units |
In SmartConsole, enable the Security Management Server to manage users in the Account Unit.
Note - You cannot use the SmartConsole User Database when the User Directory LDAP server is enabled.
To enable User Directory on the Security Management Server:
The User Directory page opens.
An Account Unit represents branches of user information on one or more LDAP servers. The Account Unit is the interface between the LDAP servers and the Security Management Server and Security Gateways.
You can have a number of Account Units representing one or more LDAP servers. Users are divided among the branches of one Account Unit, or between different Account Units.
Note - When you enable the Identity Awareness and Mobile Access Software Blades, SmartConsole opens a First Time Configuration Wizard. The Active Directory Integration window of this wizard lets you create a new AD Account Unit. After you complete the wizard, SmartConsole creates the AD object and Account Unit.
Use the LDAP Account Unit Properties window in SmartConsole to edit an existing Account Unit or to create a new one manually.
To edit an existing LDAP Account Unit:
The LDAP Account Unit Properties window opens.
To create a new LDAP Account Unit:
The LDAP Account Unit Properties window opens.
These are the configuration fields in the General tab:
Note - LDAP SSO (Single Sign On) is only supported for Account Unit objects that use User Management.
Note - This option is only available if the Profile is set to Microsoft_AD.
You can add, edit, or delete LDAP server objects.
To configure an LDAP server for the Account Unit:
The LDAP Server Properties window opens.
If necessary, create a new SmartConsole server object:
To remove an LDAP server from the Account Unit:
If all the configured servers use the same login credentials, you can modify those simultaneously.
To configure the login credentials for all the servers simultaneously:
The Update Account to All Servers window opens.
Configure the LDAP server for the Security Management Server to query and the branches to fetch.
Note - Make sure there is LDAP connectivity between the Security Management Server and the LDAP Server that holds the management directory.
To configure LDAP query parameters:
The Security Management Server queries and shows the LDAP branches.
These are the configuration fields in the Authentication tab:
The LDAP Server Properties window opens.
If the connections are encrypted, enter the encryption port and strength settings.
Note - User Directory connections can be authenticated by client certificates from a Certificate Authority (CA). To use certificates, the LDAP server must be configured with SSL strong authentication.
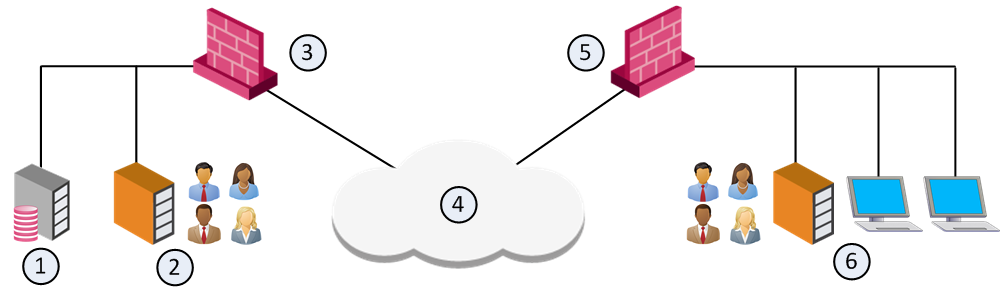
With User Directory replications for High Availability, one Account Unit represents all the replicated User Directory servers. For example, two User Directory server replications can be defined on one Account Unit, and two Security Gateways can use the same Account unit.
Item |
Description |
|---|---|
1 |
Security Management Server. Manages user data in User Directory. It has an Account Unit object, where the two servers are defined. |
2 |
User Directory server replication. |
3 |
Security Gateway. Queries user data and retrieves CRLs from nearest User Directory server replication (2). |
4 |
Internet |
5 |
Security Gateway. Queries user data and retrieves CRLs from nearest User Directory server replication (6). |
6 |
User Directory server replication. |
With multiple replications, define the priority of each LDAP server in the Account Unit. Then you can define a server list on the Security Gateways.
Select one LDAP server for the Security Management server to connect to. The Security Management server can work with one LDAP server replication. All other replications must be synchronized for standby.
To set priority on the Account Unit:
The Security Management Server and Security Gateways can use certificates to secure communication with LDAP servers. If you do not configure certificates, the management server, Security Gateways, and LDAP servers communicate without authentication.
To configure User Directory to use certificates:
ldap_use_cert_auth attribute to true:ldap_use_cert_auth attribute, and set it to true.The Certificate Authority Properties window opens.
Note - a management-only server does not have an IPSec VPN page. The User Directory on a management-only server cannot be configured to authenticate to an LDAP server using certificates.
In SmartConsole, users and user groups in the Account Unit show in the same tree structure as on the LDAP server.
The users of an organization can be distributed across several LDAP servers. Each LDAP server must be represented by a separate Account Unit.
User Directory lets you use SmartDashboard to manage information about users and OUs (Organizational Units) that are stored on the LDAP server.
To manage LDAP information from SmartDashboard:
SmartDashboard opens.
The LDAP domain is shown.
The Security Management Server queries the LDAP server and SmartDashboard shows the LDAP objects.
The Objects List pane shows the user information.
The LDAP User Properties window opens.
Create LDAP groups for the User Directory. These groups classify users according to type and can be used in Policy rules. You can add users to groups, or you can create dynamic filters.
To create LDAP groups for User Directory:
Examples
Access role objects let you configure network access according to:
After you activate the Identity Awareness Software Blade, you can create access role objects and use them in the Source and Destination columns of Access Control Policy rules.
Important: Before you add Active Directory users, machines, or groups to an access role, make sure there is LDAP connectivity between the Security Management Server and the AD Server that holds the management directory. The management directory is defined on the Objects Management tab in the Properties window of the LDAP Account Unit.
To create an access role:
The New Access Role window opens.
Identity Awareness engine automatically recognizes changes to LDAP group membership and updates identity information, including access roles. For more, see the R80.20 Identity Awareness Administration Guide.
To make an authentication rule:

