


|
|
|
In This Section: |
Whenever users access the organization from remote locations, it is essential that not only the usual requirements of secure connectivity be met but also the special demands of remote clients. These requirements include:
To resolve these issues, a secure connectivity framework is needed to ensure that remote access to the corporate network is securely enabled.
The SSL (Secure Socket Layer) Network Extender is a simple-to-implement remote access solution. A thin client is installed on the user's machine. (The SSL Network Extender client has a much smaller size than other clients.) It is connected to an SSL enabled web server that is part of the Enforcement Module. By default, the SSL enabled web server is disabled. It is activated by using the SmartDashboard, thus enabling full secure IP connectivity over SSL. The SSL Network Extender requires a server side configuration only, unlike other remote access clients. Once the end user has connected to a server, the thin client is downloaded as an ActiveX component, installed, and then used to connect to the corporate network using the SSL protocol.
It is much easier to deploy a new version of the SSL Network Extender client than it is to deploy a new version of other conventional clients.
Note - If the Mobile Access blade is active on a Security Gateway, SSL Network Extender works through Mobile Access and not IPsec VPN. In this case, SSL Network Extender must be configured through the Mobile Access blade. If you already had SSL Network Extender configured on an IPsec VPN Security Gateway and then you enable the Mobile Access blade, you must reconfigure SSL Network Extender for the Mobile Access blade.
The SSL Network Extender is a thin client installed on the user's computer and an SSL enabled web server component, integrated into the Security Gateway.
To enable connectivity for clients using the SSL Network Extender, a Security Gateway must be configured to support Remote Access Clients, in addition to a minor configuration specific to SSL Network Extender.
Users download SSL Network Extender from a Security Gateway portal.
This section briefly describes commonly used concepts that you will encounter when dealing with the SSL Network Extender. It is strongly recommended that you review the "Remote Access VPN" section of this book before reading this guide.
Refers to remote users accessing the network with client software such as Endpoint VPN clients, SSL clients, or third party IPsec clients. The Security Gateway provides a Remote Access Service to the remote clients.
A Remote Access Community, a Check Point concept, is a type of VPN community created specifically for users that usually work from remote locations, outside of the corporate LAN.
Office Mode is a Check Point remote access VPN solution feature. It enables a Security Gateway to assign a remote client an IP address. This IP address is used only internally for secure encapsulated communication with the home network, and therefore is not visible in the public network. The assignment takes place once the user connects and authenticates. The assignment lease is renewed as long as the user is connected. The address may be taken either from a general IP address pool, or from an IP address pool specified per user group, using a configuration file.
Visitor Mode is a Check Point remote access VPN solution feature. It enables tunneling of all client-to-Security Gateway communication through a regular TCP connection on port 443. Visitor mode is designed as a solution for firewalls and Proxy servers that are configured to block IPsec connectivity.
Endpoint Security on Demand (ESOD) may be used to scan endpoint computers for potentially harmful software before allowing them to access the internal application. When end users access the SSL Network Extender for the first time, they are prompted to download an ActiveX component that scans the end user machine for Malware. The scan results are presented both to the Security Gateway and to the end user. SSL Network Extender access is granted/denied to the end user based on the compliance options set by the administrator.
Since there are many different kinds of threats to your network's security, different users may require different configurations in order to guard against the increasing number and variety of threats. The ability to configure a variety of ESOD policies enables the administrator to customize the software screening process between different user groups.
ESOD can screen for the Malware software types listed in the following table:
Software Type |
Description |
|---|---|
Worms |
Programs that replicate over a computer network for the purpose of disrupting network communications or damaging software or data. |
Trojan horses |
Malicious programs that masquerade as harmless applications. |
Hacker tools |
Tools that facilitate a hacker's access to a computer and/or the extraction of data from that computer. |
Keystroke loggers |
Programs that record user input activity (that is, mouse or keyboard use) with or without the user's consent. Some keystroke loggers transmit the recorded information to third parties. |
Adware |
Programs that display advertisements, or records information about Web use habits and store it or forward it to marketers or advertisers without the user's authorization or knowledge. |
Browser plug-ins |
Programs that change settings in the user's browser or adds functionality to the browser. Some browser plug-ins change the default search page to a pay-per-search site, change the user's home page, or transmit the browser history to a third party. |
Dialers |
Programs that change the user's dialup connection settings so that instead of connecting to a local Internet Service Provider, the user connects to a different network, usually a toll number or international phone number. |
3rd party cookies |
Cookies that are used to deliver information about the user's Internet activity to marketers. |
Other undesirable software |
Any unsolicited software that secretly performs undesirable actions on a user's computer and does not fit any of the above descriptions. |
This section lists SSL Network Extender special considerations, such as pre-requisites, features and limitations:
The SSL Network Extender pre-requisites are listed below:
The SSL Network Extender client-side pre-requisites for remote clients are:
The SSL Network Extender server-side pre-requisites are listed below:
The SSL Network Extender features are listed below:
The following sections describe how to configure the server. Load Sharing Cluster Support, customizing the Web GUI, upgrading the SSL Network Extender client and Installation for Users without Administrator privileges are also discussed.
Before configuring the server, verify that you have a valid license for the SSL Network Extender.
Use cpconfig to verify that you have a valid license for the SSL Network Extender. Check Point software is activated with a License Key. You can obtain this License Key by registering the Certificate Key that appears on the back of the software media pack, in the Check Point Support Center.
The SSL Network Extender requires only server side configuration
Make sure that the VPN Software Blade is enabled before you configure the Remote Access community.
To configure the Security Gateway for Remote Access:
The gateway window opens and shows the General Properties page.
The page shows the VPN communities that the Security Gateway is participating.
Note - Office Mode support is mandatory on the Security Gateway side.
Note - If the Mobile Access blade is active on a Security Gateway, SSL Network Extender works through Mobile Access and not IPsec VPN. In this case, SSL Network Extender must be configured through the Mobile Access blade. If you already had SSL Network Extender configured on an IPsec VPN Security Gateway and then you enable the Mobile Access blade, you must reconfigure SSL Network Extender for the Mobile Access blade.
Configure each Security Gateway that uses SSL Network Extender. When the Mobile Access Software Blade is enabled, SSL Network Extender is enabled as a Web client.
To configure the SSL Network Extender settings for a Security Gateway:
The gateway window opens and shows the General Properties page.
To configure the settings for SSL Network Extender connections:
If the users do not have a certificate, they can enroll using a registration key that they previously received from the administrator.
If the administrator has configured Certificate with Enrollment as the user authentication scheme, users can create a certificate for their use, by using a registration key, provided by the system administrator.
To create a user certificate for enrollment:
Note - In this version, enrollment to an External CA is not supported.
When the user attempts to connect to the SSL Network Extender, without having a certificate, the Enrollment window is displayed, and he/she can create a certificate for his/her use by entering the Registration Key, received from the system administrator.
For a description of the user login experience, refer to Downloading and Connecting the Client.
Note - The system administrator can direct the user to the URL, http://<IP>/registration.html, to allow the user to receive a Registration Key and create a certificate, even if they do not wish to use the SSL Network Extender, at this time.
Note - The Force Upgrade option should only be used in cases where the system administrator is sure that all the users have administrator privileges. Otherwise, the user will not be able to connect to and use the SSL Network Extender.
For a description of the user upgrade experience, refer to Downloading and Connecting the Client.
For a description of the user disconnect experience, refer to Uninstall on Disconnect.
Note - The Uninstall on Disconnect feature will not ask the user whether or not to uninstall, and will not uninstall the SSL Network Extender, if a user has entered a suspend/hibernate state, while he/she was connected.
After installing the ESOD server and configuring it, fetch the XML config file from the ESOD server:
$FWDIR/conf/extender/request.xml on the Security Gateway.Note - At present, the Dynamic ESOD Update feature is not supported.
You can manually upgrade ESOD as follows:
ICSScanner.cab file, under $FWDIR/conf/extender, with the new package.ics.html, under $FWDIR/conf/extender, as follows: #Version= and replace the current value with the new version.On the Security Management Server:
Note - Make sure that Endpoint Security on Demand is enabled in the Global Properties > Remote Access > SSL Network Extender page.
$FWDIR/lib directory.vpn_table.def file.vpn_table_HFA.def to vpn_table.def.On the Security Gateway:
$FWDIR/conf/extender.$FWDIR/conf folder, create a file called ics.group. This should be a text file, in which, each row lists a group name and its policy xml file.Example of ics.group file:
Group1 group1.xml
Group2 group2.xml
Group3 defGroup.xml
Group4 defGroup.xml
Important notes about the ics.group file:
ics.group file. ics.group file will use their specific xml files. Groups that are not listed in the ics.group file will try to use the default policy, located in the request.xml file. If the request.xml file does not exist, an error will be returned. request.xml, cannot appear in the ics.group file.ics.group file (or after any change has been made), install policy.cpstop and then cpstart on the Security Gateway.https://hostIP/<groupName>_ics.htmlFor example, all users belonging to "group1" will surf to the assigned URL: https://10.10.10.10/group1_ics.html.
For troubleshooting tips, see Troubleshooting.
You can modify the SSL Network Extender Portal by changing skins and languages.
To configure the Skins Option:
The skin directory is located under $FWDIR/conf/extender on the SSL Network Extender Security Gateways.
There are two subdirectories. They are:
chkp: contains skins that Check Point provides by default. At upgrade, this subdirectory may be overwritten.custom: contains skins defined by the customer. If custom does not exist yet, create it. At upgrade, this subdirectory is not overwritten. New skins are added in this subdirectory.cd $FWDIR/conf/extender/skin/custom
mkdir skin1
touch disable
Note - Verify that this name is not already used in chkp. If it is, the new skin definition will override the existing skin definition (as long as the new skin definition exists). Once you have deleted the new skin definition, the chkp skin definition will once again be used.
Each skin folder must contain the following five style sheets:
help_data.css: The main OLH page uses this style sheet.help.css: The inner frame on the OLH page uses this style sheet.index.css: The ESOD pages, and the main SSL Network Extender portal page use this style sheet.style.css: All login pages use this style sheet.style_main.css: The main SSL Network Extender Connection page, Proxy Authentication page and Certificate Registration page use this style sheet.Note - It is recommended that you copy the aforementioned files from another chkp skin, and then modify them as desired.
Add your company logo to the main SSL Network Extender portal page.
cd $FWDIR/conf/extender/skin/custom
mkdir <skin_name>
cd <skin_name>
copy ../../chkp/skin2/* .
Place logo image file in this directory
Edit index.css.
Goto .company_logo and replace the existing URL reference with a reference to the new logo image file.
Save.
Install Policy.
Note - No spaces are allowed in the <skin_name>
To configure the Languages Option:
The languages directory is located under $FWDIR/conf/extender on the SSL Network Extender Security Gateways.
There may be two subdirectories. They are:
chkp: contains languages that Check Point provides by default. At upgrade, this subdirectory may be overwritten.custom: contains languages defined by the customer. If custom does not exist yet, create it. At upgrade, this subdirectory is not overwritten. New languages are added in this subdirectory.custom, that is to be disabled (if it exists) and create a file named disable. This file may be empty.custom, create it and then create a file within it named disable.custom subdirectory.Note - Verify that this name is not already used in chkp. If it is, the new language definition will override the existing language definition (as long as the new language definition exists). Once you have deleted the new language definition, the chkp language definition will once again be used.
messages.js file of an existing chkp language to this folder.messages.js file and translate the text bracketed by quotation marks.cd $FWDIR/conf/extender/language
mkdir custom
cd custom
mkdir <language_name>
cd <language_name>
copy ../../chkp/english/messages.js
Edit the messages.js file and translate the text bracketed by quotation marks.
Save.
In custom/english/messages.js, add a line as follows:
<language_name>="translation of language_name";
Install Policy.
Note - No spaces are allowed in the <language_name>
custom subdirectory.chkp language folder to be modified.messages.js file, and insert only those messages that you want to modify, in the following format:<variable_name>="<desired text>";
Note - For reference, refer to the messages.js file, located in chkp/<language>.
The SSL Network Extender usually requires Administrator privileges to install the ActiveX component. To allow users that do not have Administrator privileges to use the SSL Network Extender, the Administrator can use his/her remote corporate installation tools (such as, Microsoft SMS) to publish the installation of the SSL Network Extender, as an MSI package, in configuring the SSL Network Extender.
To prepare the SSL Network Extender MSI package:
extender.cab file, located in $FWDIR/conf/extender, to a Windows machine and open the file using WinZip.cpextender.msi, and use as an MSI package, for remote installation.On Windows , Mac and Linux, it is possible to install SSL Network Extender for users that are not administrators, if the user knows the admin password. In this case, perform a regular SSL Network Extender installation and supply the administrator password when asked.
This section describes the user experience, including downloading and connecting the SSL Network Extender client, importing a client certificate, and uninstalling on disconnect.
Check Point SSL Network Extender uses ActiveX controls and cookies to connect to applications via the Internet. These enabling technologies require specific browser configuration to ensure that the applications are installed and work properly on your computer. The Trusted Sites Configuration approach includes the SSL Network Extender Portal as one of your Trusted Sites. This approach is highly recommended, as it does not lessen your security. Please follow the directions below to configure your browser.
ActiveX controls are software modules, based on Microsoft's Component Object Model (COM) architecture. They add functionality to software applications by seamlessly incorporating pre-made modules with the basic software package.
On the Internet, ActiveX controls can be linked to Web pages and downloaded by an ActiveX-compliant browser. ActiveX controls turn Web pages into software pages that perform like any other program.
The SSL Network Extender can use ActiveX control in its applications. To use ActiveX you must download the specific ActiveX components required for each application. Once these components are loaded, you do not need to download them again unless upgrades or updates become available. If you do not want to use an ActiveX component you may work with a Java Applet.
Note - You must have Administrator rights to install or uninstall software on Windows XP Professional, as well as on the Windows 2000 operating systems.
The following section discusses how to download and connect the SSL Network Extender.
To download the Client:
The site's security certificate has been issued by an authority that you have not designated as a trusted CA. Before you connect to this server, you must trust the CA that signed the server certificate. (The system administrator can define which CAs may be trusted by the user.) You can view in the certificate in order to decide if you wish to proceed.
Note - The administrator can direct the user to the URL, http://< mngmt IP>:18264, to install this CA certificate, thereby establishing trust, and avoiding future displays of this message.
If Endpoint Security on Demand is enabled, the ESOD web page is displayed.
If this is the first time that the user is scanned with ESOD, the user should install the ESOD ActiveX object.
If this is the first time that ESOD is used, the following Server Confirmation window appears. The user is asked to confirm that the listed ESOD server is identical to the organization's site for remote access.
Once the user has confirmed the ESOD server, an automatic software scan takes place on the client's machine. Upon completion, the scan results and directions on how to proceed are displayed as shown below.
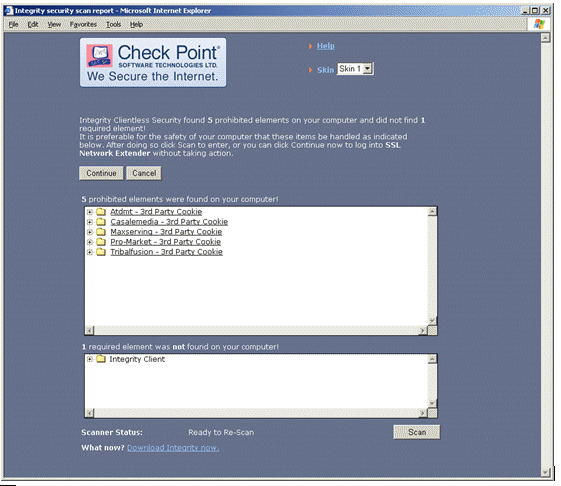
ESOD not only prevents users with potentially harmful software from accessing your network, but also requires that they conform to the corporate Anti-Virus and firewall policies, as well. A user is defined as having successfully passed the ESOD scan only if he/she successfully undergoes scans for Malware, Anti-Virus, and Firewall. Each malware is displayed as a link, which, if selected, redirects you to a data sheet describing the detected malware. The data sheet includes the name and a short description of the detected malware, what it does, and the recommended removal method/s.
The options available to the user are configured by the administrator on the ESOD server. The options are listed in the following table:
Scan Option |
Description |
|---|---|
Scan Again |
Allows a user to rescan for malware. This option is used in order to get refreshed scan results, after manually removing an undesired software item. |
Cancel |
Prevents the user from proceeding with the portal login, and closes the current browser window. |
Continue |
Causes the ESOD for Mobile Access client to disregard the scan results and proceed with the log on process. |
To continue with the download:
Note - If user authentication has been configured to be performed via a 3rd party authentication mechanism, such as SecurID or LDAP, the Administrator may require the user to change his/her PIN, or Password. In such a case, an additional Change Credentials window is displayed, before the user is allowed to access the SSL Network Extender.
At this point the user should open the file and utilize the Microsoft Certificate Import wizard as follows.
Note - It is strongly recommended that the user set the property Do not save encrypted pages to disk on the Advanced tab of the Internet Properties of Internet Explorer. This will prevent the certificate from being cached on disk.
Importing a Client Certificate with the Microsoft Certificate Import Wizard to Internet Explorer
Importing a client certificate to Internet Explorer is acceptable for allowing access to either a home PC with broadband access, or a corporate laptop with a dial-up connection. The client certificate will be automatically used by the browser, when connecting to an SSL Network Extender Security Gateway.
To import a client certificate:
The P12 file name is displayed.
It is strongly recommended that the user enable Strong Private Key Protection. The user will then be prompted for consent/credentials, as configured, each time authentication is required. Otherwise, authentication will be fully transparent for the user.
If you click OK, you must re-authenticate and a new SSL Network Extender version is installed.
The server certificate of the Security Gateway is authenticated. If the system Administrator has sent the user a fingerprint, it is strongly recommended that the user verify that the root CA fingerprint is identical to the fingerprint, sent to him/her.
The system Administrator can view and send the fingerprint of all the trusted root CAs, via the Certificate Authority Properties window in SmartDashboard.
You may work with the client as long as the SSL Network Extender Connection window, shown below, remains open, or minimized (to the System tray).
Once the SSL Network Extender is initially installed, a new Windows service named Check Point SSL Network Extender and a new virtual network adapter are added. This new network adapter can be seen by typing ipconfig /all from the Command line.
Note - The settings of the adapter and the service must not be changed. IP assignment, renewal and release will be done automatically.
Note - The Check Point SSL Network Extender service is dependent on both the virtual network adapter and the DHCP client service. Therefore, the DHCP client service must not be disabled on the user's computer.
Both the virtual network adapter and the Check Point SSL Network Extender service are removed during the product uninstall.
There is no need to reboot the client machine after the installation, upgrade, or uninstall of the product.
If the administrator has configured Uninstall on Disconnect to ask the user whether or not to uninstall, the user can configure Uninstall on Disconnect as follows.
To set Uninstall on Disconnect:
If you select Cancel, the SSL Network Extender will not be uninstalled.
If you click Yes, the Uninstall on Disconnect window will be displayed the next time the user connects to the SSL Network Extender.
There are two methods to access Network Applications using Linux:
This process is similar to the Windows Java installation.
After the installation is finished, the applet will try to connect.
If it is the first time, the following window is displayed:
If the system Administrator has sent the user a fingerprint, it is strongly recommended that the user verify that the server certificate fingerprint is identical to the Root CA Fingerprint seen in the window.
To download the SSL Network Extender installation archive package:
Before running the installation script, make sure execute permissions are available on the file. Use the command chmod + x snx_install.sh to add execution permissions.
The Shell archive package is downloaded to the user's home directory.
snx_install.sh.If the user does not have root permissions, the user is prompted to enter a root password in order to install the package. Enter the password and press Enter.
To disconnect after installation, run Server_1:/ snx -d.
Attributes |
Description |
|---|---|
snx -f <configuration file> |
Run SSL Network Extender using parameters defined in a configuration file other than the default name or location. |
snx -d |
Disconnect from Mobile Access |
snx -s <server> |
Specify server IP or hostname |
snx -u <username> |
Specify a valid user |
snx -c <certificate file> |
Specify which certificate is used to authenticate. |
snx -l <CA directory> |
Define the directory where CA's certificates are stored. |
snx -p <port> |
Change the HTTPS port. (default port is TCP 443). |
snx -g |
Enable debugging. snx.elg log file is created. |
snx -e <cipher> |
Force a specific encryption algorithm. Valid values - RC4 and 3DES. |
It is possible to predefine SSL Network Extender attributes by using a configuration file (.snxrc) located in the users home directory. When the SSL Network Extender command SSL Network Extender is executed, the attributed stored in the file are used by the SSL Network Extender command. To run a file with a different name execute the command snx -f <filename>.
Attributes |
Description |
|---|---|
server |
Change the HTTPS port. (default port is TCP 443). |
sslport |
Change the HTTPS port. (default port is TCP 443). |
username |
Specify a valid user |
certificate |
Specify which certificate is used to authenticate |
calist |
Define the directory where CA's certificates are stored. |
debug |
Enable debugging. |
cipher |
Force a specific encryption algorithm. Valid values: |
proxy_name |
Define a Proxy hostname |
proxy_port |
Define a proxy port |
proxy_user |
Define a proxy user |
proxy_pass |
Define a password for proxy authentication |
Note - Proxy information can only be configured in the configuration file and not directly from the command line.
If you imported a certificate to the browser, it will remain in storage until you manually remove it. It is strongly recommended that you remove the certificate from a browser that is not yours.
To remove the imported certificate:
The Certificates window is displayed:
The following sections contain tips on how to resolve issues that you may encounter when using SSL Network Extender.
All user's packets destined directly to the external SSL Network Extender Security Gateway will not be encrypted by the SSL Network Extender.
If there is a need to explicitly connect to the gateway through the SSL tunnel, connect to the internal interface, which is part of the encryption domain.
In order not to display this message to the users, two solutions are proposed:
On the client computer, access the Internet Explorer. Under Tools > Options > Security tab, select Local intranet > Sites. You can now add the SSL Network Extender gateway to the Local intranet zone, where the Client Authentication pop-up will not appear. Click Advanced, and add the gateway external IP or DNS name to the existing list.
On the client computer, access the Internet Explorer. Under Tools > Options > Security tab, select Internet Zone > Custom Level. In the Miscellaneous section, select Enable for the item Don't prompt for client certificate selection when no certificates or only one certificate exists. Click OK. Click Yes on the Confirmation window. Click OK again.
Note - This solution will change the behavior of the Internet Explorer for all Internet sites, so if better granularity is required, refer to the previous solution.
To resolve this, disable the overlapping site in Endpoint Security VPN.
To resolve this, verify that the flag allow_clear_traffic_while_disconnected is True (which is the default value).
The user probably did not match the policy requirements.
This means that the user has passed the scan intended for a group that he does not belong to.

