

SIP over UDP
You can enable Hide NAT changes source port for SIP over UDP IP on the gateways of:
To Hide NAT on the gateway for SIP over UDP:
SIP over TCP
AND
Note - For all internal phones to be registered successfully on the server, the source port of the Register message sent by the phone must be the same as the port in the Contact header of the Register message.
In Cisco IP Phones, this is done by selecting the NAT Enabled option.
For more information, see SIP Security Rules.
If Hide NAT changes source port for SIP over UDP is selected, the SIP packets change.
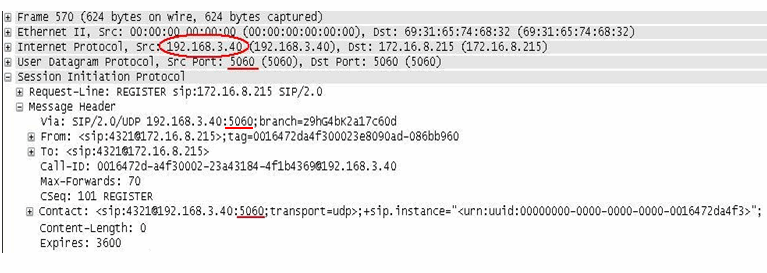
SIP Packet Before NAT
The image of the packet capture below shows a SIP packet from a phone with IP address 192.168.3.40, and source port 5060 (the default SIP port). The phone's extension is 4321.

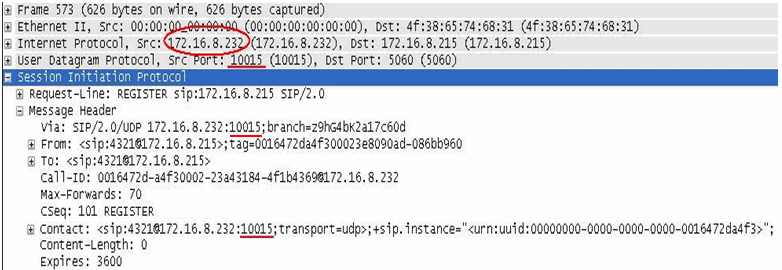
SIP Packet after Hide NAT when option is disabled
The image of the packet capture below shows the SIP packet after Hide NAT, with the Hide NAT changes source port for SIP over UDP option disabled. The IP address is translated to the Hide NAT address of 172.16.8.232, but the source port 5060 is unchanged.
Here, all the internal phones are registered with the same Source IP: port combination. For example: sip:4321@172.16.8.232:5060. A different phone with extension 8765 would register as sip:8765@172.16.8.232:5060
Some SIP servers can register a phone with only one IP address and port combination. As a result, only one of the phones behind that IP address will be registered successfully on the server.
SIP Packet after Hide NAT when option is enabled
The image of the packet capture below shows the SIP packet after Hide NAT, with the Hide NAT changes source port for SIP over UDP option enabled. The IP address is translated to the Hide NAT address of 172.16.8.232, and the source port is also translated to an allocated port of 10015

Here, each internal phone is allocated a different port. Each phone is registered with a different Source IP: port combination. For example: one phone is registered as sip:4321@172.16.8.232:10015 (as shown in the packet capture). A different phone with extension 8765 is registered as sip:8765@172.16.8.232:10016
As a result, each internal phone is registered successfully on the server.
To define Hide NAT rules:
The Network window opens.
Static NAT
Static NAT on the proxy in DMZ can be configured with Manual NAT rules or with Automatic NAT rules. To configure the NAT rules, all internal endpoints for which NAT is defined have to:
AND
If either of these conditions is not met, NAT on the proxy in the DMZ can only be configured with Manual NAT rules.
To define Static NAT for the proxy in the DMZ using Automatic NAT rules:
The Network window opens.
The Network window opens.
To define Static NAT for the proxy in the DMZ using Manual NAT rules:
local.arp To display the proxy ARP table on Unix, run: fw ctl arp
OR
arp To display the proxy ARP table on Windows, run: arp -a
Original |
Translated |
Comment |
||||
|---|---|---|---|---|---|---|
Source |
Destination |
Service |
Source |
Destination |
Service |
|
Proxy_DMZ |
Net_B |
*Any |
Proxy_DMZ_NATed: Static |
= |
= |
Outgoing |
Net_B |
Proxy_DMZ_NATed |
*Any |
= |
Proxy_DMZ: |
= |
Incoming |
Unix gateways
On UNIX-based gateways including SecurePlatform:
$FWDIR/conf/local.arp192.168.6.145 is the static address, and 00:0D:60:83:B3:74 is the address of the external interface.
The Global Properties window opens.
Make sure that the fw ctl arp command shows the new entry in the proxy ARP table.