Basic Site to Site VPN Configuration
Configuring a Meshed Community Between Internally Managed Gateways
To configure an internally managed VPN meshed community:
- Install and configure the Security Gateways as described in the R80.10 Installation & Upgrade Guide.
- In SmartConsole, double click on the Security Gateway object.
- In the page:
- Enter the gateway .
- Enter the and .
- In the tab, Select .
- Click and establish trusted communication with the Gateway.
- In the page, click .
- After the interfaces show in the table, click to open the window.
- In the window, define the general properties of the interface and the topology of the network behind it.
- In the > page, define the VPN domain one of:
The network Security Gateway objects are now configured, and need to be added to a VPN community.
Note - There is nothing to configure on the page, regarding certificates, because internally managed Security Gateways automatically receive a certificate from the internal CA.
- Open the (Ctrl+E), and select .
- Click > > .
The window opens.
- In the page, select if you need all traffic between the Security Gateways to be encrypted. If not, then create appropriate rules in the Security Policy Rule Base that allows encrypted traffic between community members (step 7).
- On the page, add the Security Gateways created in step 1.
A VPN tunnel is now configured.
For information on other options, such as , , and , see: IPsec & IKE
- If you did not select in the page of the Community, build an access control policy, for example:
Source
|
Destination
|
VPN
|
Service
|
Action
|
Any
|
Any
|
Meshed community
|
Any
|
Accept
|
Where "Meshed community" is the VPN community you have just defined.
Configuring a Star Community Between Internally Managed Gateways
A star VPN community is configured in much the same way as a meshed community, the difference being the options on the window:
- On the page - Select .
- On the Gateways page:
- - Add the central Security Gateways.
- - Select if you want the central Security Gateways to communicate.
- - Add the satellite Security Gateways.
Configuring a VPN with External Security Gateways Using Certificates
Configuring a VPN with external Security Gateways (those managed by a different Security Management Server) is more involved than configuring a VPN with internal Security Gateways (managed by the same Security Management Server). This is because:
- Configuration is performed separately in two distinct systems.
- All details must be agreed and coordinated between the administrators. Details such as the IP address or the VPN domain topology cannot be detected automatically but have to be supplied manually by the administrator of the peer VPN Security Gateways.
- The gateways are likely to be using different Certificate Authorities (CAs). Even if the peer VPN Security Gateways use the Internal CA (ICA), it is still a different CA.
There are various scenarios when dealing with externally managed Security Gateways. The following description tries to address typical cases and assumes that the peers work with certificates. If this is not the case refer to Configuring a VPN with External Security Gateways Using a Pre-Shared Secret.
Note - Configuring a VPN using PKI and certificates is more secure than using pre-shared secrets.
To configure VPN using certificates, with the external Security Gateways as satellites in a star VPN Community:
- Obtain the certificate of the CA that issued the certificate for the peer VPN Security Gateways, from the peer administrator. If the peer Security Gateway is using the ICA, you can obtain the CA certificate using a web browser from:
http://<IP address of peer Security Gateway or Management Server>:18264
- In SmartConsole, define the CA object for the CA that issued the certificate for the peer.
- Define the CA that will issue certificates for your side if the Certificate issued by ICA is not appropriate for the required VPN tunnel.
You may have to export the CA certificate and supply it to the peer administrator.
- Define the Network Object(s) of the Security Gateway(s) that are internally managed. In particular, be sure to do the following:
- In the page of the Security Gateway object, select .
- In the page, define the .
- In the page, define the VPN Domain. If it does not contain all the IP addresses behind the Security Gateway, define the VPN domain manually by defining a group or network of machines and setting them as the VPN Domain.
- If the ICA certificate is not appropriate for this VPN tunnel, then in the page, generate a certificate from the relevant CA.
- Define the Network Object(s) of the externally managed Security Gateway(s).
- If it is not a Check Point Security Gateway, define an Interoperable Device: In Object Explorer, click .
- If it is a Check Point Security Gateway, define an Externally Managed VPN Gateway: In Object Explorer, click .
- Set the various attributes of the peer Security Gateway. In particular, be sure to do the following:
- For an Externally Managed Check Point Security Gateway: In the page of the Security Gateway object, select .
- Define the .
- Define the using the VPN Domain information obtained from the peer administrator. If the VPN Domain does not contain all the IP addresses behind the Security Gateway, define the VPN domain manually by defining a group or network of machines and setting them as the VPN Domain.
- For an Externally Managed Check Point Security Gateway: In the page, define the . Specify that the peer must present a certificate signed by its own CA. If feasible, enforce details that appear in the certificate as well.
- Define the Community.
These details assume that a Star Community is used, but you can also use a Meshed Community. If you are working with a Meshed community, ignore the difference between the Central Security Gateways and the Satellite Security Gateways.
- Agree with the peer administrator about the various IKE properties and set them in the page and the page of the community object.
- Define the Central Security Gateways. These are usually the internally managed ones. If no other Community is defined for them, decide whether or not to mesh the central Security Gateways. If they are already in a Community, do not mesh the central Security Gateways.
- Define the Satellite Security Gateways. These are usually the external ones.
- Click and publish the changes.
- Define the relevant access rules in the Security Policy.
- Add the Community in the column, the services in the column, the desired , and the appropriate option.
- Install the Access Control Policy.
Configuring a VPN with External Security Gateways Using Pre-Shared Secret
Configuring VPN with external Security Gateways (those managed by a different Security Management Server is more involved than configuring VPN with internal Security Gateways (managed by the same Security Management Server) because:
- Configuration is done separately in two distinct systems.
- All details must be agreed and coordinated between the administrators. Details such as the IP address or the VPN domain topology cannot be detected automatically but have to be supplied manually by the administrator of the peer VPN Security Gateways.
There are various scenarios when dealing with externally managed Security Gateways. The following description tries to address typical cases but assumes that the peers work with pre-shared secrets. If this is not the case refer to Configuring a VPN with External Security Gateways Using PKI.
Note - Configuring a VPN using PKI and certificates is considered more secure than using pre-shared secrets.
Firewall Control Connections in VPN Communities
Check Point Nodes communicate with other Check Point Nodes by means of control connections. For example, a control connection is used when the Security Policy is installed from the Security Management Server to a Security Gateway. Also, logs are sent from Security Gateways to the Security Management Server across control connections. Control connections use Secure Internal Communication (SIC).
Control connections are allowed using Implied Rules in the Access Control Rule Base. Implied Rules are added to or removed from the Access Control Rule Base, by selecting or clearing options in the page of the SmartConsole .
Some administrators prefer not to rely on implied rules, and instead prefer to define explicit rules in the Access Control Rule Base.
Why Turning off Firewall Implied Rules Blocks Control Connections
If you turn off implicit rules, you may not be able to install a Policy on a remote Security Gateway. Even if you define explicit rules in place of the implied rules, you may still not be able to install the policy:
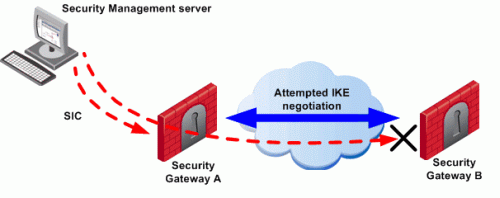
The administrator wishes to configure a VPN between Security Gateways A and B by configuring SmartConsole. To do this, the administrator must install a Policy from the Security Management Server to the Security Gateways.
- The Security Management Server successfully installs the Policy on Security Gateway A. As far as gateway A is concerned, Security Gateways A and B now belong to the same VPN Community. However, B does not yet have this Policy.
- The Security Management Server tries to open a connection to Security Gateway B in order to install the Policy.
- Security Gateway A allows the connection because of the explicit rules allowing the control connections, and starts IKE negotiation with Security Gateway B to build a VPN tunnel for the control connection.
- Security Gateway B does not know how to negotiate with A because it does not yet have the Policy. Therefore Policy installation on Security Gateway B fails.
The solution for this is to make sure that control connections do not have to pass through a VPN tunnel.
Allowing Firewall Control Connections Inside a VPN
If you turn off implied rules, you must make sure that control connections are not changed by the Security Gateways. To do this, add the services that are used for control connections to the Excluded Services page of the Community object. See sk42815 for details.
Note - Although control connections between the Security Management Server and the Security Gateway are not encrypted by the community, they are nevertheless encrypted and authenticated using Secure Internal Communication (SIC).
Discovering Which Services are Used for Control Connections
- In SmartConsole, select the Access Control Policy.
- From the toolbar above the policy, select > .
The window opens.
- In the Global Properties page, verify that control connections are accepted.
- Examine the Access Control Rule Base to see what Implied Rules are visible. Note the services used in the Implied Rules.
Simplified and Traditional Modes
By default, VPN configuration works with Simplified mode. Simplified mode uses VPN Communities for Site to Site VPN configuration, as described throughout this guide.
Traditional mode is a different, legacy way to configure Site to Site VPN where one of the actions available in the Security Policy Rule Base is . When encrypt is selected, all traffic between the Security Gateways is encrypted. For details about Traditional Mode, see the R77 versions VPN Administration Guide.
In a policy package, all layers must use the same VPN mode.


