


|
|
|
In This Section: |
The Identity Awareness Software Blade lets you configure the Security Gateways to enforce access control for individual users and groups. You can use Identity Sources to get information about users and groups to add flexibility and security for the Rule Base. Identity Awareness lets you create rules in the Access Control and Threat Prevention Rule Bases.
After the Security Gateway acquires the identity of a user, user-based rules can be enforced on the network traffic. Identity Awareness can use these sources to identify users:
The Identity Collector can connect with more than one Identity Source at a time. The Identity Sources are organized in Query Pools. The Identity Collector sends the Identity Server information from the Identity Sources selected in the Query Pool assigned to the gateway.
If there is more than one Security Gateway enabled with Identity Awareness that share identities with each other and have Office Mode configured, each gateway must be configured with different office mode ranges.
Browser-Based Authentication uses the Internet browser to identify users. You can use these Browser-Based Authentication solutions:
Captive Portal uses a web interface to authenticate users before they can access network resources. When users try to access a protected resource, they must log in to a web page to continue.
When Transparent Kerberos Authentication is enabled, the Transparent Authentication page tries to authenticate users before the Captive Portal web page opens. The Transparent Authentication page communicates with the AD to use the Kerberos protocol to authenticate the users. If the users are successfully authenticated, then they can access the network resources. If they are not authenticated, then they are redirected to the Captive Portal.
The Security Gateway registers to receive security event logs from the AD domain controllers when the security policy is installed. When a user authenticates with AD credentials, these event logs are generated and are sent to the Security Gateway. The gateway identifies the user based on the AD security event log, and enforces the appropriate Identity Awareness rule to the traffic that this user sends.
There is an Identity Awareness configuration wizard in SmartConsole that helps you enable and configure the Identity Awareness Software Blade. You can use the configuration wizard on these identity sources:
Use the Identity Awareness Configuration wizard to configure how the Security Gateway gets information about users and computers. The wizard automatically creates an Account Unit.
This is an example of how to configure the AD query and browser-based methods for Identity Awareness.
To use the Identity Awareness configuration wizard:
The gateway properties window opens.
The Identity Awareness Configuration wizard opens.
The Integration With Active Directory window opens.
Make sure that the AD account has domain administrator privileges. Alternatively, you can let non-administrators make AD connections.
Note - you can also select Create new domain and configure a new AD (Active Directory) Account Unit object.
The message about user credentials shows.
The Browser-Based Authentication Settings window opens.
The Identity Awareness is Now Active window opens.
Identity Awareness for Mobile Access and IPsec VPN clients works in Office Mode for Security Gateways. The Remote Access option is included as an identity source when you enable Identity Awareness.
To enable or disable Remote Access for Identity Awareness:
The gateway properties window opens.
After you enable Identity Awareness, you create Access Role objects.
You can use Access Role objects as source and/or destination parameter in a rule. Access Role objects can include one or more of these objects:
To create an Access Role object:
The New Access Role window opens.
For computers that use Full Identity Agents, you can select (optional) Enforce IP Spoofing protection.
The Identity Awareness Software Blade lets you configure your Access Control Policy to allow connections for users regardless of what computer they are using. Use Access Role objects in the Source column of a rule, and Identity Awareness Software Blade will identify users based on those objects. You can also configure the Accept action to redirect traffic from an unidentified user to a Captive Portal.
Sample gateway workflow with Identity Awareness
The gateway inspects traffic that starts from a source that matches the Access Role object and tries to identify the user.
You can add rules with Access Role objects as the Source or Destination to the Access Control policy for Security Gateways that have the Identity Awareness Software Blade enabled.
|
Note - Rules that use Access Role objects cannot be enforced on Security Gateways that do not have Identity Awareness enabled. |
To add an Access Role object to a rule:
You can configure rules that use Access Role objects and the Accept action with the Action Settings option, to redirect HTTP traffic to a Captive Portal. The rule allows traffic when the users that match the source Access Role object are identified. If the Enable Identity Captive Portal option is enabled, the gateway identifies users this way:
Rules can redirect HTTP traffic according to these parameters:
To enable Captive Portal for a rule:
The Action Settings window opens.
The Action column shows accept (display captive portal).
This table shows sample Identity Awareness rules for a Firewall Rule Base. (The VPN, Track and Time columns are not shown. Track is set to Log, and VPN and Time are set to Any.)
No. |
Name |
Source |
Destination |
Service |
Action |
|---|---|---|---|---|---|
1 |
CEO allow |
John_Smith_ |
Any |
Any |
Accept |
2 |
HR server allow |
HR_Partners |
HR_Server |
Any |
Accept |
3 |
Drop non-identified HR traffic |
Any |
HR_Server |
Any |
Drop |
4 |
Internet access |
Guests |
Internet_proxy |
HTTP and HTTPS proxy |
Accept |
User Directory lets you integrate LDAP and other external user management servers with Check Point products and security solutions. These are some of the Software Blades that work with User Directory:
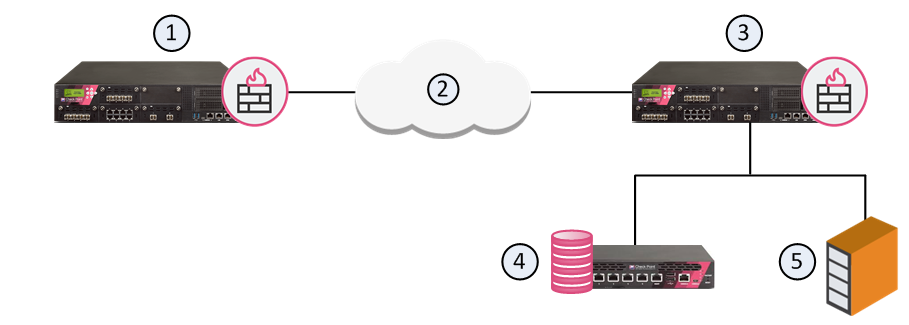
User Directory integrates the Security Management Server and an LDAP server and lets the Security Gateways use the LDAP information.
Item |
Description |
|---|---|
1 |
Security Gateway - Retrieves LDAP user information and CRLs |
2 |
Internet |
3 |
Security Gateway - Queries LDAP user information, retrieves CRLs, and does bind operations for authentication |
4 |
Security Management Server - Uses User Directory to manage user information |
5 |
LDAP server - Server that holds one or more Account Units |
An Account Unit represents branches of user information on one or more LDAP servers. The Account Unit is the interface between the LDAP servers and the Security Management Server and Security Gateways.
You can have a number of Account Units representing one or more LDAP servers. Users are divided among the branches of one Account Unit, or between different Account Units.
Note - When you enable the Identity Awareness and Mobile Access Software Blades, SmartConsole opens a First Time Configuration Wizard. The Active Directory Integration window of this wizard lets you create a new AD Account Unit. After you complete the wizard, SmartConsole creates the AD object and Account Unit.
Use the LDAP Account Unit Properties window in SmartConsole to edit an existing Account Unit or to create a new one manually.
To edit an existing LDAP Account Unit:
The LDAP Account Unit Properties window opens.
To create a new LDAP Account Unit:
The LDAP Account Unit Properties window opens.
These are the configuration fields in the General tab:
Note - LDAP SSO (Single Sign On) is only supported for Account Unit objects that use User Management.
Note - This option is only available if the Profile is set to Microsoft_AD.
You can add, edit, or delete LDAP server objects.
To configure an LDAP server for the Account Unit:
The LDAP Server Properties window opens.
If necessary, create a new SmartConsole server object:
To remove an LDAP server from the Account Unit:
If all the configured servers use the same login credentials, you can modify those simultaneously.
To configure the login credentials for all the servers simultaneously:
The Update Account to All Servers window opens.
Configure the LDAP server for the Security Management Server to query and the branches to fetch.
Note - Make sure there is LDAP connectivity between the Security Management Server and the LDAP Server that holds the management directory.
To configure LDAP query parameters:
The Security Management Server queries and shows the LDAP branches.
These are the configuration fields in the Authentication tab:
Configure SmartConsole to enable the Security Management Server to manage users in the Account Unit. You cannot use the SmartConsole User Database when the User Directory LDAP server is enabled.
To enable User Directory on the Security Management Server:
The Global Properties window opens.
The object properties window opens.
User Directory lets you use SmartDashboard to manage information about users and OUs (Organizational Units) that are stored on the LDAP server.
To manage LDAP information from SmartDashboard:
SmartDashboard opens.
The LDAP domain is shown.
The Security Management Server queries the LDAP server and SmartDashboard shows the LDAP objects.
The Objects List pane shows the user information.
The LDAP User Properties window opens.
To learn more about adding users to the Policy, see these guides:

