


|
|
|
In This Section: |
This chapter gives a brief overview of the Gaia Portal interface and procedures for using the interface elements.
https://<Gaia IP Address>.You can easily change these modes.
The Gaia Portal interface:
Example:
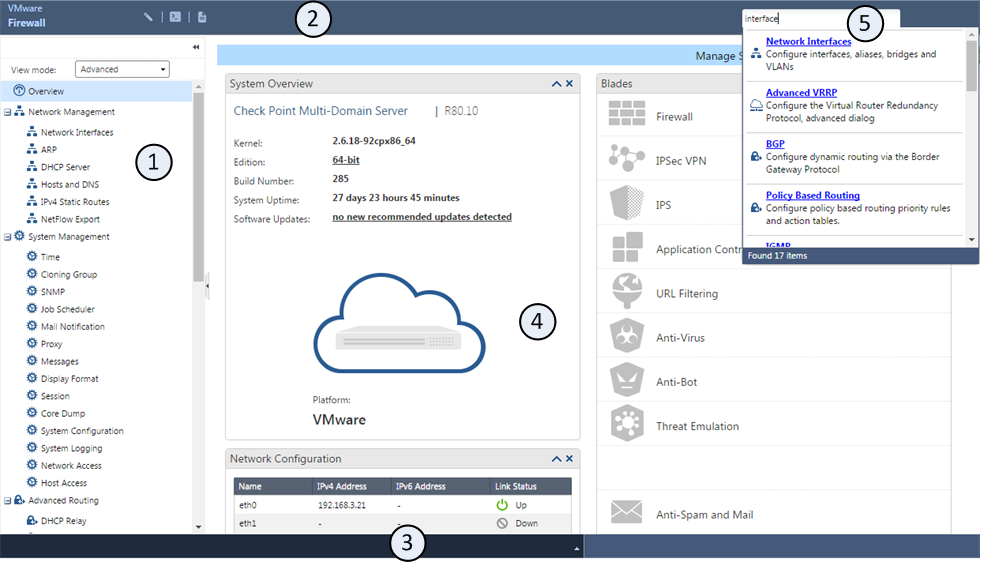
Item |
Description |
|---|---|
1 |
Navigation tree |
2 |
Toolbar |
3 |
Status bar |
4 |
Overview page with widgets that show system information |
5 |
Search tool |
Note - The browser Back button is not supported. Do not use it.
To log in to the Gaia Portal:
Step |
Description |
|---|---|
1 |
Enter this URL in your browser:
|
2 |
Enter your user name and password. |
To log out from the Gaia Portal:
Make sure that you always log out from the Gaia Portal (in the top right corner) before you close the web browser. This is because the configuration lock stays in effect even when you close the web browser or terminal window. The lock remains in effect until a different user removes the lock, or the defined inactivity time-out period expires (default is 10 minutes).
Only one user can have Read/Write access to Gaia configuration settings at a time. All other users can log in with Read-Only access to see configuration settings, as specified by their assigned roles.
When you log in and no other user has Read/Write access, you get an exclusive configuration lock with Read/Write access. If a different user already has the configuration lock, you have the option to override their lock. If you:
To override a configuration lock in the Gaia Portal:
Note - Only users with Read/Write access privileges can override a configuration lock.
The Gaia Portal contains many elements that make the task of configuring features and system settings easier.
You can use these toolbar icons to do these tasks:
Item |
Description |
|---|---|
|
Read/Write mode enabled. |
|
Configuration locked (Read Only mode). |
|
Opens the Console accessory for CLI commands. Available in the Read/Write mode only. |
|
Opens the Scratch Pad accessory for writing notes or for quick copy/paste operations. Available in the Read/Write mode only. |
You can use the search bar to find an applicable configuration page by entering a keyword. The keyword can be a feature, a configuration parameter or a word that is related to a configuration page.
The search shows a list of pages related to the entered keyword. To go to a page, click a link in the list.
The navigation three lets you select a page. Pages are arranged in logical feature groups. You can show the navigation tree in one of these view modes:
Mode |
Description |
|---|---|
Basic |
Shows some standard pages. |
Advanced |
Shows all pages. This is the default mode. |
To change the navigation tree mode, click View Mode and select a mode from the list.
To hide the navigation tree, click the Hide![]() icon.
icon.
The status bar, located at the bottom of the window, shows the result of the last configuration operation. To see a history of the configuration operations during the current session, click the Expand ![]() icon.
icon.
The Configuration tab lets you see and configure parameters for Gaia features and settings groups. The parameters are organized into functional settings groups in the navigation tree. You must have Read/Write permissions for a settings group to configure its parameters.
The Monitoring tab lets you see status and detailed operational statistics, in real time, for some routing and high availability settings groups. This information is useful for monitoring dynamic routing and VRRP cluster performance.
To see the Monitoring tab, select a routing or high availability feature settings group and then click the Monitoring tab. For some settings groups, you can select different types of information from a menu.

