

What can I do here?
Use this window to edit or create a security zone.
|
Getting Here - Object Explorer > New > Network Object > Security Zone |
Security Zones let you to create a strong Access Control Policy that controls the traffic between parts of the network.
A Security Zone object represents a part of the network (for example, the internal network or the external network). You assign a network interface of a Security Gateway to a Security Zone. You can then use the Security Zone objects in the Source and Destination columns of the Rule Base.
Use Security Zones to:
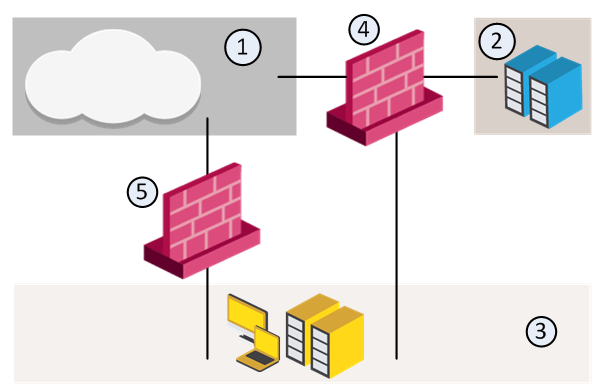
For example, in the diagram, we have three Security Zones for a typical network: ExternalZone (1), DMZZone (2) and InternalZone (3).

A Security Gateway interface can belong to only one Security Zone. Interfaces to different networks can be in the same Security Zone.
Workflow
Source |
Destination |
VPN |
Service |
Action |
|
|---|---|---|---|---|---|
InternalZone |
ExternalZone |
Any Traffic |
Any |
Accept |
|
Before you can use Security Zones in the Rule Base, you must assign Gateway interfaces to Security Zones.
To create a Security Zone:
The Security Zone window opens.
To assign an interface to a Security Zone
The Gateway Properties window opens.
The Interface window opens. The Topology area of the General pane shows the Security Zone to which the interface is already bound. By default, the Security Zone is calculated according to where the interface Leads To.
The Topology Settings window opens.
Or click New to create a new one.
These are the predefined security zones, and their intended purposes:
A DMZ lets external users and applications access specific internal servers, but prevents the external users accessing secure company networks. Add rules to the firewall Rule Base that allow traffic to the company DMZ. For example, a rule that allows HTTP and HTTPs traffic to your web server in the DMZ.