

The NAT Rule Base has two sections that specify how the IP addresses are translated:
Each section in the NAT Rule Base is divided into cells that define the Source, Destination, and Service for the traffic.
There are two types of NAT rules for network objects:
When you create manual NAT rules, it can be necessary to create the translated NAT objects for the rule.
You can enable automatic NAT rules for these SmartConsole objects:
SmartConsole creates two automatic rules for Static NAT, to translate the source and the destination of the packets.
For Hide NAT, one rule is created to translate the source of the packets.
For network and address range objects, SmartConsole creates a different rule to NOT translate intranet traffic. IP addresses for computers on the same object are not translated.
This table summarizes the NAT automatic rules:
Type of Traffic |
Static NAT |
Hide NAT |
|---|---|---|
Internal to external |
Rule translates source IP address |
Rule translates source IP address |
External to internal |
Rule translates destination IP address |
N/A (External connections are not allowed) |
Intranet (for network and address range objects) |
Rule does not translate IP address |
Rule does not translate IP address |
The Firewall enforces the NAT Rule Base in a sequential manner. Automatic and manual rules are enforced differently. Automatic rules can use bidirectional NAT to let two rules be enforced for a connection.
SmartConsole organizes the automatic NAT rules in this order:
Here are some sample automatic rules.
The Firewall does not apply rules 2 and 3 to traffic that matches rule 1.
The Firewall does not apply rule 2 to traffic that matches rule 1.
You can enable and configure NAT for SmartConsole objects.
Configuring Static NAT
When you enable Static NAT, each object is translated to a different IP address. SmartConsole can automatically create the NAT rules, or you can create them manually.
Configuring Hide NAT
Hide NAT uses different port numbers to identify the internal IP addresses. When you enable Hide NAT mode, the Firewall can translates the IP address to:
Note - You cannot use Hide NAT for these configurations:
SmartConsole can automatically create and configure the NAT rules for a network. Enable automatic NAT for every object, for which you are translating the IP address. Then configure the Access Control Rule Base to allow traffic to the applicable objects.
To enable automatic NAT:
The General Properties window of the gateway opens.
After you enable and configure NAT on all applicable gateways, install the policy.
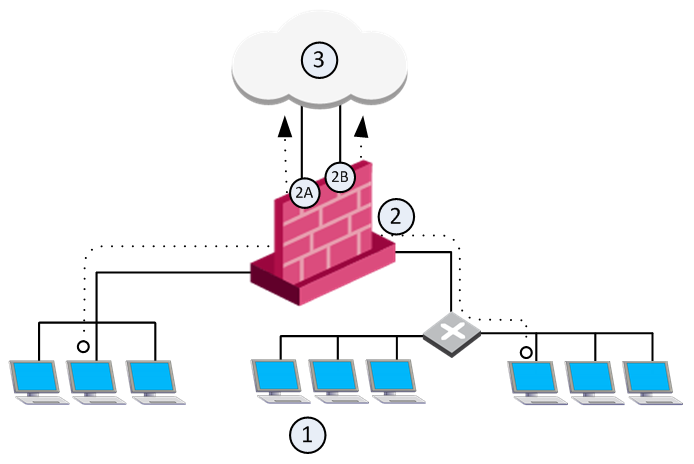
For large and complex networks, it can be impractical to configure the Hide NAT settings for all the internal IP addresses. An easy alternative is to enable a Firewall to automatically Hide NAT for all traffic with external networks. The Firewall translates all traffic that goes through an external interface to the valid IP address of that interface.
In this sample configuration, computers in internal networks open connections to external servers on the Internet. The source IP addresses of internal clients are translated to the IP address of an external interface.

Item |
Description |
|---|---|
1 |
Internal networks |
2 |
Security Gateway - Firewall is configured with automatic Hide NAT. |
2A and 2B |
Two external interfaces 192.0.2.1 and 192.0.2.100. |
1 -->3 |
External computers and servers on the Internet |
Source IP addresses are translated to the applicable external interface IP address: 192.0.2.1 or 192.0.2.100.
Note - If a connection matches a regular NAT rule and a NAT-for-internal-networks rule, the regular NAT rule takes precedence.
The General Properties window of the gateway opens.
For some deployments, it is necessary to manually define the NAT rules. Create SmartConsole objects that use the valid (NATed) IP addresses. Create NAT rules to translate the original IP addresses of the objects to valid IP addresses. Then configure the Firewall Rule Base to allow traffic to the applicable translated objects with these valid IP addresses.
Note - For manual NAT rules, it is necessary to configure Proxy ARP entries to associate the translated IP address.
These are some situations that must use manual NAT rules:
This procedure explains how to configure manual Static NAT for a web server. You can also configure manual Hide NAT for SmartConsole objects.
To enable manual Static NAT, follow this workflow:
To create a clone network object:
The General Properties window of the new object opens.
To add a NAT rule to the Rule Base:
To add Access Control rules:
These objects are the cloned objects that are called <name>_valid_address.
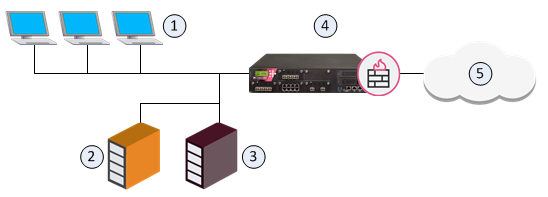
The goal for this sample deployment is to configure:

Item |
Description |
|---|---|
1 |
Internal computers (Alaska_LAN 2001:db8::/64) |
2 |
Web server (Alaska.Web 2001:db8:0:10::5 translated to 2001:db8:0:a::5) |
3 |
Mail server (Alaska.Mail 2001:db8:0:10::6 translated to 2001:db8:0:a::6) |
4 |
Security Gateway (External interface 2001:db8:0:a::1) |
5 |
External computers and servers in the Internet |
To configure NAT for the network:
The goal for this sample configuration is to let external computers access a web and mail server in a DMZ network from one IP address. Configure Hide NAT for the DMZ network object and create manual NAT rules for the servers.

Item |
Description |
|---|---|
1 |
External computers and servers in the Internet |
2 |
Security Gateway (Alaska_GW external interface 2001:db8:0:c::1) |
3 |
DMZ network (Alaska_DMZ 2001:db8:a::/128) |
4 |
Web server (Alaska_DMZ_Web 2001:db8:a::35:5 translated to 2001:db8:0:c::1) |
5 |
Mail server (Alaska_DMZ_Mail 2001:db8:a::35:6 translated to 2001:db8:0:c::1) |
To configure NAT for the DMZ servers:
NAT Rule Base for Manual Rules for Port Translation Sample Deployment
