Managing Security Gateways
Security Gateway Settings
Some management configurations are common to all Security Gateways, Small Office Appliances, and UTM-1 Edge gateways that reference a Provisioning Profile, whether they are SmartLSM Security Gateways, CO gateways, or Provisioning-only gateways.
Before you begin, make sure that your administrator user name has Read/Write permissions for Managing Device Settings.
Scheduling Backups of Security Gateways
You can set up a schedule for backups of the individual Security Gateway, or view how it is managed with the assigned Provisioning Profile.
You can select to use SmartProvisioning to manage the backup settings, or configure on the local appliance or server.
To manage the backup schedule on the appliance or server:
- From the pane, double-click the Security Gateway.
The window opens and shows the tab.
- Click the tab.
- Click .
- Click .
To enable SmartProvisioning to manage the backup schedule:
- From the pane, double-click the Security Gateway.
The window opens and shows the tab.
- Click the tab.
- Click .
The backup schedule settings are shown.
- Click .
- To see how the backup schedule is configured by the Provisioning Profile, select .
The Provisioning Profile settings are shown.
- Define the schedule settings:
- : Set the hour and minute when the backup should start.
- : Select either and provide a date, or select the day(s) of the week, to set how many times a week or month, and on which days, the backup should occur.
- If you want the backup to include product log files, select the .
Note: If disk space is a problem for the appliance or server, make sure that this option is cleared.
- If you want the backup file to be stored on a server other than the selected gateway, click .
The window opens.
- Configure the IP address or hostname for the server where the backup file is stored.
- Click .
The window closes.
- Click .
Configuring DNS Servers
You can configure the DNS servers of the individual Security Gateway, or view how they are managed with the assigned Provisioning Profile.
You can select to use SmartProvisioning to manage the DNS settings, or configure on the local appliance or server.
To manage the DNS servers on the appliance or server:
- From the pane, double-click the Security Gateway.
The window opens and shows the tab.
- Click the tab.
- Click .
- Click .
To configure DNS servers with SmartProvisioning:
- From the pane, double-click the Security Gateway.
The window opens and shows the tab.
- Click the tab.
- Click .
- Enter the IP addresses of the , , and DNS servers.
Configuring Hosts
You can set up the host list of the individual Security Gateway, or view how it is managed centrally with the assigned Provisioning Profile.
You can use SmartProvisioning to manage the host list, or configure on the local appliance or server.
To manage the host list on the appliance or server:
- From the pane, double-click the Security Gateway.
The window opens and shows the tab.
- Click the tab.
- Click .
- Click .
To configure the host list with SmartProvisioning:
- From the pane, double-click the Security Gateway.
The window opens and shows the tab.
- Click the tab.
- Click .
- Click .
- Provide the Host name and IP address.
- Click OK.
Configuring Domain
You can set up the domain of the individual Security Gateway, or view how it is managed centrally with the assigned Provisioning Profile.
You can select to use SmartProvisioning to manage the domain settings, or configure on the local appliance or server.
To manage the domain settings on the appliance or server:
- From the pane, double-click the Security Gateway.
The window opens and shows the tab.
- Click the tab.
- Click .
- Click .
To configure domain settings with SmartProvisioning:
- From the pane, double-click the Security Gateway.
The window opens and shows the tab.
- Click the tab.
- Click .
- Enter the .
- Click .
Configuring Host Name
You can see or change the host name of the individual Security Gateway in SmartProvisioning. You cannot use a Provisioning Profile to change the host name.
You can select to use SmartProvisioning to manage the host name settings, or configure on the local appliance or server.
To manage the host name on the appliance or server:
- From the pane, double-click the Security Gateway.
The window opens and shows the tab.
- Click the tab.
- Click .
- Click .
To configure host name with SmartProvisioning:
- From the pane, double-click the Security Gateway.
The window opens and shows the tab.
- Click the tab.
- Click .
- Enter the of the gateway.
- Click .
Configuring Routing for Security Gateways
You can manage the routing settings of individual Security Gateways through SmartProvisioning. You must configure the interfaces before the routes, because there are different types of routing configurations for different interfaces, depending on device. You cannot use a Provisioning Profile to configure routing settings.
You can select to use SmartProvisioning to manage the routing settings, or configure on the local appliance or server.
To manage the routing settings on the appliance or server:
- From the pane, double-click the Security Gateway.
The window opens and shows the tab.
- Click the tab.
- Click .
- Click .
To configure the routing settings with SmartProvisioning:
- From the pane, double-click the Security Gateway.
The window opens and shows the tab.
- Click the tab.
- Click .
- Click .
A menu opens, displaying these options:
- Configure internal network routes.
- Configure access to a specified host.
- Configure the default route to access external destinations.
- Select a route type.
A different window opens for each type.
- Enter the data and click .
There are different windows and options for different route types for SecurePlatform Security Gateways. If the gateway is an IP appliance, the windows offer other options.
The IP Appliance alternative to Metric, is Next Hop Type:
- Normal: Allow traffic to the gateway.
- Reject: Block traffic where the gateway is the destination, and acknowledge.
- Black Hole: Block traffic without acknowledging.
Configuring Net Route
- Destination IP Address: Destination IP address for this route (for example, the IP address of the CO gateway or the Security Management Server/Domain Management Server).
- Destination Mask: Net mask of the destination network.
- Interface: Select a pre-configured interface for this route.
- Gateway: IP address of the gateway providing access to this route.
- Metric: Distance in hops to the destination. (This value should be as accurate as possible: too low a value may cause lost communications with looping; too high a value may cause security issues.)
Configuring Host Route
- Destination IP Address: IP address of the destination host.
- Interface: Select a pre-configured interface for this route.
- Gateway: IP address of the gateway providing access to this host.
- Metric: Distance in hops to the destination. If the host is on your local site, this should be a very low number; if the host is not behind routers, the metric should be zero.
Configuring Default Route
- Gateway: IP address of the gateway providing access to the default external route.
- Metric: Distance in hops to the gateway. (This value should be as accurate as possible: too low a value may cause lost communications with looping; too high a value may cause security issues.)
Small Office Appliance Settings
For more about the Small Office Appliance settings, see the Check Point 1100 Appliance Centrally Managed Administration Guide and Security Gateway 80 Administration Guide.
Configuring DNS
Configure the DNS server in the tab.
To configure DNS:
- From the window, double-click the Security Gateway 80.
The Security Gateway window opens.
- Select the tab.
- Select .
The DNS settings open.
- To manually configure the IP addresses:
- Select Set DNS server configuration.
- Enter the IP addresses for each DNS server that is being used.
- To use the DNS server of the ISP provider, select .
- To use the Security Gateway 80 appliance as your default DNS proxy, select .
- Click .
Configuring Interfaces
Configure the Security Gateway 80 interfaces in the tab in the Security Gateway window.
To configure the interfaces:
- From the window, double-click the Security Gateway 80.
The window opens.
- Select the tab.
- Select .
The interface settings open.
- Select the interface and click .
The window opens.
- From the IP Assignment section, configure the IP address of the interface:
- Select .
- Enter the IP address and subnet mask for the interface.
- In , select , , , or .
Security zone is a type of zone, created by a bridge to easily create segments, while maintaining IP addresses and router configurations. Security zones let you choose if to enable or not the firewall between segments.
- To configure the DHCP settings for the interface:
- In the DHCP section, select .
- In , enter the range of IP addresses that can be assigned to the DHCP clients.
- In , enter the range of IP addresses that are not assigned to the DHCP clients.
- To configure an IP Relay agent, select .
- Enter the IP address for the IP Relay agent.
- To configure the advanced parameters for the interface:
- To assign a MAC address to the interface, select .
- Enter the new MAC address value.
- From , select the bandwidth for the interface.
- Click .
The window closes.
- To configure the MTU (Maximum Transmission Unit) for all the interfaces that are not part of the LAN switch:
- In the section, enter the new MTU value.
- To enable the configured connection, select the interface and click .
Adding a VLAN
You can add a new VLAN to a configured interface.
To create a VLAN (according to the IEEE 802.1q Standard) on one of the interfaces:
- From the window, double-click the Security Gateway 80.
The Security Gateway window opens.
- Select the tab.
- Click .
The Add VLAN window opens.
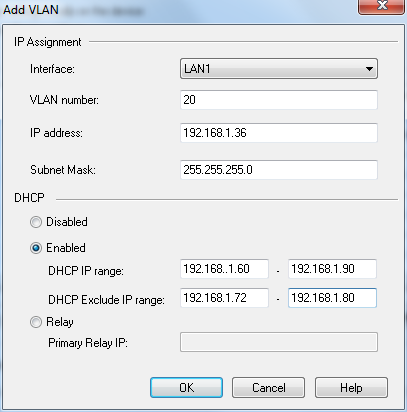
- From , select the interface to which the new VLAN is added.
- Enter these parameters from the new VLAN:
- To configure the DHCP settings for the new VLAN:
- From the DHCP section, select .
- In , enter the range of IP addresses that can be assigned to the DHCP clients.
- In , enter the range of IP addresses that are not assigned to the DHCP clients.
- To configure an IP Relay agent for the new VLAN, select .
- Enter the IP address for the IP relay.
- Click .
The new VLAN is added to the interface.
Configuring a LAN Switch
Configure the Security Gateway 80 as a LAN switch in the tab in the Security Gateway window.
To configure LAN switch parameters:
- From the window, double-click the Security Gateway 80.
The Security Gateway window opens.
- Select the tab.
- From the Switch section, click .
The Edit Switch window opens.
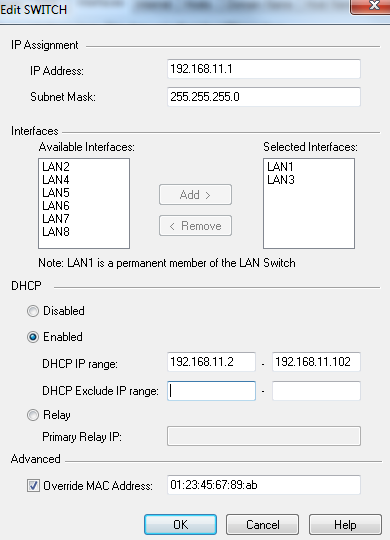
- In the IP Assignment section, enter and of the LAN switch.
- To add an interface to the LAN switch:
- In the section, select an interface from the list.
- Click .
- To configure the DHCP settings for the LAN switch:
- From the DHCP section, select .
- In , enter the range of IP addresses that can be assigned to the DHCP clients.
- In , enter the range of IP addresses that are not assigned to the DHCP clients.
- To configure an IP Relay agent for the new VLAN, select .
- Enter the IP address for the IP Relay agent.
- To assign a MAC address to the interface, in the Advanced section select and enter the MAC address.
- Click .
The Edit Switch window closes and the switch is configured and activated.
- The Switch section allows you to manage the LAN switch.
- To disable the interfaces in the LAN switch, clear .
- To deactivate the LAN switch, click .

|
Note - When the LAN switch is deactivated, the settings of all interfaces in the LAN switch are erased.
|
- Click .
Configuring Internet Connection Types
You must configure a primary Internet connection, and you can configure a secondary one. When High Availability is activated, if there is a failover on the primary Internet connection, then the Security Gateway 80 starts using the secondary Internet connection.
These are the Internet connections:
- Static IP - A fixed (non-dynamic) IP address.
- DHCP - Dynamic Host Configuration Protocol (DHCP) automatically issues IP addresses within a specified range to devices on a network.
- PPPoE - A network protocol for encapsulating Point-to-Point Protocol (PPP) frames inside Ethernet frames. It is used mainly with DSL services where individual users connect to the DSL modem over Ethernet and in plain Metro Ethernet networks.
- PPTP - The Point-to-Point Tunneling Protocol (PPTP) is a method for implementing virtual private networks. PPTP uses a control channel over TCP and a GRE tunnel operating to encapsulate PPP packets.
- L2TP - Layer 2 Tunneling Protocol (L2TP) is a tunneling protocol used to support virtual private networks (VPNs). It does not provide any encryption or confidentiality by itself; it relies on an encryption protocol that it passes within the tunnel to provide privacy.
When you have enabled both Internet connections, you can configure High Availability to revert back to the primary Internet connection.
To configure High Availability:
- Select .
- Click .
Configuring a Static Internet Connection
You can configure an Internet connection with a static IP address.
To configure a static IP Internet connection:
- From the window, double-click the Security Gateway 80 network object.
The Security Gateway window opens.
- Select the tab.
- Select . The Internet connection settings open.
- Configure the primary Internet connection type:
- Select .
- Select whether the primary Internet connection is on the or .
- From , select .
- Click .
The Primary Internet Configuration window for the Static IP Internet connection type opens.
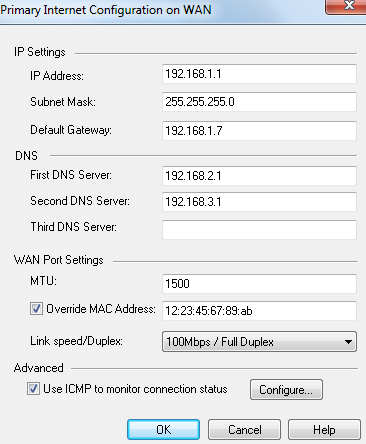
- In the IP Settings section, enter these IP address parameters:
- In the DNS section, enter the IP addresses for the DNS servers.
- In the WAN Port Settings section, enter these interface settings:
- To configure the MTU (Maximum Transmission Unit) for the Internet connection, enter the new value.

|
Note - For a DMZ interface, the MTU value is applied to all LAN ports.
|
- To assign a MAC address to the Internet connection, select and enter the MAC address.
- To configure the bandwidth for the Internet connection, select the appropriate option from .
- Click .
Configuring a DHCP Internet Connection
You can configure an Internet connection that uses DHCP to automatically assign IP addresses.
To configure a DHCP Internet connection:
- From the window, double-click the Security Gateway 80 network object.
The Security Gateway window opens.
- Select the tab.
- Select . The Internet connection settings open.
- Configure the primary Internet connection type:
- Select .
- Select whether the primary Internet connection is on the or .
- From , select .
- Click .
The Primary Internet Configuration window for the DHCP Internet connection type opens.
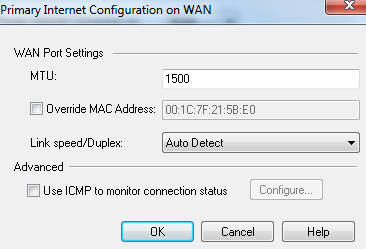
- In the WAN Port Settings section, enter these interface settings:
- To configure the MTU (Maximum Transmission Unit) for the Internet connection, enter the new value.

|
Note - For a DMZ interface, the MTU value is applied to all LAN ports.
|
- To assign a MAC address to the Internet connection, select and enter the MAC address.
- To configure the bandwidth for the Internet connection, select the appropriate option from .
- Click .
Configuring a PPoE Internet Connection
You can configure an Internet connection that uses PPPoE protocol.
To configure a PPPoE Internet connection:
- From the window, double-click the Security Gateway 80 network object.
The Security Gateway window opens.
- Select the tab.
- Select . The Internet connection settings open.
- Configure the primary Internet connection type:
- Select .
- Select whether the primary Internet connection is on the or .
- From , select .
- Click .
The General tab of the Primary Internet Configuration window for the PPPoE Internet connection type opens.
- Enter these settings for your Internet Service Provider:
- In the WAN Port Settings section, enter these interface settings:
- To configure the MTU (Maximum Transmission Unit) for the Internet connection, enter the new value.

|
Note - For a DMZ interface, the MTU value is applied to all LAN ports.
|
- To assign a MAC address to the Internet connection, select and enter the MAC address.
- To configure the bandwidth for the Internet connection, select the appropriate option from .
- Click .
PPPoE Advanced Settings
You can configure the advanced settings for a PPoE Internet connection. The advanced settings allow you to configure:
- IP settings for the tunnel
- How the Internet connection is started and maintained
To configure PPPoE advanced settings:
- From the Primary Internet Configuration window for PPPoE, select .
The Advanced PPPoE window opens.
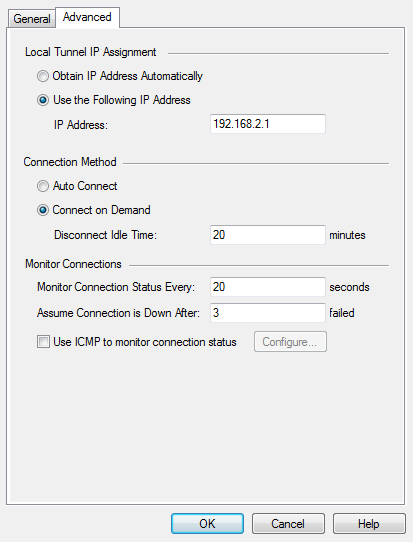
- In the Local Tunnel IP Assignment section, enter these settings for the PPPoE tunnel:
- - The IP address for the PPPoE tunnel is automatically configured (default setting).
- - Enter the static IP address that is used for the PPPoE tunnel.
- In the Connection Method section, configure how the Security Gateway 80 uses the PPPoE Internet connection:
- - The Security Gateway 80 automatically establishes a PPPoE connection to the Internet.
- - The Security Gateway 80 establishes a PPPoE connection to the Internet when required.
- - Enter the number of maximum number of idle minutes before the PPPoE Internet connection is disconnected.
- In the Monitor Connections section, enter the PPPoE Echo requests settings:
- - Enter how often, in seconds, that PPPoE Echo requests are sent to the server.
- - Enter the maximum number of failed PPPoE Echo requests before the PPPoE server is considered down.
- Click .
Configuring a PPTP or L2TP Internet Connection
You can configure an Internet connection that uses PPTP or L2TP protocol.
To configure a PPTP Internet connection:
- From the window, double-click the Security Gateway 80 network object.
The Security Gateway window opens.
- Select the tab.
- Select . The Internet connection settings open.
- Configure the primary Internet connection type:
- Select .
- Select whether the primary Internet connection is on the or .
- From , select or .
- Click .
The General tab of the Primary Internet Configuration window for the Internet connection type opens.
- Enter these settings for your Internet Service Provider:
- In the WAN Port Settings section, enter these interface settings:
- To configure the MTU (Maximum Transmission Unit) for the Internet connection, enter the new value.

|
Note - For a DMZ interface, the MTU value is applied to all LAN ports.
|
- To assign a MAC address to the Internet connection, select and enter the MAC address.
- To configure the bandwidth for the Internet connection, select the appropriate option from .
- Click .
PPTP or L2TP Advanced Settings
You can configure the advanced settings for a PPTP or L2TP Internet connection. The advanced settings allow you to configure:
- IP settings for the tunnel and the WAN
- How the Internet connection is started and maintained
To configure PPTP or L2TP advanced settings:
- From the Primary Internet Configuration window for PPTP or L2TP, select .
The Advanced settings open.
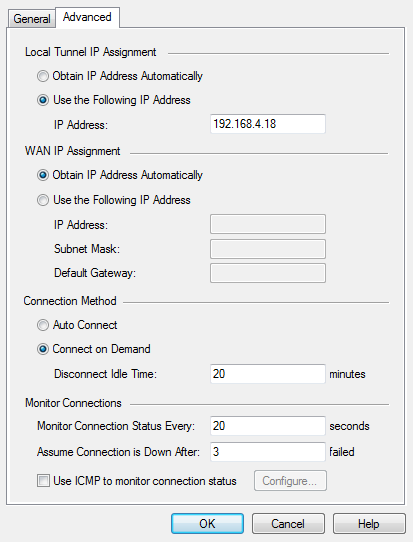
- In the Local Tunnel IP Assignment section, enter the settings for the tunnel:
- - The IP address for the tunnel is automatically configured (default setting).
- - Enter the static IP address that is used for the tunnel.
- In the WAN IP Assignment section, enter the IP address settings for the WAN:
- - The IP address for the WAN is automatically configured (default setting).
- - Configure these settings for the WAN IP address:
- In the Connection Method section, configure how Security Gateway 80 uses the PPTP or L2TP Internet connection:
- - Security Gateway 80 automatically establishes a PPTP or L2TP connection to the Internet.
- - Security Gateway 80 establishes a PPTP or L2TP connection to the Internet when required.
- - Enter the number of maximum number of idle minutes before the PPTP or L2TP Internet connection is disconnected.
- In the Monitor Connections section, enter the Echo request settings:
- - Enter how often (in seconds) that Echo requests are sent to the server.
- - Enter the maximum number of failed Echo requests before the server is considered down.
- Click .
Configuring a Bridge Connection
You can configure an Internet connection that is a bridge.
To configure a bridge connection:
- From the window, double-click the Security Gateway 80 network object.
The Security Gateway window opens.
- Select the tab.
- Select . The Internet connection settings open.
- Configure the primary Internet connection type:
- Select .
- Select whether the primary Internet connection is on the or .
- From , select .
- Click .
The Primary Internet Configuration window for the bridge opens.
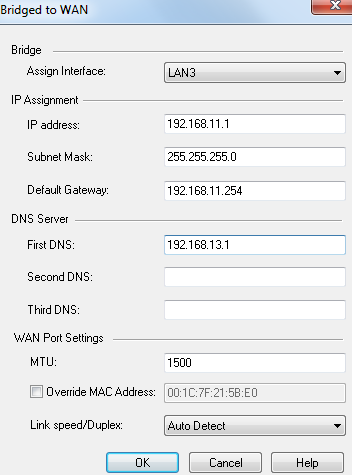
- From , select the interface that is being configured as a bridge.
- In the IP Settings section, enter these IP address parameters:
- In the DNS section, enter the IP addresses for the DNS servers.
- In the WAN Port Settings section, enter these interface settings:
- To configure the MTU (Maximum Transmission Unit) for the Internet connection, enter the new value.

|
Note - For a DMZ interface, the MTU value is applied to all LAN ports.
|
- To assign a MAC address to the Internet connection, select and enter the MAC address.
- To configure the bandwidth for the Internet connection, select the appropriate option from .
- Click .
Configuring ICMP
You can configure the ICMP (Internet Control Message Protocol) settings for the Internet connection. You can specify servers that receive ICMP requests to monitor the status of the Internet connection. If you have enabled High Availability, then the Security Gateway 80 can activate the other Internet connection when necessary.
To configure the ICMP settings:
- From the window, double-click the Security Gateway 80.
The Security Gateway window opens.
- Select the tab.
- From the required Internet connection, click .
The Internet Configuration window is opens.
- From the Advanced section, select .
- Click .
The ICMP Settings window opens.
- To monitor a server:
- Click .
- Enter the host name or IP address of the server.
- Repeat these steps for all the servers that are being monitored.
- Select .
- To monitor the default gateway, select .
- Enter these ICMP connection monitoring settings:
- - Enter the number of seconds between each ICMP request.
- - Enter the maximum number of failed ICMP requests. When High Availability is active, after an ICMP failover the other Internet connection becomes active.
- - Enter the number of seconds after an ICMP failover that ICMP requests are resumed.
- Click .
Configuring Routing Settings
You must configure Security Gateway 80 interfaces before configuring the routing settings. The routing configurations are not the same for all interfaces.
You cannot add a default route from the tab. The default route of the system is the same as the default gateway that is configured for the Internet connection. If Internet Connection High Availability is active, the default route automatically changes to the default gateway of the other Internet connection. When there is no active Internet connection and no default route is active, this message is displayed: Note: There is no default route since no Internet connection is enabled.
You can configure Security Gateway 80 to automatically select the interface or gateway that is used for a route. You cannot select the option for both the interface and the gateway.
Configuring a Network Route
You can use SmartProvisioning to configure network routes for Security Gateway 80. You should use a network route to configure routing for an internal network.
To configure a network route:
- In the window, double-click the Security Gateway 80.
The Security Gateway window opens.
- Select the tab.
- Select .
The Routing settings open.
- Click and select .
The Routing window opens.
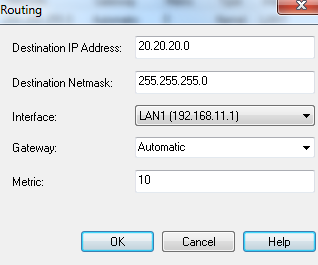
- In , enter the IP address of the network.
- In , enter the netmask for the destination IP address.
- From , select a configured interface for the route.
- In , enter the IP address of the gateway that provides access to the route.
- In , enter number of hops to the destination.

|
Note - This value should be accurate. A metric that is too low can cause lost communications because of looping. A metric that is too high can cause security issues.
|
- Click .
Configuring a Host Route
You can use SmartProvisioning to configure host routes for Security Gateway 80. A host route configures access to a specific host.
To configure a host route:
- In the window, double-click the Security Gateway 80.
The Security Gateway window opens.
- Select the tab.
- Select .
The Routing settings open.
- Click and select .
The Routing window opens.
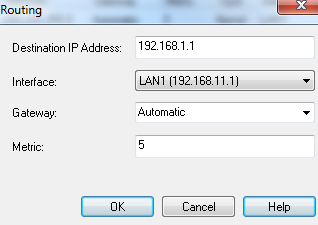
- In , enter the IP address of the host.
- From , select a configured interface for the route.
- In , enter the IP address of the gateway that provides access to the host.
- In , enter number of hops to the destination host.

|
Note - If the host is on your local site, the metric should be a low number. If the host is not behind routers, the metric should be zero.
|
- Click .
Configuring Firmware Installation Settings
You can use SmartProvisioning to manage the firmware installation settings for Security Gateway 80.
You can select the firmware image to install on your Security Gateway. The firmware images that are shown in the list were uploaded through SmartUpdate. If firmware installation fails, the Security Gateway reverts to its state before installation. The list shows details of the firmware image. These include the Name, Vendor, Major Version, Minor Version, Build Number, and Description.
You can install the firmware with one of these options:
- Immediately - Downloads and installs the firmware immediately after saving these settings in the next synchronization with a Security Gateway that references this profile.
- According to time ranges - You can define download and installation time ranges for the firmware image. The download and installation time can be limited to a specified list of time ranges in the week. They will start at the nearest time range after firmware settings were applied. For example, if the firmware installation settings were applied on Sunday and there are two time ranges:
- One range is set to Friday 00:00 to Saturday 00:00
- One range is set to Wednesday 23:00 to Thursday 06:00
The firmware will be installed between Wednesday 23:00 and Thursday 06:00.
In the event that the Security Gateway did not succeed to download and/or install the firmware during the nearest time range, it will try again in the next time range.
To configure firmware installation settings:
- In the window, double-click the Security Gateway 80.
The Security Gateway window opens.
- Select the tab.
- Select .
The Firmware settings open.
- In , click to select a firmware image that has been uploaded through SmartUpdate.
- In , select a related SmartLSM profile from the list that can be installed for the selected firmware image and its supported versions.
- Select one of the options to install the firmware:
- - Select to use the Security Gateway time or local time.
- - Click Add or Edit to open the Time Range window to define/change the weekdays and times for downloading and installing the firmware image. Select the days and times and click .
- - Select a range from the list and click to delete a time range.
- - Click this option to download the firmware image immediately but install the image during one of the set time ranges.
- Click - to see the settings of the Provisioning Profile that this gateway references.
- Click .
Configuring a RADIUS Server
You can configure the RADIUS server (Remote Authentication Dial In User Service) that provides authentication, authorization, and accounting for Security Gateway 80 gateways. By configuring RADIUS in the Provisioning Profile, you can configure it once for all gateways that reference this profile. The RADIUS server must be already defined as a SmartDashboard object.
You can configure your appliance to contact more than one RADIUS server. If the first server in the list is unreachable, the next RADIUS server in the list is contacted to authenticate with. If the list is empty, the RADIUS option is turned off on the Security Gateway.

|
Note - This feature is supported for Small Office Appliances version R75.20 and higher.
|
To configure RADIUS:
- In the window, double-click the Security Gateway 80.
The Security Gateway window opens.
- Select the tab.
- Select .
- Click to add RADIUS servers that have been defined in SmartDashboard, select a RADIUS server from the list and click .
- To remove a server, select a server in the list and click .
- Use to set the priority used for contacting RADIUS servers.
- Click to allow authentication from specified groups as defined on the RADIUS server. Only administrators belonging to those groups can get access.
- Click .
Managing Software
You can manage the software installed on SmartLSM Security Gateways and standard Security Gateways. Package commands (from the Actions menu) and the Package toolbar buttons are available only when a non-Edge gateway is selected in a Devices work space.
These commands are not available for Small Office Appliances (version R75.20 and above) and UTM-1 Edge gateways.
- To centrally manage the firmware of Small Office Appliances from version R75.20 and above, use the tab.
- To manage the software of UTM-1 Edge devices, use the UTM-1 Edge portal (right-click > Launch UTM-1 Edge Portal).
Uploading Packages to the Repository
Upload Security Gateway software packages to the SmartProvisioning Package Repository on the Security Management Server or Domain Management Server.
To upload packages to the repository:
- Open SmartUpdate (> ).
- From the menu bar, select > and select a source:
- : Have your user name and password for the Check Point Download/User Center ready. When your credentials are authenticated, the window opens, displaying the packages that are available to you. Select the ones you want and click .
- : Insert the CD or DVD with the package into the appliance or server. Browse to the DVD with the TGZ files that you are adding to the repository, and then click .
- : Browse to the TGZ files that you are adding to the repository, and then click . The software package is added to the Package Repository.
Viewing Installed Software
You can view the Check Point software packages installed on a gateway. Such packages include Security Gateway upgrades, Check Point Hotfixes that are relevant for the installed version, and Check Point HFAs.
To view the packages list on a gateway:
- From the pane, double-click the Security Gateway.
The window opens and shows the tab.
- Click the tab.
The operating system of the gateway, and all installed Check Point packages are listed.
Verifying Pre-Install
Before installing a Check Point software package on a gateway, you can test whether the package is compatible with the selected gateway.
To verify package pre-installation:
- In the work space, select a Security Gateway.
- From the menu bar, select > > .
A message appears: Getting targets for install. Please wait...
If there are packages in the Package Repository, the window opens.
- Select a listed package and click .
In > , see the verification phases in the column:
- Checks connection between gateway and Security Management Server or Domain Management Server.
- Checks for sufficient disk space on the gateway.
- Checks that the package is not already installed.
- Checks compatibility of package with operating system and currently installed packages.
If the package is verified for the selected gateway, the column shows , and the column shows:
'
Upgrading Packages with SmartProvisioning
Use the Upgrade All Packages features to upgrade devices for a new version of the Security Gateway software.
To upgrade Check Point software on a gateway:
- In the work space, select the gateway.
- From the menu bar, select > > .
If there are packages in the Package Repository, installed packages are upgraded to the latest available version.
If required packages are missing, they are listed in the Missing Packages window.
Use SmartUpdate to add the missing packages, and then rerun Upgrade All Packages.
Distributing Packages with SmartProvisioning
Use the Distribute Packages feature to distribute Check Point Hotfixes and HFAs to the specific Security Gateways that can be enhanced by installing the package.
To install a Check Point package on a gateway:
- In the work space, select the Security Gateway.
- Verify that the package you want to distribute is available and appropriate for the selected gateway.
- From the menu bar, select > > .
A warning opens, explaining that using Distribute Packages, rather than Upgrade All, may lead to a mismatch between versions and malfunctions.
To prevent this issue, make sure to use Distribute for Hotfix and HFA installation, not for upgrading to a new version.
- If you want to continue with this procedure, click OK.
If there are packages in the Package Repository, the Distribute Package window opens.
- Select a package from the list.
- In the Choose action section, select an action:
- Distribute and install packages: Download selected packages from the Package Repository and install them on the selected gateway.
- Only distribute packages: Download selected packages from the Package Repository to the selected gateway, but do not install them yet.
- Install previously distributed packages: Install packages that were previously distributed to the selected gateway.
- If you want the gateway to automatically reboot after the installation, if the installation requires this, select the Allow reboot if required check box.
- Select the Backup image for automatic revert check box (available only for Security Gateways). Clear this check box only if disk space is a real issue.
Creating the image may take some time.
- If Change to a new profile after install is enabled, you must select an appropriate SmartLSM Security Profile for the gateway from the drop-down list.
This field is enabled, and required, only if the change is necessary.
- Click Start.
Security Gateway Actions
You can execute immediate actions on SmartLSM Security Gateways and Security Gateway Provisioned gateways. You can run these actions on individual gateways, or on a SecurePlatform Provisioning Profile, effectively running the action on all gateways that reference this profile.
Before you begin, make sure that your administrator has permissions to Run Scripts.
Viewing Status of Remote Gateways
You can get an instant view of the status of a Security Gateway: traffic, interfaces, performance, CPU, memory, and so on.
To view status details of a selected gateway:
- Make sure an administrator is logged into the gateway.
- Select Actions > Get Status Details.
Running Scripts
You can execute complex gateway commands with your own scripts on any provisioned gateway. The Run Script feature is not available for UTM-1 Edge devices or UTM-1 Edge Provisioning Profiles.
Before you begin, make sure that your administrator has permissions for running scripts.
Running Scripts on Individual Gateways
To run a script on a single gateway:
- Right-click a [SmartLSM] Security Gateway and select .
- In the window, provide your script.
- If you have the script in a file, select and then browse to the file.
- You can type a script into the text box, or paste it in from another source.
- Click .
The script is pushed to the gateway and runs immediately. See the tab of the pane to view the details of the push and execution.
The pane displays the results of the script, for success and for failure.
- To save the script to a file, click .
Running Scripts by Profiles
The Run Script feature lets you use a Security Gateway Provisioning Profile to run scripts on multiple gateways.
To run a script on all gateways of a Provisioning Profile:
- In the tree in the main window, select .
- Select an existing Provisioning Profile for UTM-1/Power-1/SecurePlatform and from the menu bar select .
- In the Run Script window, provide your script.
- If you have the script in a file, select and then browse to the file.
- You can type a script into the text box, or paste it in from another source.
- Click . The script is pushed to all the gateways that use this profile.
See the tab of the pane to view details of the push and execution.
The pane displays the results of the script, for success and for failure.
- To save the script to a file, click .
Immediate Backup of Security Gateways
You can create a backup image of Security Gateways and SmartLSM Security Gateways. You can do this with an Action command on a specific gateway, or on a Security Gateway Provisioning Profile to create a backup image of all gateways that reference this profile.
You can choose to store backups on the selected gateway, or on another backup server. If you choose another server, make sure you have the IP address or host name of that server, and if needed, a user name and password with Read/Write permissions.

|
Note - SmartProvisioning does not provide backup management for UTM-1 Edge devices or UTM-1 Edge Provisioning Profiles. UTM-1 Edge backups are managed through the UTM-1 Edge Portal (right-click > Launch UTM-1 Edge Portal), using the Export Tool. For more information, see the R75.40VS UTM-1 Edge Administration Guide.
|
To execute an immediate backup of a Security Gateway:
- Right-click a [SmartLSM] Security Gateway or UTM-1/Power-1/SecurePlatform Provisioning Profile and select Actions > Backup.
- If you want the backup to include Check Point logs, select the Include Check Point products log files in the backup check box.
- Provide details of the device on which the backup will be stored, or select Locally on device, if each device will hold its own backup file.
- Click OK.
- Select Actions > Push Settings and Actions.
The backup is created and pushed to the gateway or defined server. See the documentation of the target's operating system for Restore Backup instructions.
Applying Changes
If you make a change to a Security Gateway Provisioning Profile, or use the Actions > Backup command, no change or action is immediately applied to the gateways.
Profile changes are applied to the gateways that reference them when the gateways fetch their profiles on interval. At this time, the gateways get the commands to pull the scripts from SmartProvisioning and execute them, or to create backup images.
However, profile changes and actions sometimes need to be applied immediately. For example, if you run a script that configures a new server behind a SmartLSM Security Gateway, you will want this configuration to be applied as quickly as possible, to include the server in the gateway's VPN with the CO gateway.
To apply profile changes and actions immediately:
Right-click the Provisioning Profile and select Actions > Push Settings and Actions.
Maintenance Mode
Security Gateways that reference a Provisioning Profile have a maintenance feature. Enable Maintenance Mode on a Security Gateway while testing changes to its object configuration or Provisioning Profile. In this mode, changes are pushed from the SmartProvisioning console to the Security Management Server or Domain Management Server, but they are not pushed to the gateway.
For example:
You have a SmartLSM Security Gateway on your SmartProvisioning management that has operational issues. The remote office where this SmartLSM Security Gateway sits is too far away for you to manage it yourself, so you ask the local system administrator to handle the issue.
However, you do not want the gateway to lose the configurations that you have already made to it from your central SmartProvisioning console. You enable Maintenance Mode on this gateway.
The local administrator fixes the issue. You disable Maintenance Mode, which switches the SmartLSM Security Gateway back to centralized configuration through the SmartProvisioning console.

|
Note - Disabling Maintenance Mode overrides any local changes with the central SmartProvisioning configurations. If the local administrator discovers that changes need to be made on this gateway, make sure you have the data before switching back.
|
To enable Maintenance Mode:
- From the pane, double-click the Security Gateway.
The window opens and shows the tab.
- Select .
- Select Actions > Push Settings and Actions.
Remember:
- Changes to the Provisioning Profile do not affect the gateway as long as Maintenance Mode is selected.
- If you clear the Maintenance Mode check box, all local changes are overridden by central configurations.
|
|


