Check Point Small Office Appliance Centrally Managed Gateways
For more about how to use SmartProvisioning with Check Point 1100 Appliances, see the Check Point 1100 Appliance Centrally Managed Administration Guide.
Creating a Gateway
Make sure you have a SmartLSM Security Profile for Small Office Appliance gateways defined in SmartDashboard before you create a gateway in SmartProvisioning.
To create a new gateway:
- Open SmartProvisioning.
- In the page, right-click an empty row in the table, select > .
The SmartLSM Security Gateway General Properties page opens.
General Properties
- Enter a for the SmartLSM Security Gateway. It cannot contain spaces or non-alphanumeric characters.
- Enter an optional that identifies the SmartLSM Security Gateway.
- Click .
More Information
- In ,select the firmware version of the installed Small Office Appliance.
- In ,select the relevant SmartLSM gateway profile that the SmartLSM Security Gateway is mapped to.
- In , make sure the operating system selection is .
- In ,select this checkbox to enable this gateway to be managed with provisioning configurations. For more information, see Managing Device Settings.
- In ,select this option if you want to enable provisioning but are not yet ready to assign a specific profile.
- In ,select the provisioning profile to assign to this gateway, from the list of profiles created in SmartProvisioning.
- Click .
Communication Properties
In the Communication Properties page, you define an Activation Key that is used to set up Secure Internal Communication (SIC) Trust between the SmartLSM Security Gateway and the Security Management Server. This is the same key that you should enter in the one-time password field of the Security Management Server Authentication page of the Small Office Appliance First Time Configuration Wizard.
To generate a key automatically:
- Select .
- Click .
The Generated Activation Key window opens.
- Click .
The two Activation Key fields show the new key in hidden text. You cannot view it in clear text again. If you click , the generated key is discarded.
To manually define an activation key:
- Select .
- Enter your own key, a string of any length.
- In , enter the key again. You cannot copy the text from the first field.
To clear the key, click .
To initialize certification:
The SIC certificate must be shared between the Security Management Server and the SmartLSM Security Gateway. With this SmartLSM wizard, you create the key on the Security Management server (the SIC certificate and the IKE certificate for the selected gateway are created when you finish this wizard). The certificate will be pulled by the gateway when it first connects to the Security Management Server after it is configured with the Small Office Appliance First Time Configuration Wizard.
- If you know the IP address of the SmartLSM Security Gateway, select , and enter the IP address.
- If you do not know the IP address of the SmartLSM Security Gateway, select .
- Click .
VPN Properties
- Select how to create a VPN certificate:
- For a CA certificate from the Internal Check Point CA, select .
- For a CA certificate from a third party (for example, if your organization already has certificates from an external CA for other devices), clear this checkbox and request the certificate from the appropriate CA server.
- Click .
Finish
- Select to start working with the newly created object.
- Clickto complete the SmartLSM Security Gateway creation.
After the SmartLSM Security Gateway object has been created:
- Update the Corporate Office Gateway.
- If the VPN option was selected in the VPN Properties page, the Certificate Authority issues a certificate to the appliance. This certificate is installed on the appliance the first time that the SmartLSM Security Gateway connects to the Security Management Server.
To update the Corporate Office Gateway:
- Select from the toolbar.
- Select the from the list.
It is important that the Corporate Office Gateway be updated whenever SmartLSM Security Gateways are added, deleted, or modified (such as the generation of a new IKE key, a Push Policy action, or a Push Dynamic Objects action).
Creating a SmartLSM Appliance Cluster
Make sure you have a SmartLSM cluster profile defined in SmartDashboard before you create a Small Office Appliance cluster in SmartProvisioning.
To create a new SmartLSM Security Cluster:
- Open SmartProvisioning.
- In the page, right-click an empty row in the table, select > .
The SmartLSM Security Gateway General Properties page opens.
General Properties
- Enter a unique (Suffix is optional).
The SmartLSM Security Cluster name will be:
<prefix>cluster<suffix>.
- In , enter the real external virtual IP address for your actual gateway cluster.
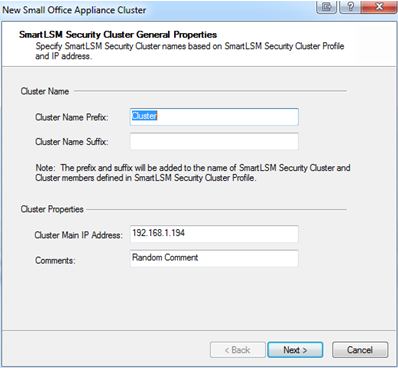
- Click .
Cluster Properties
- In ,select the firmware version for the Small Office Appliance.
- In , select the SmartLSM Cluster Profile that was created in SmartDashboard (in the example ClusterProfile1).
- In ,select this checkbox to enable this gateway to be managed with provisioning configurations. For more information, see Managing Device Settings.
- In ,select this option if you want to enable provisioning but are not yet ready to assign a specific profile.
- In ,select the provisioning profile to assign to this gateway, from the list of profiles created in SmartProvisioning.
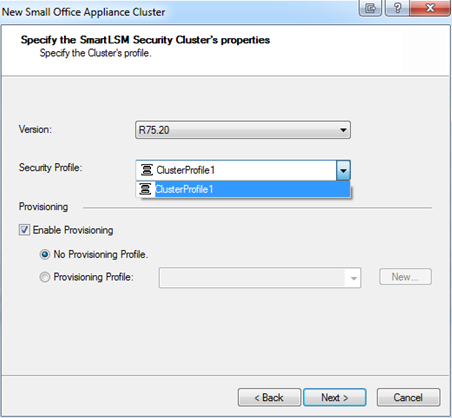
- Click .
Cluster Names
The cluster members' names are shown with the configured prefix.
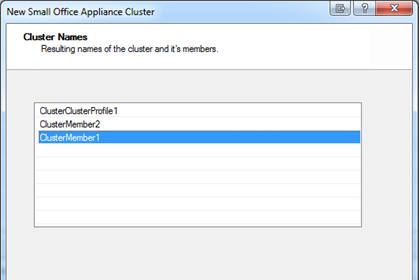
Click .
More Information
- Click to override the settings of the template topology on each of the interfaces. For example, select WAN and click Edit.

The interface's window opens.
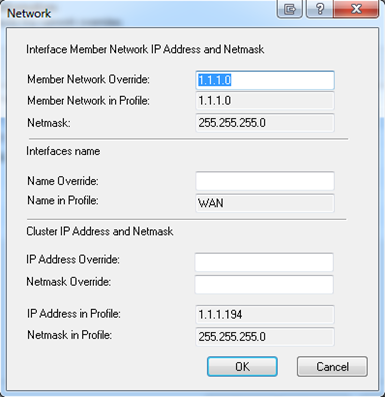
- In , enter the actual network IP address to override the template Network address.

- Click and do the above steps again for all the interfaces.
- Click .
Communication Properties
- Select a member and click . Enter the trusted communication (SIC) details and click .
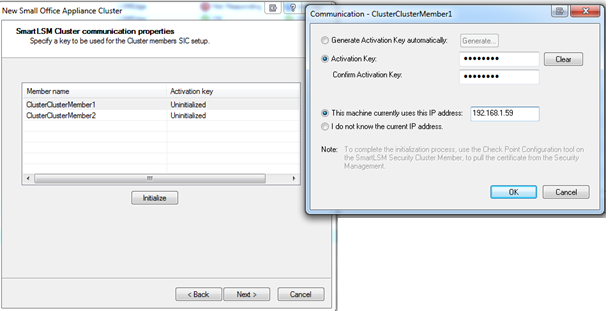
- Do this step again for the second member.
- Click .
VPN Properties
- Select how to create a VPN certificate:
- For a CA certificate from the Internal Check Point CA, select .
- For a CA certificate from a third party (for example, if your organization already has certificates from an external CA for other devices), clear this checkbox and request the certificate from the appropriate CA server.
- Click .
Finish
- Click . After the wizard finishes, wait until the SIC initialization completes. It can take a few minutes. When it completes, you see the cluster object and its two members.
When you double-click the cluster object you can see that the topology is configured with the actual addresses.

- On each Small Office Appliance, open the WebUI > page and click to manually pull the policy immediately. Alternatively, the appliance connects to the Security Management Server at predefined periodic intervals to pull the policy.
Defining SmartLSM Gateways Using LSM CLI
This is a sample SmartLSM CLI script that you can use to create a new gateway object and associate it with a SmartLSM profile. Optionally, you can also set a SIC password and initiate a SIC connection.
LSMcli <server> <user> <password> AddROBO CPSG80 <RoboName> <Profile>
[-O=<ActivationKey> [-I=<IP>]]
|
Parameter
|
Description
|
<server>
|
The Security Management Server on which to create the gateway object
|
<user>
|
The username of the Security Management Server administrator
|
<password>
|
The password of the Security Management Server administrator
|
<RoboName>
|
The name for the new gateway object
|
<Profile>
|
Then name of the SmartLSM profile to associate with the gateway
|
<ActivationKey>
|
The SIC password
|
<IP>
|
The IP to use to initiate a SIC connection
|
|
|

