Advanced Access Control
Multicast Access Control
Multicast IP transmits a single message to a predefined group of recipients. An example of this is distributing real-time audio and video to a set of hosts that have joined a distributed conference.
Multicast is similar to radio and TV where only those people who have tuned their tuners to a selected frequency receive the information. With multicast you hear the channel you are interested in, but not the others.
IP multicasting applications send one copy of each datagram (IP packet) and address it to a group of computers that want to receive it. This technique sends datagrams to a group of recipients (at the multicast address) rather than to a single recipient (at a unicast address). The routers in the network forward the datagrams to only those routers and hosts that want to receive them.
The Internet Engineering Task Force (IETF) has developed multicast communication standards that define:
- Multicast routing protocols
- Dynamic registration
- IP multicast group addressing
Multicast Routing Protocols
Multicast routing protocols communicate information between multicast groups. Examples of multicast routing protocols include Protocol-Independent Multicast (PIM), Distance Vector Multicast Routing Protocol (DVMRP), and Multicast Extensions to OSPF (MOSPF).
Dynamic Registration Using IGMP
Hosts use the Internet Group Management Protocol (IGMP) to let the nearest multicast router know if they want to belong to a particular multicast group. Hosts can leave or join the group at any time. IGMP is defined in RFC 1112.
IP Multicast Group Addressing
The IP address area has four sections: Class A, Class B, Class C, and Class D. Class A, B, and C addresses are used for unicast traffic. Class D addresses are reserved for multicast traffic and are allocated dynamically.
The multicast address range 224.0.0.0 through 239.255.255.255 is used only for the group address or destination address of IP multicast traffic. Every IP datagram whose destination address starts with 1110 is an IP multicast datagram.

Just as a radio is tuned to receive a program that is transmitted at a certain frequency, a host interface can be tuned to receive datagrams sent to a specific multicast group. This process is called joining a multicast group.
The remaining 28 bits of the multi-case address range identify the multicast group to which the datagram is sent. Membership in a multicast group is dynamic (hosts can join and leave multicast groups). The source address for multicast datagrams is always the unicast source address.
Reserved Local Addresses
Multicast group addresses in the 224.0.0.0 through 224.0.0.255 range are assigned by the Internet Assigned Numbers Authority (IANA) for applications that are never forwarded by a router (they remain local on a particular LAN segment).
These addresses are called permanent host groups. The following table shows examples of reserved Local Network Multicast Groups.
Local Network Multicast Groups Examples
Multicast Address
|
Purpose
|
224.0.0.1
|
All hosts. An ICMP Request (ping) sent to this group should be answered by all multicast capable hosts on the network. Every multicast capable host must join this group at start up on all of its multicast capable interfaces.
|
224.0.0.2
|
All routers. All multicast routers must join this group on all of its multicast capable interfaces.
|
224.0.0.4
|
All DVMRP routers.
|
224.0.0.5
|
All OSPF routers.
|
224.0.0.13
|
All PIM routers.
|
For additional information on reserved multicast addresses, refer to the IANA website.
Per-Interface Multicast Restrictions
A multicast enabled router forwards multicast datagrams from one interface to another. When you enable multicast on a Security Gateway running on SecurePlatform, you can define multicast access restrictions on each interface. These restrictions specify which multicast groups (addresses or address ranges) to allow or to block. Enforcement is performed on outbound multicast datagrams.
When access is denied to a multicast group on an interface for outbound IGMP packets, inbound packets are also denied.
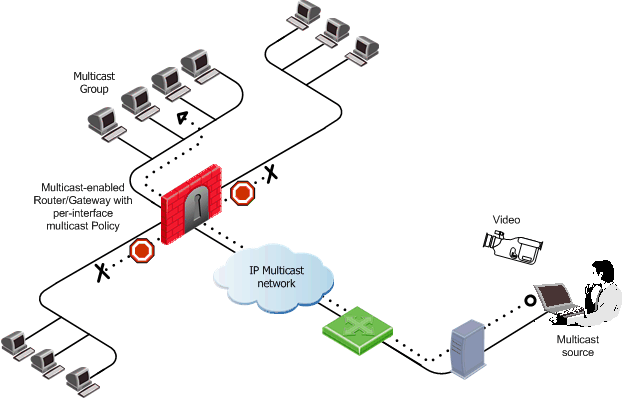
When access restrictions for multicast datagrams are not defined, inbound multicast datagrams entering a gateway from one interface are allowed out of all other interfaces.
In addition to defining per interface access restrictions, you must define a rule in the Rule Base that allows multicast traffic and services, and the destination defined in this rule must allow the required multicast groups.
VPN Connections
Multicast traffic can be encrypted and sent across VPN links defined using multiple VPN tunnel interfaces (virtual interfaces associated with the same physical interface).
Configuring Multicast Access Control
To configure multicast access control:
- Select a gateway object in SmartDashboard.
- On General Properties page, ensure that the gateway version is specified correctly.
- On the Topology page, select an interface and click Edit.
- On the Multicast Restrictions tab of the Interface Properties page, select Drop Multicast packets by the following conditions.
- Select a multicast policy for the interface:
- Drop multicast packets whose destination is in the list
- Drop all multicast packets except those whose destination is in the list
- Click Add to add a multicast address range. The Add Object window opens, with the Multicast Address Ranges object selected in the list.
- Click New > Multicast Address Range. The Multicast Address Range Properties window opens.
- Provide a name for this range.
- Define either an IP address Range or a Single IP Address that are in the 224.0.0.0 to 239.255.255.255 range.
- Click OK. The named Multicast Range appears in the Add Object window.
- Click OK. The named Multicast Range appears in the Interface Properties > Multicast Restrictions window.
- Click OK to close the Interface Properties window and again to close the gateway window.
- In the Rule Base, add a rule that allows the multicast address range. As the Destination of the rule, specify the range defined in step 5.
- Save and install the security policy: Policy > Install.
Microsoft Networking Services Security
Securing Microsoft Networking Services (CIFS)
CIFS (Common Internet File System) is a protocol used to request file and print services from server systems over a network. CIFS is an extension of the Server Message Block (SMB) protocol. CIFS is used as the underlying transport layer for the NETBIOS session (nbsession) service over TCP using port 139. In Windows networking, CIFS is used over the Microsoft-DS protocol (port 445) for networking and file sharing. More information on CIFS can be found at http://samba.org/cifs/.
By default, a Windows server has default shares open for administrative purposes (C$, ADMIN$, PRINT$) and is therefore an easy target for internal attacks, such as brute-force password attacks on file servers.
A Security Gateway secures Microsoft Networking Services in the Inspection Module, without requiring a Security server. This meets the high performance requirements of LAN security (Fast Ethernet and Gigabit Ethernet).
The CIFS resource can be used to enforce the following security checks on CIFS connections:
- Verifying the correctness of the protocol.
- Preventing CIFS and NETBIOS messages issued by the client from pointing to beyond message boundaries.
- Restricting access to a list of CIFS servers and disk shares.
- Logging disk share access.
Restricting Access to Servers and Shares (CIFS Resource)
To restrict access to servers and shares:
- Define a new CIFS Resource.
- Configure the CIFS Resource. Allowed Disk\Print Shares is a list of allowed CIFS servers and disk shares. Note that the use of wildcards is allowed. Select Add, Edit or Delete to modify the list.
For example, to allow access to the disk share PAUL on the CIFS server BEATLES:
- Click Add and type BEATLES in the Server Name field and IPC$ in the Share Name field. Click OK.
- Click Add again and type BEATLES in the Server Name field and PAUL in the Share Name field. Click OK.
- Add a new rule. Under Service, add either nbsession or Microsoft-DS, together with the configured Resource.

|
Important - Do not delete or change the protocol type of the service objects that perform content inspection. If the service is altered in this way, the protection will not work.
|
- Install the security policy: Policy > Install.
|

