Single Sign On
Single Sign On (SSO) eliminates the need for users to re-authenticate to an application when they access it for a second time, during a Mobile Access session, or between sessions. The authentication credentials used to log in to the Mobile Access portal can be re-used automatically to authenticate to multiple applications accessed through Mobile Access. You can also record other credentials for the application, and store them for future use. SSO user credentials are securely stored on Mobile Access and therefore remain valid even if the user logs in from a different client machine.
Supported SSO Authentication Protocol
Mobile Access supports Single Sign On for authentication to internal Web and other application servers. The supported authentication protocols are:
- Basic Access - RFC enhancement. Not recommended because of security implications.
- Digest Access - RFC enhancement.
- Integrated Windows Authentication - RFC enhancement. Formerly NTLM version 1.
- Credential forwarding in HTTP headers - Ad hoc solution. Not recommended because of security implications.
- Web form (HTML) based.
HTTP Based SSO
For applications that perform authentication at the HTTP level, HTTP-based SSO is available, in which the credentials are forwarded in HTTP headers. This applies to the Basic, Digest, Integrated Windows Authentication, and Credential forwarding in HTTP headers authentication protocols.
When the user attempts to access these sites, a browser-specific form appears:
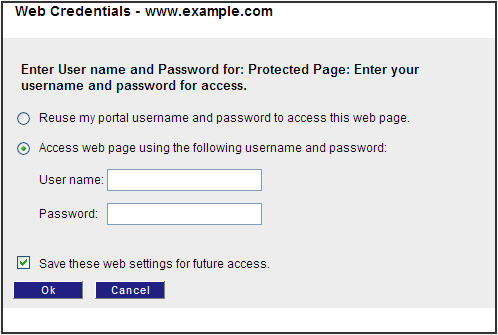
The user must enter his/her user name and password for that application, and click OK.
HTTP Based SSO Limitation
If the Web server requests authentication for a POST request in either the digest or Integrated Windows Authentication methods, and the server does not support sending of "100 Continue" responses, Single Sign On is not supported.
Web Form Based SSO
Most Web applications have their own Web forms for authentication. For these applications, Mobile Access supports Web form (HTML) based SSO.
The advantage of Web form based SSO authentication over HTTP authentication is that users are presented with the login page of the application itself, rather than a more obtrusive browser-specific page.
A typical Web form is shown below, for Outlook Web Access, together with a Mobile Access SSO popup that assists the user.

It is recommended to use the Web form based SSO for every application that is configured to work with Web form authentication. Do not enable Web form SSO for other applications, in order to maintain performance and connectivity.
Application Requirements for Easy Configuration
Web form based SSO in its default configuration can be configured by selecting a single check box in SmartDashboard. In order for the default settings to work, the application must:
- Present the login form as the first form seen by the user.
- Redirect (status 301 or 302) on login success.
Web Form Based SSO Limitations
Web form based SSO does not support:
- Password remediation forms.
- Forms containing 'old/new/confirm' password fields. These fields are not recognized properly, and wrong credentials may be recorded or forwarded.
Configuring SSO Name Format
This feature prevents problems with SSO caused by different formats of credentials required by different applications. You configure the credential format for each application in GuiDBedit, and the Mobile Access gateway sends the credentials to the organizational server in the correct format. This applies to Web, Capsule Workspace Mail, and ActiveSync applications and works with Web Form based SSO.

|
Note - This feature is for LDAP users who connect to the Mobile Access portal. Internal users who connect to web applications though the portal with SSO authentication use a default of .
|
For example, SSO can apply to both of these applications:
- Web application A that uses the format domain/username
- ActiveSync application B that uses the format username@domain
This feature is supported in R77.20 and higher. To learn how to activate this feature in R77.20, see sk101217.
To configure the format of credentials required for an application in R77.30 and higher:
- Go to the tab > .
- Select an application type.
- Click to open an application.
- Select > .
- In the area, select the required format for the application.
- Click .
- Install policy.
To configure the format of credentials required for an application in R77.20:
- Open GuiDBedit.
- For a Capsule Workspace Mail or Web application, go to Other > network_applications > APPLICATION NAME > single_sign_on > username_and_domain_format.
- For an ActiveSync application, go to Other > network_applications > APPLICATION NAME > username_and_domain_format.
- Enter the internal server format credentials with these place holders:
- $$user for user name
- $$domain for domain
For example, $$domain\$$user or $$user@$$domain.
- Save the changes.
- Install policy.
Application and Client Support for SSO
The following table shows which SSO methods are available for each Mobile Access application:
Mobile Access Application
|
Supports HTTP Based SSO
|
Supports Web Form Based SSO
|
Web applications
|
Yes
|
Yes
|
File shares
|
Yes
|
No
|
Citrix services
|
Yes
|
Yes
|
Web Mail
|
Simplified
|
No
|
Native applications
|
No
|
No
|
Most Mobile Access Web Applications and Citrix Services support Web Form SSO, with either no configuration, or minimal configuration required. Some applications have been tested and found to require manual configuration (of the HTTP Post details). Some applications do not support Web Form SSO at all.
For a list of common applications that are certified by Check Point to work with Web Form SSO, see SecureKnowledge solution sk35080.
Mobile Access Client Support for SSO
Single Sign On is available only via the Mobile Access portal. It is not available for authentication via the VPN clients: SSL Network Extender, SecureClient Mobile, and Endpoint Connect.
Basic SSO Configuration
To configure a basic SSO setup:
- In the SmartDashboard Mobile Access tab, select the Additional Settings > Single Sign On page.
- In the Single Sign On page, select an application and click Edit.
The Single Sign On page of the application window opens.
- Select Turn on single Sign On for this application.
- Configure the sign on method for the application. The default option is:
For Web applications, File Shares and Citrix Services:
Prompt the users for their credentials and store them for future use
For Web Mail applications this same option is called:
Prompt user for credentials
With this option, the application credentials are stored and reused. The portal credentials are not used to authenticate to applications.
Basic Configuration of Web Form SSO
Web form SSO is supported only for Mobile Access Web applications and Citrix services.
In the default settings, Web Form Single Sign On automatically analyses the sign-in Web page of the application. The default settings assume:
- HTTP redirect (301, 302) upon authentication success.
- No redirect upon authentication failure.
To configure Web Form SSO with default settings:
In the Single Sign On page of the Mobile Access application, select This application uses a Web form to accept credentials from other users
|
Note - Only enable Web form SSO for applications that use a Web form to accept user credentials, in order to maintain performance and connectivity.
|
SSO for Native Applications
Native applications that you access with SSL Network Extender can use Single Sign-On (SSO) functionality. With SSO support, users connect automatically to native applications that require login. The native application gets the Mobile Access portal login username and password parameters from the internal server.
This feature is supported in R77.20 and higher. It requires a SSL Network Extender client upgrade.
Configuring SSO for Native Applications
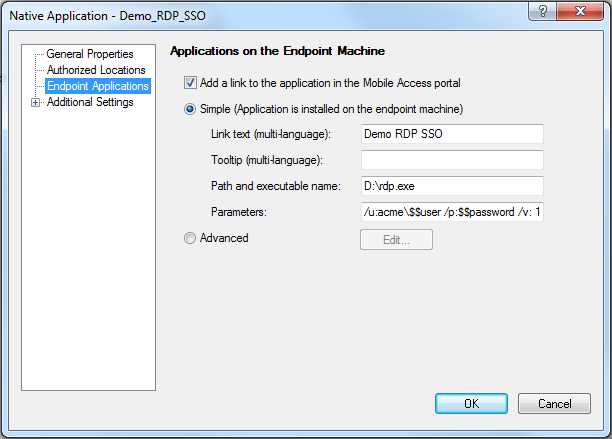
Use the dynamic parameters $$user and $$password to configure SSO for a native application. These parameters are resolved to the actual username and password of the logged-in user when the gateway sends the parameters to the native application.
These instructions show you how to configure the new $$password parameter in for a Simple native application. You can also use the $$password parameter in the application parameters in Advanced native applications.
To configure SSO:
- Open .
- From the tab, select > .
- Edit an existing or create a new native application object.
- Select from the navigation tree of the object.
- Select and enter information for these fields:
- Click .
- Install policy.
Advanced Configuration of SSO
The following configuration instructions apply to both HTTP based SSO and to Web form based SSO. The advanced configuration options are supported for Web applications, file shares, and Citrix services.
For configuration options that are specific to Web form SSO, see Advanced Configuration of Web Form SSO.
Configuring Advanced Single Sign On
There are a number of Single Sign On methods. The different options allow you to configure how to handle portal credentials, and how to handle other credentials used to authenticate to the application.
To configure the Single Sign On methods:
- Go to the Single Sign On page of the Mobile Access application.
- For the Advanced options, click Edit.
These are the available single sign on methods.
SSO Method
|
Single Sign On is On/Off
|
Forward portal credentials
|
Learn other credentials
|
Turn on Single Sign On for this application - Unchecked
|
Off
Users are always prompted.
|
No
|
No
|
Prompt users for their credentials, and store them for future use
|
On
Default method
|
No
|
Yes
|
This application reuses the portal
credentials. Users are not prompted.
|
On
Advanced method.
|
Yes
|
No
|
This application reuses the portal credentials. If authentication fails, Mobile Access prompts users and stores their credentials.
|
On
Advanced method.
|
Yes
|
Yes
|
Configuring Login Settings
Login settings allow you to configure the default Windows domain (if Windows authentication is being used), to notify users that their credentials will be stored, and to specify a hint to help users supply the correct credentials.
To configure the login settings for Single Sign On:
- Go the Single Sign On page of the Mobile Access application.
- In the Login Settings section, click Edit.
The Login Settings window opens.
- Fill in the fields according to the explanations below.
Windows Domain
- The user of this application belongs to the following Windows domain:
Specify the Windows domain or workgroup (for example "LOCALDOMAIN") if Windows authentication is used. Integrated Windows authentication requires the domain to be forwarded with the user name and password.
If Accept the portal credentials from the gateway Single Sign On method is used, Mobile Access does not know the domain, because the user does not supply it with the portal credentials. The domain is fetched from the one specified here.
User Notification
- Notify the users that their credentials for this application are going to be stored
When users access the application login page for the first time, they see a message that their credentials will be stored for future access.
- Allow the users to specify that their credentials for this application will not be stored
When users access the application login page for the first time, they see a message from which they can select not to record their credentials.
Administrator Message
- Show the following message together with the credentials prompt
Show a hint to the user about the credentials they must supply. for example, whether or not they should supply the domain name and user name (for example: AD/user) or just the user name (for example: user). After clicking the Help me choose credentials link, the user sees the hint. The message can include ASCII characters only.
Advanced Configuration of Web Form SSO
Use the advanced Single Sign On settings for Web form credentials to configure an application for Web form SSO if there is one of these:
- No HTTP redirect (301, 302) upon authentication success
- No redirect upon authentication failure.
You can specify different criteria for:
- Sign In Success or Failure Detection
- Credential Handling
Sign In Success or Failure Detection
Most Web applications respond to authentication success by redirecting to another page. If a redirect is not an indication of success, you can configure a different indicator of success or failure.
To configure Sign In success or failure criteria:
- In the Single Sign On page of the Mobile Access application, in the Web Form section, click Edit.
- Select Specify a criterion for success or failure and then select one of the following options:
- Mobile Access regards the authentication as successful, if after signing in, this application creates a cookie with the following name:
The application places a session cookie upon success. To obtain the exact name of the session cookie, install a sniffer or browser plug-in (such as the Fiddler HTTP debugging proxy) - Mobile Access regards the authentication as a failure, if after signing in, this application redirects to the following URL:
The application redirects on failure. To find the target URL, install a sniffer or browser plug-in (such as the Fiddler HTTP debugging proxy). Use the following URL format:
<protocol>://<host>/[<path>][?< query>]
Credential Handling
By default, Mobile Access looks for the user name and password fields at the application URL. If the default settings do not work, you can either configure an automatic credential detection method, or you can manually hard-code the POST details.
To configure automatic credential handling:
- In the Single Sign On page of the Mobile Access application, in the Web Form section, click Edit.
- In the Credentials Handling section, click Edit.
The Credentials Handling window opens.
- Select Automatically handle the credentials.
- Under Sign in Web Form Detection Settings, select:
Mobile Access regards the following URL as the sign in Web form:
If the application presents a Web form that requires credentials, before the actual login form, so that Mobile Access is unable to automatically analyze the sign-in Web page, you can specify the URL of the actual login form.
Syntax:
<protocol>://<host>/[<path>][?< query>]
- Under Password Validation Settings, select
Mobile Access sends the following password:
Clients need to submit the sign on Web form with a user name and password. However, it is not secure to store the password on the client for future SSO use. Mobile Access therefore generates a dummy password that it sends to the client, and replaces it upon sign on with the real password. Some applications check the dummy password on the client side. If the Mobile Access dummy password is not compatible with the application, you can define a different one.
|
Note - This password cannot include special characters. Use ASCII characters only.
|
Manually Defining HTTP Post Details
If automatic Web form SSO does not work, you can define HTTP POST details.
To manually specify how to handle credentials:
- From the Credentials Handling window, select Manually specify how to handle the credentials.
- Fill in the fields for When the following sign in URL is requested:
- post to the following URL
In this and the previous field, the URL must be absolute. Use the URL format
<protocol>://<host>/[<path>][?< query>] - the following POST data, which must include:
- $USERNAME resolves to the user name stored on Mobile Access.
- $PASSWORD resolves to the password stored on Mobile Access.
When manual credential handling is configured for Web form SSO, the HTTP authentication request window appears, when credentials are requested for the first time.
Kerberos Authentication Support
Kerberos is a network protocol that lets people and computers securely authenticate over a non-secure network. In Windows 2000 and higher, Kerberos is the default authentication protocol.
- Kerberos Authentication is supported for Web Applications (HTTP and HTTPS). Mobile Access can authorize against Kerberos servers on behalf of users.
- Microsoft IIS and other web servers employ Kerberos using the Negotiate method in HTTP authentication headers.
- Kerberos is sensitive to time differences between the Security Gateway and Domain Controller. Make sure clocks on the Mobile Access gateway and on the domain controller(s) are synchronized to within 1 minute. The best way to ensure this is to use an NTP time server.
To use Kerberos with Mobile Access:
Configuring Microsoft Active Directory for Mobile Access
If Microsoft AD is not configured in the Check Point environment, create or edit the required Network Objects. Use these steps if the LDAP Account Unit object was created without the Mobile Access wizard, or if there are connectivity issues with the AD Domain Control.
Note: In some environments, you will have to manually configure the AU object and the gateway object, even if you used the Wizard. Use these steps to make sure the settings are correct after you finish the wizard.
These steps assume you defined the Microsoft AD server as a Check Point LDAP Account Unit object. If that object does not exist, create one: > > > .
To make sure Microsoft Active Directory is configured for default settings:
- In the SmartDashboard, open the LDAP Account Unit object that represents the AD.
In the tab of the window, the value of is .
- Make sure the value of is correct for the AD Domain.
- Save changes and close the window.
To configure Microsoft Active Directory server priorities:
- Open the object for the Security Gateway with Mobile Access enabled.
If there is more than one, do these steps for each.
- Open > .
By default, the gateways use all Domain Controllers of the AD. If there is a connectivity issues (no or poor connectivity) from a gateway to a Domain Controller, adjust the priorities.
- Make sure that is selected.
When this is selected, the list is available. If the list is empty, click to add an defined for .
- Select the Microsoft AD server.
The is available.
- Clear .
- Select a host of the AD server.
The field is available.
- Set the priority of the host with connectivity issues to be lower than a different host.
For example: Priority is highest. Priority is lower.
- Click .
- Click .
Manual Configuration for Kerberos
If you are working with a directory that is not Microsoft AD, or experiencing problems with automatic configuration, manually configure Kerberos authentication.
To manually configure Kerberos:
- Create
$CVPNDIR/var/krb5.manual.conf. - Populate
krb5.manual.conf with values that specify your domain addresses and domain controllers.Use this format:
[libdefaults]
default_realm = YOUR.AD.NAME
[realms]
YOUR.AD.NAME = {
admin_server = your.domain.controller.name
default_domain = your.dns.domain
}
[domain_realm]
.your.dns.domain = YOUR.AD.NAME
your.dns.domain = YOUR.AD.NAME
In the file:
Important: If you specify multiple domain addresses (realms) and domain controllers in krb5.manual.conf , you must also add them to the Mobile access configuration in $CVPNDIR/conf/cvpnd.C.
To add them, use these cvpnd_settings commands:
cvpnd_settings $CVPNDIR/conf/cvpnd.C listAdd kerberosRealms YOUR.AD.NAME
cvpnd_settings $CVPNDIR/conf/cvpnd.C listAdd kerberosRealms YOUR.OTHER.AD.NAME
- Test the manual configuration:
- Set
KRB5_CONFIG as an environment variable in the shell to point to the relevant configuration file:- In the bash shell, run:
export KRB5_CONFIG=$CVPNDIR/var/krb5.manual.conf - For tcsh or csh, run:
setenv KRB5_CONFIG $CVPNDIR/var/krb5.manual.conf
- From the Mobile Access gateway command line, run:
kinit your-ad-username.- If there are several realms, the
kinit syntax applies to the default realm. - For other realms, use the syntax:
kinit your-ad-username@YOUR.OTHER.AD.NAME
You should get a prompt similar to: Password for your-ad-username@YOUR.DOMAIN:
- Enter the password.
- Run:
klistThe Ticket cache list shows one ticket.
- Delete the list by running:
kdestroy.
- Open
$CVPNDIR/conf/cvpnd.C for editing. - Change the value of the
kerberosConfigMode attribute from auto to manual.Alternatively, run: cvpnd_settings $CVPNDIR/conf/cvpnd.C set kerberosConfigMode manual
Note: If you assign the value none to kerberosConfigMode, it disables Kerberos SSO.
- Run:
cvpnrestart.
Important: In a cluster environment, repeat steps 1 to 6 on each cluster member.
Kerberos Constrained Delegation
Kerberos constrained delegation is a Single Sign-on method that uses Kerberos authentication for users to access internal resources without the need to enter a password. It is supported for the Mobile Access portal and Capsule Workspace.
To enable Kerberos constrained delegation:
- On the Mobile Access gateway, run:
cvpnd_settings $CVPNDIR/conf/cvpnd_internal_settings.C set EnableKCD true - Run
cvpnrestart on the gateway. - In a cluster environment, repeat the steps on all cluster members.
Configuring Kerberos Constrained Delegation
Before you begin, make sure:
- That your site supports Kerberos authentication.
- The Mobile Access-enabled gateway is configured to support Kerberos. To learn more about this, see the Mobile Access Administration Guide.
- The date and time on the gateway and Active Directory server are the same.
- You use FQDN and not an IP address with your internal server name. Make sure that the FQDN resolves both on the Security Gateway and on the Kerberos server.
The configuration includes:
- Configuring a Delegate User on the AD Server.
- Configuring Kerberos Constrained Delegation support on the Mobile Access gateway.
Configuring a Delegate User on the AD Server
A delegate user can have specified permissions without being part of a higher privileged group. For Kerberos Constrained Delegation, the delegate user can allow access to other users for specified services.
To configure a delegate user on the Active Directory (AD) server:
- Add a new user to the AD server.
- Open the command prompt on the AD server and run the command:
setspn –A HTTP/<user name> <domain name>\<user name>
<user name> - The user name for the user that was created.
<domain name> - The domain name that the created user belongs to.
- From the tree, right-click the user to open the of the new user.
- Click the tab.
- In the table, click to add http on the server that the user is allowed to access.
- Click .
Configuring Support on the Mobile Access Gateway
Kerberos Constrained Delegation is supported with Web Applications and Capsule Workspace Mail applications.
To configure Kerberos Constrained Delegation in SmartDashboard:
- Make sure that an LDAP Account Unit is defined in SmartDashboard and that the credentials used in it have delegate privileges.
- In the Mobile Access tab, open the application for which you want to configure Kerberos Constrained Delegation.
- In >
- Select .
- Select and click .
- In the window that opens, select .
- Click .
- Install policy.
Troubleshooting
If you have issues with Kerberos Constrained Delegation:
- Make sure that the value of in
$CVPNDIR/conf/cvpnd_internal_settings.c is . - Run:
cvpnrestart on the gateway through SSH and see if there is a entry in the Mobile Access logs in SmartView Tracker or SmartLog. - Make sure that the account unit credentials have delegate privileges.
- Make sure that the date and time of the gateway and Active Directory server are synchronized.
- Make sure that the DNS server is configured correctly and the gateway can resolve the web application host name and the Active Directory server.
Certificate Attribute Forwarding
Certificate attribute forwarding is a Single Sign-on method that transfers details from a user's certificate to internal servers without the need for a username and password. It forwards the certificate attributes as HTTP headers to the internal servers when a user logs in with a certificate. Users can then log in to other applications automatically with Single Sign-on.
Configuring Certificate Attribute Forwarding
Configure Certificate attribute forwarding in the Mobile Access configuration file: $CVPNDIR/conf/cvpnd.C
After every change to cvpnd.C, you must restart the cvpn services: cvpnrestart
To:
|
Parameter=value in $CVPNDIR/conf/cvpnd.C
|
Enable XX Product XX
|
:EnableCertHeadersForwarding (true)
|
Disable XX Product XX
|
:EnableCertHeadersForwarding (false)
|
To configure which attributes of the certificate are forwarded in the HTTP headers:
Add parameters to the CertHeaders section in $CVPNDIR/conf/cvpnd.C.
To forward:
|
Parameter=value in $CVPNDIR/conf/cvpnd.C
|
Complete certificate, encoded in base 64
|
"<header_name> : CERT.BASE64"
|
Certificate Issuer DN
|
"<header_name> : CERT.ISSUER.DN"
|
Serial number of the certificate
|
"<header_name> : CERT.SERIAL"
|
Subject DN
|
"<header_name> : CERT.SUBJECT.DN"
|
Alternative subject DN
|
"<header_name> : CERT.ALTERNATIVESUBJECT.DN"
|
Valid start date, before which the certificate cannot be used
|
"<header_name> : CERT.VALIDITY.NOTBEFORE"
|
Certificate expiration date
|
"<header_name> : CERT.VALIDITY.NOTAFTER"
|
Example:
To forward the certificate Issuer DN, edit cvpnd.C for this (where is the header name):
:EnableCertHeadersForwarding (true)
:CertHeaders (
: ("X-Cert-IssuerDN : CERT.ISSUER.DN")
)
|
|

