Getting Started with Mobile Access
Recommended Deployments
Mobile Access can be deployed in a variety of ways depending on an organization's system architecture and preferences.
Simple Deployment
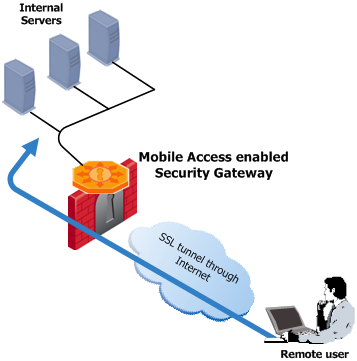
In the simplest Mobile Access deployment, one Mobile Access enabled Security Gateway inspects all traffic, including all Mobile Access traffic. IPS and Anti-Virus can be active on all traffic as well. The Security Gateway can be on the network perimeter.
This is the recommended deployment. It is also the least expensive and easiest to configure as it only requires one gateway machine for easy and secure remote access.
Deployment in the DMZ
When a Mobile Access enabled Security Gateway is placed in the DMZ, traffic initiated both from the Internet and from the LAN to Mobile Access is subject to firewall restrictions. By deploying Mobile Access in the DMZ, the need to enable direct access from the Internet to the LAN is avoided. Remote users initiate an SSL connection to the Mobile Access Gateway. The firewall must be configured to allow traffic from the user to the Mobile Access server, where SSL termination, IPS and Anti-Virus inspection, authentication, and authorization take place. Requests are then forwarded to the internal servers via the firewall.
Cluster Deployment
If you have large numbers of concurrent remote access users and continuous, uninterrupted remote access is crucial to your organization, you may choose to have Mobile Access active on a cluster. A cluster can be deployed in any of the deployments described above.
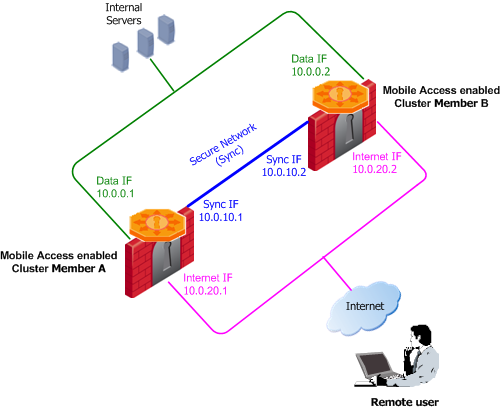
Each cluster member has three interfaces: one data interface leading to the organization, a second interface leading to the internet, and a third for synchronization. Each interface is on a different subnet.
In a simple deployment with the Mobile Access cluster in the DMZ, two interfaces suffice; a data interface leading to the organization and the internet, and a second interface for synchronization.
Deployments with VSX
You can enable the Mobile Access Software Blade on VSX Virtual Systems.
This feature is supported in R77.10 and higher.
You can use a VSX deployment to support different Mobile Access scenarios. Each Virtual System can have a Mobile Access portal with different applications, access policies, authentication requirements, and mobile clients.
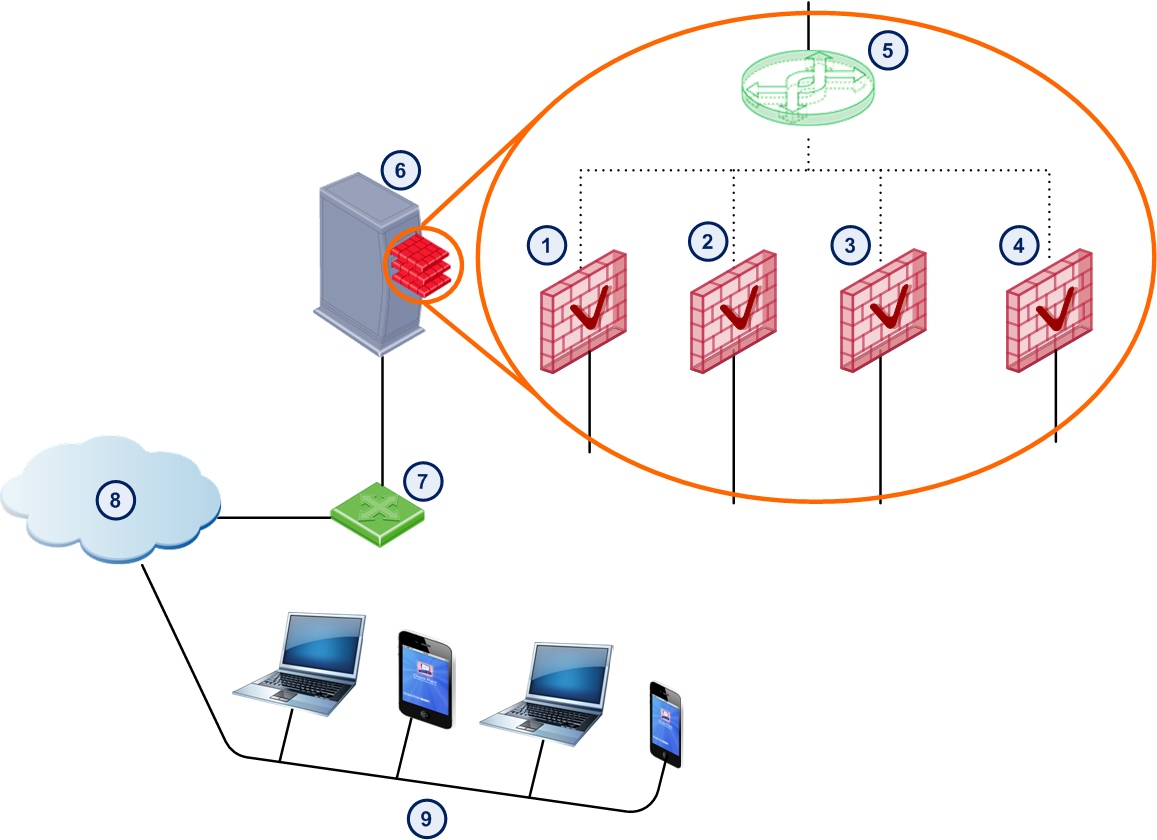
For example, in the picture below, a VSX Gateway has four Virtual Systems with Mobile Access enabled. Each Virtual System has Mobile Access configured with different settings to meet the company's needs for different users.
Item
|
Description
|
Example Mobile Access Portal URL
|
1
|
Virtual System 1 with Mobile Access enabled
|
https://dev.company.com/sslvpn
|
2
|
Virtual System 2 with Mobile Access enabled
|
https://sales.company.com/sslvpn
|
3
|
Virtual System 3 with Mobile Access enabled
|
https://finance.company.com/sslvpn
|
4
|
Virtual System 4 with Mobile Access enabled
|
https://guest.company.com/sslvpn
|
5
|
Virtual switch
|
|
6
|
VSX Gateway
|
|
7
|
Router
|
|
8
|
Internet
|
|
9
|
Remote users
|
|
This table shows an example of different settings that you can have on each Virtual System.
Virtual System
|
Users
|
Clients Allowed
|
Authentication Schemes
|
Endpoint Health Checks
|
Applications Configured
|
Virtual System 1
|
Development team
|
Mobile Access Portal, SSL Network Extender, Capsule Workspace
|
Certificate + AD Password
|
Mobile Access Portal ESOD check for company Endpoint Security requirements
Jail broken or rooted devices not allowed
|
Development applications
|
Virtual System 2
|
Sales team
|
Capsule Workspace, Capsule Connect
|
SecurID + AD password
|
Jail broken or rooted devices not allowed
|
Sales applications
|
Virtual System 3
|
Finance team
|
Mobile Access Portal, Capsule Workspace
|
SecurID + AD password
|
Cooperative enforcement with company MDM server
|
Finance applications
|
Virtual System 4
|
Contractors
|
Mobile Access Portal
|
Certificate that expires after 30 days
|
Mobile Access Portal ESOD check for commercial AV solution and recent AV signature updates
|
Contractor internal applications
|
SmartDashboard Toolbar
You can use the SmartDashboard toolbar to do these actions:
Icon
|
Description
|

|
Open the SmartDashboard menu. When instructed to select menu options, click this button to show the menu.
For example, if you are instructed to select > , click this button to open the Manage menu and then select the option.
|

|
Save current policy and all system objects.
|

|
Open a policy package, which is a collection of Policies saved together with the same name.
|

|
Refresh policy from the Security Management Server.
|

|
Open the Database Revision Control window.
|

|
Change global properties.
|

|
Verify Rule Base consistency.
|

|
Install the policy on Security Gateways or VSX Gateways.
|

|
Open SmartConsole.
|
Getting Started with Mobile Access
The steps required in SmartDashboard before working with Mobile Access are:
- Enable the Mobile Access blade on a Security Gateway or Security Gateway cluster: In the General Properties page of a Security Gateway, in the Network Security tab, select Mobile Access.'
Note - The Mobile Access blade can only be enabled on Security Gateways running on the SecurePlatform and Gaia operating systems.
- When you enable the Mobile Access blade:
- You are automatically given a 30 day trial license for 10 users.
- The Mobile Access Wizard opens. Follow the instructions to configure remote access to your network.
- Configure your firewall access rules to permit Mobile Access traffic. The actual rules needed depend on your configuration. Implied rules are automatically added to the Rule Base to allow:
- HTTPS (TCP/443) traffic.
- HTTP (TCP/80). Requests are redirected to HTTP (TCP/443).
- The DNS servers and WINS servers configured on the gateway.
The Security Gateway might also need access to: LDAP, RADIUS, or ACE servers for authentication, and an NTP server for clock synchronization.
- Configure the authentication scheme that the Mobile Access gateway will accept from remote users. Do this in Gateway Properties > Mobile Access > Authentication.
Sample Mobile Access Workflow
This is a high-level workflow to configure remote access to the internal applications and resources.
- Use SmartDashboard to enable the Mobile Access Software Blade on the Security Gateway.
- Follow the steps in the Mobile Access Configuration wizard to configure these settings:
- Select mobile device access clients
- Define the Mobile Access portal
- Define the web applications, for example Outlook Web App
- Connect to the AD server for user information
- For VPN clients, add Firewall rules to allow the mobile device connections.
- Optional: Distribute client certificates to authenticate the mobile users.
For R76 and higher, use the Certificate Creation and Distribution Wizard.
- Users download the Check Point Mobile app.
- Users open the Check Point Mobile app and enter the Mobile Access Site Name and necessary authentication, such as user name and password.
From SmartDashboard, enable Mobile Access
|

|
Configure settings in Mobile Access wizard
|
|
Add rules for mobile devices to Firewall
|
|
Generate a certificate for the clients
|
|
|
|
|
|
|

|
|
|
Users can access internal resources
|

|
Users open app and enter settings
|
|
Users download app
|
Mobile Access Wizard
The Mobile Access Wizard runs when you enable the Mobile Access blade on a gateway. It lets you quickly allow selected remote users access to internal web or mail applications, through a web browser, mobile device, or remote access client.
See Check Point Remote Access Solutions to understand more about the remote access clients mentioned in the wizard. Many of the settings in the wizard are also in >
Going through the wizard:
- - Select from where users can access the Mobile Access applications:
- - Through a browser on any computer. SSL Network Extender can be downloaded by users when necessary to access native applications.
- - Through an iOS or Android Mobile device. Devices must have a Check Point app installed.
- - Use Check Point Capsule Workspace - An app that creates a secure container on the mobile device to give users access to internal websites, file shares, and Exchange servers.
- - A full L3 tunnel app that gives users network access to all mobile applications.
- - Through a remote access client installed on a desktop computer. Select the clients to allow:
- - Endpoint Security VPN for Windows or Mac. Includes desktop firewall and security compliance verification.
- - Check Point Mobile for Windows. Includes security compliance verification.
- - SecuRemote for Windows.
- - Enter the primary URL for the Mobile Access portal. The default is the https://<IP address of the gateway>/sslvpn. You can use the same IP address for all portals on the gateway with a variation in the path. You can import a p12 certificate for the portal to use for SSL negotiation. All portals on the same IP address use the same certificate.
- - Select the applications that will be available to web or mobile device users:
- - Select the web applications to show on the Mobile Access portal.
- - Select while testing Mobile Access, to have a web application show as it will when you are in production.
- - Enter the URL of the web application that you want users to be able to open when they connect with Mobile Access. For example, you can set the home page of your intranet site.
- - Enter the Exchange server that mobile devices work with and select which applications mobile device users can access.
- - Select the AD domain, enter your credentials and test connectivity. If you do not use AD, select .
- -Select users and groups from Active Directory or internal users. You can also create a test user that will get access to the configured applications.
- - This window helps you understand steps that are required to complete the automatic configuration done by the Mobile Access wizard. Depending on the selections you made, you might see these steps:
- - To work with Desktop Remote Access Clients or Capsule Connect clients, the Mobile Access Wizard automatically includes this gateway in the Remote Access VPN community. Remote Access Clients get access rules from the Firewall Rule Base. See Preparing for Desktop Clients.
- - When you install policy, the changes made by the Mobile Access Wizard become active.
- - This is the web portal that you configured. Log in to see and use it. See
 Setting up the Mobile Access Portal. Setting up the Mobile Access Portal.Each Mobile Access-enabled Security Gateway leads to its own Mobile Access user portal. Remote users log in to the portal using an authentication scheme configured for that Security Gateway. Remote users access the portal from a Web browser with https://<Gateway_IP>/sslvpn, where <Gateway_IP> is one of these:
- FQDN that resolves to the IP address of the Security Gateway
- IP address of the Security Gateway
Remote users that use HTTP are automatically redirected to the portal using HTTPS.

|
Note - If Hostname Translation is the method for link translation, is required.
|
Set up the URL for the first time in the Mobile Access First Time Wizard.
You can change the URL of the portal and the look and feel:
- To change the IP address used for the user portal: From the properties of the Gateway object, select Mobile Access > Portal Settings.
- To configure the look and feel of the portal in the Portal Customization page: Go to Mobile Access tab > Portal Settings > Portal Customization.
- - Install an App or VPN client to start using it. See Preparing for Mobile Devices and Preparing for Desktop Clients.
- - If you use authentication with client certificates, see Managing Client Certificates.
Setting up the Mobile Access Portal
Each Mobile Access-enabled Security Gateway leads to its own Mobile Access user portal. Remote users log in to the portal using an authentication scheme configured for that Security Gateway.
Remote users access the portal from a Web browser with https://<Gateway_IP>/sslvpn, where <Gateway_IP> is one of these:
- FQDN that resolves to the IP address of the Security Gateway
- IP address of the Security Gateway
Remote users that use HTTP are automatically redirected to the portal using HTTPS.
|
Note - If Hostname Translation is the method for link translation, is required.
|
Set up the URL for the first time in the Mobile Access First Time Wizard.
You can change the URL of the portal and the look and feel:
- To change the IP address used for the user portal: From the properties of the Gateway object, select Mobile Access > Portal Settings.
- To configure the look and feel of the portal in the Portal Customization page: Go to Mobile Access tab > Portal Settings > Portal Customization.
Configuring Mobile Access Policy
The Mobile Access policy applies to the Mobile Access portal and Capsule Workspace. It does not apply to Desktop clients or Capsule Connect.
Users can access applications remotely as defined by the policy rules. Configure Mobile Access policy in the page of the tab. Create rules that include:
- Users and User Groups.
- Applications that the users can access.
- The gateways that the rule applies to.
Users and applications have multiple properties that you can choose to configure. However, you can add objects to a rule quickly and configure more detailed properties at a different time.
Settings related to what users can access from mobile devices are also defined in the Mobile Settings Profile: tab > .
To create rules in the Mobile Access Rule Base:
- In the page of the Mobile Access tab, click one of the add rule buttons.
 - In the column, click the sign, or right-click and select .
- In the User Viewer that opens, you can:
- Select a user directory, either internal or an Active Directory domain.
- Search for and select individual users, groups, or branches.
- In the column, click the sign, or right-click and select .
- In the Application Viewer that opens, you can:
- Select an application from the list.
- Click to define a new application.
- If you create a New application:
- Select the type of application.
- In the window that opens enter a that end-users will see, for example, Corporate Intranet.
- Enter the URL or path to access the application according to the example shown.
- In the column, click the sign, or right-click and select and select the gateways that the rule applies to.
- Install the Policy ( > ).
Preparing for Capsule Workspace
To enable devices to connect to the gateway with Capsule Workspace:
- Enable and configure Mobile Access on the gateway.
- In the Mobile Access wizard or in > , selectand.
- In > > , select how users authenticate to the mobile device.
If you use Certificates, in the tab, selectto create and distribute certificates for authentication between the devices and the gateway.
- Optional: Configure ESOD Bypass for Mobile Apps.
- Make sure you have rules in the Firewall Rule Base that allow traffic from mobile devices. For example, access to Exchange and application servers from the gateway.
- Download a Capsule Workspace App from the App Store or Google Play to mobile devices.
- Give users instructions to connect including the:
- Site Name
- Registration key (if you use certificate authentication)
If you use certificate authentication, we recommend that you include this information in the client certificate distribution email.
Preparing for Capsule Connect
To enable devices to connect to the gateway with Capsule Connect:
- Enable and configure Mobile Access on the gateway.
- In the Mobile Access wizard or in > , selectand.
- In > > , select how users authenticate to the mobile device.
If you use Certificates, in the tab, selectto create and distribute certificates for authentication between the devices and the gateway.
- Make sure you have rules in the Firewall Rule Base that allow traffic from mobile devices. For example:
- Remote Access VPN Community access.
- Access to Exchange and application servers from the gateway.
- Download a Check Point App from the AppStore or Google Play Market to mobile devices.
- Give users instructions to connect including the:
- Site Name
- Registration key (if you use certificate authentication)
If you use certificate authentication, we recommend that you include this information in the client certificate distribution email.
Preparing for Desktop Clients
Name
|
Source
|
Destination
|
VPN
|
Service
|
Action
|
Remote Access
|
Capsule Connect Users
|
Any
|
 Remote Access Remote Access
|
HTTP
HTTPS
|
Accept
|
|
|