Mobile Access Blade Configuration and Settings
Interoperability with Other Software Blades
The Mobile Access Software Blade is fully integrated with the other Software Blades. Any Security Gateway running on SecurePlatform or Gaia with the Firewall blade enabled can also have the Mobile Access blade enabled.
Most Network objects, Resources, and Users created in SmartDashboard also apply to Mobile Access and can be used when configuring Access to Applications. Similarly, any Network objects, Users and User Groups that you create or modify in Mobile Access appear in the SmartDashboard navigation tree and are usable in all of the SmartDashboard applications.
IPS Blade
When you enable Mobile Access on a Security Gateway certain IPS Web Intelligence protections are activated. The settings of these protections are taken from a local file and are not connected to the IPS profile. These IPS protections always apply to Mobile Access traffic only, even if the Security Gateway does not have the IPS blade enabled.
Disabling Protections for Advanced Troubleshooting
You should only disable the Mobile Access Web Intelligence protections for advanced troubleshooting.

|
Important - We do not recommend that you deactivate these protections because of potential security risks to the Security Gateway while the protections are off.
|
To disable the local Web Intelligence protections:
- Backup the
$CVPNDIR/conf/httpd.conf configuration file. - Edit
$CVPNDIR/conf/httpd.conf by deleting or commenting out this line:
LoadModule wi_module /opt/CPcvpn-<current version>/lib/libModWI.so

|
Note - <current version> is the Check Point version installed. For example, R75.20.
|
Changing to an IPS Profile Configuration for Mobile Access
We recommend using the local IPS Web Intelligence protections that are automatically configured and activated when you enable the Mobile Access blade. If you want to use the IPS profile that you assign to the Security Gateway instead of the local file, make sure that certain crucial protections are active so that your Security Gateway stays secure.
To change to a Security Gateway IPS profile configuration for Mobile Access instead of the local configuration:
- Edit the IPS profile assigned to the Security Gateway to include all of the protections listed in IPS Protections Crucial for Mobile Access.
- From the CLI, run:
cvpnd_settings $CVPNDIR/conf/cvpnd.C set use_ws_local_configuration false
|
- When prompted, backup
$CVPNDIR/conf/cvpnd.C - Restart the Check Point processes by running
cvpnstop, cvpnstart.
|
Note - If IPS is disabled, Mobile Access will use the local IPS configuration to ensure that the Security Gateway is protected. This is true regardless of the use_ws_local_configuration flag settings.
|
To switch back to the local, automatic IPS settings for Mobile Access:
- From the CLI, run:
cvpnd_settings $CVPNDIR/conf/cvpnd.C set use_ws_local_configuration true
|
- Restart the Check Point processes by running
cvpnstop, cvpnstart.
IPS Protections Crucial for Mobile Access
The protections listed below should always be active on Mobile Access traffic. They are included in the local IPS settings that are automatically activated when Mobile Access is enabled on a Security Gateway. See that most but not all are included in the Recommended_Protection IPS Profile.
Protection Name
|
In Recommended_Protection Profile?
|
HTTP Format Sizes
|
yes
|
HTTP Methods
|
yes
|
ASCII Only Request
|
yes
|
General HTTP Worm Catcher
|
yes
|
Directory Traversal
|
yes
|
Cross-Site Scripting
|
no
|
Command Injection
|
yes
|
Header Rejection
|
yes
|
Malicious Code Protector
|
no
|
Non Compliant HTTP
|
yes
|
Anti-Virus and Anti-Malware Blade
Certain Anti-Virus settings configured for a Security Gateway in the page of the tab also apply to Mobile Access traffic. To activate traditional Anti-Virus protection, enable the Traditional Anti-Virus on the Security Gateway.
These settings apply to Mobile Access traffic when is configured to scan traffic :
- Incoming files arriving to - Inspects traffic that Mobile Access users upload to Mobile Access. (The drop-down menu is not relevant.)
- Outgoing files leaving - Inspects the traffic that Mobile Access users download from Mobile Access. (The drop-down menu is not relevant.)
- The Internal Files field is not relevant since Mobile Access uses an external interface.
- Exceptions are not supported.
If is configured to scan traffic , all portal traffic is scanned according to the settings defined for the Mail, FTP and HTTP protocols in SmartDashboard.
Mobile Access Anti-Virus protections always work in proactive mode regardless of which option you select.
|
Note - After SSL Network Extender traffic is rerouted to the Security Gateway, Anti-Virus inspects the traffic as it does to any other unencrypted traffic.
|
Enabling Traditional Anti-Virus
The Anti-Virus blade and Traditional Anti-Virus can be activated on Security Gateways in your system.
|
Note - You cannot activate the Anti-Virus blade and Traditional Anti-Virus on the same Security Gateway.
|
To configure traditional Anti-Virus:
- On the tab, double-click the required Security Gateway network object.
- Select > > .
- Click .
- Define rules in the Rule Base to permit specific services. Anti-Virus scanning is applied only to accepted traffic.
- From tab > , select the services to scan using these options:
- From the page, configure when to perform automatic signature updates or initiate a manual signature update.
- From the > page, configure Anti-Virus scanning options for , , , and services.
- From the > page, configure FTP traffic scanning options.
- From the > page, configure HTTP traffic scanning options.
- From the > page, configure the options to scan, block or pass traffic according to the file type and configure continuous download options.
- From the > page, configure options for file handling and scan failures.
IPsec VPN Blade
The IPsec VPN blade and Mobile Access blade can be enabled on the same gateways. They can be used in parallel to enable optimal site to site and remote access VPN connectivity for your environment.
Certain VPN Clients that worked with Mobile Access in previous versions do not work with the Mobile Access blade on R71 and higher gateways. They only work with the IPsec VPN blade. These are:
- Endpoint Connect
- SecureClient Mobile
SSL Network Extender works either with Mobile Access or with IPsec VPN, however, if the Mobile Access blade is enabled on a gateway, SSL Network Extender must be configured through Mobile Access. If you had SSL Network Extender configured through IPsec VPN and now you enabled the Mobile Access blade on the gateway, you must reconfigure SSL Network Extender policy in the Mobile Access tab of SmartDashboard. Rules regarding SSL Network Extender in the main security rule base are not active if the Mobile Access tab is enabled.
Office mode can be configured either with Mobile Access or with IPsec VPN.
Portal Settings
Each Mobile Access enabled gateway has its own Mobile Access portal that end users browse to for remote access. On the gateway you can configure:
- How the portal can be accessed.
- The look and feel of the portal.
- The default language of the portal.
- An alternative portal for specific user groups.
Portal Accessibility Settings
Configure how users access the Mobile Access portal.
Main URL
Each Mobile Access-enabled Security Gateway leads to its own Mobile Access user portal. Remote users log in to the portal using an authentication scheme configured for that Security Gateway.
Remote users access the portal from a Web browser with https://<Gateway_IP>/sslvpn, where <Gateway_IP> is one of these:
- FQDN that resolves to the IP address of the Security Gateway
- IP address of the Security Gateway
Remote users that use HTTP are automatically redirected to the portal using HTTPS.
|
Note - If Hostname Translation is the method for link translation, is required.
|
Set up the URL for the first time in the Mobile Access First Time Wizard.
Aliases
Click the button to URL aliases that are redirected to the main portal URL. For example, portal.example.com can send users to the portal. To make the alias work, it must be resolved to the main URL on your DNS server.
Certificate
Click Import to import a p12 certificate for the portal website to use. If you do not import a certificate, the portal uses a Check Point auto-generated certificate. This might cause browser warnings if the browser does not recognize the gateway's management. All portals on the same IP address use the same certificate.
Accessibility
Click to select from where the portal can be accessed. The options are based on the topology configured for the gateway.
- Through all interfaces
- Through internal interfaces
- Including undefined internal interfaces
- Including DMZ internal interfaces
- According to the Firewall policy - Select this if there is a rule that states who can access the portal.
Portal Customization
You can configure the look and feel of the default Mobile Access end user portal. There is a default end user portal for each Mobile Access gateway or cluster.
To customize the Mobile Access end user portal:
- Go to the Portal Customization page of the gateway in one of these ways:
- From the properties of the gateway, select Mobile Access > Portal Customization.
- In the SmartDashboard Mobile Access tab, select the Portal Settings > Portal Customization.
- Select a gateway or cluster object and click Edit.
The Portal Customization page opens.
- Make a selection in each field.
Title of the Portal
Title text (multi-language) of the end user portal, such as the name of your company, or any other text.
Localization
Default language (can be changed by user) localizes the end user portal to the selected language.
Logo in the Portal
Use custom logo image and browse to a location where logos are stored. The logo must be 165 x 35 pixels or smaller. Larger images are resized.
|
Note - If the custom logo is changed, end users must refresh their browser cache in order see the new logo image.
|
Clicking the logo redirects to this URL is a URL that can serve as a starting point. It is often used for the URL of the organization's intranet home page.
Localization Features
Mobile Access localizes the user interface of the Mobile Access user portal and the Secure Workspace to multiple languages.
The Mobile Access user portal and the Secure Workspace can be configured by gateway in the Portal Settings > Portal Customization page to use these languages:
- English (the default language)
- Bulgarian
- Chinese- Simplified
- Chinese- Traditional
- Finnish
- French
- German
- Italian
- Japanese
- Polish
- Romanian
- Russian
- Spanish
Auto Detection of User Language Preferences
Automatic language detection is an optional feature that gives priority to the language settings in the user’s browser over the language chosen by the administrator.
Automatic language detection is activated by configuring the CVPN_PORTAL_LANGUAGE_AUTO_DETECT flag in the Main.virtualhost.conf file on Mobile Access.
By default, the language preference in the user’s browser is not automatically detected. If automatic detection is configured, the language used in SmartDashboard is the first language supported by Mobile Access that is found in the Language Preference list defined in the user’s browser settings. If no supported language is found in the Language Preference list in the user’s browser, the language set by the administrator in SmartDashboard is used.
To activate automatic language detection, perform the following steps on each cluster member:
- Open an SSH connection to Mobile Access, or connect to it via a console.
- Log in to Mobile Access using your administrator user name and password.
- Change to Expert mode by typing expert and supplying the password.
- Edit the
$CVPNDIR/conf/includes/Main.virtualhost.conf file, and change the following line from:SetEnv CVPN_PORTAL_LANGUAGE_AUTO_DETECT 0
to:
SetEnv CVPN_PORTAL_LANGUAGE_AUTO_DETECT 1
- Run the command:
cvpnrestart.
Language Selection by End Users
Any explicit language selection by the user in any of the portal pages overrides both the administrator’s default language setting, and the automatic language detection.
Users can select a language in the user portal sign-in page, in the Change Language To field.
Alternative Portal Configuration
It is possible to specify the portal that is presented to users when they sign in to Mobile Access. You can specify alternative portals for different user groups. Users that do not belong to any of these user groups reach the default Mobile Access portal.
|
Note - There should be an Mobile Access policy rule that includes the alternative portal as a Web application and allows its intended users to access it.
|
To specify an alternative user portal:
- In the SmartDashboard Mobile Access tab, select Portal Settings > Alternative Portal.
- Click Add. The Mobile Access Sign-In Home Page window opens.
- In the User Groups tab, specify user groups that may access the alternative user portal.
- In the Install On tab, specify the Mobile Access gateways and gateway clusters that host the alternative portal.
- In the Sign-In Home Page tab, choose an alternative portal for users, in place of the Mobile Access user portal that users reach by default. URL is the location of the alternative user portal for the user group(s) specified in the User Groups tab.
When a user belongs to more than one group, the table in the Alternative Portal page acts as an ordered rule base. Users are directed to the alternative portal of the first group that they are part of.
Concurrent Connections to the Gateway
In the > section you can configure the maximum limit for concurrent connections.
When users connect to corporate resources through the Mobile Access blade, it creates multiple connections. For example, from the user to the gateway, and from the gateway to the internal server. Therefore, in an environment with over 1000 remote users, we recommend that you increase the maximum concurrent connections.
For example: The default maximum is 25,000. If you have 2000 mobile access users, increase the maximum to 29,000 (2 times 2000).
Server Certificates
For secure SSL communication, gateways must establish trust with endpoint computers by showing a Server Certificate. This section discusses the procedures necessary to generate and install server certificates.
Check Point gateways, by default, use a certificate created by the Internal Certificate Authority on the Security Management Server as their server certificate. Browsers do not trust this certificate. When an endpoint computer tries to connect to the gateway with the default certificate, certificate warning messages open in the browser. To prevent these warnings, the administrator must install a server certificate signed by a trusted certificate authority.
All portals on the same Security Gateway IP address use the same certificate.
Obtaining and Installing a Trusted Server Certificate
To be accepted by an endpoint computer without a warning, gateways must have a server certificate signed by a known certificate authority (such as Entrust, VeriSign or Thawte). This certificate can be issued directly to the gateway, or be a chained certificate that has a certification path to a trusted root certificate authority (CA).
The next sections describe how to get a certificate for a gateway that is signed by a known Certificate Authority (CA):
Generating the Certificate Signing Request
First, generate a Certificate Signing Request (CSR). The CSR is for a server certificate, because the gateway acts as a server to the clients.
|
Note - This procedure creates private key files. If private key files with the same names already exist on the computer, they are overwritten without warning.
|
- From the gateway command line, log in to expert mode.
- Run:
cpopenssl req -new -out <CSR file> -keyout <private key file> -config $CPDIR/conf/openssl.cnf
This command generates a private key. You see this output:
Generating a 2048 bit RSA private key
.+++
...+++
writing new private key to 'server1.key'
Enter PEM pass phrase:
- Enter a password and confirm.
Fill in the data.
- The field is mandatory. This field must have the Fully Qualified Domain Name (FQDN). This is the site that users access. For example:
portal.example.com. - All other fields are optional.
- Send the CSR file to a trusted certificate authority. Make sure to request a Signed Certificate in PEM format. Keep the
.key private key file.
Generating the P12 File
After you get the Signed Certificate for the gateway from the CA, generate a P12 file that has the Signed Certificate and the private key.
- Get the Signed Certificate for the gateway from the CA.
If the signed certificate is in P12 or P7B format, convert these files to a PEM (Base64 encoded) formatted file with a CRT extension.
- Make sure that the CRT file has the full certificate chain up to a trusted root CA.
Usually you get the certificate chain from the signing CA. Sometimes it split into separate files. If the signed certificate and the trust chain are in separate files, use a text editor to combine them into one file. Make sure the server certificate is at the top of the CRT file.
- From the gateway command line, log in to expert mode.
- Use the
*.crt file to install the certificate with the *.key file that you generated. - Run:
cpopenssl pkcs12 -export -out <output file> -in <signed cert chain file> -inkey <private key file>
For example:
cpopenssl pkcs12 -export -out server1.p12 -in server1.crt -inkey server1.key
- Enter the certificate password when prompted.
Generating Wildcard Certificates for Hostname Translation
If you use Hostname Translation, you need a wildcard certificate. This lets clients access Web applications on sub-domains behind the gateway. If Mobile Access uses a fixed domain certificate, client browsers issue certificate warnings when users try to access Web applications in a sub-domain behind the Mobile Access gateway. This is because each Web application URL is translated to a different Mobile Access hostname.
Before you begin, make sure the Hostname Translation support is configured in the DNS server and in the SmartDashboard.
To prepare a request a 3rd-Party wildcard server certificate:
- In , start with
CN=FQDN.For example: CN=sslvpn.example.com
- In , enter two DNS names: the FQDN and the wildcard.
For example: sslvpn.example.com, *.sslvpn.example.com
To configure wildcard certificate generation:
- Backup and edit the configuration file of the script:
- R66.x, R71.x, R75, R75.10 -
- R75.20 and higher -
- In the
[ req ] section, uncomment the line:
req_extensions = v3_req - In the
[ v3_req ] section, add this line:
subjectAltName=DNS:FQDN,DNS:*.ParentDomain For example: subjectAltName=DNS:sslvpn.example.com,DNS:*.sslvpn.example.com
- Save .
- Runand create the CSR.
To make sure the CSR was generated properly, run:
- R75.x -
cpopenssl req -in requestFile.csr -text - earlier versions -
openssl req -in requestFile.csr -text
- When asked for the CommonName (CN), enter the FQDN. For example:
sslvpn.example.com - Restore the file from the backup.
Installing the Signed Certificate
Install the Third Party signed certificate to create Trust between the Mobile Access Software Blade and the clients.
All portals on the same IP address use the same certificate. Define the IP address of the portal in the Portal Settings page for the blade/feature.
- Import the new certificate to the gateway in SmartDashboard from a page that contains the Portal Settings for that blade/feature. For example:
In the section, click or.
- Install the policy on the gateway.
|
Note - The Repository of Certificates on the IPsec VPN page of the SmartDashboard gateway object is only for self-signed certificates. It does not affect the certificate installed manually using this procedure.
|
Viewing the Certificate
To see the new certificate from a Web browser:
The Security Gateway uses the certificate when you connect with a browser to the portal. To see the certificate when you connect to the portal, click the lock icon that is next to the address bar in most browsers.
The certificate that users see depends on the actual IP address that they use to access the portal- not only the IP address configured for the portal in SmartDashboard.
To see the new certificate from SmartDashboard:
From a page that contains the portal settings for that blade/feature, click in the section.
Web Data Compression
Mobile Access can be configured to compress Web content. This can produce a much faster website for users. It also reduces bandwidth needs, and therefore, costs.
Most compression algorithms, when applied to a plain-text file, can reduce its size by 70% or more, depending on the content in the file.
Be aware that compression does increase the CPU usage of Mobile Access, which in itself does have some performance implications.
Most browsers can accept compressed data, uncompress it and display it.
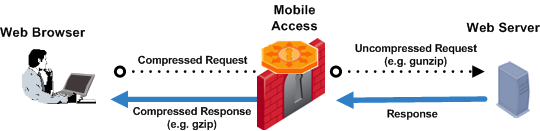
If configured to compress data, Mobile Access compresses the data received from Web servers (the http or https response). If the Web browser at the endpoint compresses the http or https request, Mobile Access uncompresses it and sends it on to the server. This is illustrated in the figure below.
Mobile Access supports the gzip, deflate, and compress compression methods.
It is possible to specify the mime types that will be compressed.
Configuring Data Compression
Web data compression is configured per gateway in GuiDBedit, the Check Point Database Tool.
To configure data compression by Mobile Access:
|
Note - In a cluster, perform the following steps on the cluster object.
|
- In GuiDBedit, go to network_objects > the table of the gateway.
- Search for web_compression under connectra_settings and fill in the following parameters:
- enable_web_compression - Enter true to enable data compression and false to disable it.
- compression_level - Enter e a value between 1 and 9. The higher the number, the more CPU is used. The default is 5.
- compress_specific_mime - Enter true if you want to compress specific mime types and false if you do not.
- mime_types - If you typed true for compress_specific_mime, enter the mime type, for example, text/html.
- Save the changes in GuiDBedit and close it.
- Install policy on the Security Management Server using SmartDashboard.
Using Mobile Access Clusters
A remote access enabled gateway is a business critical device for an organization. A failure of a gateway results in immediate loss of remote access traffic in and out of the organization. Many of these sessions may be mission critical, and losing them will result in loss of critical data.
Using ClusterXL, you can set up a Load Sharing or High Availability clustering solution that distributes network traffic among Mobile Access cluster members.
A cluster including Mobile Access gateways provides:
- Transparent failover in case of cluster member failure.
- Zero downtime for mission-critical environments.
- Enhanced throughput (in Load Sharing mode).
All cluster members are aware of the sessions tracked through each of the other cluster members. The cluster members synchronize their sessions and status information across a secure synchronization network.
The Sticky Decision Function
If you are using SSL Network Extender, you must enable the Sticky Decision Function.
A connection is sticky when all of its packets are handled, in either direction, by a single cluster member.
The Sticky Decision Function distributes sessions from client IPs between the cluster members, and ensures that connections from a given IP always pass through the same member.
How Mobile Access Applications Behave Upon Failover
The table below summarizes the end-user experience upon failover for each Mobile Access application.
How Applications Behave Upon Failover
Application
|
Survives
failover?
|
User experience upon failover
|
Web browsing through the user portal
Domino Web Access
Outlook Web Access
File Shares
|
Yes
|
User is unaware of failover. If the failover happens while a user is clicking a link or waiting for a server response, user may be disconnected and may need to refresh the page.
|
Web Mail
|
No
|
If failover occurs while a user is clicking a link or waiting for a server response, user sees an error page. By clicking the link "Go to the login page" the user returns to the Inbox, and the original session is lost.
|
Citrix
|
No
|
User is disconnected, and the Citrix session is lost. User must actively re-establish a connection.
|
Endpoint Compliance Scan
|
Yes
|
Re-scan may be required if user logs out of the portal, or needs to log in again.
|
Secure Workspace
|
Yes
|
User is unaware of failover. However, if the failover happens while a user is clicking a link or waiting for a server response, user may be disconnected and may need to refresh the page.
|
Multi challenge login
|
No
|
If user is in the middle of a multi-challenge login he/she is redirected to the initial login page.
|
SSL Network Extender Network Mode
|
Yes
|
The user may notice the connection stalling for a few seconds, as if there was a temporary network disconnection.
|
SSL Network Extender Application Mode
|
No
|
SSL Network Extender remains open and in a connected state. However, connections of applications using the VPN tunnel are lost. Some applications (such as Outlook) try to reopen lost connections, while others (Telnet for example) are closed (or exit).
|
SSL Network Extender— Downloaded-to-Mobile Access applications
|
Mode
dependent
|
Network Mode — Survives failover.
Application Mode — Does not survive failover.
|
|

