


|
|
|
For more about Kerberos SSO, see:
SSO configuration includes two steps:
The Endpoint Identity Agent client needs to be connected to an Identity Awareness Gateway. For this to happen, it must discover the server and trust it.
Server discovery refers to the process of deciding, to which server the client should connect. We offer several methods for configuring server discovery – from a very basic method of simply configuring one server to a method of deploying a domain wide policy of connecting to a server based on your current location. This section describes these options.
Server trust refers to the process of validating that the server, to which the end user connects, is indeed a genuine one. It also makes sure that communication between the client and the server was not tampered with by a Man In The Middle (MITM) attack.
The trust process compares the server fingerprint calculated during the SSL handshake with the expected fingerprint. If the client does not have the expected fingerprint configured, it will ask the user to verify that it is correct manually. This section describes the methods that allow the expected fingerprint to be known, without user intervention.
These are the options that the client has for discovering a server and creating trust with it:
|
Requires AD |
Manual User Trust Required? |
Multi- |
Client Remains Signed? |
Allows Ongoing Changes |
Level |
Recommended for... |
|---|---|---|---|---|---|---|---|
File name based |
No |
Yes |
No |
Yes |
No |
Very Simple |
Single Security Gateway deployments |
AD based |
Yes |
No |
Yes |
Yes |
Yes |
Simple |
Deployments with AD that you can modify |
DNS based |
No |
Yes |
Partially (per DNS server) |
Yes |
Yes |
Simple |
Deployments without AD or with an AD you cannot modify, but the DNS can be changed |
Remote registry |
No |
No |
Yes |
Yes |
Yes |
Moderate |
Where remote registry is used for other purposes |
Pre- |
No |
No |
Yes |
No |
No |
Advanced |
When both DNS and AD cannot be changed, and there is more than one Security Gateway |
This option is the easiest to deploy, and works out-of-the-box if the Captive Portal is also the Identity Awareness Gateway. If your deployment consists of one Identity Awareness Gateway, and a Captive Portal is running on the same Security Gateway, and it is OK with you that the user needs to verify the server fingerprint and trust it once, then you can use this option, which works with no configuration.
How does it work?
When a user downloads the Endpoint Identity Agent client from the Captive Portal, the address of the Identity Awareness Gateway is added to the file name. During the installation sequence, the client checks if there is any other discovery method configured (Pre-packaged, AD based, DNS based or local registry). If no method is configured, and the Identity Awareness Gateway can be reached, the Endpoint Identity Agent will use it. You can make sure that this is the case by looking at the Endpoint Identity Agent settings and seeing that the Identity Awareness Gateway that is shown in the file name is present in the Endpoint Identity Agent dialog box.
Why can't we use this for trust data?
As the file name can be changed, we cannot be sure that the file name was not modified by an attacker along the way. Therefore, we cannot trust data passed in the file name as authentic, and we need to verify the trust data by another means.
If your endpoint computers are members of an Active Directory domain, and you have administrative access to this domain, you can use the Distributed Configuration tool to configure connectivity and trust rules for the Endpoint Identity Agent.
This tool is installed a part of the Endpoint Identity Agent: go to the Start menu > All Programs > Check Point > Identity Agent.
Note - You must have administrative access to this Active Directory domain.
The Distributed Configuration tool has three panes:
Note - The complete configuration is written to Active Directory database - under the Program Data branch in a hive named Check Point. This hive is added in the first run of the tool. Adding this hive will not have any effect on other AD based applications or features.
Server Configuration Rules
The Endpoint Identity Agent fetches the configured rule lists from the Active Directory database. Each time the Endpoint Identity Agent needs to connect to an Identity Awareness Gateway, it tries to match itself against the rules, from top to bottom.
When the Endpoint Identity Agent matches a rule, it uses the Identity Awareness Gateways configured in this rule, according to the priority specified.
For example:
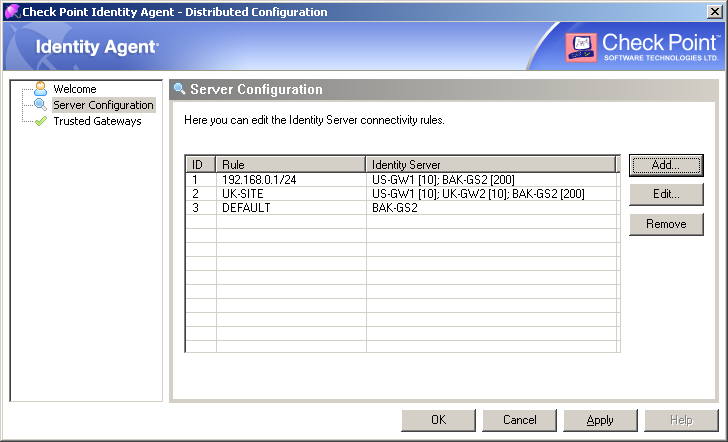
This configuration means:
192.168.0.1 / 24, then the Endpoint Identity Agent needs to connect to the Identity Awareness Gateway "US-GW1".If the gateway "US-GW1" is not available, then the Endpoint Identity Agent needs to connect to the Identity Awareness Gateway "BAK-GS2" (it will be used only if gateway "US-GW1" is not available, as its priority is higher).
UK-SITE", then the Endpoint Identity Agent needs to connect to either Identity Awareness Gateway "US-GW1", or Identity Awareness Gateway "UK-GW2" (Endpoint Identity Agent will choose between these gateways randomly, as they both have the same priority).If both of these gateways are not available, then the Endpoint Identity Agent needs to connect to the Identity Awareness Gateway "BAK-GS2".
BAK-GS2" (the default rule is always matched when it is encountered).Trusted Gateways
The Trusted Gateways pane shows the list of Identity Awareness Gateways considered trusted - no pop-ups will open when the Endpoint Identity Agent tries to connect to these Identity Awareness Gateways.
You can add, edit or delete a server. If you have connectivity to the Identity Awareness Gateway, you can get the name and fingerprint by entering its address and clicking Fetch Fingerprint. Otherwise, you should enter the same name and fingerprint that is shown when connecting to that Identity Awareness Gateway.
For example:
If you configure the client to ‘Automatic Discovery’ (the default), it looks for a server by issuing a DNS SRV query for the address ‘CHECKPOINT_NAC_SERVER._tcp’ (the DNS suffix is added automatically). You can configure the address in your DNS server.
To configure the automatic discovery address on the DNS server:
443._tcp.
|
Note - Security Gateway with Identity Awareness Load Sharing can be achieved by creating several SRV records with the same priority and High Availability can be achieved by creating several SRV records with different priorities. |
|
Note - If you configure AD based and DNS based configuration, the results are combined according to the specified priority (from the lowest to highest). |
C:\> nslookup
> set type=SRV
> checkpoint_nac_server._tcp
Example output:
Server: dns.company.comAddress: 192.168.0.17
checkpoint_nac_server._tcp.ad.company.com SRV service location: priority = 0 weight = 0 port = 443 svr hostname = idserver.company.com
idserver.company.com internet address = 192.168.1.212
> exit
If you have another way to deploy registry entries to your client computers (such as Active Directory GPO updates), you can deploy the Identity Awareness Gateway addresses and trust parameters before you install the clients. Clients will use the already-deployed settings immediately after installation.
To use the remote registry option:
The full agent installs itself to your Program Files directory and saves its configuration to HKEY_LOCAL_MACHINE.
The light Endpoint Identity Agent installs itself to the Users directory and saves its configuration to HKEY_CURRENT_USER.
If let the client choose a server based on location, click Advanced.
HKEY_LOCAL_MACHINE or HKEY_CURRENT_USER, according to the client type installed):SOFTWARE\CheckPoint\IA\TrustedGateways (the whole tree)SOFTWARE\CheckPoint\IA\ (on 32-bit), orSOFTWARE\Wow6432Node\Checkpoint\IA (on 64-bit)
DefaultGatewayDefaultGatewayEnabledPredefinedPDPConnRBUsedPredefinedPDPConnectRuleBaseYou can use the Identity Awareness Configuration Utility to create custom Endpoint Identity Agent installation packages. Endpoint Identity Agents have many advanced configuration parameters. Some of these parameters are related to the installation process, while others are related to Endpoint Identity Agent functionality. All of the configuration parameters have default values that are deployed with the product and can remain unchanged.
You must install Microsoft .NET Runtime framework 4.0 or higher before you install and run the Endpoint Identity Agent Configuration Tool.
To install the .NET Runtime Framework v4.0:
To create a custom Endpoint Identity Agent installation package, you must first copy the customizable MSI file from the Security Gateway to your management computer. This is the computer on which you use the Endpoint Identity Agent Configuration Tool.
To get the customizable MSI file:
/opt/CPNacPortal/htdocs/nac/nacclients/customAgent.msiYou must use the original copy of the MSI file when you work with the Endpoint Identity Agent Configuration Tool.
You must install Endpoint Identity Agent v2.0 or above (from Security Gateway R77 or above) on your management client computer. The Configuration Tool is installed in the Endpoint Identity Agent installation directory.
To install the Endpoint Identity Agent on your client computer:
/opt/CPNacPortal/htdocs/nac/nacclients/fullAgent.exe/opt/CPNacPortal/htdocs/nac/nacclients/lightAgent.exeTo run the Endpoint Identity Agent Configuration Tool:
The Endpoint Identity Agent Configuration Tool opens.
You configure all features and options in the Endpoint Identity Agent Configuration Tool window.
MSI Package Path
Enter or browse to the source installation package. You must use a Check Point customizable MSI file as the source for the configuration tool.
Installation Type
Select whether the Endpoint Identity Agent applies to one user or to all users of the computer, on which it is installed.
Installation UI
Select one of these end user interaction options:
Endpoint Identity Agent Type
Select the type of Endpoint Identity Agent to install:
Custom Features
Select these features for the Custom Endpoint Identity Agent type:
Copy configuration
Save
Click to save this configuration to a custom MSI file. Enter a name for the MSI file.
To deploy a custom Endpoint Identity Agent with the Captive Portal:
customAgent.msi package to the /opt/CPNacPortal/htdocs/nacclients/ directory on the Security Gateway.
