|
|
|
In This Section: |
Check Point Gaia software runs on many platforms and pre-configured appliances. Installations differ by deployment option and platform.
During installation, an automatic check is done to makes sure that there is enough disk space for the installation.
For more about supported deployments, platforms, hardware requirements and operating systems, see the
R77 Release Notes
R77.10 Release Notes
R77.20 Release Notes
R77.30 Release Notes
Note - You must install, configure and activate the TCP/IP network protocol before you run the installation program.
With CPUSE, you can automatically update Check Point products for the Gaia OS, and the Gaia OS itself. The software update packages and full images are for major releases, minor releases and Hotfixes. All of the CPUSE processes are handled by the Deployment Agent daemon (DA).
Gaia automatically locates and shows the available software update packages and full images that are relevant to the Gaia operating system version installed on the computer, the computer's role (gateway, Security Management Server, standalone), and other specific properties. The images and packages can be downloaded from the Check Point Support center and installed.
Note - The Software Updates feature was renamed to Check Point Upgrade Service Engine (CPUSE) in R77.20.
Limitations when Installing Full Images
Software Update Requirements
/var/logpvsdf -hTo update the Gaia Software Updates agent:
To install R77 using Upgrades (CPUSE) - Portal:
The Installation verified - Installation is allowed window shows. Verification is complete.
In This Section |
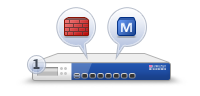
Standalone Deployment - The Security Management Server and the Security Gateway are installed on the same computer or appliance.
|
Item |
Description |
1 |
Standalone computer |
|
|
Security Gateway component |
|
|
Security Management Server component |
In general, Gaia disk partitions in a clean installation are larger than SecurePlatform partitions.
On Check Point appliances, the size of the disk partitions is predefined. On Smart-1 50/150/3050/3150 appliances, you can modify the default disk partitions in the first 20 seconds of an installation. The non-interactive installation then continues.
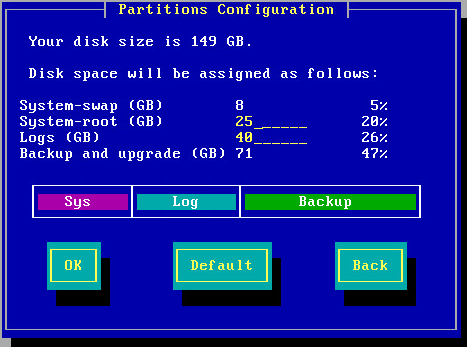
When installing Gaia on an open server, these partitions have default sizes:
You can change the System-root and the Logs partition sizes. The storage size assigned for backup and upgrade is updated accordingly.
To see the size of the system-root and log partitions on an installed system, enter expertdf -h
For example:
>df -h
Filesystem Size Used Avail Used% Mounted on /dev/mapper/vg_splat-lv_current 25G 3.4G 20G 15% / /dev/sda1 145M 19M 118M 14% /boot tmpfs 2.0G 0 2.0G 0% /dev/shm /dev/mapper/vg_splat-lv_log 40G 345M 37G 1% /var/log |
In this example, the system root partition has 25 GB of disk space, and 40 GB is assigned for logs.
Most of the remaining space on the disk is reserved for backup images and upgrade. To see the disk space assigned for backup images, connect to the Gaia Portal and go to the Maintenance > Image Management page. On an Open Server, the available space shown in the Image Management page is less than the space you defined when installing Gaia. The difference between the two amounts is the space reserved for upgrades. The amount of reserved space equals the size of the system-root partition.
Note - The minimum recommended space in /var/log
You can configure these appliances as Standalone:
Before you configure an appliance as a Standalone (Check Point Security Gateway and Security Management Server in one), you must first install the latest version of R77 Gaia Operating System on it. To install the latest version of R77 on appliances running R77.20 or earlier version of Gaia, run a clean installation. On appliances running R77.30 or higher, revert to factory defaults.
To install R77 Gaia on IP appliances:
See sk100686.
To install R77 Gaia on UTM-1 and 2012 series appliances:
For installation from a DVD, connect an external DVD drive, and insert the DVD into it.
The appliance begins the boot process and status messages show in the terminal emulation window.
Note - If more time elapses, the appliance boots from the hard drive.
The R77 ISO file is installed on the appliance, and the version and build number show in the terminal emulation window and on the LCD screen.
The appliance reboots and shows the model number on the LCD screen.
You can configure a Check Point Standalone appliance using the Check Point First Time Configuration Wizard in one of these modes:
Gaia Quick Setup is suitable for quick deployment of preconfigured settings on Check Point appliances. You can use it in production environments, for Security Checkup analysis, and for demos. Quick Setup configures appliances as Check Point Standalone (Security Management Server and Security Gateway), with selected Software Blades preconfigured, and in monitor or in bridge mode. For more information, see sk102231.
To configure Check Point products on an appliance running Gaia Operating System, the administrator uses the IP address of the management interface on the appliance. The default is 192.168.1.1, but you can change it. If you change the management interface IP address, make sure it is on the same subnet as the management network, so that you can access the appliance from a remote computer over the network. You can change the management IP address before, during, or after running the First Time Configuration Wizard. If you change the management IP address during the First Time Configuration Wizard, the warning shows: Your IP address has been changed. In order to maintain the browser connection, the old IP address will be retained as a secondary IP address.
|
Note - On a UTM-1 appliance, the internal interface (INT) is used as the management interface. |
To change the management IP address before running the First Time Configuration Wizard:
adminadminshow interfacesset interface mgmt ipv4-address <IPv4 address> subnet-mask <mask>
set static-route default nexthop gateway address <ip address> on
Now, you can use the configured management IP address to connect through a browser with the Portal and to run the First Time Configuration Wizard.
To change the management IP address after running the First Time Configuration Wizard:
Note - The connection will drop, because the settings of an interface the browser is currently connecting to are changed.
To configure a Standalone appliance using First Time Configuration Wizard in the standard mode:
The login page opens.
adminadminThe First Time Configuration Wizard starts and the Welcome screen shows.
Note - You can leave the IP address and the subnet mask unchanged. It is either the factory default address or the latest address that the administrator configured.
If the unit is part of a cluster:
A progress bar tracks the configuration of each task.
If the Help Check Point Improve Upgrades (CPUSE) window shows, click Yes or No.
After Gaia R77.30 is installed on the appliance, you can also download the SmartConsole using the Gaia Portal.
To download the SmartConsole:
https://
When you configure a Standalone appliance in Quick Setup mode, these products settings are configured:
|
Note - Anti-Bot, Anti-Virus, and Threat Emulation are not installed on 2200 series appliances |
To configure a Standalone appliance using First Time Configuration Wizard in the Quick Setup mode:
The login page opens.
adminadminThe First Time Configuration Wizard starts and the Welcome screen shows.
Note - You can leave the IP address and the subnet mask unchanged. It is either the factory default address or the latest address that the administrator configured.
|
Note - In Quick Setup mode, date and time are automatically synchronized with those on the PC that is used to run the First Time Configuration Wizard. |
After the First Time Configuration Wizard runs in Quick Setup mode, the latest R77 version of the Security Checkup is installed and can be used with R77.30 or a later version of SmartConsole.
If you want to convert the standalone appliance into a gateway only, and manage it with an existing Security Management Server, you can download and run this script on the appliance:
# /bin/standlone_to_gw_registry_update.sh $CPDIR/registry/HKLM_registry.data
|
Notes -
|
A standalone deployment can be installed on any computer that meets the minimum requirements (see the Release Notes).
This procedure explains how to install the Gaia operating system on an open server. Then you configure the Standalone Check Point products.
To install Gaia on an open server:
eth0To configure Check Point products on Gaia, use the First Time Configuration Wizard. Configure the operating system and install the products in one wizard.
To configure standalone products on Gaia:
https://
If you change the management IP address, the new IP address is assigned to the interface. The old IP address is added as an alias and is used to maintain connectivity.
Optional:
Click Next.
If there is a proxy server between the appliance and the Internet, enter its IP address and port.
A progress bar tracks the configuration of each task.
After some minutes, you can use the Portal to configure your standalone environment.
https://To configure a Gaia Secondary Security Management Server on a Standalone Open Server:
Use the same procedure as for the primary Security Management Server, with these changes:
In This Section |
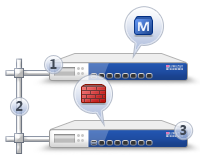
Distributed Deployment - The Security Gateway and the Security Management Server are installed on different computers.
|
Item |
Description |
1 |
Security Management Server |
|
2 |
Network connection |
|
3 |
Security Gateway |
|
|
Security Gateway component |
|
|
Security Management Server component |
This section explains how to install the Security Management Server.
In general, Gaia disk partitions in a clean installation are larger than SecurePlatform partitions.
On Check Point appliances, the size of the disk partitions is predefined. On Smart-1 50/150/3050/3150 appliances, you can modify the default disk partitions in the first 20 seconds of an installation. The non-interactive installation then continues.
When installing Gaia on an open server, these partitions have default sizes:
You can change the System-root and the Logs partition sizes. The storage size assigned for backup and upgrade is updated accordingly.
To see the size of the system-root and log partitions on an installed system, enter expertdf -h
For example:
>df -h
Filesystem Size Used Avail Used% Mounted on /dev/mapper/vg_splat-lv_current 25G 3.4G 20G 15% / /dev/sda1 145M 19M 118M 14% /boot tmpfs 2.0G 0 2.0G 0% /dev/shm /dev/mapper/vg_splat-lv_log 40G 345M 37G 1% /var/log |
In this example, the system root partition has 25 GB of disk space, and 40 GB is assigned for logs.
Most of the remaining space on the disk is reserved for backup images and upgrade. To see the disk space assigned for backup images, connect to the Gaia Portal and go to the Maintenance > Image Management page. On an Open Server, the available space shown in the Image Management page is less than the space you defined when installing Gaia. The difference between the two amounts is the space reserved for upgrades. The amount of reserved space equals the size of the system-root partition.
Note - The minimum recommended space in /var/log
Make sure that the upgrade does not overwrite custom values with defaults.
For upgrades to R77.30:
cphaconf cluster_id getIt must be the same as before the upgrade.
For upgrades to R77.20 and lower:
Each must be the same as before the upgrade.
You can install a Security Management Server on Smart-1 appliances. For more about supported appliances, see the Release Notes.
The Security Management Server image is selected for the appliance and then the appliance resets.
Install the Security Management Server using the First Time Configuration Wizard.
Note - The management IP address can be changed before or after running the First Time Configuration Wizard. This is useful if you must access the device over the network. Use the console connection to configure the management interface before connecting the Gaia appliance to the network. Once the management interface has this address, you can connect through a browser over the network and run the First Time Configuration Wizard.
To change the Management address before running the First Time Configuration Wizard:
admin adminshow interfacesset interface mgmt ipv4-address subnet-mask
set static-route default nexthop gateway address on
To change the management IP address after running the First Time Configuration Wizard:
Note - This changes the settings of an interface the browser is currently connecting to.
To start the First Time Configuration Wizard on Gaia:
The management interface is preconfigured with the IP address 192.168.1.1
The login page opens.
admin admin The First Time Configuration Wizard runs.
|
Note - Settings that you configure in the First Time Configuration Wizard, can be changed later in the Portal, from an Internet browser go to |
To configure Gaia Security Management on Smart-1 appliances:
In the Deployment Options page, select Continue with Gaia configuration. Other options are:
Clean install
Recovery
Click Next.
Click Next.
You can change the Management IP address. Gaia automatically creates a secondary interface to keep connectivity when the management interface is not available. After you complete the First Time Configuration Wizard, you can remove this interface in the Interface Management > Network Interfaces page.
Optional:
Click Next.
Click Next.
Click Next.
For R77.10 and higher: Automatically download Blade Contracts and other important data. Check Point highly recommends that you select Automatic Downloads.
Click Next.
Click Next.
Click Next.
Optional: Improve product experience by Sending Data to Check Point.
Click Finish.
A progress bar tracks the configuration of each task.
Click OK.
The Security Management Server is installed on the appliance.
https://To configure a Gaia secondary Security Management on Smart-1:
Use the same procedure as for the primary Security Management Server, with these changes:
To configure a dedicated server for SmartEvent on Smart-1 205/210/225/3050/3150
Use the same procedure as for the Security Management Server, with these changes in the First Time Configuration Wizard:
A Security Management Server can be installed on any computer that meets the minimum requirements listed in the Release Notes.
First install and configure the operating system, then install Check Point products.
This procedure explains how to install a Security Management Server in a distributed deployment after you install the operating system.
To configure a Security Management Server on Gaia:
https://<Gaia management IP address>
If you change the management IP address, the new IP address is assigned to the interface. The old IP address is added as an alias and is used to maintain connectivity.
Optional:
Click Next.
If there is a proxy server between the appliance and the Internet, enter its IP address and port.
A progress bar tracks the configuration of each task.
https://To configure a Gaia Secondary Security Management Server:
Use the same procedure as for the primary Security Management Server, with these changes:
You can install a log server for a distributed deployment. Install the operating system and start to install the products as for a Security Management Server, but stop at the step where you select components.
To install a Log Server:
Do the steps to install a Security Management Server with these changes:
In all non-standalone deployments, the Network Security Management Server can also be an Endpoint Security Management Server.
Installing Endpoint Security Servers
Use the installation instructions in this guide to install Security Management Servers. You can enable the Endpoint Security Management Server after the Security Management Server installation is completed. Endpoint Security E80.50 is installed with R77.
For R77 and R77.10 Security Management Servers, see the E80.50 Endpoint Security Administration Guide for more information.
For R77.20 Security Management Servers, see the Endpoint Security on R77.20 Management Administration Guide for more information.
To enable an Endpoint Security Management Server:
Check Point Cloud Services for Endpoint
After the Endpoint Security Management Server is enabled on the Security Management Server, these components communicate with the Check Point cloud services:
These updates are mandatory for the correct functioning of the Anti-Malware Software Blade. Preventing them causes severe security issues, because the blade does not operate with the latest malware information database.
These updates increase the accuracy of malware detection by Check Point Endpoint Security clients and Check Point Security Appliances. To turn them off, modify the Anti-Malware rule in the Organizational Security Policy in SmartEndpoint.
These updates are mandatory for the correct functioning of the Endpoint Application Control Software Blade. Without these updates, the blade is unable to classify malicious applications and automatically distinguish between them and non-malicious ones.
To enable an Endpoint Policy Server:
When the Endpoint Policy Management blade is enabled, the SecurePlatform/Gaia Portal port changes from 443 to 4434. If you disable the blade, the port changes back to 443.
Disk Space for Endpoint Security
We recommend that you have at least 10 GB available for Endpoint Security in the Root disk partition.
The files include:
|
Note - To make future upgrades easier, we recommend that you use a larger disk size than necessary in this deployment. |
In This Section |
Distributed Deployment - The Security Gateway and the Security Management Server are installed on different computers.
|
Item |
Description |
1 |
Security Management Server |
|
2 |
Network connection |
|
3 |
Security Gateway |
|
|
Security Gateway component |
|
|
Security Management Server component |
This section explains how to install the Security Gateway.
You can install a Security Gateway on UTM-1 appliances, Power-1 appliances, certain 2012 Models, and IP appliances. The appliance operating system can be Gaia or SecurePlatform. For more about supported appliances, see the Release Notes.
After you install the Gaia or SecurePlatform operating system, install the Security Gateway.
To install the Security Gateway on Gaia appliances, use the First Time Configuration Wizard.
|
Note - The internal interface (INT) on a UTM-1 appliance is used as the management interface. |
Note - The management IP address can be changed before or after running the First Time Configuration Wizard. This is useful if you must access the device over the network. Use the console connection to configure the management interface before connecting the Gaia appliance to the network. Once the management interface has this address, you can connect through a browser over the network and run the First Time Configuration Wizard.
To change the Management address before running the First Time Configuration Wizard:
admin adminshow interfacesset interface mgmt ipv4-address subnet-mask
set static-route default nexthop gateway address on
To change the management IP address after running the First Time Configuration Wizard:
Note - This changes the settings of an interface the browser is currently connecting to.
To start the First Time Configuration Wizard on Gaia:
192.168.1.1Note - Make sure that the management interface on the computer is on the same network subnet as the appliance. For example: IP address 192.168.1.x255.255.255.0
You can change the interface in the Portal, after you complete the First Time Configuration Wizard.
The login page opens.
admin admin The First Time Configuration Wizard runs.
|
Note - Settings that you configure in the First Time Configuration Wizard, can be changed later in the Portal, from an Internet browser go to |
To configure Gaia Security Gateway appliances:
If you change the management IP address, the new IP address is assigned to the interface. The old IP address is added as an alias and is used to maintain connectivity.
Optional:
Click Next.
The Summary window shows the settings for the appliance.
Gaia R77 is installed on the appliance.
You can install the Gaia operating system and Check Point Security Gateway on IP appliances.
This is a clean installation. The IPSO and Check Point product configurations are not imported into Gaia.
To install the Operating System:
See: sk100686.
In the First Time Configuration Wizard:
If you change the management IP address, the new IP address is assigned to the interface. The old IP address is added as an alias and is used to maintain connectivity.
Optional:
.If there is a proxy server between the appliance and the Internet, enter its IP address and port.
A progress bar tracks the configuration of each task.
This procedure explains how to install a Security Gateway in a distributed deployment after you install the operating system.
To configure a Security Gateway on Gaia:
https://
Click Next.
Click Next.
The Summary window shows the settings for the appliance.
Gaia R77 is installed on the computer.
A VSX Gateway can be installed on certain Check Point appliances. You can also install it on any computer that meets the minimum requirements (see the Release Notes). Install and configure the Gaia operating system for a Security Gateway. Then install Check Point products and use SmartDashboard to change the Security Gateway to a VSX Gateway. The Security Gateway becomes virtual (VSX) when the VSX object is defined in SmartDashboard. The basic installation procedure for a Security Gateway and a VSX Gateway is the same.
For VSX Gateways on a Crossbeam platform, you must convert the gateway to VSX before you create the VSX object in SmartDashboard. For more about converting to VSX on a Crossbeam platform, see the Crossbeam Administration Guide (password required).
To install a VSX Gateway:
The steps are different if the VSX Gateway is on an appliance or an Open Server.
In the Products window, make sure to only select Security Gateway.