


|
|
|
In This Section: |
This chapter shows you how to see system information using the WebUI and some CLI commands.
The Overview page shows status widgets.
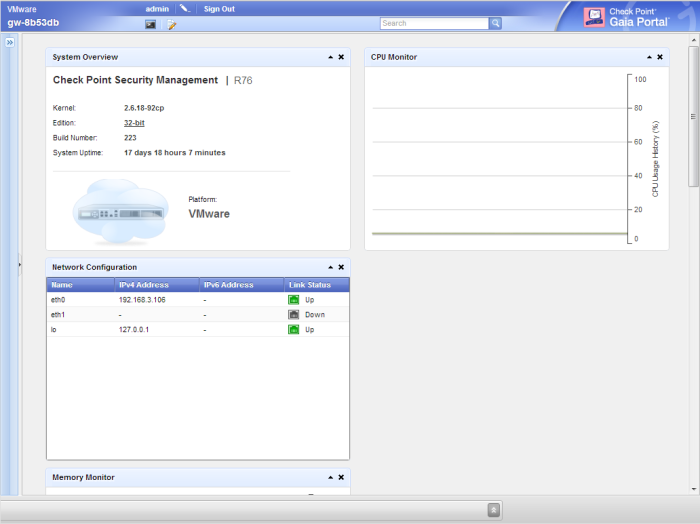
You can add or remove widgets from the page, move them around the page and minimize or expand them.
Widget |
Description |
|---|---|
System Overview |
System information, including:
|
Blades |
Installed Software Blades. Those that are enabled in SmartDashboard are colored. Those that are not enabled are grayed out. |
Network Configuration |
Interfaces, their status and IP addresses |
Memory Monitor |
Graphical display of memory usage |
CPU Monitor |
Graphical display of CPU usage |
To add a widget to the page: Scroll down to the bottom of the page, click Add Widget and select a widget to show.
To move a widget: Click its title bar and drag it to the desired location.
You can use these commands to show system status.
uptime
Description |
Show how long the system has been running |
|---|---|
Syntax |
|
Parameters |
None |
version
Description |
Show the name and versions of the OS components |
||||||||||||
Syntax |
To show the full system version information: show version all To show version information for OS components: show version os {build | edition | kernel}
To show name of the installed product: show version product |
||||||||||||
Parameters |
|
||||||||||||
Comments |
If the Gaia appliance has more than 4 GB of memory, it automatically boots to the 64-bit edition. Otherwise, it boots to the 32-bit edition. If you upgrade and the appliance has more than 4 GB, the appliance boots to the 32-bit edition. You can configure Gaia to automatically boot to the 64-bit edition. To configure Gaia to automatically boot to the 64-bit edition:
To see which edition is running:
|
Gaia automatically starts in the 32 bit edition after an upgrade and for open servers that have less than the minimum RAM as described in the Release Notes.
You can change the system to 32-bit or 64-bit using the set edition command.
Syntax |
|
To make sure the edition change persists after reboot, run save config. For example:
set edition 64-bit
save config
reboot
|
Note - If the computer or appliance cannot support 64-bit, the command will not let you choose 64-bit. |

