Securing Data
Overview
Data is more accessible and transferable today than ever before, and the vast majority of data is sensitive at different levels. Some is confidential simply because it is part of an internal organization and is not meant to be available to the public. Some data is sensitive because of corporate requirements and legal regulations.
The Check Point Data Loss Prevention Software Blade (DLP) lets you use the Firewall to prevent users from sending sensitive data to external networks. DLP helps you implement an automated corporate policy that catches sensitive and protected data before it leaves your organization.
For more about using DLP, see the R77 Data Loss Prevention Administration Guide.
Data Loss Prevention Features
These are the features that the Data Loss Prevention Software Blade uses:
- UserCheckä - Lets users handle data loss incidents with automated user notification and the unique mode. Each person in your organization learns the best practices to prevent future accidental leaks. These are the majority of DLP incidents and they can be handled quickly with the DLP Self Incident Handling Portal or the UserCheck client.
- MultiSpectä - Unmatched accuracy to identify and prevent incidents. DLP uses multi-parameter correlation with different customizable data types and with CPcode.
- Out of the Box Security - A rich set of defined data types recognizes sensitive forms, templates and data. DLP has a good out-of-the-box policy to make sure that the data stays in the internal network.
- Data Owner Auditing - Data Owners are the users in the organization that control the information and files for their own area or department. They get timely automated notifications and reports that show how their data is being moved. Without Data Owner control, system administrators can frequently be placed in an awkward position between managers and employees.
- CPcodeä - DLP supports fully customized data identification through the use of CPcode. You can define how email data matches DLP policies and rules.
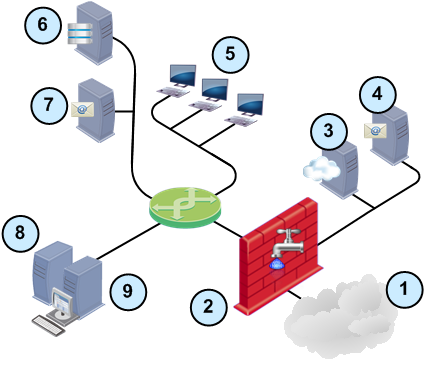
Sample DLP Deployment
Item
|
Description
|
1
|
External computers and servers in the Internet
|
2
|
Security Gateway configured with DLP
|
3
|
Web server in the DMZ
|
4
|
Mail relay in the DMZ
|
5
|
Internal computers
|
6
|
AD or LDAP server
|
7
|
Internal Exchange server with Exchange Security Agent
|
8
|
SmartEvent and SmartView Tracker server
|
9
|
SmartConsoles and Security Management Server
|
- Use SmartDashboard and the Security Management Server to install the DLP Policy on the Security Gateway.
- The Security Gateway uses the built-in data types and rules to supply out-of-the-box Data Loss Prevention. DLP can also use the AD or LDAP server to identify users in the internal organization.
- The Security Gateway analyzes all traffic from the web and mail server before it goes to the Internet.
It catches all traffic containing data and being sent through supported protocols. It scans the traffic, including email attachments, for data that should be protected from being sent to external networks. This data is recognized by protocol, source, destination, and complex data type representations.
The Security Gateway can also inspect internal traffic between Microsoft Exchange clients in the organization. The Exchange Security Agent forwards internal emails to DLP.
- SmartView Tracker and SmartEvent log, track, analyze events, and report incidents that are captured by DLP.
Using a Mail Relay and Mail Server
You can configure the Security Gateway to send email notifications to users and Data Owners. If you are using email notifications, it is necessary for the Security Gateway to access a mail server and a mail relay.
We recommend that you use different computers for a mail server and a mail relay. For more about other deployments, see the R77 DLP Administration Guide.
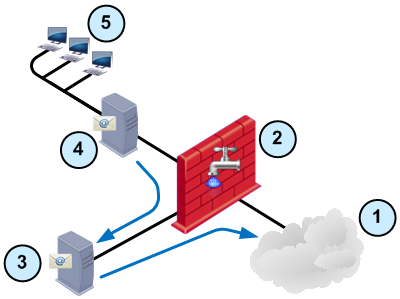
Sample Mail Relay Deployment
In this deployment the Security Gateway with the DLP Software Blade scans emails once, as they are sent from an internal mail server (such as Microsoft Exchange) to a mail relay in the DMZ. The Security Gateway scans the email before it reaches the mail relay. The mail relay can send the allowed emails to internal and external recipients.
Item
|
Description
|
1
|
External computers and servers in the Internet
|
2
|
Security Gateway configured with DLP
|
3
|
Mail relay in the DMZ
|
4
|
Internal mail server
|
5
|
Internal computers
|
Mail Relay Workflow
- User at internal computer sends email.
- Email reaches the internal mail server and is forwarded to the mail relay.
- Security Gateway intercepts and scans the email.
- Email matches a rule - email is not forwarded
- Email matches an rule - User must confirm that the email does not violate the DLP policy to forward it
- Email matches , , or no rule - email is forwarded
- The mail relay receives the email from the Security Gateway and sends it to the internal or external recipient.
Enabling DLP
You can configure a DLP rule that sends users to the DLP portal when they send questionable data. This rule lets users decide if they will send data that can potentially violate the security policy.
The DLP portal is a web page that informs users that the specified data is possibly against company policy. If the users the data, then the action is logged.

|
Important - If you are using Data Owners, it is necessary to configure a mail server in the window.
|
To enable DLP on an existing Security Gateway or cluster:
- From the tree, double-click the Security Gateway.
The s window opens.
- In the tab, select .
The opens.
- Click .
The page opens.
- Enter the email domain for your company to let DLP distinguish between internal and external email addresses.
- To enable the Security Gateway to access user information in an AD, enter the AD user name and password.
The Security Gateway accesses information in the definition of .
- Click .
The page opens.
- Enter different names and phrases that are used to identify your organization.
DLP uses these names to accurately detect incidents of data loss.
- Click .
The page opens.
- Enable the DLP portal.
It is not necessary to enable the DLP portal if UserCheck is enabled.
- Select .
- In , enter the URL for the DLP portal.
- Enable a mail server to send DLP emails to users about possible DLP incidents.
- Select .
- From, select a mail server or click .
- To create a new mail server, in the window enter the settings for the mail server and click .
- Click .
The page opens.
- Select one or more of these protocols to which the DLP policy applies.
- Click .
The window opens.
- Click .
Adding Data Owners
When DLP incidents are logged, the DLP gateway can send automatic notifications to the Data Owners.
To add Data Owners to a Data Type:
- In the tab, select .
- Double-click a data type.
The Data Type properties window opens.
- From the navigation tree, select .
- Click .
The window opens.
- Select the user or group who is responsible for this data and click Add.
If the data owner is not in the list, click New. In the Email Addresses window, enter the name and email address of the data owner (or name a list of email addresses).
- Add as many data owners as needed.
- Click OK.
Notifying Data Owners
DLP can send automatic messages to Data Owners for incidents that involve the applicable data types.
To configure Data Owner notification:
- In the tab, select .
- Right-click the cell of the rule and select .
The window opens.
- Select .
are added to the Email Notification list.
- Click to send notification emails to more users.
- Use the default notification email message, or click and enter the message.
The default message is: The Check Point Data Loss Prevention system has found traffic which matches a rule
- Click .
Using DLP with Microsoft Exchange
Internal emails between Microsoft Exchange clients use a proprietary protocol which is not supported by the Security Gateways. To scan internal emails between Microsoft Exchange clients, you must install an Exchange Security Agent on the Exchange Server. The agent sends emails to the Security Gateway for inspection using the SMTP protocol encrypted with TLS. To supply Data Loss Prevention for Microsoft exchange, it is necessary that the Exchange server can communicate with the Security Gateway.
An Exchange Security Agent must be installed on each Exchange Server that sends traffic to the Security Gateway with DLP. Each agent is centrally managed through SmartDashboard and can only send emails to one Security Gateway. If your organization uses Exchange servers for all of its emails, you can also use this setup for scanning all emails.
To use the Exchange Security Agent it is necessary to configure settings in SmartDashboard and on the Exchange server. For more about configuring an Exchange Security Agent, see the R77 DLP Administration Guide.
DLP Rule Base
The rules in the DLP Rule Base are not applied sequentially, all the rules are applied to each data transmission. If the data matches multiple rules, the most restrictive rule is applied. The order from most restrictive to least is:
- Rule with an exception
- Action - Prevent
- Action - Ask User
- Action - Inform User
- Action - Detect
Managing the DLP Rule Base
Use SmartDashboard to easily create and configure DLP rules.
These are the fields that manage the rules for the DLP Rule Base.
Field
|
Description
|
Flag
|
Mark a rule to or .
|
Name
|
Name of the rule.
|
Data
|
Data type for this rule.
|
Source
|
Who or what starts the connection: Users and Administrators, network, or email domains. If Identity Awareness is enabled, you can use Access Roles.
|
Destination
|
Who or what completes the connection: Users and Administrators, network, or email domains. If Identity Awareness is enabled, you can use Access Roles.
|
Protocol
|
Type of network protocol for this rule.
|
Exceptions
|
Number of exceptions that allow traffic for this rule.
|
Action
|
DLP action that is done when traffic matches the rule.
|
Track
|
Tracking and logging action that is done when traffic matches the rule.
|
Severity
|
Set the severity level for this rule. Use to help filter Data Loss Prevention incidents with SmartEvent.
|
Install On
|
Network objects that will get the rule of the security policy. The option installs the rule on all firewall gateways.
|
Time
|
Time period that DLP enforces this rule.
|
Category
|
DLP category for this rule.
|
DLP Rule Exceptions
When a data transmission matches the exception of a DLP rule, the data is bypasses the rule, and the rule is not applied. If the data matches two DLP rules, and only one of the rules has an exception, the rule without exceptions is applied.
To create an exception for a DLP rule:
- In the tab, select .
The window opens and shows the DLP Rule Base.
- Right-click the cell for a rule and select .
The window opens.
- Click .
- Configure these settings for the exception: Type, , , .
- Click and then install the policy.
DLP Rule Actions
For each DLP rule that you create for a data type, you also define what action is to be taken if the rule matches a transmission.
Action
|
Description
|
Detect
|
The Firewall sends the data. The event is logged in SmartView Tracker and is available for your review and analysis in SmartReporter and SmartEvent. The data and the email itself, or the properties of the transmission if not email, are saved in storage for future reference.
|
Inform User
|
The Firewall sends the data, but the incident is logged and the user is notified.
|
Ask User
|
The Firewall blocks the data and DLP holds it until the user verifies that it should be sent. A notification, usually with a remediation link to the Self Incident Handling portal, is sent to the user. The user decides whether the transmission should be completed or not. The decision itself is logged in SmartView Tracker under the User Actions category.
Administrators with full permissions or with the View/Release/Discard DLP messages permission can also decide whether the transmission should be completed or not from SmartView Tracker. This can be useful in the event that a user is not available to make sure if it should be sent.
|
Prevent
|
The Firewall blocks the data.
Note: Check Point does not recommend using the Prevent action as a first choice. The action may prove disruptive. To improve the accuracy of rule matches, set rules to Prevent only when you have tested them with the less strict actions over a reasonable amount of time.
|
Watermark
|
Tracks Microsoft Office documents (Word, Excel, or PowerPoint files from Office 2007 and higher) and adds visible watermarks or invisible encrypted text.
- By default, all rules are created without a watermark action.
- Watermarks can be created and edited without having to apply them.
- Once a watermark object is created, it can be reused in multiple rules.
|
Sample Rule Base
This table shows a sample DLP Rule Base. These are the settings for the columns that are not shown:
- - My Organization
- - Outside My Organization
- - DLP Blades
- - Any
- - Any
Flag
|
Name
|
Data
|
Exceptions
|
Action
|
Track
|
Severity
|
Category
|
Follow Up
|
Salesforce Reports
|
Salesforce Reports
|
None
|
Ask User
Restricted
|
Log
|
High
|
Business
|
No Flag
|
PCI - Credit Card Numbers
|
PCI - Cardholder Data
PCI - Credit Card Numbers
|
None
|
Prevent
|
Log
|
Critical
|
Compliance
|
No Flag
|
SEC Filings - Draft or Recent
|
SEC Filings - Draft or Recent
|
None
|
Detect
|
Log
Email
|
High
|
Financial
|
No Flag
|
Source Code
|
Source Code
|
1
|
Detect
|
Alert
|
High
|
Intellectual Property
|
- When users send data that matches the Data Type category, they are asked to confirm the data transmission. A watermark with the word is added to Microsoft Word, Excel and PowerPoint files. This incident is logged with severity.
- Users are blocked from sending data that matches the , and Data Type categories. These incidents are logged with severity.
- Data transmissions that matches the Data Type category are logged with severity. An email is sent to the Data Owners for each incident.
- Data transmissions that matches the Data Type category are logged with severity. A pop-up window opens in SmartView Monitor for each incident.
Analyzing and Tracking DLP
To keep a strong Data Loss Prevention policy, it is necessary to do an analysis of DLP incidents. These SmartConsole clients can help with your DLP analysis:
- SmartView Tracker
- SmartEvent
You can use the flag in SmartDashboard for the DLP rules. If you find one or more incidents that you want to change or fine-tune, set the Data Type or rule to .

|
Note - To use a Windows 7 computer to view DLP incidents in SmartView Tracker or SmartEvent, Microsoft Office 2010 must be installed. These SmartConsole clients do not show DLP incidents, if these EML files are associated with another application.
|
Using SmartView Tracker
You can open the log of an incident and see the actual data that caused the incident. It is not necessary to review most of the incidents manually, but the data transmission (for example, the email or attachment) is saved.
|
Important - The DLP logs can contain personal emails and web posts that were captured. that this can happen. Failure to do so may cause your organization to be in conflict with local privacy laws.
|
To use SmartView Tracker to analyze DLP:
- In SmartDashboard, select SmartConsole > SmartView Tracker.
- In the Network & Endpoint tab, select Predefined > Data Loss Prevention Blade.
- Double-click a category.
The Data Loss Prevention logs for the category are shown.
DLP Actions
SmartView Tracker actions for DLP incidents include:
DLP Action
|
Description
|
Ask User
|
DLP incident captured and put in Quarantine, user asked to decide what to do.
|
Do not Send
|
User decided to drop transmission that was captured by DLP. An administrator with full permissions or with the View/Release/Discard DLP messages permission can also drop these transmissions. Email notification is sent to the user.
|
Send
|
User decided to continue transmission after DLP capture. An administrator with full permissions or with the View/Release/Discard DLP messages permission can also decide to continue transmission. Email notification is sent to the user.
|
Quarantine Expired
|
DLP captured data transmission cannot be sent because the user did not make a decision in time. Expired incidents may still be viewed, until they are deleted (routine cleanup process).
|
Prevent
|
DLP transmission was blocked.
|
Allow
|
DLP transmission was allowed; usually by exception to rule.
|
Inform User
|
DLP transmission was detected and allowed, and user notified.
|
Deleted Due To Quota
|
DLP incidents are deleted from gateway for disk space.
|
DLP General Columns
DLP incidents can show some or all of these columns and are available to all administrators.
DLP Columns
|
Description
|
Incident UID
|
Unique ID of the incident.
|
DLP Action Reason
|
Reason for the action. Possible values: Rule Base, Internal Error, Prior User Decision
|
Related Incident
|
Internal incident ID related to the current log.
|
DLP Transport
|
Protocol of the traffic of the incident: HTTP, FTP, Email.
|
Using the Incident UID as a key between multiple logs:
Each DLP incident has a unique ID included in the log and sent to the user as part of an email notification. User responses (Send, Do not Send) are assigned the same Incident UID that was assigned to the initial DLP incident log.
If a user/administrator sends an email with a DLP violation and then decides to discard it, two logs are generated. The first log is a DLP incident log with action and is assigned an Incident UID. On the user action, the second log is generated with the same UID, with the Do not Send action.
Each matched Data Type generates its own log. The gateway makes sure that all the Data Type logs of one incident show the same unique Incident UID and rule action (Prevent, Ask, Inform, or Detect). This happens also if Data Types were matched on different rules. The same action shown for an incident is the most restrictive.
For example, in a case that a transmission matches two Data Types. Each Data Type is used in a different rule. The action of one rule is Prevent. The action in the second rule is Detect. The two logs that are generated will show Prevent as the action. The action implemented will be Prevent. The log of the Detect rule will show Rule Base in the column.
DLP Restricted Columns
These columns are restricted to administrators with permissions.
Restricted Filters
|
Description
|
UserCheck
|
|
User Response
|
Comment entered by the user in the text box shown in the UserCheck notification.
|
UserCheck Message to User
|
The message shown to the user.
|
Interaction Name
|
The interaction name as shown in SmartDashboard.
|
Fingerprint
|
|
Matched File
|
The file name and path in the scanned fingerprint repository that matches the inspected message.
|
Matched File Percentage
|
How much is this file similar to Matched File. In "exact match" this will always be 100%.
|
Matched File Text Segments
|
In a partial match, the number of file parts/segments that are matched between the Matched File and the inspected file (parts/segment may overlap).
|
DLP Type
|
|
DLP Rule Name
|
Name of the DLP rule on which the incident was matched.
|
Message to User
|
Message sent, as configured by administrator, for the rule on which the incident was matched.
|
DLP Words List
|
If the Data Type on which the incident was matched included a word list (keywords, dictionary, and so on), the list of matched words.
|
DLP Relevant Data Types
|
If matched Data Type is a group Data Type. This field specifies which Data Types from that group were matched.
|
User Information
|
|
DLP Recipients
|
For SMTP traffic, list of recipients of captured email.
|
Mail Subject
|
For SMTP traffic, the subject of captured email.
|
Scanned Data Fragment
|
Captured data itself: email and attachment of SMTP, file of FTP, or HTTP traffic.
|
More
|
|
UserCheck
|
A boolean field that shows if the log is produced by UserCheck or by another DLP.
|
Data Type Name
|
Name of the matched Data Type.
|
Data Type UID
|
Internal ID of the Data Type on which the incident was matched.
|
DLP Categories
|
Category of Data Type on which the incident was matched.
|
DLP Template Score
|
A measurement, expressed as a percentage, that shows how closely a document matches the template file.
0% - The document and template are very different.
100% - The document and template are a close match.
|
Using SmartEvent
SmartEvent provides advanced analysis tools with filtering, charts, reporting, statistics, and more, of all events that pass through enabled Security Gateways. SmartEvent combines all DLP logs of the same incident (all matching rules and Data Types and user action if applicable) to a single event.
You can filter out the specific Data Loss Prevention information for efficient monitoring and relevant reporting on DLP incidents.
- Real-time and history graphs and reports of Data Loss Prevention incidents
- Graphical incident timelines for rapid information retrieval
- Easily configured custom views to quickly answer specific queries
- Incident management workflow
- Reports to data owners on a scheduled basis
To open SmartEvent:
- In SmartDashboard, select Window > SmartEvent.
- When SmartEvent is open, open Events.
- Select Predefined > DLP or any of the analysis data categories under DLP.
|
|

