Defending Against Network Intrusions
Overview of IPS
Check Point IPS Software Blade analyzes traffic for possible risks, to enhance network security of your organization. The IPS detection engine has multiple defense layers, detects and prevents against known threats, and often protects against future ones.
For example IPS protects against drive-by downloads, where a user can go to a legitimate web site and unknowingly download malware. The malware can exploit a browser vulnerability that lets it create a special HTTP response that sends the malware to the client. The firewall allows the HTTP traffic from the web site and the computer is at risk for this malware. IPS protects the computer, it can identify and then block the drive-by download connection.
For more about using the IPS Software Blade, see the R77 IPS Administration Guide.
IPS Protection Profiles
An IPS protection is a set of rules that lets you define how IPS analyzes network traffic. Create IPS profiles to easily configure one or more protections for groups of Security Gateways. You can customize the profile for the specified protections to identify specified attacks. These profiles can then be applied to the groups of Security Gateways to protect them against those attacks.
To create a new IPS protection profile:
- In the tab, select .
- Click and select .
The page of the window opens.
- Enter the .
- In , select the default action for an IPS protection.
- - Protections block traffic that matches the definitions.
- - Protections log traffic that matches the definitions.
- In , select if protections are enabled automatically or manually.
- From the navigation tree, click > .
- Select the default IPS Mode for new protections that are downloaded: or .
- Click to create the profile.
Enabling IPS
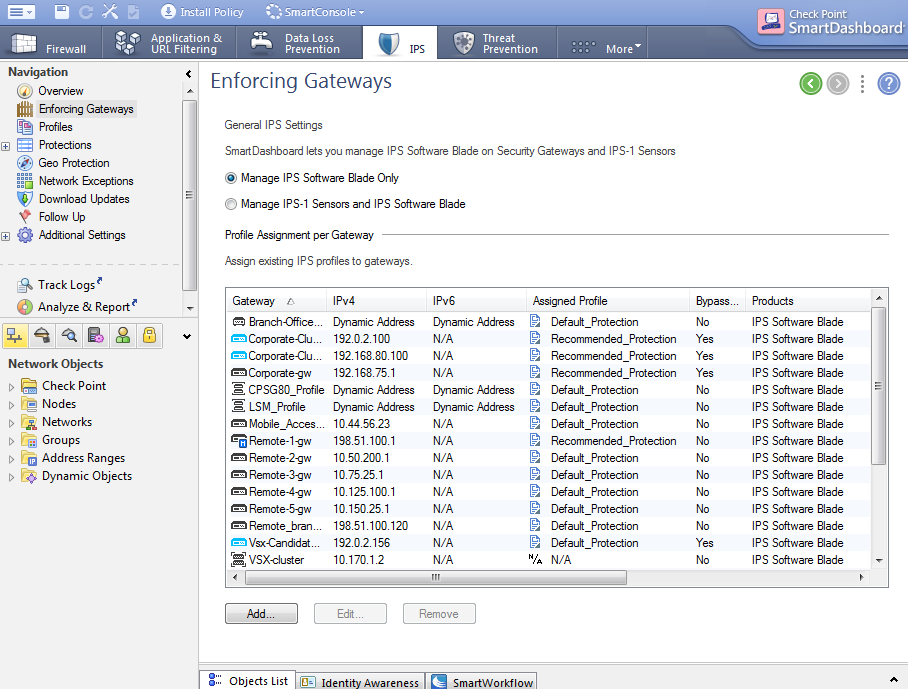
The Enforcing Gateways page in the IPS tab shows all the Security Gateways that the IPS Software Blade is enabled. You can enable IPS on a Security Gateway that has the Firewall Software Blade enabled.
To enable IPS on a Security Gateway:
- From the tab, click .
The page opens.
- Click .
The window opens.
- Select a Security Gateway and click .
IPS is enabled on the Security Gateway and it is shown in the page.
- Install the policy.
Using IPS Profiles
The page shows all the Security Gateways that have the IPS Software Blade enabled. From this page, you can open the window and assign an IPS profile to a Security Gateway.
To assign a profile to a gateway:
- In the tab, select .
- Select a gateway and click .
The page of the window opens.
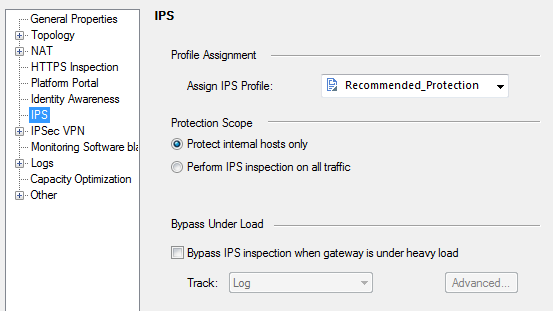
- From Assign profile, select an IPS profile.
- Click OK.
To show the Security Gateways for a profile:
- In the tab, select .
- Select the IPS profile.
- Click .
The window opens and shows the Security Gateways that are assigned to the IPS profile.
Adding Network Exceptions
You can configure exceptions for a protection with the action, so that it does not identify the specified traffic. These are some situations where it is helpful to use exceptions:
- Traffic that is legitimate for some machines or services can match the protection criteria for malware.
- A server that does not comply with RFC standards.
Adding an IPS Exception
To add a new exception:
- In the tab, select .
- Click .
The window opens.
- From , select a profile or .
- From , select the protections to exclude.
- - Click and then select the protection.
- - Only protections that support the Network Exceptions feature are excluded.
- Define the and , and for the excluded protection.
- To use a SmartDashboard object, click and then select the object.
- To enter a value, click or and then enter the value.
- Define on which Security Gateways this exception is installed. Select one of these options:
-
- and select the Security Gateway object.
- Click and then install the policy.
Browsing IPS Protections
The window lets you quickly see IPS protections and shows a summary of each protection.
To browse IPS protections:
Click the tab and from the navigation tree click .
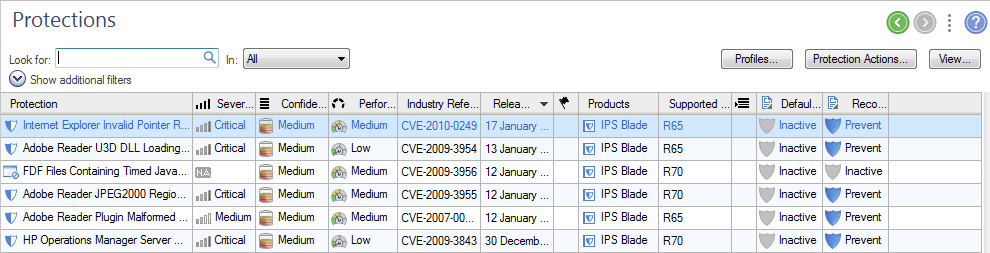
These columns give information about the IPS protections.
Column
|
Description
|
Protection
|
Name of the protection.
|
Severity
|
Probable severity of a successful attack on your environment.
|
Confidence Level
|
How confident IPS is that recognized attacks are actually undesirable traffic.
|
Performance Impact
|
How much this protection affects the performance of a Security Gateway.
|
Industry Reference
|
International CVE or CVE candidate name for attack.
|
Release Date
|
Date the protection was released by Check Point.
|
Follow Up 
|
Shows if this protection is marked for Follow Up.
|
Products
|
Shows if this protection is enforced by IPS Software Blades.
|
Supported
|
Which Security Gateway versions support this protection.
|
Has an Exception 
|
Shows if this protection has a network exception.
|
<profile_name>
|
There is a separate column for each IPS Profile. The cell shows the Activation setting for the protection.
|
Updating IPS Protections
Check Point is constantly developing and improving its protections against the latest threats. You can manually update the IPS protections and also set a schedule when updates are automatically downloaded and installed.

|
Note - The Security Gateways with IPS enabled only get the updates after you install the Policy.
|
To show the IPS update settings:
Click the tab and from the navigation tree click .
IPS Update Options
You can use these IPS update options to easily manage new IPS protections:
- - New protections can be automatically marked with a flag and are listed on the page in the tab. Click to change these settings.
- - Automatically create a database revision before the IPS protections are updated. You can revert the SmartDashboard database back to the earlier IPS protections. For more information about Database Revision Control, see the R77 Security Management Administration Guide.
Configuring Geo Protections
Geo Protection lets you control network traffic for specified countries. An IP-to-country database connects packet IP addresses to the countries. Configure one set of policies for each Profile to block or allow traffic for one or more countries. Configure a different policy that applies to the other countries. Private IP addresses are allowed unless the other side of the connection is explicitly blocked. Check Point control connections (such as between Security Gateways and the Security Management Server) are always allowed, regardless of the Geo Protection policy.
Configure the Geo Protections for each IPS Profile separately. Policies with a Block action for and are only enabled when the is set to .
To configure Geo Protection for specified countries:
- Click the tab and from the navigation tree click .
The page opens.
- Select the IPS and one of these Geo Protection for this Profile:
- - The actions for these countries are enabled.
- - All traffic is allowed. Traffic that matches a policy with a Block action is logged.
- - Geo Protection is disabled.
- Click and configure exceptions for the Geo Protection for this Profile.
- To configure new Geo Protection policies, click .
The window opens.
- Click and select the country for this policy.
- Select the traffic for this country.
- From , select or .
- From , select a logging option.
If a connection matches more than one Geo Protection policy, the first policy is logged.
- Click .
- Configure the Geo Protection policy for the other countries.
- From the drop-down menu, select or .
- From , select a logging option.
- Do these steps for all the IPS Profiles.
- Install the policy.
We recommend that after some days, you review the Geo Protection logs.
|

