


|
|
|
#setupSet SGMs for Security Group Chassis 1, SGM 1 (slot 1 in Chassis 1)If installing a Security Gateway: Define the SGMs that belong to the Security Group. There are two lines, one for Chassis 1, one for Chassis 2.
Enter one of these values in each line as applicable:
all (same as 1-12) 1-9 1-3,5-71,410,2, 3-7By default, the SGM you are connected belongs to the group: Chassis 1, SGM 1 (slot 1 in Chassis 1). To define a fully populated dual Chassis system select all in the top and bottom lines. For more about Security Gateway Module numbering, see 61000 Security System front panel components.
Host NameTime and DateTo configure the local time, choose the geographical area and city.
Network Connections. Configure the management ports and the data ports of the Security Switch Module.
|
Note - Wait 10-20 seconds for routing information to be updated throughout the system. |
This program helps you to configure Check Point products.
When prompted, enter and confirm the activation key. Remember this activation key. The same activation key is used for configuring the 61000 Security System object in SmartDashboard.
Configuration settings are applied, and the SGM reboots. Other Security Gateway Modules in the Security Group are installed automatically.
System Validation
Make sure that the initial system setup is completed successfully:
asg monitor command. An initial policy must be installed on the local SGM after initial setup completes and the SGM reboots.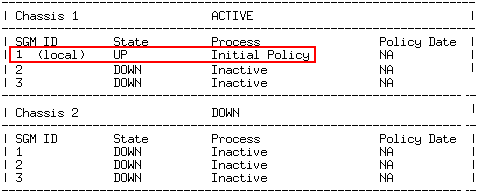
tail -f /var/log/start_mbs.log. 
